Note
Access to this page requires authorization. You can try signing in or changing directories.
Access to this page requires authorization. You can try changing directories.
hi everyone, Maha Ibrahim from the VMM team prepared this great blog entry for how to deploy the Pet Shop 3-tier Application as a Service using VMM 2012 beta. I have attached this as a word document at the bottom of this post as well.
Please follow all the steps in this guide to successfully deploy Pet Shop. If you encounter any issues, post to the VMM forums and our team will help you fix them.
Setting Up the Fabric
Hosts
Add Hosts/Clusters, create the necessary host groups that will provide the compute resources for the Pet Shop Application.
Networking
- Create Logical Network
- Create Logical Network Definition
- Attach it to a host group
- Create Logical Network Definition
- Associate Host Network Adapters with Logical Networks
- In the host properties, go to networking tab and find the Network Adapter for which the Virtual Network is created.
- Then in Hardware tab for host properties, go to the Network Adapter and mark the checkbox to set the logical network connectivity.
Library resources
To create the Pet Shop Application in VMM, you need to first download the library building blocks for Pet Shop.
- Go to https://Connect.Microsoft.Com
- Sign In using your Live ID
- Click on 'Browse the full Product Directory'
- Choose to Join the VMM 2012 Beta
- Product: System Center in the Datacenter and Cloud
- Program: SCVMM 2012 Public Beta
- Once you visit the SC VMM 2012 Beta page, click on Downloads
- Download the "PetShop Sample Resources"
- This resource package contains the VHDs, Scripts and Applications necessary to create the Pet Shop application as a Service in VMM
- Once you extract the contents of the self-extractor, copy all the contents of the top level PetShop folder to the library share you want to use
- Refresh the library share that contains the Pet Shop resources you just copied
In case of Highly Available VMM setup, the application frameworks for installing Server App-V and Web Deploy clients are not added to the library and will need to be copied manually from VMM 2012 installation directory to the library share, for instructions on how to configure the library resources for Highly Available VMM setup, please refer to https://go.microsoft.com/fwlink/?LinkId=213988
Set Web Application Package Encryption Password
- Set the encryption password for the web app package petshop-ws08-v1.zip
- Password: 123
Credential Management
In Pet Shop Service template, Run As Profiles are needed for
- SQL Server service accounts needed in configuring SQL Instance install in the SQL profile
- DAC instance installation in the Application Profile for the SQL tier
- 1. Create a run as account for SQL Server Administrator: SQLAdminRAA
User: sa
Password: Passw0rd
Category: Profile Account
- 2. Create a run as profile SQLAdminRAP for the SQLAdminRAA
- o Add SQLAdminRAA for the host group scope
- o For deploying to cloud, add the RAA for the cloud scope as well
- 3. Create run as profile NTSystemRAP
- o Add the built in "NT Authority\System" RAA for the host group scope
- o For deploying to cloud, add the RAA for the cloud scope as well
Setting up the Cloud
- This section is needed only if you want to deploy the service to cloud, skip if your deployment is targeted to host groups.
- Create Cloud
- o Set the cloud name and host group
- o Set a Read Only library path to the share where the Pet shop resources (VHDs/Application Packages/Scripts) are located
- o Add the Hyper-V capability profile
- o If the run as profiles were scoped to a particular host group when created, then set the RAA/RAP association for RAA/RAP from the cloud properties.
Setting up the Self Service User Role
- This section is needed only if you want to deploy to cloud as Self Service User, skip if you want to deploy as a Full Admin.
- Create a Self Service user role
- o Profile: Self Service User
- o Members: <domain accounts designated for the role, i.e. Contoso\ServiceUser , etc.)
- o Scope: select the cloud
- o RunAsProfiles: add SQLAdminRAP & NTSystemRAP
- o Actions: select all
After creating the user role, connect the Admin console using the desired user role.
Service Creation and Deployment
Pet shop service will be deployed from a service template that defines the profiles for hardware, guest OS, applications, and SQL.
Step 1. Create a New Service Template
- 1. Library workspace -> Home tab, click Create Service Template ribbon action.
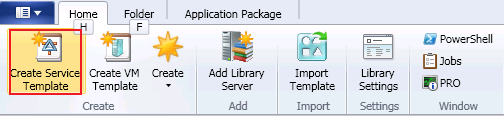
- 2. Enter a name for the new Service Template, click OK.
- 3. The Virtual Machine Manager 2012 Service Template Designer opens.
Step 2. Create Virtual Machine Templates For the 3 Tiers of Pet Shop
The Virtual Machine template will contain information about the VHD used for this tier, along with hardware, operating system and application configuration.
Hardware Configuration identifies settings as memory, CPU, network adapter configuration, and cloud capability profiles in case deployments are made to the cloud.
Operating System Configuration identifies Operating system type, Computer Name, product key, domain join info, operating system roles and features.
Application Configurations will contain the application packages, along with configuration scripts for each tier.
Scripts will be used to install application clients as Server App-V agent and Web Deploy agent, these scripts will be configured as Pre-Install scripts on the Application Profile level so that they execute before deploying any application in the application profile.
Scripts used to configure specific applications, should be configured as Pre-Install or Post-Install on the Application Deployment level.
For Pet Shop service template, we will create 3 Virtual Machine templates, one for each tier.
To create a VM template, click Create VM template button from the service template designer.

Create a Virtual Machine Template for the Web Tier
- 1. Click Create VM Template on the Service Template Designer.
- 2. In the select source page, use Existing VHD: Windows Server 2008 R2 Enterprise Evaluation.VHD
- 3. VM Template Identity: Enter the VM template name: ex. Web Tier VM Template
- 4. Configure Hardware as follows:
- a. Select the disk, verify the check box for "Contains the operating system for the virtual machine" is marked.
- b. Connect the Network Adapter of the hardware profile to the logical network created during fabric setup
- c. For deploying to cloud, set the Capability Profile to Hyper V in the Compatibility of the hardware properties.
- 5. Configure the Operating System as follows:
- a. Computer Name: MyWebVM##
- i. Computer name should be short and unique to avoid conflicts in DNS.
- ii. Patterns as ## will be automatically replaced by 01, 02, ...etc before deployment.
- b. Admin Password: Passw0rd
- c. Product key: 489J6-VHDMP-X63PK-3K798-CPX3Y
- d. Operating System: 64-bit edition of windows server 2008 R2 Enterprise
- e. Roles:
- i. Application Development
- ii. Basic Authentication
- iii. Management Tools
- iv. Web Server (IIS)
- f. Features:
- i. .NET Framework
- ii. Background Intelligent Transfer Service (BITS)
- iii. Message Queuing
- g. Domain join:
- i. Domain Name: provide the FQDN (ex. Contoso.com)
- ii. Domain User: should be in (domain\user) format (ex. Contoso\User1)
- a. Computer Name: MyWebVM##
- 6. Configure Applications: The application profile for the web tier will contain:
- 1. Pre-install application profile script to install the Web Deploy client
- 2. The web deploy application package
- 3. Post-install application deployment script to configure the web deploy application
-
- Operating System: 64-bit edition of windows server 2008 R2
- Add a Pre-Install Application Profile Script:
Click on Scripts option group, then from the toolbar, click Add ->Script.
-
-
- o Script command type: Pre-Install
- o Executable: cmd.exe
- o Parameters: /q /c InstallWebDeploy.cmd
- o Script Package: WebDeploy_x64_en-US_1.1.0600.cr (1.1.0600)
- o Timeout: 300
- o Advanced options:
- § Provide a standard output/error file paths for logging purposes
-
-
- Add Web Deploy Application:
- o Application Package: petshop-ws08-v1.zip
- o Provide values for application settings as follows:
- Add Web Deploy Application:
CS_SERVICES_DB |
server=@sqlComputerName@;database=MSPetShop4Services;user id=@petshopUser@;password=@petshopPassword@;connect timeout=200;min pool size=4;max pool size=4; |
CS_CORE_DB
|
server=@sqlComputerName@;database=MSPetShop4;user id=@petshopUser@;password=@petshopPassword@; connect timeout=200;min pool size=4;max pool size=4; |
CS_ORDERS_DB
|
server=@sqlComputerName@;database=MSPetShop4Orders;user id=@petshopUser@;password=@petshopPassword@; connect timeout=200;min pool size=4;max pool size=4; |
CS_PROFILE_DB
|
server=@sqlComputerName@;database=MSPetShop4Profile;user id=@petshopUser@;password=@petshopPassword@; connect timeout=200;min pool size=4;max pool size=4; |
QUEUE_PATH
|
FormatName:DIRECT=OS:@lobComputerName@\Private$\PSOrders |
- Add a Post-Install Application Deployment Script
Click on the Web Application, then from the toolbar click Add -> Application Script
- o Script Command type: Post-Install
- o Executable: cmd.exe
- o Parameters: /q /c configure-webtier.cmd
- o Script package: petshop.wt.cr
- o Timeout: 300
- o Advanced options:
- § Provide a standard output/error file paths for logging purposes
7. Click Next in the Configure Applications page to commit the changes made in the previous step.
8. Go to the Summary page, and click Create.
Create a Virtual Machine Template for the Middle Tier
- 1. Click Create VM Template on the Service Template Designer.
- 2. In the select source page, use Existing VHD: Windows Server 2008 R2 Enterprise Evaluation.VHD
- 3. VM Template Identity: Enter the VM template name: ex. Middle Tier VM Template
- 4. Configure Hardware as follows:
- a. Select the disk, verify the check box for "Contains the operating system for the virtual machine" is marked.
- b. Connect the Network Adapter of the hardware profile to the logical network created during fabric setup
- c. For deploying to cloud, set the Capability Profile in the Compatibility of the hardware properties.
- 5. Configure the Operating System as follows:
- a. Computer Name: MyMidVM##
- b. Admin Password: Passw0rd
- c. Product key: 489J6-VHDMP-X63PK-3K798-CPX3Y
- d. Operating System: 64-bit edition of windows server 2008 R2 Enterprise
- e. Roles:
- i. Application Development
- ii. Basic Authentication
- iii. Management Tools
- iv. Web Server (IIS)
- f. Features:
- i. .NET Framework
- ii. Background Intelligent Transfer Service (BITS)
- iii. Message Queuing
- g. Domain join:
- i. Domain Name: provide the FQDN (ex. Contoso.com)
- ii. Domain User: should be in (domain\user) format (ex. Contoso\User1)
- 6. Configure Applications: The application profile for the middle tier will contain
- 1. Pre-install application profile script to install Server App-V client
- 2. The Server App-V application package for the middle tier
- 3. Pre-install application deployment script to configure the Server App-V application
- Operating System: 64-bit edition of windows server 2008 R2
- Add a Pre-Install Application Profile Script:
Click on Scripts option group, then from the toolbar, click Add -> Script.
-
- o Script command type: Pre-Install
- o Executable: cmd.exe
- o Parameters: /q /c InstallSAV.cmd
- o Script Package: SAV_x64_en-US_4.7.11.1127.cr (4.7.11.1127)
- o Timeout: 300
- o Advanced options:
- § Provide a standard output/error file paths for logging purposes
- Add Virtual Application:
- o Application Package: Petshop-Midtier64
- o Provide values for application settings as follows:
SQLConn1
|
server=@sqlComputerName@;user id=@petshopUser@;password=@petshopPassword@;database=MSPetShop4;min pool size=4;max pool size=4;packet size=3072
|
SQLConn2
|
server=@sqlComputerName@;user id=@petshopUser@;password=@petshopPassword@;database=MSPetShop4Profile;min pool size=4;max pool size=4;packet size=1024
|
SQLConn3
|
server=@sqlComputerName@;user id=@petshopUser@;password=@petshopPassword@;database=MSPetShop4Orders;min pool size=4;max pool size=4;packet size=1024
|
OrderQueuePath |
server=@sqlComputerName@;database=MSPetShop4Profile;user id=@petshopUser@;password=@petshopPassword@;min pool size=4;max pool size=4; |
- Pre-Install Application Deployment Script
Click on the Virtual Application then from the toolbar click Add -> Application Script
- o Script command type: Pre-Install
- o Executable: cmd.exe
- o Parameters: /q /c configure-midtier.cmd
- o Script package: petshop.mt.cr
- o Timeout: 300
- o Advanced options:
- § Provide a standard output/error file paths for logging purposes
- 7. Click Next in the Configure Applications page to commit the changes made in the previous steps.
- 8. Go to the Summary page, and click Create.
Create a Virtual Machine Template for the SQL Tier
- 1. Click Create VM Template on the Service Template Designer.
- 2. In the select source page, use Existing VHD: SQL Server 2008 R2 Evaluation (SQLPROFILE) on Windows Server 2008 R2.VHD
- 3. VM Template Identity: Enter the VM template name: ex. SQL Tier VM Template
- 4. Configure Hardware as follows:
- a. Select the disk, verify the check box for "Contains the operating system for the virtual machine" is marked.
- b. Connect the Network Adapter of the hardware profile to the logical network created during fabric setup
- c. For deploying to cloud, set the Capability Profile in the Compatibility of the hardware properties.
- 5. Configure the Operating System as follows:
- a. Computer Name: MySQLVM##
- b. Admin Password: Passw0rd
- c. Product key: 489J6-VHDMP-X63PK-3K798-CPX3Y
- d. Operating System: 64-bit edition of windows server 2008 R2 Enterprise
- e. Domain join:
- i. Domain Name: provide the FQDN (ex. Contoso.com)
- ii. Domain User: should be in (domain\user) format (ex. Contoso\User1)
- 6. Configure Applications: The application profile for the SQL Tier will contain:
- 1. Four DACPAC application packages for the database definitions
- 2. Post-install application profile script to configure the data tier by creating the sql login for the databases and populating the data in the SQL tables.
- Operating System: 64-bit edition of windows server 2008 R2
- DAC Application Deployment for Pet shop Database:
- o Application package: mspetshop4.dacpac
- o Authentication: SQL Server Authentication
- o Deployment Run As Profile: SQLAdminRAP
-
- DAC Application Deployment for Pet shop Orders Database:
- o Application package: mspetshop4orders.dacpac
- o Authentication: SQL Server Authentication
- o Deployment Run As Profile: SQLAdminRAP
- DAC Application Deployment for Pet shop Orders Database:
- DAC Application Deployment for Pet shop Profile Database:
- o Application package: mspetshop4profile.dacpac
- o Authentication: SQL Server Authentication
- o Deployment Run As Profile: SQLAdminRAP
- DAC Application Deployment for Pet shop Services Database:
- o Application package: mspetshop4services.dacpac
- o Authentication: SQL Server Authentication
- o Deployment Run As Profile: SQLAdminRAP
- Post-Install Application Profile Script
- Click on Scripts option group, then from the toolbar, click Add ->Script.
- o Script command type: Post-Install
- o Executable: cmd.exe
- o Parameters: /q /c configure-datatier.cmd @sqlAdmin@ @sqlAdminPassword@
- o Script package: petshop.sql.cr
- o Timeout: 300
- o Advanced options:
- § Provide a standard output/error file paths for logging purposes
- 7. SQL Server Configuration
The SQL Profile will specialize the sysprep SQL Server Image. The sysprep SQL image is included in the SQL Profile VHD: SQL Server 2008 R2 Evaluation (SQLPROFILE) on Windows Server 2008 R2.VHD
- Create new SQL Server Deployment
- SQL Server Deployment:
- o Instance name: MSSQLSERVER
- o Instance id: SYSPREPSQL
- Configuration:
- o Media source: C:\SQLEVAL
- o SQL Admins: add a valid domain account
- o Security Mode: SQLServerAuthentication
- o SA Password RAP: SQLAdminRAP
- o Enable named pipes: true
- o Enable TCP: true
- Service accounts
- o SQL server service: NTSystemRAP
- o SQL server agent: NTSystemRAP
- o Reporting services: NTSystemRAP
- 8. Go to the Summary page, and click Create.
Step 3: Add the Machine Tier Templates to the Service Template
- 1. Open the Service Template Designer if it's not already opened.
- 2. On the VM Templates tab, select the VM template for the Web Tier, Drag and drop it onto the service template designer canvas.
- 3. Repeat step 2 for the Middle and SQL Tier VM templates.
- 4. For customizing tier properties as deployment option, instance counts, ...etc. select a machine tier template in the canvas and view/change properties from the details pane.
- 5. In the Service Template Designer, click Save.

Step 4: Configure and Specialize the Service Instance
- From the service template designer, click on Configure Deployment.
- o Set the name and destination for the new service instance.
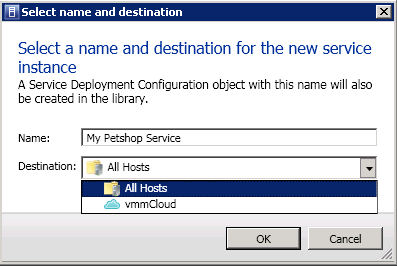
- The Specialization UI will open.
- o Check the generated VM/Computer names, and change them if needed
- § It's a good practice to ping the VM computer name from the VMM server to make sure that the name you chose is not currently being used by another machine in the domain
- o Provide Values for the service global settings as follows:
- § petshopUser=mspetshop
- § petshopPassword=pass@word1
- § sqlAdmin=sa
- § sqlAdminPassword=Passw0rd
- § sqlComputerName=<your sql-tier computer name>
- § lobComputerName = <your mid-tier computer name>
- o Check the generated VM/Computer names, and change them if needed
Step 5: Deploy the Service and Verify
- From the Specialization UI, Click on Deploy
- Verification
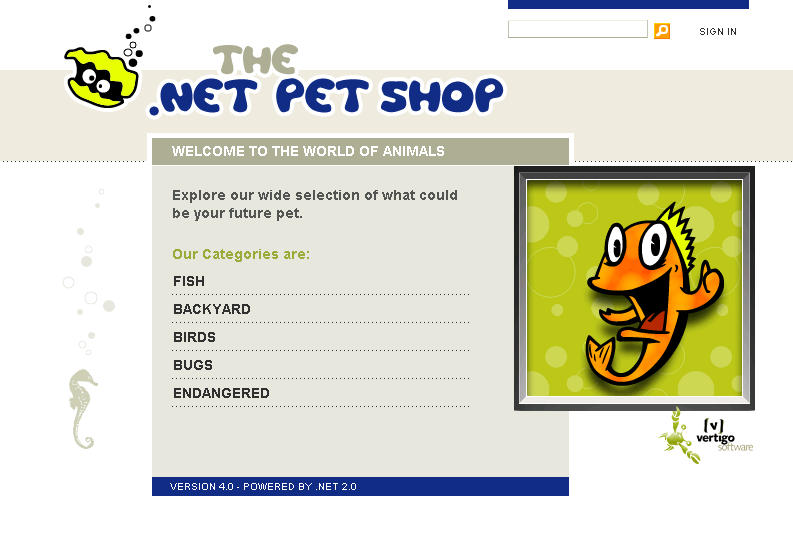
- o After the deployment completes, open IE and connect to Pet Shop application.
- o URL: Error! Hyperlink reference not valid.
- o The website should open