Note
Access to this page requires authorization. You can try signing in or changing directories.
Access to this page requires authorization. You can try changing directories.
WCF technology samples released by Microsoft contain a sample (Custom Message Encoder: Compression Encoder) which shows how to write your own custom message encoder (GZip) for desktop WCF applications. In the past there have been a lot of questions regarding how this can be achieved for device applications using .Net Compact Framework.
Microsoft has also released a sample GZip encoder for Compact Framework (downloadable here). This sample contains only the encoder and we have had questions around how to use this successfully in CF applications.
In this post I will show how to write a simple Compact Framework application which uses the sample GZip encoder and communicates with the sample desktop WCF service so that both the above questions can be answered.
Step 1 – Installing and modifying the desktop WCF service
1.1 Download and install the WCF technology samples. You will be able to find the code for the desktop WCF service at <installation path>\WCF Samples\WCF_WF_CardSpace_Samples\WCF\Extensibility \MessageEncoder\Compression\CS \Server
1.2 Do NOT pick up the GZipEncoder code from here. This implementation uses some desktop specific classes which are not available in Compact Framework.
1.3 Modify the following line in App.config, replace “localhost” with the name of your development machine.
<add baseAddress="https://localhost:8000/samples/GZipEncoder"/>
Step 2 – Use NetCFSvcUtil to generate the service metadata and compact framework client proxy
2.1 NetCFSvcUtil is installed with the Power Toys for .NET Compact Framework 3.5. It is located in the following directory: \Program Files\Microsoft.NET\SDK\CompactFramework\v3.5\bin. Make sure to add this path to you environment variable of you machine.
2.2 Go to the Bin directory of the Server project in a command prompt and run the following commands in sequence
(1) NetCFSvcUtil.exe Server.exe
(2) netcfsvcutil *.wsdl *.xsd /language:C#
(1) Will generate the metadata file required for code generation while (2) will generate the C# code for the client proxy.
2.3 There will be two source files generated, CFClientBase.cs and …..array.cs. Rename …..array.cs to CFGeneratedCode.cs
Step 3 – Create Compact Framework client application
3.1 Start VS 2008, File->New Project, select Smart Device project, Device Application, .NET Compact framework 3.5, and Windows Mobile 5/6 as device (I choose WM 6 Professional SDK).
3.2 Once the project is created drop a text box onto the form and create required menu items (the application is attached to this post, hence I will not go in detail)
3.3 Copy the files CFClientBase.cs and CFGeneratedCode.cs created in step 2.2 to the project directory and add them to the project.
Step 4 – Adding sample GZip encoder to client application
4.1 Download and install the sample GZip encoder for Compact Framework (downloadable here)
4.2 Copy the project/solution to the client application solution directory and add the IndigoGzipSample.csproj to the client application solution
4.3 Add the required references, using statements etc to make sure that your application compiles
Step 5 – Using the GZip encoder and running the applications
5.1 Add the following lines of code to use the GZip encoder in your client application
System.ServiceModel.Channels.CustomBinding customBinding = new System.ServiceModel.Channels.CustomBinding();
CompressionMessageEncodingBindingElement compressionBindingElement = new CompressionMessageEncodingBindingElement();
customBinding.Elements.Add(compressionBindingElement);
HttpTransportBindingElement httpBindingElement = new HttpTransportBindingElement();
customBinding.Elements.Add(httpBindingElement);
EndpointAddress endPoint = new EndpointAddress("https://<your_machine_name>:8000/samples/GZipEncoder/HttpSampleServer");
SampleServerClient client = new SampleServerClient(customBinding, endPoint);
5.2 Compile the application and you are ready to go!!
Step 6 – Running the service and client application
6.1 Run the desktop service
6.2 Start the client application (make sure your device is able to talk to your desktop machine and there are no network issues)
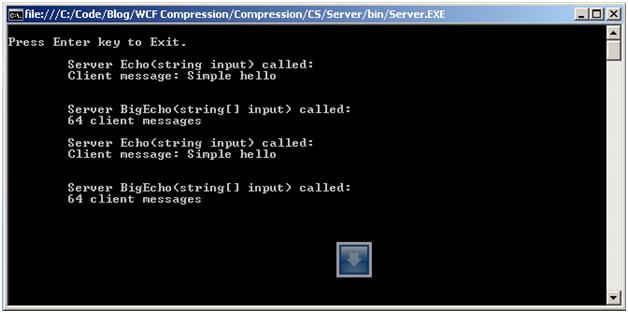
6.3 Click on “Talk to Server” to make the client exchange WCF messages with the server. These messages are GZip encoded. On successful communication you can see the following on the server
And this on the client
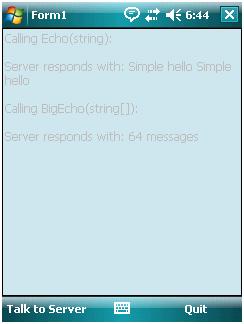
You can download the complete source code for the client which is attached to this post.
Comments
Anonymous
December 23, 2008
PingBack from http://www.codedstyle.com/gzip-message-encoding-for-wcf-applications-written-using-net-compact-framework/Anonymous
December 26, 2008
Manish is a Sr. Program manager in our NETCF Part of the Mobile Developer Group ; he recently wrote up