Note
Access to this page requires authorization. You can try signing in or changing directories.
Access to this page requires authorization. You can try changing directories.
This post is authored by Mathew Salvaris, Ilia Karmanov and Jaya Mathew.
Data scientists and engineers routinely encounter issues when moving their final functional software and code from their development environment (laptop, desktop) to a test environment, or from a staging environment to production. These difficulties primarily stem from differences between the underlying software environments and infrastructure, and they eventually end up costing businesses a lot of time and money, as data scientists and engineers work towards narrowing down these incompatibilities and either modify software or update environments to meet their needs.
Containers end up being a great solution in such scenarios, as the entire runtime environment (application, libraries, binaries and other configuration files) get bundled into a package to ensure smooth portability of software across different environments. Using containers can, therefore, improve the speed at which apps can be developed, tested, deployed and shared among users working in different environments. Docker is a leading software container platform for enabling developers, operators and enterprises to overcome their application portability issue.
The goal of Azure Container Services (ACS) is to provide a container hosting environment by using popular open-source tools and technologies. Like all software, deploying machine learning (ML) models can be tricky due to the plethora of libraries used and their dependencies. In this tutorial, we will demonstrate how to deploy a pre-trained deep learning model using ACS. ACS enables the user to configure, construct and manage a cluster of virtual machines preconfigured to run containerized applications. Once the cluster is setup, DC/OS is used for scheduling and orchestration. This is an ideal setup for any ML application since Docker containers facilitate ultimate flexibility in the libraries used, are scalable on demand, and all while ensuring that the application is performant.
The Docker image used in this tutorial contains a simple Flask web application with Nginx web server and uses Microsoft's Cognitive Toolkit (CNTK) as the deep learning framework, with a pretrained ResNet 152 model. Our web application is a simple image classification service, where the user submits an image, and the application returns the class the image belongs to. This end-to-end tutorial is split into four sections, namely:
- Create Docker image of our application (00_BuildImage.ipynb).
- Test the application locally (01_TestLocally.ipynb).
- Create an ACS cluster and deploy our web app (02_TestWebApp.ipynb).
- Test our web app (03_TestWebApp.ipynb, 04_SpeedTestWebApp.ipynb).
Each section has an accompanying Jupyter notebook with step-by-step instructions on how to create, deploy and test the web application.
Create Docker Image of the Application (00_BuildImage.ipynb)
The Docker image in this tutorial contains three main elements, namely: the web application (web app), pretrained model, and the driver for executing our model, based on the requests made to the web application. The Docker image is based on an Ubuntu 16.04 image to which we added the necessary Python dependencies and installed CNTK (another option would be to test our application in an Ubuntu Data Science Virtual Machine from Azure portal). An important point to be aware of is that the Flask web app is run on port 5000, so we have created a proxy from port 88 to port 5000 using Nginx to expose port 88 in the container. Once the container is built, it is pushed to a public Docker hub account so that the ACS cluster can access it.
Test the Application Locally (01_TestLocally.ipynb)
Having short feedback loops while debugging is very important and ensures quick iterations. Docker images allow the user to do this as the user can run their application locally and check the functionality, before going through the entire process of deploying the app to ACS. This notebook outlines the process of spinning up the Docker container locally and configuring it properly. Once the container is up and running the user can send requests to be scored using the model and check the model performance.
Create an ACS Cluster and Deploy the Web App (02_DeployOnACS.ipynb)
In this notebook, the Azure CLI is used to create an ACS cluster with two nodes (this can also be done via the Azure portal). Each node is a D2 VM, which is quite small but sufficient for this tutorial. Once ACS is setup, to deploy the app, the user needs to create and SSH tunnel into the head node. This ensures that the user can send the JSON application schema to Marathon.
From the schema, we have mapped port 80 of the host to port 88 on the port (users can choose different ports as well). This tutorial only deploys one instance of the application (the user can scale this up, but it will not be discussed in here). Marathon has a web dashboard that can be accessed through the SSH tunnel by simply pointing the web browser to the tunnel created for deploying the application schema.
Test the Web App (03_TestWebApp.ipynb, 04_SpeedTestWebApp.ipynb)
Once the application has been successfully deployed the user can send scoring requests. The illustration below shows examples of some of the results returned from the application. The ResNet 152 model seems to be fairly accurate, even when parts of the subject (in the image) are occluded.
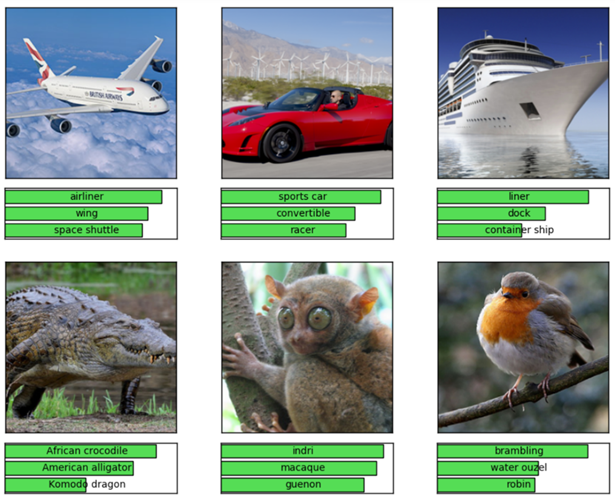
Further, the average response time for these requests is less than a second, which is very performant. Note that this tutorial was run on a virtual machine in the same region as the ACS. Response times across regions may be slower but the performance is still acceptable for a single container on a single VM.
After running the tutorial, to delete ACS and free up other associated Azure resources, run the cells at the end of 02_TestWebApp.ipynb notebook.
We hope you found this interesting - do share your thoughts or comments with us below.
Mathew, Ilia & Jaya