Note
Access to this page requires authorization. You can try signing in or changing directories.
Access to this page requires authorization. You can try changing directories.
This blog post is authored by Alexey Kamenev, Software Engineer at Microsoft.
Neural networks are one of the most popular machine learning algorithms today. One of the challenges when using neural networks is how to define a network topology given the variety of possible layer types, connections among them, and activation functions. Net# solves this problem by providing a succinct way to define almost any neural network architecture in a descriptive, easy-to-read format. This post provides a short tutorial for building a neural network using the Net# language to classify images of handwritten numeric digits in Microsoft Azure Machine Learning.
It is useful to have basic knowledge of neural networks for this tutorial. The following links provide good starting points to catch up:
https://www.coursera.org/course/neuralnets
https://en.wikipedia.org/wiki/Artificial_neural_network
Let us start with a very simple one-hidden-layer neural network architecture. We’ll walk through the “Sample Experiment – Digit Recognition (MNIST), Neural Net: 1 fully-connected hidden layer” – this is included as one of the sample experiments in the Samples list in every Azure ML workspace, you will need to sign up for our free trial to run this sample.
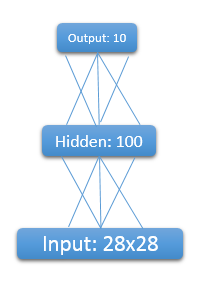
The network has 3 layers of neurons: an input layer of size 28*28 = 784, one hidden layer of size 100, and the output layer of size 10. The input layer is written as 28x28 because we train on the MNIST dataset which is a dataset of images of handwritten digits where each image is a 28x28 grayscale picture.
Here is the corresponding network definition in Net#:
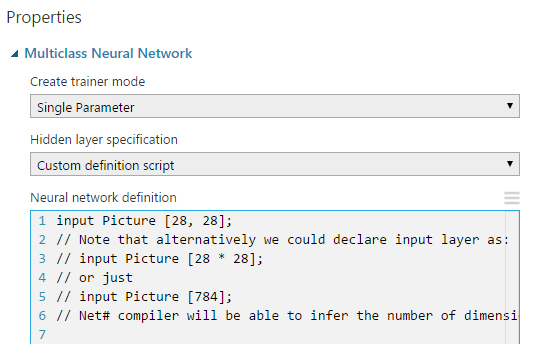
input Picture [28, 28];// Note that alternatively we could declare input layer as:// input Picture [28 * 28];// or just // input Picture [784];// Net# compiler will be able to infer the number of dimensions automatically. // This defines a fully-connected (to the input layer 'Picture')// hidden layer of size 100 with sigmoid activation function// (which is a default activation function).hidden H [100] from Picture all; // This defines an output layer of size 10 which is fully-connected to layer 'H', // with softmax activation function.output Result [10] softmax from H all; |
To add a Net# definition to a neural network module in Azure ML, you drag the learner module onto the canvas (in this case “Multiclass Neural Network”) and in the properties window for the module, under “Hidden layer specification,” select “Custom definition script” from the dropdown list. Then you will see the Neural Network definition script box in the properties window where you can enter your Net# definition. If you select the “Multiclass Neural Network” module in the sample experiment, you will see the following definition.
Using this topology, you can run a simple experiment using default values for learning rate and initial weight diameter, while reducing number of iterations to 30 to result in faster training. The experiment should run for less than 2 minutes, providing an accuracy of 97.7% (or 2.3% error), which is not bad given such a simple net and short training time.
Net#’s lexical grammar and rules are very similar to those of C#/C++. For example:
Net# is case sensitive.
Net# supports standard C#/C++ comments.
Net# constant literals are similar to C#, including decimal and hexadecimal integer literals, floating point literals, and string literals (including verbatim string literals) with escape sequence support.
Prefixing a keyword with the @ character makes it a normal identifier.
The language also supports various types of layers which will be described in subsequent posts.
Once you have the basic experiment in place, you can try playing with the network and the algorithm parameters to improve your results. For example, what happens if you:
Change the number of nodes in the hidden layer H? Does it change your accuracy if you use 200 nodes? Or 1000?
Change parameters like learning rate, initial weights diameter and number of iterations?
You can easily add more layers resulting in a more complex neural network. For example, to define a two hidden layers, fully-connected net, use the following Net# script:
input Picture [28, 28]; hidden H1 [200] from Picture all; // Note that H2 is fully connected to H1.hidden H2 [200] from H1 all; // Output layer is now fully connected to H2.output Result [10] softmax from H2 all; |
If you train this “deeper” net, which should take about 4 minutes (30 iterations), you should get an accuracy of about 98.1% (error is 1.9%) which is certainly better than our previous single hidden layer net. Note that you might not get exactly the same results if you haven’t fixed your random seed, but the results should be close to those shown above.
In addition to changing the layers, changing various parameters of the network and observing results may be an interesting exercise and may improve the results.
In subsequent posts, we will cover more advanced topics, such as activation functions, and different layer types: sparse and convolutional. A guide to Net# is also available in case you want to get an overview of most important features of Net#.
Please do not hesitate to ask questions or share your thoughts – we value your opinion – and enjoy training the nets in Azure ML!
Alexey
Comments
- Anonymous
February 24, 2015
안녕하세요. 한 주간의 마이크로소프트의 개발 관련 주요 소식들을 정리합니다.
관련 영상 : This Week on Channel 9 – Azure Machine Learning - Anonymous
February 25, 2015
Net# 是在 Azure ML 中設定類神經網路配置的簡單 script 語言,讓使用能在預設的 full bundle (即,各層間的節點是完全連接的) 之外,作出以下的變化,以進行機器學習並建構模型 - Anonymous
March 10, 2015
This blog post is authored by Alexey Kamenev, Software Engineer at Microsoft.
After introducing Net#