WPF/Surface demo: driving an extending desktop with a popfly duck !
Contrarily to the title, this is a serious article !
From 10th to 12th of February Microsoft France have organized the Paris Techdays event.
During the developer keynote, I have presented some Surface development features with a funny demo.
Here is a video of this demo but in french.
Now let me explain what happened.
Here is the idea:
Get a Surface table, setup a windows extended desktop using the VGA output of the table and an external display. The Surface application is very simple and similar to the very classical application where many people can move, rotate and resize pictures. In our case, pictures were slides exported from Powerpoint. When the applications runs, it creates a classical WPF window (not Surface specific) and put it on the secondary display, in a maximized state.
The goal is to output a defined part of what we have on the table on the external display. I have choose to use Tag to define this part (a rectangle) on the table. Placing the tag will define the center of this output rectangle. Then you can change the position of the output rectangle by moving the tag. As the Surface also recognizes the orientation, I have used the delta orientation value to increase or decrease the output rectangle size depending on the direction you are turning the tag (clockwise/counter clockwise).
As many people (including me :-) ) can't test this application at home, I have simulated feature in a WPF application using mouse move and mouse wheel events.
How to implement it:
It's quite fast to implement but let's see the interesting points.

First, how to capture the targeted visual part ? We will use a WPF VisualBrush.
This component is a Brush, comparable to a image brush, a plain color or a gradient brush but will use another WPF Visual as for painting. What you can notice is that the VisualBrush is not based on a kind of bitmap capture but is redrawing the visual using the wpf vector information. This means that if the VisualBrush is growing the original size, you will still keep a sharp rendered image keeping the benefits of the vector based drawing.
So the output window is simply defined this way:
<Window x:Class="SurfaceMedia.OutputWindow"
xmlns="https://schemas.microsoft.com/winfx/2006/xaml/presentation"
xmlns:x="https://schemas.microsoft.com/winfx/2006/xaml"
Title="OutputWindow" Height="300" Width="300">
<Window.Background>
<VisualBrush x:Name="vb" />
</Window.Background>
</Window>
Now we need to define which part of the main window we want to output.
We will surround our main content with a grid and then put a Canvas over it. Then we can define a Rectangle in our canvas to visually define our output region.
No the problem is we have our Rectangle over the main content but we want our main content to still receive inputs (mouse, keyboard) and we want the Rectangle to respond to some mouse events.
To achieve this, we will define the Canvas IsHitTestVisible attribute to "False". Easy to do but now the Rectangle will no longer receive mouse events.
In our surrounding grid, we will catch the needed mouse events. As the main content can potentially stop the bubble events from going up to their parents, we will prefer using PreviewMouseMove and PreviewMouseWheel.
<Grid PreviewMouseMove="Canvas_MouseMove" PreviewMouseWheel="Grid_MouseWheel">
<Grid>
...main content
</Grid>
<Canvas x:Name="canvas" IsHitTestVisible="False">
<Rectangle x:Name="outputRect" Width="100" Height="100" Stroke="Black"
StrokeThickness="1" Opacity="0.5" Canvas.Left="6" Canvas.Top="72" />
</Canvas>
</Grid>
Now we get what we wanted. We just need to adjust the VisualBrush playing on its Viewbox property to define exactly which part of the source we want to display.
private void Canvas_MouseMove(object sender, MouseEventArgs e)
{
RefreshOutputWindow(e);
}
private void Grid_MouseWheel(object sender, MouseWheelEventArgs e)
{
if ((outputRect.Width < 40) && (e.Delta < 0))
return;
outputRect.Width += e.Delta / 10;
outputRect.Height += e.Delta / 10;
RefreshOutputWindow(e);
}
private void RefreshOutputWindow(MouseEventArgs e)
{
var pos = e.GetPosition(canvas);
pos.Offset(-outputRect.Width / 2, -outputRect.Height / 2);
Canvas.SetTop(outputRect, pos.Y);
Canvas.SetLeft(outputRect, pos.X);
outputWindow.vb.Viewbox = new Rect(pos, new Size(outputRect.Width, outputRect.Height));
outputWindow.vb.ViewboxUnits = BrushMappingMode.Absolute;
}
How to programmatically place a WPF window on a secondary display ?
This one is not really related to WPF but is a little bit tricky.
We will need to make some interop with Window Forms because Screens information is not accessible from WPF APIs.
For this demo, if an extended desktop is available, we will place our output window on it in full screen. If not, we will just put it as a regular window on the main screen.
private void ShowOutputWindow()
{
outputWindow = new OutputWindow();
if (System.Windows.Forms.Screen.AllScreens.Length > 1)
{
outputWindow.WindowStartupLocation = WindowStartupLocation.Manual;
System.Drawing.Rectangle workingArea
= System.Windows.Forms.Screen.AllScreens[1].WorkingArea;
outputWindow.Left = workingArea.Left;
outputWindow.Top = workingArea.Top;
outputWindow.Width = workingArea.Width;
outputWindow.Height = workingArea.Height;
outputWindow.WindowStyle = WindowStyle.None;
outputWindow.Topmost = true;
}
outputWindow.Show();
outputWindow.vb.Visual = mainGrid;
}
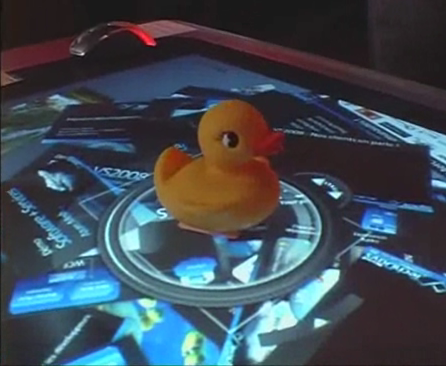
Why using the popfly duck ?!
I was just looking for something to stick the tag on and when looking around me I have found this funny duck that we had received when organizing the Paris ReMix a few years ago. It's hard to stick the tag under the duck but once it's done the duck shape is quite handy !
The source code is attached to this post.