How to Setup and Protect an Azure Application with a Barracuda Firewall
Editor's Note: This post comes from Tim Omta, Senior Application Development Manager
1 Introduction
If a business has an application hosted on Windows Azure, it will at some point be exposed to the internet in order to be commercially useful. The public internet brings with it both customers and attackers. As the value of the data within an application increases, so does its attractiveness to attackers. Businesses may be evaluating the cost benefit of hosting their Web Applications in Azure, but have concerns about protecting their data from attackers while providing their customers a positive experience. With an on-premises datacenter, there are a number of options for internet edge devices to protect applications from attackers. Some manufacturers of these types of devices are now making them available within hosting providers such as Windows Azure.
Barracuda Networks has created such a device for Windows Azure. Their Web Application Firewall virtual device may be used to protect Azure IaaS web servers or PaaS web roles. In this post, I will introduce you to the Barracuda Networks security solution for Windows Azure by walking you through setting it up in front of a simple PaaS application. There are four major parts to this post:
- Network Setup
- Azure PaaS Application
- Barracuda Web Application Firewall (WAF) Setup
- Exposing the Application
In this walkthrough, we will create a system that looks like the architectural diagram below:
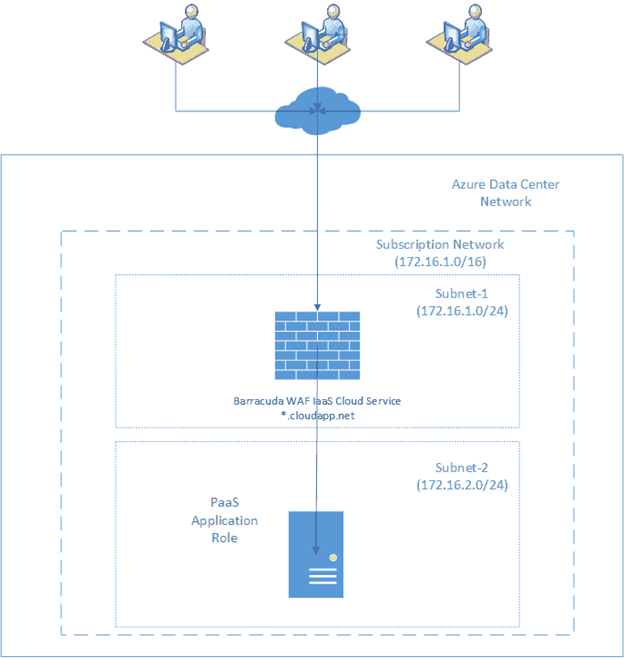
2 Network Setup
The first part of our setup will be the network because it is the foundational piece that connects the PaaS application, the Web Application Firewall (WAF), and the internet together within Azure. Choices need to be made carefully here because they cannot be changed. We will create a network, two subnets within it, and an affinity group. The network is the overall pool of IP addresses all resources will draw from. The 2 subnets will be named Subnet-1 and Subnet-2. Subnet-1 will be the WAF subnet and contain only WAFs. Subnet-2 will be the application subnet and contain only application PaaS roles. This subnet distinction is made so you know what type of resource you're communicating with by its address. In addition, it allows you to secure each type of resource by subnet (it essentially groups the resource types so you can deal with the groups appropriately). The subnets provide a security and address allocation boundary.
Finally, the affinity group will allow us to tell Azure to group all the machines with the newly created network. The group also collocates our resources geographically to decrease communication latency.
2.1 Create the Network and Affinity Group
Begin by signing in to the Azure management portal at https://manage.windowsazure.com/.
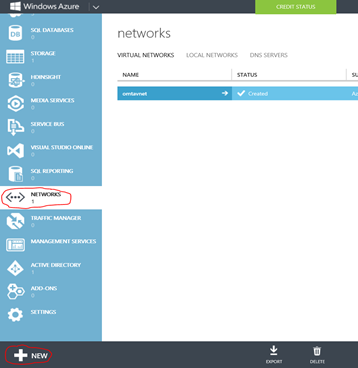
Click on Networks in the left pane
Click Virtual Networks on the top middle of the page
Click on New in the bottom left
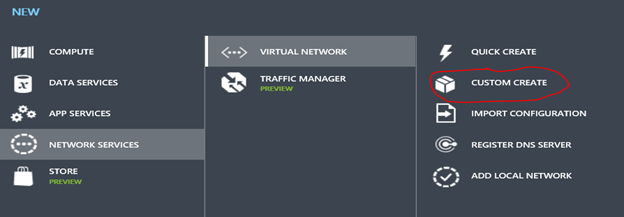
Click on network services
Click on virtual network
Click on custom create
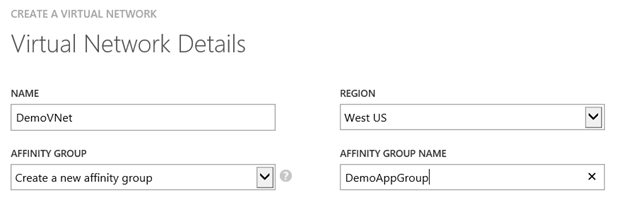
Choose your names carefully in this dialog. You'll use the network name and affinity group name throughout all the rest of your infrastructure, so you can't change them later without tearing everything down.
Type your network name in the Name text box
Make sure "Create a new affinity group" is selected for Affinity Group
Choose a region where your network will be built and your resources geographically located
Type a name for your affinity group
Click OK
2.2 Network Address and Subnet Address Ranges
Next you'll see a page like that pictured below.
Choose an address space for your network. Note that I chose 172.16.x.x overall network address range, so the first two dotted numbers (octets) will not change for anything on this network. The 172.16.1.0/16 tells Azure that I intend to start IP address allocation from 172.16.1.0 and will be varying the last 16 bits (last two octets) as addresses. I will use the last 2 octets as subnet number and device address respectively.
For address space type in 172.16.1.0/16
Add a subnet named Subnet-1 with an address space of 172.16.1.0/24
Add a subnet named Subnet-2 with an address space of 172.16.2.0/24
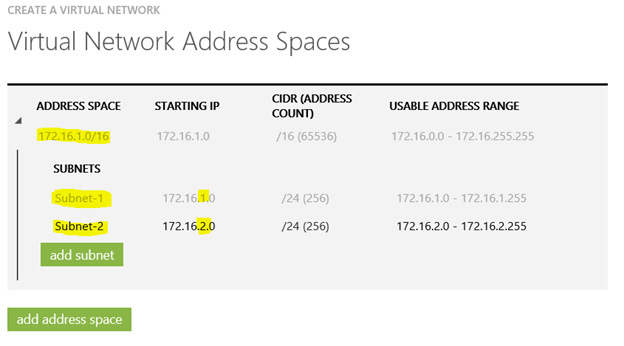
You completed network should show in your portal as created as in the figure below

You are now ready to begin placing the WAF on Subnet-1 and the application on Subnet-2.
Next, we'll create and configure the application that will be protected.
3 Azure PaaS Application
In this step, we'll create an application and deploy it to a PaaS web role. The application itself is not the important part, but the configuration of the application is. The configuration steps need to be done for any web role that will be protected by the WAF. The configuration also assumes you've prepared the network layout we created earlier. The network name, affinity group, and subnet names are integral to the application configuration. The deployed application will not be able to receive traffic from the internet directly. It will only be able to communicate with roles on its own subnet (Subnet-2, the application subnet) and the WAF subnet (Subnet-1, the WAF subnet).
3.1 Create a Demo Application
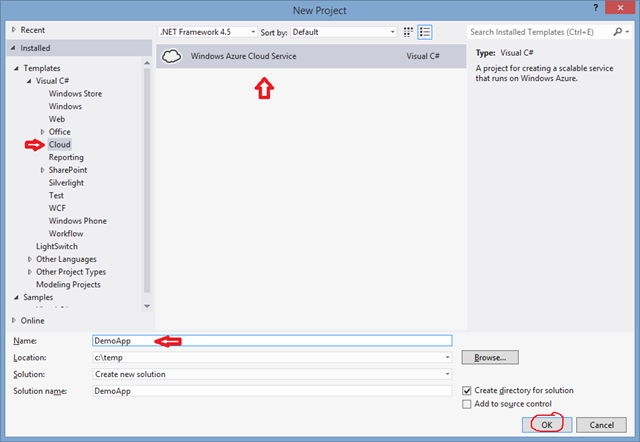
In Visual Studio, open the File menu, choose New, and click on project
Choose Cloud in the left hand pane
Click on the Windows Azure Cloud Service template in the center pane
Name the project or leave the default WindowsAzure1 name. I named mine DemoApp, so that is the application name you'll see from here on.
Click OK
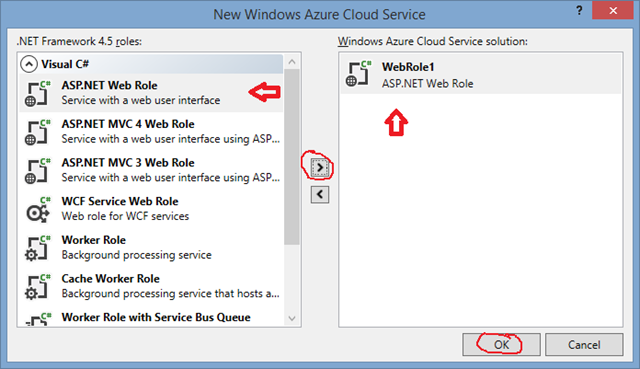
In the next dialog, click on ASP.Net Web Role
Click the > button to add the web role to it
Click OK
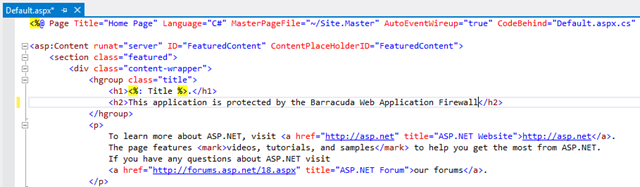
Open Default.aspx and change the <h2> tag contents from
"Modify this template to jump-start your ASP.NET application"
to
"This application is protected by the Barracuda Web Application Firewall"
Up to this point, we've just created a standard Azure Web Role application. The modifications below are the important ones to make to any application you need to place behind the WAF in Azure.
3.2 Configuring the Application
First we'll modify the application configuration to place it on the on the application subnet of the network (Subnet-2).
In your Visual Studio cloud project, open the ServiceConfiguration.Cloud.cscfg file
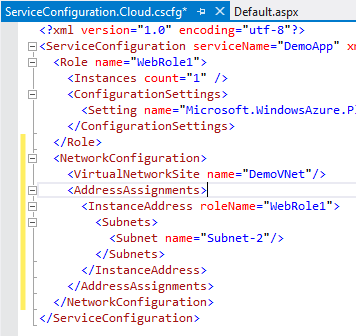
Add a NetworkConfiguration section within the ServiceConfiguration tags like that shown in the figure below. You can add it just after the closing Role tag.
<NetworkConfiguration>
<VirtualNetworkSite name="DemoVNet"/>
<AddressAssignments>
<InstanceAddress roleName="WebRole1">
<Subnets>
<Subnet name="Subnet-2"/>
</Subnets>
</InstanceAddress>
</AddressAssignments>
</NetworkConfiguration>
Assign the name attribute of the VirtualNetworkingSite to the name of the network. If you used the same name as I did, it is called "DemoVNet"
Assign the roleName attribute of the InstanceAddress tag to the same value as the name attribute of the Role tag that is already in this file
Assign the name attribute of the Subnet tag to the name of the subnet we created and designated to be the application subnet, "Subnet-2"
Your ServiceConfiguration.Cloud.cscfg should look similar to the one pictured below
Save the file
3.3 Add a Command File to Configure the Application Firewall
The main point of this is to add code to open the firewall of the PaaS role to accept traffic from the WAF subnet (Subnet-1). I'm showing you how to do this with a role startup task that calls netsh to add a firewall rule. This can be done in other ways such as C# code in your role OnStart method.
Right click on the WebRole1 project
Click Add
Choose Text File
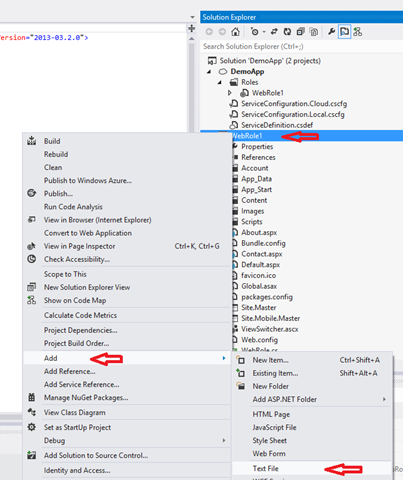
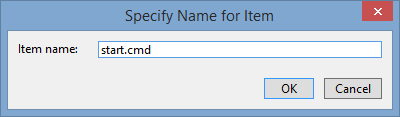
Name the file Start.cmd
Click OK
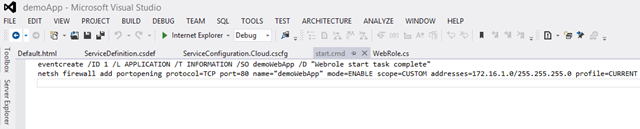
Add these lines to start.cmd
eventcreate /ID 1 /L APPLICATION /T INFORMATION /SO demoWebApp /D "Webrole start task complete"
netsh firewall add portopening protocol=TCP port=80 name="demoWebApp" mode=ENABLE scope=CUSTOM addresses=172.16.1.0/255.255.255.0 profile=CURRENT
The first line will post an event to the Windows Server application event log to indicate that start.cmd ran
The second line opens port 80 for TCP traffic on the PaaS web role to traffic from the WAF subnet (remember that we created Subnet-1 to be in the 172.16.1.x address space).
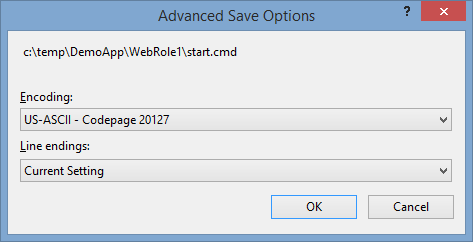
By default, Visual Studio will save start.cmd in Unicode, however the cmd command processor can't run that. You need to ensure you save the file in ASCII encoding so the cmd can be executed.
To do this click on the Visual Studio File menu and choose Advanced Save Options
Change the encoding to US-ASCII – Codepage 20127
Click OK
Select start.cmd in Solution Explorer
In the properties of the start.cmd file, set "Build Action" to "None"
Set "Copy to Output Directory" to "Copy Always"

Save the start.cmd file (File, Save)
We have created a batch file that is intended to run when our role is started. Now we need to configure the role not to accept internet traffic and to actually run our start.cmd file.
3.4 Configure the Application Endpoint and Startup Task
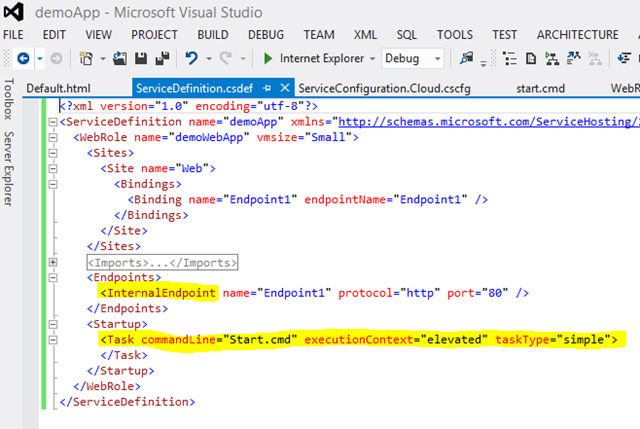
In the cloud project, open the ServiceDefinition.csdef file
Change the InputEndpoint tag to InternalEndpoint
Add a Startup tag to run start.cmd under the closing Endpoints tag
<Startup>
<Task commandLine="start.cmd" executionContext="elevated" taskType="simple"></Task>
</Startup>
Your ServiceDefinition.csdef should look similar to that shown below
Save the file
3.5 Add a Cloud Service for the Application in the Proper Affinity Group
Next, we need to custom create a cloud service to host the application. We're custom creating it so that we can specify the affinity group to later ensure that the application can be placed within the application subnet, Subnet-2, of the network we created.
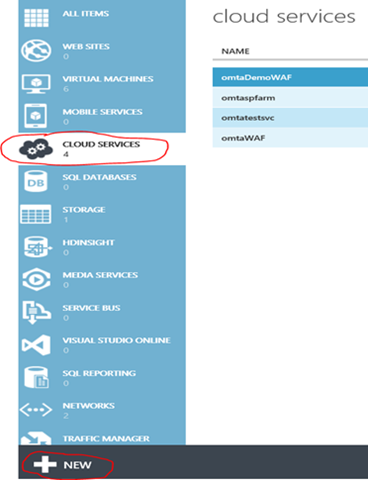
In the Azure management portal, click on Cloud Services in the left pane
Click on New at the bottom left
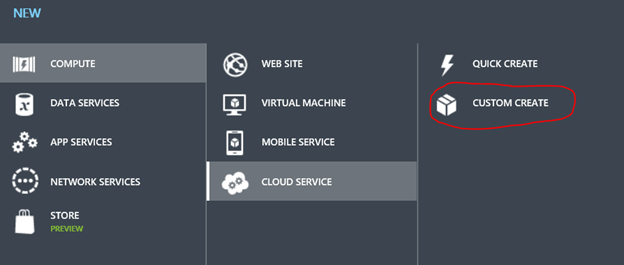
Choose Compute, Cloud Service
Click Custom Create
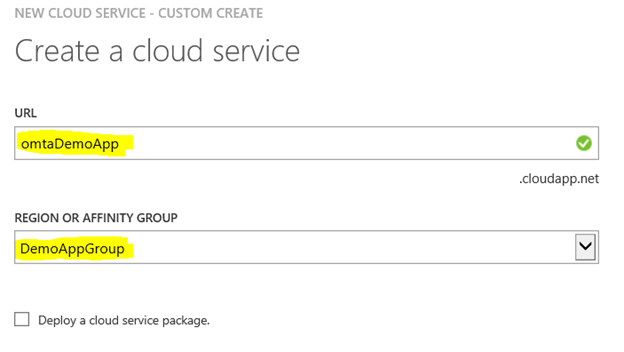
Give the application cloud service a URL of your choice. I used the same name as my application.
Select the affinity group that you created when you created the network. This is crucial as it places the application cloud service in the same group as the network.
Click OK check mark
3.6 Publish the Application
Finally, we will publish the application into the custom created cloud service.
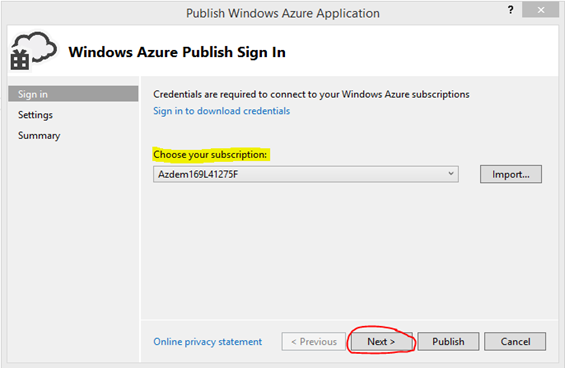
In Visual Studio, right click on the Cloud Project and choose Publish…
Choose your subscription
Click Next
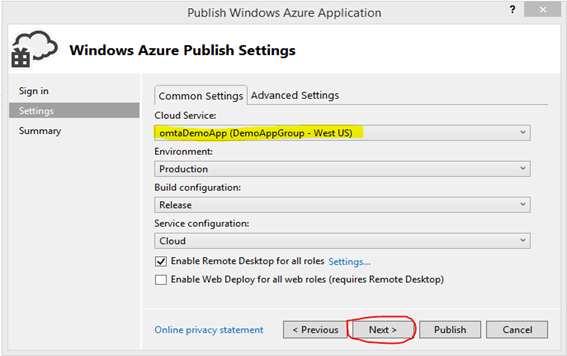
Choose the cloud service you just created. Notice that it shows the affinity group we associated the service with.
Configure RDP and any other settings you like
Click Next
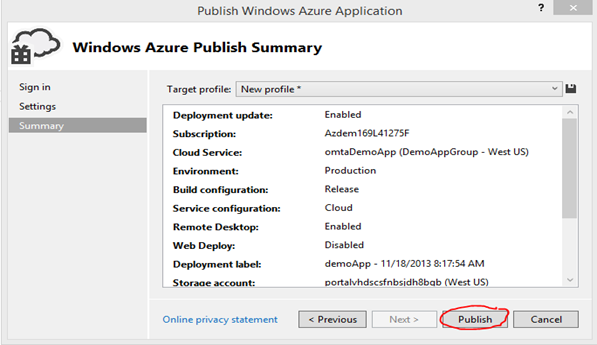
Finally, you should see a summary similar to the below figure
Click Publish
After a few minutes, your application will be published out to Azure and running there. If you enabled RDP, you can log onto the PaaS role instance and take a look at the event log. If the startup task ran correctly, you should see the message "Webrole start task complete" in the role application log. If you look closely at the start.cmd file we created, you'll see the first line posts that event message. In addition, you should see the firewall rule listed in the Windows Firewall console for the role. The rule should be present with the name it was given in the netsh line of the start.cmd.
Now that the application is up and running, we'll setup the WAF.
4 WAF Setup
If you have not done so already, you need to acquire the WAF VHD file from Barracuda Networks. Ask for the Barracuda Web Application Firewall Azure Virtual Device.
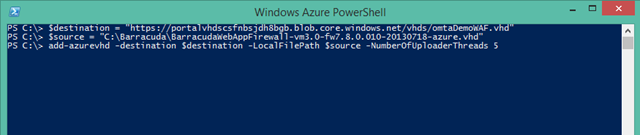
4.1 Upload the Barracuda VHD to Your Azure Storage Account
You can use the add-azurevhd Azure PowerShell cmdlet similar to that shown below. The source variable is the full path to the vhd you downloaded from Barracuda. The destination variable is the URL of the storage account container and filename to upload the vhd to. For instructions on setting up the Azure PowerShell cmdlets, see https://msdn.microsoft.com/en-us/library/windowsazure/jj156055.aspx.
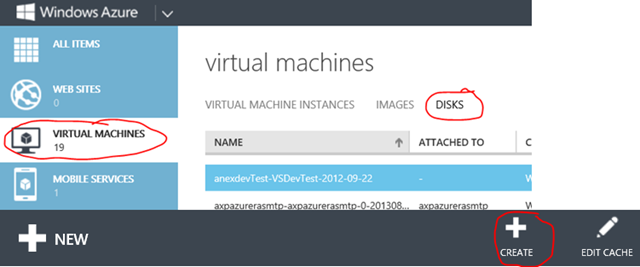
4.2 Create a VM Disk from the VHD
In the Azure management portal, select Virtual Machines on the left
Click on Disks near the top middle of the page
Click on Create
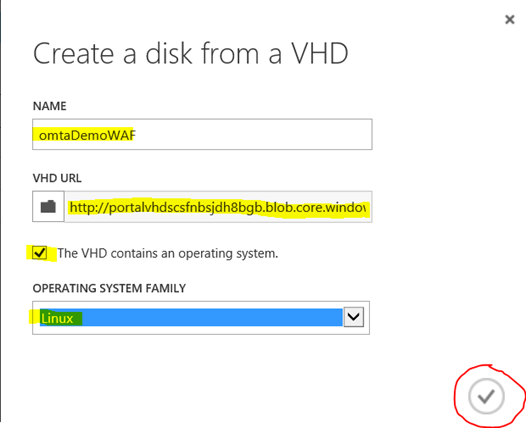
On the next dialog, name the disk
Set the VHD URL to the path and filename of the vhd you uploaded
Check the box "VHD contains an operating system"
Select Linux for the operating system
Click the check mark
The disk is now created. The next step is to create a VM from it.
4.3 Create the IaaS Barracuda VM
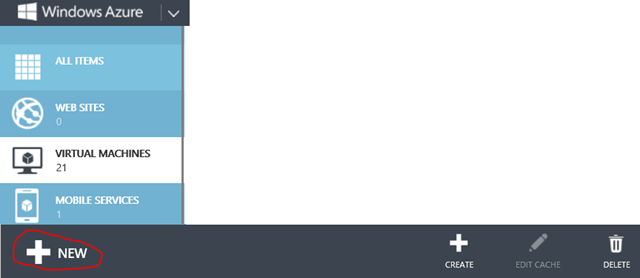
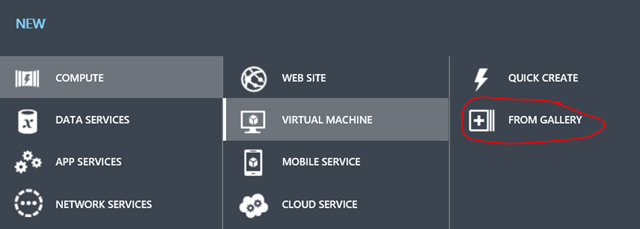
To create a VM from the disk, select Virtual Machines in the management portal
Click on the New button at the bottom of the page
Choose Compute, Virtual Machine
Click From Gallery
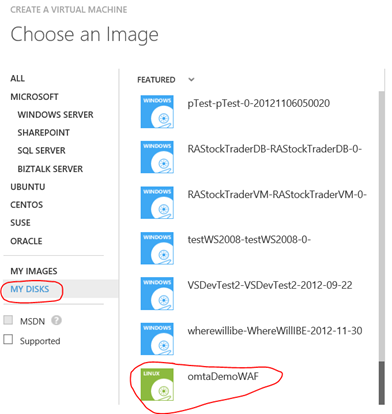
On the next dialog, click on My Disks on the left
Scroll to the bottom of the list on the right
Click on disk you just created
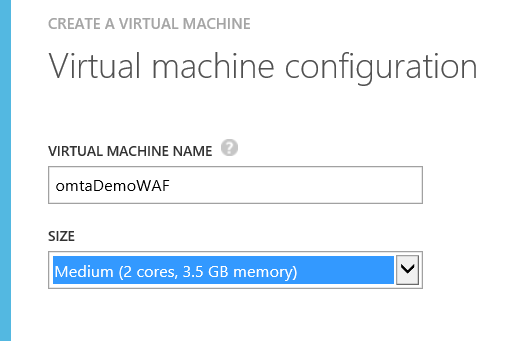
Name the virtual machine
Choose a size for the VM. The selection of size depends on how much traffic your WAF must handle. Unless you have very light traffic to your site, I'd start with at least a Medium.
Click the Next arrow
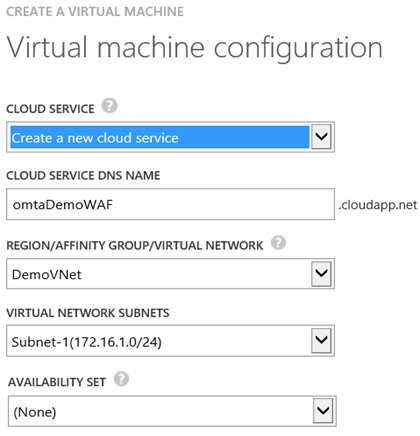
Make sure you choose "Create a new cloud service" in the Cloud Service list box
Choose a DNS name for the cloud service
Set the Virtual Network to the one we created in part 1, "DemoVNet"
Set the subnet to the WAF subnet we created in part 1, "Subnet-1"
Click the Next arrow
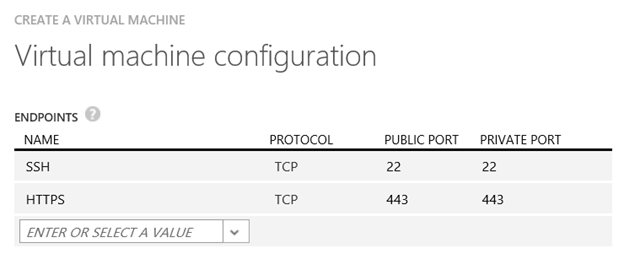
Open TCP port 443 to the WAF by adding the HTTPS endpoint
Click the OK check mark
Azure will create the virtual machine and start it. Give the WAF VM a several minutes (30 minutes is a safe number) to power up and reach steady state. You can watch its status in the Azure management portal Dashboard for the VM. It will start registering CPU percentage numbers.
4.4 Provision the Barracuda Virtual Device
Open a browser and navigate to the WAF administration page. It will be the DNS name for the VM's cloud service you just specified above. In my example figure, it would be https://omtaDemoWAF.cloudapp.net. There is a technical note on Barracuda's site that the SSL administration site may not be accessible while booting (see https://techlib.barracuda.com/display/BWAFv76/Barracuda%2BWeb%2BApplication%2BFirewall%2BVx%2BQuick%2BStart%2BGuide%2B-%2BWindows%2BAzure). If you think this is an issue, add port 8000 as an endpoint to the cloud service you just created in the previous step via the Azure portal, then access the administration site in clear HTTP on port 8000 (in my example, that would look like https://omtaDemoWAF.cloudapp.net:8000) to get a status on the device.
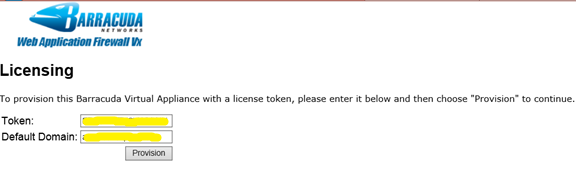
Since this is the first time you've accessed the WAF, the admin page will look like the figure below.
Enter your license token from Barracuda
Enter the DNS domain your applications will be in (contoso.net or whatever)
Click Provision
Close your browser and wait a several minutes for the WAF to provision itself. It will restart itself and eventually come back up.
Now you're ready for the next part, exposing the application.
5 Exposing the Application
Finally we will create the link from the internet through the WAF to the application
5.1 Create a WAF Virtual Service
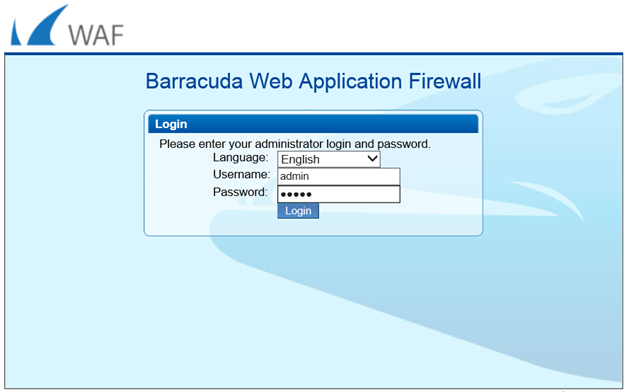
Open a browser and navigate to the WAF administration page again, just as in part 3.
This time you'll receive a login page, type the default administrative user for the Barracuda
Type the default password for the admin user
Click Login
Once logged into the WAF administrative portal, click on the Basic tab
Click on Services in the ribbon
You'll see a page that lists the WAF services and a section to add a virtual service. A WAF service is the link between traffic coming in to the WAF and your PaaS application. Remember that the PaaS application was created with an internal endpoint, meaning that it is firewalled off from the internet.
Type a name for your virtual service in the Service Name text box
Type the IP address of the WAF in the Virtual IP Address text box. Since the WAF is the first device in Subnet-1 (the WAF subnet), it will have an address of 172.16.1.4. Azure addresses are DHCP addresses, but the first one it hands out within a given subnet is always the 4th one from the beginning of that network's range.
Type 81 in the Port text box
Type the IP address of the first PaaS role server in the Real Servers text box. It will be 172.16.2.4, because it is the first server in Subnet-2 (the application subnet).
Click the Add button

We have now created a Virtual Service on the WAF that tells it to inspect traffic coming in from the internet on port 81, check it against policy, and if it complies, pass it to the backend PaaS application server on port 80. The only reason I've chosen port 81 is to show that you don't need to select the same port that the application exposes. You can choose port 80 for the virtual service, and I'll leave that is an exercise for the reader.
Your Services page should look similar to the figure below

5.2 Open the WAF Virtual Service to the Internet
Next, we need to tell Azure to allow traffic from the internet to the WAF. This is done by adding port 81 to the WAF cloud service endpoints.
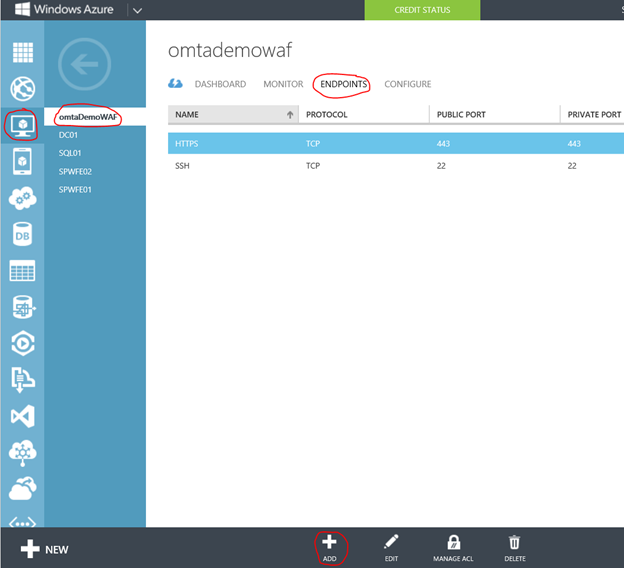
In the Azure management portal, click on Virtual Machines in the left pane
Click on the WAF virtual machine name
Click on Endpoints near the top middle
Click on the Add button on the bottom near the middle
Choose Add a Stand-Alone Endpoint
Click the Next arrow
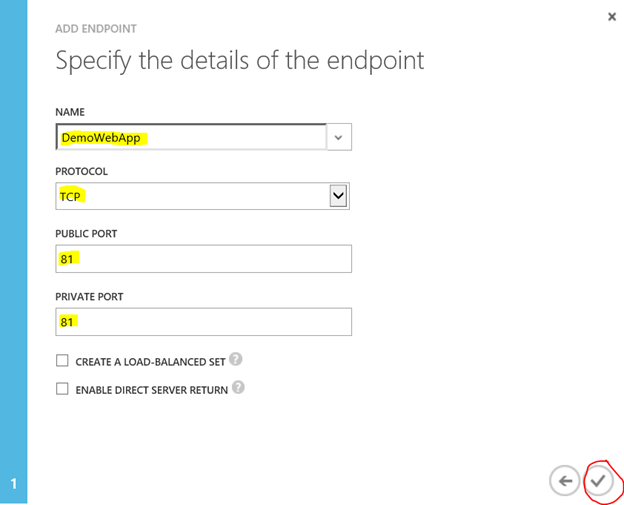
Give the endpoint a name by typing it in the Name text box
Choose TCP as the protocol
Set public port to 81
Set private port to 81
Click on the check mark button to add the endpoint
You should now see a list of endpoints similar to the figure below. These are the ports that Azure is allowing in from the internet to your WAF virtual machine.
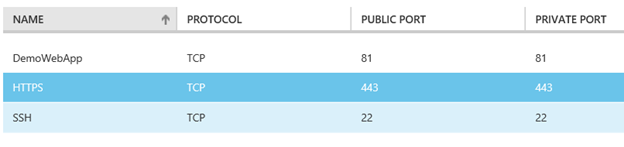
At this point, you should be able to access your application using the DNS name you gave to the cloud service hosting the WAF IaaS machine. In this demo, we used omtaDemoWAF, so the URL would be https://omtaDemoWAF.cloudapp.net:81/default.aspx.

Congratulations!
6 Load Balancing and Fault Tolerance
Now that you've learned the basics of operation, you can move on to create a fault tolerant, load-balanced system. You can cluster Barracuda virtual devices and place multiple PaaS roles in the WAF service you created in section 5.1.
At the time of this writing, the documentation for clustering virtual devices was not released, but you can follow the instructions for the physical devices here: https://techlib.barracuda.com/display/BWAFV76/How+to+Set+Up+a+High+Availability+Environment+with+Two+Barracuda+Web+Application+Firewalls
You can ignore the LAN, MGMT, and bridge mode references in the above link (LAN and MGMT interfaces are the same on the virtual device).
Once set up, configuration amongst systems can be synchronized in an active/active cluster of two or more WAF nodes. Configuration changes made to one device in the cluster are propagated to all other devices in the configuration cluster.
The following settings are not propagated between clustered WAFs. These must be manually configured on each WAF in the cluster if they had not already been set at the time of clustering.
- WAN IP Address/Netmask/Gateway
- System DNS Servers
- System Hostname
- Cluster Shared Secret
- System Time Zone
- System IP/Password/Serial
- HTTP/HTTPS Port (must be the same value on all machines)
- HTTPS Certificate/Settings
- Appearance Name, Logo, or URL
- Link monitoring settings
- Remote Support option
- NIC Speed/Duplex settings
With respect to PaaS roles, just as you added the first PaaS role to the WAF service in section 5.1, you can add others. The process can be automated since the WAF has a REST API. You can (and I have) write code to the OnStart method of the PaaS role that will add it to the WAF service when the role starts. Since our design placed the WAF(s) are in a specific subnet and Azure always assigns the fourth IP in the subnet address range to the first device (in our walkthrough, the first WAF will always be assigned 172.10.1.4), you could add configuration settings to the PaaS roles so they can find the first WAF and add themselves to a known WAF service.
Conversely, you could write and add code to the PaaS role's OnStop method to remove the role from the WAF service if it is stopped.
Thank you for your time and I hope this information has helped you open up for business with your data protected.