Note
Access to this page requires authorization. You can try signing in or changing directories.
Access to this page requires authorization. You can try changing directories.
Editor’s note: The following post was written by Office Server and Services MVP Luis Valencia.
The IoT is exploding - and everybody is talking about it; Twitter feeds are buzzing, and blog posts are flooded with information. However, for many of us mere mortals, it looks like rocket science.
In this post, I will try to make it easy for you to understand the basic concepts and technology behind the scenes. I will also build a fully functional sample web app, where you can see the end result and how all the pieces are connected.
So, what is the IoT? You will probably find different explanations, but for me, the best explanation is:
The IoT comprises of things or devices that are connected to a network; they produce or receive data, and then perform actions based on it.
Let’s take a Temperature Sensor as a simple example. In this scenario, this particular sensor sends data to a website in real-time. It is connected to a refrigerator in a drugstore, which by law needs to have controlled temperature. Rather than employing a person to go to the refrigerator every 30 minutes to take note of the current temperature, write it down manually on a piece of paper, and then save the evidence that the temperature has been written down for 24 hours, the sensor does it all automatically.
The IoT enables new business scenarios, new products, new services, and--just like the one I am going to show--there are hundreds out there already in production. And it’s really not rocket science.
What will you need to complete this?
The first thing to have is the THING, or a device. In my case I have Raspberry PI 3; this is a $39.99 dollar computer to which we can connect devices and then create applications that interact with those devices or sensors. Here I also have BPM180 Sensor, which you can find on Amazon for $9 or $10. This sensor measures temperature in real time. Later you will learn how to show it in real-time in a web application.
The Raspberry PI 3 comes by default with Raspbian installed. This is a Linux based OS based on Debian, however you can install Windows IoT Core. This is a minimum footprint version of the Operating System. What is amazing about this OS is that you can create apps with the tools you already know and love -- yes, Universal Windows Platform Apps will run on IoT Core, as well as Windows 8 or Windows 10, with the same programming language you already know, C#.
There are APIs out there to create apps in Javascript or other languages, but for simplicity I will just show the C# code.
Moving Parts of Our Solution
The PI APP
In our solution, in visual studio, I have a project in Universal Windows App. This Application has only four jobs: it will connect to the sensor, it will read the temperature from the sensor, show it on the screen and then send it to the IoT Hub.
The app on this device will never be connected in real time with a database. These sensors can read hundreds of readings per second, so--depending on how you code or configure your application--if you make it insert directly to a database the app will probably not scale well.
IoT Hub
The IoT Hub is a messaging system built on top of Azure Event Hub. It’s basically a system that is able to receive millions of messages per second, which we can then process at a later time. So, if we have 10,000 temperature sensors, sending temperature each second, it could receive 10,000 messages per second, and that’s not much for this Azure Service. I've copy and pasted the capabilities from this Microsoft Azure article. Azure IoT Hub:
- Provides multiple device-to-cloud and cloud-to-device communication options, including one-way messaging, file transfer, and request-reply methods.
- Provides a queriable storage for device metadata and synchronized state information.
- Enables secure communications and access control using per-device security keys or X.509 certificates.
- Provides extensive monitoring for device connectivity and device identity management events.
- Includes device libraries for the most popular languages and platforms.
Azure Web Job
Okay, now we have our IoT Core app sending messages to the IoT hub in real-time, what do we do next? We should process them offline through a different process--in this case, an Azure Web job.
An Azure Web job is just a background process that can be written in C#, Powershell and different languages. These live alongside a web app and you can develop any business logic you want, in order to process things in the background.
My particular Azure Web job connects to the IoT Hub, and takes the last messages on the hub, then inserts a new record in SQL Server (in Azure as well), and then marks the messages or the batch of messages as processed.
SQL Server
As with almost any other app, we need a way to store our information, because the device belongs to a company and to a user. While we have used SQL Server for a relational database, this is not mandatory. The layer could be changed by no relational databases if you wish, but the Web App layer will change in this case, of course.
Web App
The web application is just an ASP.NET MVC Application--the one you already know and love. However, we plug in SignalR. As many of you may already know, SignalR is a real time communication framework that will allow you to push changes that happen on the server side to the front end without post backs, or Javascript set timeouts.
SignalR relies on different technologies built on the modern browsers to allow this real time communication. In our case, we have a dashboard that shows the temperature in real time, the delay is only what it takes between the PI App to send the message, the web job to process the message and inserts it into a database, and then reads the data from the corresponding table.
When we tested it, delay was no longer than 1-2 seconds, which is fine for our scenario. A refrigerator won’t change the temperature dramatically in that period of time.
Creating the IoT Hub
In order for the code below to work, we need to create an IoT Hub in the Azure Portal. There is no rocket science in this step; you just click on the plus sign, find IoT Hub...and that’s it.
Copy and paste the URL (it should be something like this: myiothub.azuredevices.net) -- you will need it later.
You will find instructions on this in the first part of this post: https://azure.microsoft.com/en-us/documentation/articles/iot-hub-csharp-csharp-getstarted/
Raspberry PI App (Universal Windows Platform)
I am going to assume that you already have installed the latest version of Windows IoT Core on your Raspberry PI. If not here is a link explaining how to do it: https://developer.microsoft.com/enus/windows/iot/Docs/GetStarted/rpi3/sdcard/insider/GetStartedStep1.htm
Once Windows IoT Core is installed you can run Visual Studio and create a UWP App with C#, then review the code.
There are several pieces of relevant code. At the end of the post you will find a link to my GitHub repo where the full code is posted, but just in this post itself I only show the relevant pieces.
When the application starts, you have to initialize the sensor. The sensor is BMP180 and it reads the temperature. You need to create a Timer with this code. The timer has an interval assigned, and a callback, which means that a certain method will be executed every number of milliseconds, according to what the user has configured.
You can find the Bmp180 sensor class in this project: https://www.hackster.io/acegrc/bmp180-windows-iot-d14b76
  private async void InitializeSensors()
        {
            string calibrationData;
            try
            {
                _bmp180 = new Bmp180Sensor();
                await _bmp180.InitializeAsync();
                calibrationData = _bmp180.CalibrationData.ToString();   //Retorna una cadena que representa al objeto actual.
                if (_periodicTimer == null)
                {
                    _periodicTimer = new Timer(this.TimerCallback, null, 0, readingInterval);
                }
            }
            catch (Exception ex)
            {
                calibrationData = "Error de dispositivo! " + ex.Message;
            }
        }
After the device has been initialized, create the code for the timer callback. This code just reads the data from the sensor, and then creates a JSON message, which will be sent to the IoT Hub.
   public async void TimerCallback(object state)
        {
            string temperatureText;
            try
            {
                var sensorData = await _bmp180.GetSensorDataAsync(Bmp180AccuracyMode.UltraHighResolution);
                temperatureText = sensorData.Temperature.ToString("");
                temperatureText += "°C";

                var temperatureDataPoint = new
                {
                    deviceKey = deviceKey,
                    deviceName = deviceName,
                    temperatura = sensorData.Temperature,
                    fecha = DateTime.Now
                };
                //// actualizaciones de la interfaz de usuario... deben ser invocados en el subproceso de interfaz de usuario
                var task = this.Dispatcher.RunAsync(CoreDispatcherPriority.Normal, () =>
                {
                    temperatura.Text = temperatureText;
                });
                var messageString = JsonConvert.SerializeObject(temperatureDataPoint);
                var message = new Microsoft.Azure.Devices.Client.Message(Encoding.ASCII.GetBytes(messageString));
                message.Properties["Ambiente"] = ambiente;
                autoResetEvent.WaitOne();
                await deviceClient.SendEventAsync(message);
                autoResetEvent.Set();
            }
            catch (Exception ex)
            {
                var a = ex.StackTrace;
                temperatureText = "Sensor Error: " + ex.Message;
            }

        }
The device client has to be initialized with the IoT hub connection string and the device key, like this.
deviceClient = DeviceClient.Create(iotHubUri, new DeviceAuthenticationWithRegistrySymmetricKey(deviceName, deviceKey));
Azure Web Job
After our sensors are reading data and sending messages to the IoT Hub, we need to process those messages and insert them into the database. Our web job is just a C# Console Application that continuously reads from the Hub and inserts into the database.
Our Azure web job uses EventProcessorHost. This is a class provided by the Azure SDK which allows to control the reception of the messages and also checkpoint creation.
What is a checkpoint? It’s just a way to control or take a snapshot of when messages are processed, so that when the next time the job runs, it doesn’t read the same messages again.
In order to make it work, we need an Azure Storage Account. Alsom in the config file for the console application, we need to enter the IoT hub connection string. Keep in mind that you have to take it from the Messaging Tab in the azure portal--it’s what they call the “Event Hub compatible endpoint”.
My app.config looks like this:
 <appSettings>
    <add key="EventHubConnectionString"
value="Endpoint=sb:/xuzthub-ns-tempsense-69811-eb157a3ed0.servicebus.windows.net/;SharedA
ccessKeyName=iothubowner;SharedAccessKey=mykey" />
     <add key="EventHubName" value="myeventhubname" />
     <add key="StorageAccountName" value="mystorageaccountname" />
     <add key="StorageAccountKey" value="mystorageaccountkey/>
     <add key="TamanoLoteMensajes" value="100" />
   </appSettings>
   <connectionStrings>
     <add name="TempsenseConnection"
connectionString="Server=192.168.100.3\SQL2014;Initial Catalog=myDB;Persist Security
Info=False;User ID=myusername;Password=mypassword;" providerName="System.Data.SqlClient"
/>
In Azure, web jobs have triggers. These triggers mean that certain functions are executed when something happens - like when a file is dropped in Azure storage, or a message is received on a queue. In my case, I used a cronjob trigger, which means that the funcion be executed every minute, or however often you want.
   public static void CronJob([TimerTrigger("* */1 * * * *")] TimerInfo timer)
        {
            try
            {
                Console.WriteLine(String.Format("Inicio lectura mensajes : {0}", DateTime.Now.ToString()));
                string storageConnectionString = string.Format("DefaultEndpointsProtocol=https;AccountName={0};AccountKey={1}",
                                       Configuracion.StorageAccountName, Configuracion.
                                       StorageAccountKey);
                string _guid = Guid.NewGuid().ToString();
                string eventProcessorHostName = _guid;
                EventProcessorHost eventProcessorHost = new EventProcessorHost(
                                                                eventProcessorHostName,
                                                                Configuracion.EventHubName,
                                                                EventHubConsumerGroup.DefaultGroupName,
                                                                Configuracion.EventHubConnectionString,
                                                                storageConnectionString);
                Console.WriteLine("Registering EventProcessor...");
                var options = new EventProcessorOptions();
                options.ExceptionReceived += (sender, e) => { Console.WriteLine(e.Exception); };
                eventProcessorHost.RegisterEventProcessorAsync(options).Wait();
eventProcessorHost.UnregisterEventProcessorAsync().Wait();
                Console.WriteLine(String.Format("Fin lectura mensajes : {0}", DateTime.Now.ToString()));
            }
            catch (Exception ex)
            {
                throw ex;
            }

        }
The Event processor class, which is actually responsible for opening and closing connections, is also responsible for receiving the messages from the IoT hub.
  namespace ActiveSense.Tempsense.Receptor
{
    public class SimpleEventProcessor : IEventProcessor
    {
        Stopwatch checkpointStopWatch;
        int messageCount = 0;
        async Task IEventProcessor.CloseAsync(PartitionContext context, CloseReason reason)
        {
            Console.WriteLine("Processor Shutting Down. Partition '{0}', Reason:'{1}'.", context.Lease.PartitionId, reason);
            if (reason == CloseReason.Shutdown)
            {
                await context.CheckpointAsync();
            }
        }

        Task IEventProcessor.OpenAsync(PartitionContext context)
        {
            Console.WriteLine("SimpleEventProcessor initialized. Partition:'{0}',offset:'{1}'", context.Lease.PartitionId, context.Lease.Offset);
            this.checkpointStopWatch = new Stopwatch();
            this.checkpointStopWatch.Start();
            return Task.FromResult(null);
        }

        public Task ProcessEventsAsync(PartitionContext context, IEnumerable messages)
        {
            List medidas = new List();
            foreach (EventData eventData in messages)
            {
                string strConn = string.Format(ConfigurationManager.ConnectionStrings["myConnection"].ConnectionString, eventData.Properties["Ambiente"]);
                messageCount++;
                string data = Encoding.UTF8.GetString(eventData.GetBytes());
                JObject o = JObject.Parse(data);
                var deviceKey = int.Parse(o["deviceKey"].ToString());


                using (ActiveSenseContext db = new ActiveSenseContext(strConn))
                {
                    try
                    {
                        var disp = db.Dispositivos
                            .Where(p => p.DispositivoID == deviceKey);
                        if (disp.ToList().Count > 0)
                        {
                            ActiveSense.mynm.model.Modelo.Medida medida = new ActiveSense.mynm.model.Modelo.Medida()
                            {
                                DispositivoID = disp.FirstOrDefault().DispositivoID,
                                Valor = decimal.Parse(o["valor"].ToString()),
                                FechaHora = Convert.ToDateTime(o["fecha"].ToString()),
                            };
                            Console.WriteLine(string.Format("Message received. Partition:{0}, Data:{1}{2}", context.Lease.PartitionId, data, eventData.EnqueuedTimeUtc));
                            db.Medidas.Add(medida);
                            db.SaveChanges();
                        }
                        else
                        {
                            Console.WriteLine(string.Format("Device Key not found in database:{0}, Message:{1}", o["deviceKey"].ToString(), o));
                        }
                    }
                    catch (Exception ex)
                    {
                        Console.WriteLine(string.Format("Mensaje tuvo error:{0},{1}", ex.Message, data));
                    }
                }
            }

            //if (messageCount > Configuracion.TamanoLoteMensajes)
            context.CheckpointAsync();
            return Task.FromResult(null);
        }


    }
}
Okay, so now he have our data in the database, our sensor is sending messages to the IoT Hub, and our Azure webjob is reading them in real time and inserting them row per row into our measures table.
Web Application
The web application is just a simple ASP.NET MVC application that shows data in real time. The nice part of the entire demo here is the real time sentence, for which we use SignalR.
SignalR is a framework that provides us the utilities we need to refresh our page in real time when something happens on the server. In our case we have a timer that, based on a pre-defined interval, goes to the database and takes the last temperature of the device, and then sends it to the clients (the browsers), and then with Javascript will refresh the user interface in real time. The best way to prove that this works is just to put a finger on the sensor, and then you will see the temperature skyrocket.
For demo purposes all the temperatures are in Celsius degrees.
The code that implements this dashboard is using SignalR. For this we have to create a Hub which is below:
 public class TemperatureHub : Hub
    {
        // Create the instance of ChartDataUpdate
        private readonly LastTemperatureUpdate _instance;
        public TemperatureHub() : this(LastTemperatureUpdate.Instance) { }


        public TemperatureHub(LastTemperatureUpdate instance)
        {
            _instance = instance;
        }


        public void InitTempData(string data = "" )
        {
            _instance.idUsuario = data;
            _instance.GetTempData();

        }

    }


public void GetTempData()
    {
        _timer = new Timer(TempTimerCallback, null, _updateInterval, _updateInterval);


    }
    private void TempTimerCallback(object state)
    {
        if (_sendingLastTemperature)
        {
            return;
        }
        lock (_tempUpdateLock)
        {
            if (!_sendingLastTemperature)
            {
                _sendingLastTemperature = true;
                SendLastTemperature();
                _sendingLastTemperature = false;
            }
        }
    }


  private void SendLastTemperature()
    {
        tempUpdate.TakeLastTemp(this.idUsuario);
        GetAllClients().All.UpdateTemperature(tempUpdate);
    }
So, we have a ChartHub - which is a SignalR component that centralizes communication with the clients (browsers) - and on the initializer of the hub we define a timer with an Interval callback method. When that method is executed, it reads the last temperature from the database. Then with SignalR API sends the new information (the last temperature from each sensor) to all clients (the opened browsers in the dashboard view).
The code below is the view of the dashboard, which actually is responsible for getting the message sent by the server and then taking that data and refreshing the user interface. For simplicity purposes I won’t paste the entire JS and HTML, just the piece that receives the data. The rest of the code is in the GITHUB repository.
 <script >

         $().ready(function () {
             $(function () {

                 $("#ContenedorPreload").show();
                 $("#content").hide();
                 //Create the Hub
                 var temperatureHub = $.connection.temperatureHub;


                 //Call InitChartData
                 $.connection.hub.start().done(function () {
                     temperatureHub.server.initTempData($('#usery').val());
                 });


                 temperatureHub.client.updateTemperature = function (tempUpdate) {
                     UpdateTemperature(tempUpdate);
                 };
             });
         });
</script >
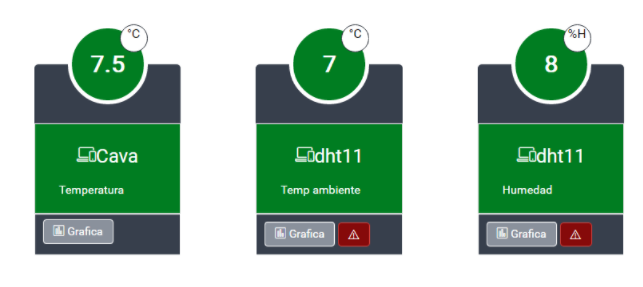
And the end result is a dashboard which shows the temperature in real time, like this screenshot demonstrates:
The entire code of this project is in this GitHub repo. https://github.com/levalencia/IoTRealTimeSensorWebApp
Luis Valencia at the MVP Summit
Luis is featured in a great interview here on Channel 9, in which he speaks about the same solution.
 Luis Valencia is an Office Server and Services MVP living in Medellin, Colombia. He's the CTO of Software Estrategico, and has nearly more than 15 years of experience using Microsoft technologies - and about 8 of those years have been in the Sharepoint world. Luis is an active person in the community, as he organizes meet ups on various topics including Sharepoint, Azure, and web stack technologies.
Follow him on Twitter @levalencia