Note
Access to this page requires authorization. You can try signing in or changing directories.
Access to this page requires authorization. You can try changing directories.
This previous blog "NAV 2009 - The structure of reports in VS report designer" describes how to get data from your data items into the layout of a report in Visual Studio (VS) report designer. This time we look at how to control the iterations of a report with code, and showing variables rather than fields on a report. So, for when you manually want to control what to print.
The tricky part is really to get the structure of the report right. Once this is done, adding additional information from variables / controlling data items from code, is not much work - mainly for these reasons:
- The data flow in the report is still done from data items, which means the old way.
- To show variables on a report, you just add it to sections, and it automatically becomes available from the VS report designer.
This example shows how to:
- Use code to control the number of iterations on a data item
- Show variables on the report
- Add options to the request page, so user can tick “show Details”
Control data flow from code
This is really the same as it has always been. Just use C/AL code on data item triggers to decide how many iterations / whether to print a record or not. For this example, we will just print integer numbers. So to begin with, make a new report with the following two data items:
Integer - DataItemTableView = SORTING(Number) WHERE(Number=FILTER(1..3))
Integer (name it Int2), and indent it under the first one. Don’t specify further properties for this data item – we will control this from code. The report should look like this:

As I am sure you realise, without filtering on the Integer table the report becomes very long! So, to restrict the second data item to print just 5 numbers, just do it as you would normally from C/AL code:
Int2 - OnPreDataItem()
SETRANGE(Number,1,5);
This is really all you have to do to manually control what data is printed. As mentioned already, this is not different to how it has always been.
So now we just need to complete the report to print these numbers. This is where it can get more tricky if you are new to tables in VS report designer. For further details about the next steps, refer to this post.
First, to make data available in VS report designer, add it to the sections:
Go to View -> Sections, and add Number for each of the data items (Integer.Number and Int2.Number) from the Field Menu. It doesn’t matter where on the sections you add it.
Then, finally open VS report designer (View -> Layout) to put the numbers on the report. In VS report designer, add a table. Insert a group by right clicking on the icon for the Header:

Set the group to have Expression = “=Fields!Integer_Number.Value”, and untick “Include group footer”. Then put Integer_NumberCaption into the header, Integer_Number.Value into the Group Header and Int2_Number.Value into the Group Details, like this:

The report should now print 3 times the numbers 1 – 5:

Adding variables to the report
Now, instead of printing records from the two data items, create a variable and assign it values dynamically. Create a new global variable called TextVar, type Text, then assign it some value, for example like this:
Int2 - OnAfterGetRecord()
TextVar := 'Num ' + FORMAT(Number);
Again, just like you are used to. All you have to do from here, is to add it somewhere to sections to make it available in VS report designer.
In many cases, a report is designed to be run from either the classic client or the Role Tailored Client (RTC), and you need to add something to sections just to get access to it from VS report designer, but you don’t want it to show when the classic report runs the report. In this case, just set Visible=False, and the classic report won’t show it. In places in the standard application where this is done, the property ForeColor has also been set to 65535 (Yellow), just to mark that this field is only there so that it can be used in the VS report designer. For example, look at sections for report 116 – Statement.
Adding options to a request page
In the classic report designer you have request forms. In reports for RTC, you have request pages. To add something to a request page, go to View -> Request Page, and you are in a normal page designer. For this report, add a variable called HideDetails (Boolean) to the request page like this:
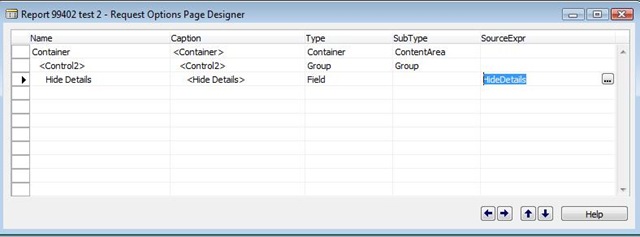
Note that Type is “Field”, whether SourceExpr is an actual field, or as in this case a global variable. Again, to make it available in VS report designer, you must add the variable to the sections. Then go into the layout in VS report designer.
To hide a section from the table, use the Visibility-tab for the section. Right click on the Details section in the table, then Edit Group, and on the Visibility tab set Visibility to Expression, and the expressions to =Fields!HideDetails.Value:

The end result is, that now when printing the report from RTC, you have the option to Hide Details.
Lars Lohndorf-Larsen
Microsoft Dynamics UK
Microsoft Customer Service and Support (CSS) EMEA
These postings are provided "AS IS" with no warranties and confer no rights. You assume all risk for your use.
Comments
Anonymous
November 18, 2008
PingBack from http://blog.a-foton.ru/index.php/2008/11/19/using-variables-and-cal-code-in-a-report-in-nav-2009/Anonymous
December 08, 2008
Is it possible to open a Report using dynamicsnav:////runreport?report=121 (for example) and pass parameters? The question is how to link for example "Customer List report" with a the "Customer Detail Report"Anonymous
January 08, 2009
In Microsoft Dynamics NAV 2009 we released the possibility to create reports with SSRS layout. SSRS(SQL