How-To: Configuring ERP MA / SAP MA for FIM 2010
My experience is that the configuration steps listed in the ERP MA Help file are incomplete to say the least. This post is an attempt to give step-by-step or rather screen-by-screen instructions on how to configure and use SAP MA with FIM 2010.
The SAP MA that is shipped with FIM 2010 makes use of SAP .NET Connector 2.0. Please note that this is a 32-bit component while FIM 2010 needs a Windows 2008 64-bit server. The .NET connector also has Visual Studio 2003 as one of its installation prerequisite. So installing the complete package on FIM 2010 Synchronization Server is cumbersome to say the least. And since I’ve not tried installing the complete package, I cannot tell if it gets installed on a Window 2008 x64 server at all. Luckily, the SAP MA only needs three runtime files listed below from the package:
- SAP.Connector.dll
- SAP.Connector.Rfc.dll
- LibRfc32.dll
Here are the steps to extract and deploy these files on a FIM Sync Server:
- Download the SAP .NET Connector 2.0 from SAP website https://service.sap.com/connectors.
- Expand the SAP.NET Connector msi files using the command line:
msiexec /a <<Path to SAP.NET Connector msi file>> /qb TARGETDIR=<<Directory to extract msi to>> - On the FIM 2010 Sync machine, copy SAP.Connector.dll and SAP.Connector.Rfc.dll to the directory C:\Program Files\Microsoft Forefront Identity Manager\2010\Synchronization Service\UIShell\ERPMA. Then register it in the global assembly cache (GAC) using gacutil.exe or by the drag-and-drop on the assembly folder (if UAC is turned off). If we choose, we can then delete SAP.Connector.dll and SAP.Connector.Rfc.dll from the original UIShell\ERPMA folder.
- Since librfc32.dll is a 32-bit DLL while FIM 2010 Sync Server is a 64-bit machine, copy it into C:\Windows\SysWOW64 folder.
- That’s all. We are now ready to ERP MA Configuration tool.
It may be helpful to note that running Synchronization Service ERP MA Configuration UI Tool requires following additional permissions:
The user running the ERPMAConfigTool will require the following privileges:
- Full Control to the folder where the proxy assembly and configuration files are saved.
- Read access to the registry key HKLM\System\CurrentControlSet\Services\ FIMSynchronizationService\Parameters
The ERPMAConfigTool also comes with a sample template file called ERPDefaultTemplate.xml. We can use it, along with the help file, to explore how Add, Replace, Delete, Full Import etc. operations are configured on employees and users. If we look at, say, the Full Import configuration for employee or user information, the general pattern is: call GETLIST for all the records and then call GETDETAIL for each of the record returned in the previous call. Needless to say, this does not perform well for a large enterprise. Hence there is always a need to get custom BAPI’s written which will return all the needed information is a single call.
So for this tutorial, we’ll make use of a custom BAPI function ZBAPI_FETCH_EMPLOYEE_DETAILS which has following signature and returns all the employee details of interest to FIM in a single call:
ZBAPI_FETCH_EMPLOYEE_DETAILS
RECORD_DATE RFCTYPE_DATE in IT_EMP_DETAILS RFCTYPE_TABLE inout RETURN RFCTYPE_STRUCTURE out
The BAPI is written such that it supports Full Import as well as Delta Import depending on what is passed as RECORD_DATE. The employee records are return in the IT_EMP_DETAILS table. Let’s use this BAPI for configuring the SAP MA.
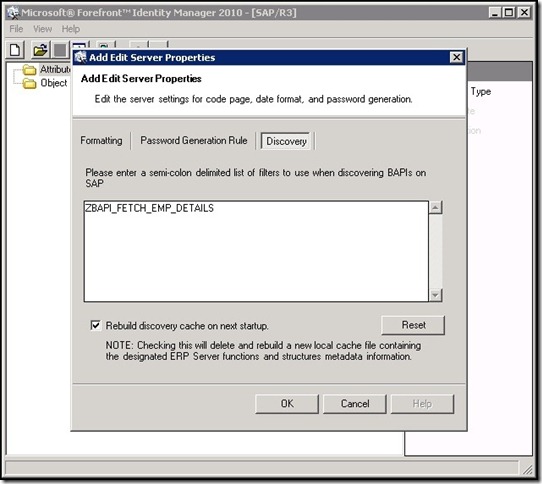
The first time we connect to a SAP environment through the ERP MA Configuration Tool, a discovery process is launched. Discovery retrieves the set of available BAPIs and caches them for future use. The discovery with the default filter generally takes half an hour or more. Hence the first thing we would do is to narrow down the filter before connecting to the SAP server as shown in the screenshot below:
We make sure we check the “Rebuild discovery cache on next startup” checkbox and close the application. We get a warning as shown below:
We ignore the warning and exit the application.
We now reopen the application and connect to our SAP environment.
Once we enter the correct connection string and user credentials, the BAPI discovery process starts and quickly finishes.
Now we can proceed with the configuration of the employee object.
Add Object Type
- Click the "Add Object Type" action button. Enter the name of the CS object to be created in FIM, in our case we enter employee.

- Click Next to move to the “Add Operations for Object Type” page.

- Click the "Add" button to add new operations for this object type. Doing so will start the "Define Operation" wizard. Select "full" for the operation by clicking and selecting from the standard FIM operations in the drop-down combo box.

- Enter Z* in the search dialog box to lookup the definition for all functions beginning with "Z". Select ZBAPI_FETCH_EMPLOYEE_DETAILS from the list and click OK.

- Click OK to display the summary page.

- Click Finish to take us back to the “Define Operations for this Object Type” page.

- For now, we’ll not configure any additional operations, so click next.

- Click “Finish” on the summary page.
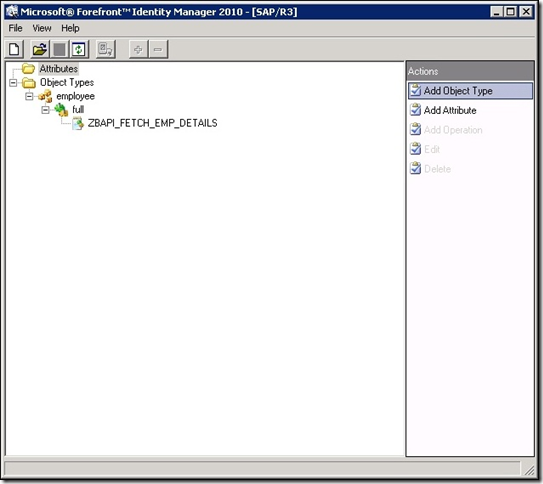
- Now we are ready to define the employee attributes.
Add Attributes
Adding attribute employeeNumber
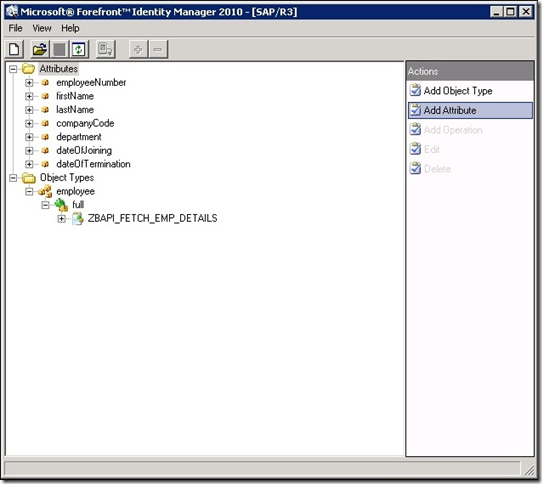
- Click the “Add Attribute” action button on the main window. This will start the “Add New Attribute” wizard. Type the attribute name as employeeNumber and select Type as string. Since we are going to define employeeNumber as the anchor attriute, it makes sense to mark it as required attribute.

- Clicking Next takes us to the attribute mapping page. Here we map it to the Employee Number column (PRI_EMPNUM) of our IT_EMP_DETAILS employee details table.

- Click Next to get to the Attribute Summary Page.

Adding additional attributes
Define Anchor
Now if we think we are done with the configuration and try to save the file, we get following error:
Obviously, we are yet to set the anchor for the employee object and this is where it gets little tricky. Let’s follow the documented instructions and see how far it takes us to.
- Select the operation where the attribute is mapped, i.e. "employee.full", and click Edit quick action button to launch the "Add or Edit Operation Wizard".

- Select the mapped function, i.e. "ZBAPI_FETCH_EMP_DETAILS" function and click the Edit button. This will open the Add or Edit Function Properties form.

- Select the PRI_EMPNUM parameter (as shown below) and click Edit. This will open the Add Edit Parameter Properties from. Check the Parameter Defines the object check box.
![clip_image001[5] clip_image001[5]](https://msdntnarchive.z22.web.core.windows.net/media/MSDNBlogsFS/prod.evol.blogs.msdn.com/CommunityServer.Blogs.Components.WeblogFiles/00/00/01/41/71/metablogapi/1581.clip_image0015_thumb_2D14E543.png)
- The documented instructions end here, so we should be able click OK. But instead silent success, this is what we get: Warning!! “You cannot assign an alias to an Infotype and to the fields within that Infotype. Please review your strategy and decide if you want data from all fields (the entire Infotype) or individual fields”.
![clip_image002[5] clip_image002[5]](https://msdntnarchive.z22.web.core.windows.net/media/MSDNBlogsFS/prod.evol.blogs.msdn.com/CommunityServer.Blogs.Components.WeblogFiles/00/00/01/41/71/metablogapi/5807.clip_image0025_thumb_7C22080A.png) Though this is a warning, it does not let us save the change we made and so we therefore cannot define the anchor attribute. Fortunately, this is just a UI issue and there is a workaround for it. If we read the warning carefully and look at the screenshot again, we’ll notice that IT_EMP_DETAILS structure has got an alias “_IT_EMP_DETAILS” defined for it. We, for sure, did not define it. What happens is that if we are flowing function or parameter data to or from a CS attribute, and the data type of the parameter is a structure (i.e. SAPStructure or SAPTable) we will need to define an alias for this parameter. Doing so will identify and label this data structure in memory and allow the MA to find the named-structure easily when retrieving the field data. We do this by defining an alias for the parameter structure. Aliases can be created explicitly by a defining an alias in the configuration or automatically by the ERP Configuration Tool when its usage is implied and obvious. In our case, it was obvious, so the alias was created automatically when we did the first mapping of employeeNumber to IT_EMP_DETAILS.PRI_EMPNUM. From this explanation, it is clear that it is as much important that we need the alias for IT_EMP_DETAILS as it is that we need to define the anchor to be able to save the configuration file. Hence we’ll perform the next steps to temporarily remove the alias, set the anchor and then restore the alias back.
Though this is a warning, it does not let us save the change we made and so we therefore cannot define the anchor attribute. Fortunately, this is just a UI issue and there is a workaround for it. If we read the warning carefully and look at the screenshot again, we’ll notice that IT_EMP_DETAILS structure has got an alias “_IT_EMP_DETAILS” defined for it. We, for sure, did not define it. What happens is that if we are flowing function or parameter data to or from a CS attribute, and the data type of the parameter is a structure (i.e. SAPStructure or SAPTable) we will need to define an alias for this parameter. Doing so will identify and label this data structure in memory and allow the MA to find the named-structure easily when retrieving the field data. We do this by defining an alias for the parameter structure. Aliases can be created explicitly by a defining an alias in the configuration or automatically by the ERP Configuration Tool when its usage is implied and obvious. In our case, it was obvious, so the alias was created automatically when we did the first mapping of employeeNumber to IT_EMP_DETAILS.PRI_EMPNUM. From this explanation, it is clear that it is as much important that we need the alias for IT_EMP_DETAILS as it is that we need to define the anchor to be able to save the configuration file. Hence we’ll perform the next steps to temporarily remove the alias, set the anchor and then restore the alias back. - With IT_EMP_DETAILS structure selected, click Edit to launch the “Add or Edit Parameter Properties” dialog box.
![clip_image003[5] clip_image003[5]](https://msdntnarchive.z22.web.core.windows.net/media/MSDNBlogsFS/prod.evol.blogs.msdn.com/CommunityServer.Blogs.Components.WeblogFiles/00/00/01/41/71/metablogapi/7041.clip_image0035_thumb_22639FBC.png)
- Now delete the alias and perform the steps followed previously to set the PRI_EMPNUM as the parameter that defines the object. You should be able to save these changes.
![clip_image004[5] clip_image004[5]](https://msdntnarchive.z22.web.core.windows.net/media/MSDNBlogsFS/prod.evol.blogs.msdn.com/CommunityServer.Blogs.Components.WeblogFiles/00/00/01/41/71/metablogapi/5381.clip_image0045_thumb_62C6169E.png)
- Then edit IT_EMP_DETAILS structure and type out _IT_EMP_DETAILS as the Alias. Note than Alias name is completely arbitrary and we could have chosen any other name for the alias.
![clip_image005[5] clip_image005[5]](https://msdntnarchive.z22.web.core.windows.net/media/MSDNBlogsFS/prod.evol.blogs.msdn.com/CommunityServer.Blogs.Components.WeblogFiles/00/00/01/41/71/metablogapi/0511.clip_image0055_thumb_76332AA5.png)
- Click OK to get us back to the “Edit Function Properties” screen.
![clip_image006[5] clip_image006[5]](https://msdntnarchive.z22.web.core.windows.net/media/MSDNBlogsFS/prod.evol.blogs.msdn.com/CommunityServer.Blogs.Components.WeblogFiles/00/00/01/41/71/metablogapi/6864.clip_image0065_thumb_680415DB.png)
- Click OK to get us back to the “Edit Operation” screen.
![clip_image007[5] clip_image007[5]](https://msdntnarchive.z22.web.core.windows.net/media/MSDNBlogsFS/prod.evol.blogs.msdn.com/CommunityServer.Blogs.Components.WeblogFiles/00/00/01/41/71/metablogapi/5488.clip_image0075_thumb_766EEC33.png)
- Click Next to get us to the Summary Page.
![clip_image008[5] clip_image008[5]](https://msdntnarchive.z22.web.core.windows.net/media/MSDNBlogsFS/prod.evol.blogs.msdn.com/CommunityServer.Blogs.Components.WeblogFiles/00/00/01/41/71/metablogapi/1565.clip_image0085_thumb_7AF4D120.png)
- Click Finish. Now we should be able to save the configuration. However, in our case, if you recall, our BAPI ZBAPI_FETCH_EMPLOYEE_DETAILS expects a RECORD_DATE as an input. So let’s configure that first. Since this is a Full Import operation, we’ll be passing a very old date 01.01.0000 as the record date.
- Launch the "Add or Edit Operation Wizard" and then launch the “Add or Edit Function Properties” form:
![clip_image001[7] clip_image001[7]](https://msdntnarchive.z22.web.core.windows.net/media/MSDNBlogsFS/prod.evol.blogs.msdn.com/CommunityServer.Blogs.Components.WeblogFiles/00/00/01/41/71/metablogapi/7345.clip_image0017_thumb_14F564B8.png)
- Click Add button to open “Add or Edit Parameter Properties” form. Type 0000.01.01 as the value for RECORD_DATE.
![clip_image002[7] clip_image002[7]](https://msdntnarchive.z22.web.core.windows.net/media/MSDNBlogsFS/prod.evol.blogs.msdn.com/CommunityServer.Blogs.Components.WeblogFiles/00/00/01/41/71/metablogapi/8103.clip_image0027_thumb_6D5E4CB3.png)
- Click OK to close the form. The parent screen will look like below. Note that though we entered the date in the Value field, it appears in the “Alias” column. That is just how it is displayed on these forms.
![clip_image003[7] clip_image003[7]](https://msdntnarchive.z22.web.core.windows.net/media/MSDNBlogsFS/prod.evol.blogs.msdn.com/CommunityServer.Blogs.Components.WeblogFiles/00/00/01/41/71/metablogapi/7851.clip_image0037_thumb_1C5062BE.png)
- Click OK to close the “Add or Edit Function Properties” form.
![clip_image004[7] clip_image004[7]](https://msdntnarchive.z22.web.core.windows.net/media/MSDNBlogsFS/prod.evol.blogs.msdn.com/CommunityServer.Blogs.Components.WeblogFiles/00/00/01/41/71/metablogapi/1588.clip_image0047_thumb_100E9CFD.png)
- Click Next, review the summary page and finish the wizard. Now we have fully configured the Full Import operation for employee objects and ready to save the configuration.
- We need to save the configuration to the FIM Sync Service Extensions folder and save it with the name that we want to use it for our MA name. We’ll create the MA by the name “SAPHR Employee MA”, so we’ll save the configuration with the same name. The name must not be SAPMA to avoid conflict with the existing assembly in the Extensions folder.
![clip_image005[7] clip_image005[7]](https://msdntnarchive.z22.web.core.windows.net/media/MSDNBlogsFS/prod.evol.blogs.msdn.com/CommunityServer.Blogs.Components.WeblogFiles/00/00/01/41/71/metablogapi/0027.clip_image0057_thumb_3F6CE5FC.png)
We can notice that saving the configuration creates following three files in the Extensions folder:
- SAPHR Employee MA.xml
- SAPHR Employee MA-schemaAttributes.xml
- SAPHR_Employee_MA.dll
The first xml file is our source code, the second xml file is meant to be provided as an input during the configuration of our management agent while the third DLL file is our compiled binary assembly needed at our management agent run time. The first two .xml files are not needed at run-time so can be removed from the Extensions folder after use.
We can also configure the Delta operation making use of the same BAPI and following the same steps. The only difference here would be to pass ma.lastrundate from the Reference drop-down as the RECORD_DATE instead of hard-coded values of 0000.01.01.
For the sake of completeness, the following screenshot sequence depicts the configuration of SAPHR Employee MA.
- On Create Management Agent page, we specify the MA name exactly same as used for saving the configuration files. We also make sure we select x86 as the Process Architecture.

- On Configure Connection Information page, we specify the correct connection string and user credentials.
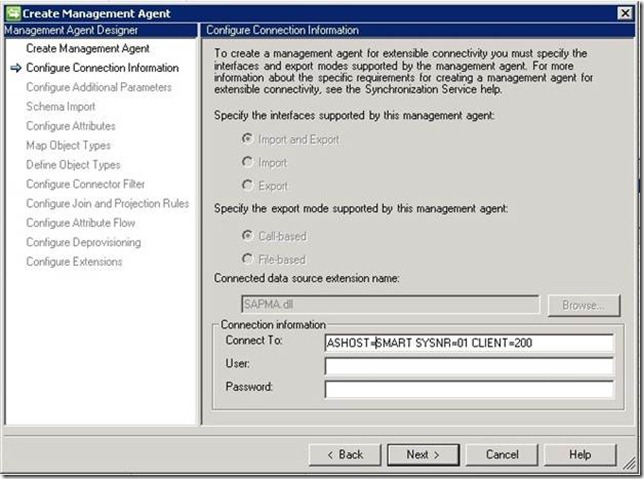
- On Configure Connection Information page, we will not specify anything. With a custom BAPI returning all records in a single call, my experience is we can fetch 150K-200K records in 90 min or so, so pagination support is generally not needed.

- On Schema Import page, we will specify the schema file generated by the ERP MA Configuration Tool.

- On Configure Attributes page, we need not make any change.

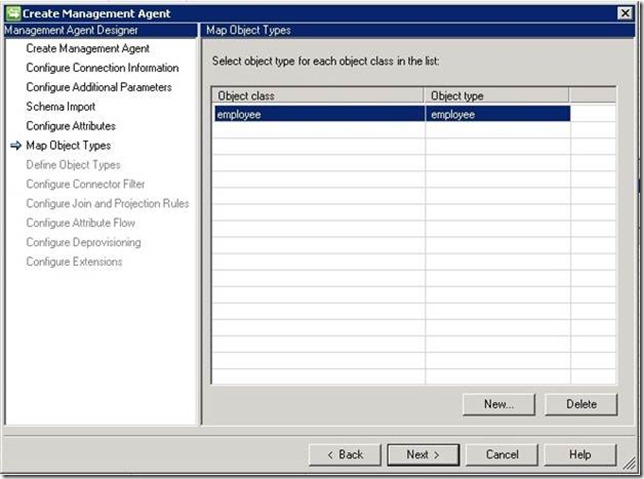
- On Map Object Type page, we need not make any change.
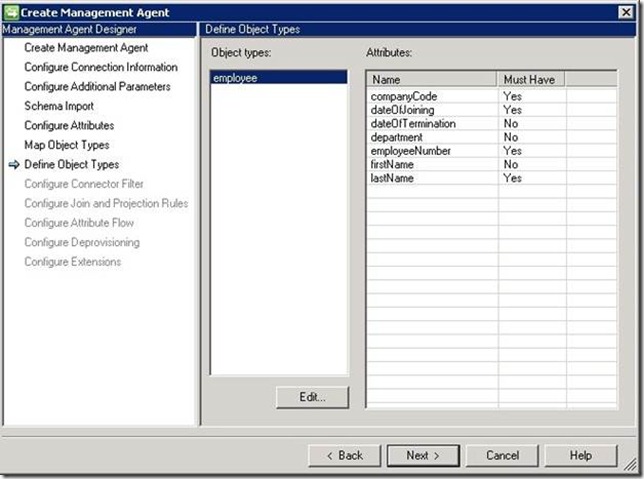
- On Define Object Type page, we need not make any change.
- On Configure Connection Filter page, we need not make any change.

- On Configure Join and Projection Rules page, we can define any rules or leave them undefined here and define is using the declarative provisioning in FIM Portal.

- On Configure Attribute flow page, we can define any flow rules or leave them undefined here and define is using the declarative provisioning in FIM Portal.

- On Configure Deprovisioning page, we will keep the default option.

- On Configure Extensions page, we will disable the password management as have just Full and Delta import operation defined in our ERP MA configuration.

Now we are ready to configure a couple of run profiles and see if we get the data in the SAP MA’s connector space.
Comments
- Anonymous
December 10, 2012
Can you please tell me when I am setting delta sync for SAP management agent, what SAP guys specifically do on their side. I am getting missing chang type error. Sankar Mana smana@deloitte.com
