Adding an already running VM in Virtual Machine Manager to a Windows Azure Pack Subscription
Hi Again
One thing I get asked quite often; is it possible to add an already running VM to a subscription in Windows Azure Pack (WAP), so it shows up in the WAP Tenant portal?
Scenario:
The blog post will have two scenarios:
Scenario1:
"A tenant has signed up a subscription and just migrated 2 Virtual Machines from on premise to service provider environment and as a service owner we want to assign those 2 VMs under his subscription"
I have two VMs called Contoso101 and Contoso102 running in Virtual Machine Manager (VMM) which I would like to add to my new WAP subscription.
Scenario2:
After the two VMs are added to the subscription we are going to give a co-worker at the Tenant access to the two VMs in the WAP Tenant Portal.
Solution:
Windows Azure Pack & Service Provider Foundation (SPF) allows tenants to access their VMs using subscription which are registered in VMM as user role and has access to the Cloud assigned for that subscription (plan).
For a VM to show under a subscription the following needs to happen:
- The VM must be a member of the Cloud for which the Subscription (Plan) uses in Windows Azure Pack.
- The VM Owner and User Role must be set to the tenant in WAP and user role for that subscription in VMM.
To add an already running VM to a WAP subscription do the following:
Log in into the WAP tenant portal with the credentials of a tenant administrator that has an active subscription. (e.g. admin@contoso.com)
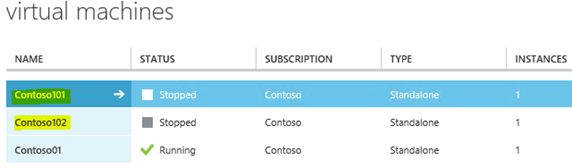
Select VM Clouds and verify that the VM(s) you want to move are not already showing and that minimum one VM is running under the subscription.
We are using the running VM to make sure we extract the right information to move the two VMs to the subscription.

Figure 1: VM running under Contoso subscription in the WAP Tenant Portal
Close the WAP Tenant Console.
Open the WAP Admin Portal and login as an administrator.
Select Plans.
Select the plan that the VMs should be added to. (e.g. Contoso).
Select Virtual Machine Cloud.
Note the VMM Management Server and Virtual Machine Cloud for the VM Cloud Plan as we will use this later. (e.g. vmm01.contoso.com and Contoso).

Figure 2: VMM Server and Cloud used by a VM Cloud Plan in WAP
Click the "back arrow" to get back to Plans.
Select Subscriptions.
Notice the user for the subscription, as we will use this later (e.g.: User: admin@contoso.com).

Figure 3: Plan and user showing for a subscription in the WAP portal
Login to the WMM Server as VMM Administrator.
Start the VMM Console.
Select VMs and Services.
Select Clouds.
Select the Cloud for which the WAP VM Cloud Plan is mapped (e.g. Contoso).
Right Click on a Virtual Machine which was showing in the WAP Tenant Portal and select Properties.

Select Access in the left menu
Note the Self-service Owner (e.g. admin@contoso.com (admin@contoso.com_4afe55ef-c171-4b48-8a02-97aee2e7ed34))

Click Ok to close the VM Properties.
Click on All Hosts.
In the search windows search for the VMs you would like to add to the WAP subscription (e.g. Contoso1).
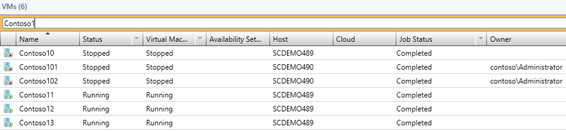
Note: In the list above, two VMs are showing that does not belong to a cloud. (Contoso101 and Contoso102).
Right click on the first VM and select Properties (e.g. Contoso101).
Under General select the Cloud (from the drop down) which the VM should belong to, according to the WAP Plan. (E.g. Contoso).
Click OK.
Do the same for the other VM (e.g. Contoso102).
Click on the Cloud that the VMs were assigned to under Clouds and verify that the VMs have been added.

Open a VMM PowerShell windows from the start menu.
Connect to VMM Server by using the ForOnBehalfOf parameter in VMM, this will allow you to make use of tenant users in VMM and setting the owner for a VM, for a user which is not in AD.
Run the following command:
$SCVMMSERVER = Get-SCVMMServer -ComputerName vmm01.contoso.com -ForOnBehalfOf
We want to take the following properties from the already running VM in the cloud and save them to the following variables:
Owner
User Role
Run the following command to extract the needed information from the VM which is already running under the WAP Tenant Subscription (e.g. Contoso01):
get-vm -name contoso01 |ft name, selfserviceuserrole, owner

Set the variables for the VMs, where Contoso01 is the VM currently running in the WAP Tenant Portal and Contoso101 is the VM we would like to move to the WAP Subscription.
$vmnamesource = "contoso01"
$vmnametarget = "contoso101"
$vminfo = Get-SCVirtualMachine -name $vmnamesource
$vmowner = $vminfo.owner
$vmselfserviceuserrole = $vminfo.selfserviceuserrole
Set the Owner and the self-service user for the VM by running the following command:
Set-SCVirtualMachine –VM $vmnametarget –UserRole $vmselfserviceuserrole –Owner $vmowner

Verify the result in VMM.

To move Contoso102 VM to the Contoso subscription just set the $vmnametarget variable to contoso102 and run the command again.
$vmnametarget = "contoso102"
Set-SCVirtualMachine –VM $vmnametarget –UserRole $vmselfserviceuserrole –Owner $vmowner

Open the WAP Tenant Portal.
Login in as the subscription admin (e.g. admin@contoso.com).
Select Virtual Machines.
Verify that the two new VMs shows in the list of VMs.
Click Start and verify that the VM performs the action

In the VMM Console verify that the two VMs are in fact running.

Adding a co-administrator to a subscription
The second part of the scenario is to add a co-administrator the Contoso subscription, so this user also can access the cloud resources under the Contoso subscription. To do this perform the following steps:
Login to the WAP Tenant Portal as the Subscription owner of a plan.
Click My Account.
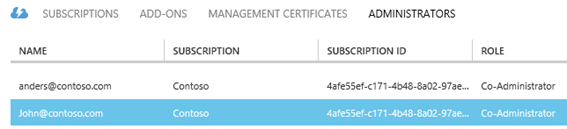
Click Administrators.
Click Add from the bottom menu.
Write the e-mail of the user you would like to be a co-administrator (e.g. john@contoso.com).
Select the Subscription(s) that you would like the co-administrator to have access to.
Click OK.
Verify that the new user shows in the list.
Sign Out from the tenant portal.

Click Sign in back to Service Management Portal.
Select

Provide the user name created earlier (e.g. john@contoso.com).
Provide a password and click sign up.
Complete the Welcome Screen wizard.
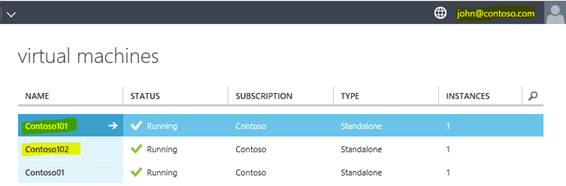
Click Virtual Machines.
Verify that you have the same list of VMs as the subscription owner.
Close the WAP Tenant portal.
Hope this blog post helps you with adding already running VMs in Virtual Machine Manager to a Windows Azure Pack subscription and how it's possible to also add a Co-Administrator to a subscription.
While writing this blog post I stumbled over another blog post from an MVP (Hans Vredevoort), which has a similar approach to the VM scenario which can be viewed here.
Hans Vredevoort is also one of the people behind WAP Wiki blog that brings a good overview of WAP Blog Posts that can be found on the Internet, the Wiki can be found here.
Happy moving VMs to a WAP Subscription.
Comments
- Anonymous
January 01, 2003
As per the instructions in point:
18. Note the Self-service Owner (e.g. admin@contoso.com (admin@contoso.com_4afe55ef-c171-4b48-8a02-97aee2e7ed34))
I am unable to add with the GUID but only with the domain user, the guid that I copy form the portal and try to find to add it, does not resolve - Anonymous
December 15, 2013
Pingback from Saturday, December 14, 2013 on #WindowsAzure | Alexandre Brisebois - Anonymous
December 15, 2013
Pingback from Saturday, December 14, 2013 on #WindowsAzure | Alexandre Brisebois - Anonymous
December 19, 2013
Over the last two “Best Practices” posts, I’ve looked at how to Plan and Build a Hybrid Cloud, and with - Anonymous
December 19, 2013
Pingback from Success with Hybrid Cloud: Best Practices for Deploying a Hybrid Cloud - Anonymous
December 20, 2013
Pingback from Windows Azure Pack Blog Post Overview on Building Clouds & TechNet - Building Clouds Blog - Site Home - TechNet Blogs - Anonymous
December 31, 2013
Hallo Community, heute gibt es wieder einen Auszug aus dem neuen Microsoft TechNet Newsflash. Der Auszug - Anonymous
December 31, 2013
Hallo Community, heute gibt es wieder einen Auszug aus dem neuen Microsoft TechNet Newsflash. Der Auszug - Anonymous
January 06, 2014
Pingback from Windows Azure Pack Blog Post Overview on Building Clouds & TechNet - Anonymous
January 15, 2014
Microsoft’s Anders Ravnholt posted a great article on how to add an already running VM in Virtual - Anonymous
March 21, 2014
在上两篇“最佳实践”文章中,我讨论了如何 规划 和 构建 混合云,完成这些技术练习之后,本文将着重探讨部署这一精心设计且构建的混合云的最佳实践。
本文将介绍一些关键的部署项目 - Anonymous
June 02, 2014
原文链接: http://blogs.technet.com/b/privatecloud/archive/2013/12/05/adding-an-already-running-vm-in-virtual - Anonymous
August 05, 2014
It looks like the VMSelfServiceUserRole is a combination of owner and subscription ID, is there any way of doing this without needing to copy it from another VM?
I tried to manually add it, but get an error stating 'cannot convert value of type "System.String" to type "Microsoft.SystemCenter.VirtualMachineManager.UserRole"...
Help? :) - Anonymous
August 25, 2014
Hi,
I have tried the same operation as Ryan and also get the error as mentioned by Ryan.
Set-SCVirtualmachine -VM $VMName -UserRole $UserRole -Owner $Owner
Ftm we don't have enabled VM creation by tenants in our Enterprise so I can't copy past from existing VM.
Please advice how to put Owner and Role to a VM. - Anonymous
September 07, 2014
As per step 18. Note the Self-service Owner (e.g. admin@contoso.com (admin@contoso.com_4afe55ef-c171-4b48-8a02-97aee2e7ed34))
I don't get the email address, it checks only for the domain name contosoadmin and not the email address - Anonymous
October 02, 2014
Hi Anders,
Mine is having the same scenario as Joe, which we don't have an enabled VM created by tenants. I too, encountered the same error as other 'cannot convert value of type "System.String" to type "Microsoft.SystemCenter.VirtualMachineManager.UserRole"...
I broke up the parameters and found out that only the -UserRole has an error. The -Owner works fine.