Migrating Azure IaaS SQL Server AlwaysOn Cluster to Premium Storage (Classic)
Microsoft recommends the use of Premium Storage for optimal performance of SQL Server on Azure Virtual Machines. If you are running a SQL Server AlwaysOn environment on Standard storage, you might plan to migrate your environment to Premium Storage. This Step-by-Step guide will describe how to migrate to Premium Storage an existing SQL Server AlwaysOn Cluster built on Azure VM (IaaS), reducing the down time to its minimum.
This blog article will cover infrastructures deployed with Classic deployment model. Microsoft recommends that most new deployments use the Resource Manager model.
The scenario covered here is responding to the following constraints:
- Keep the original FQDN for the cloud service.
- Reduce the downtime as much as possible.
- Use a single subnet.
Introduction
In this guide it will be assumed to have an initial configuration similar to the one described below.
[caption id="attachment_265" align="aligncenter" width="291"]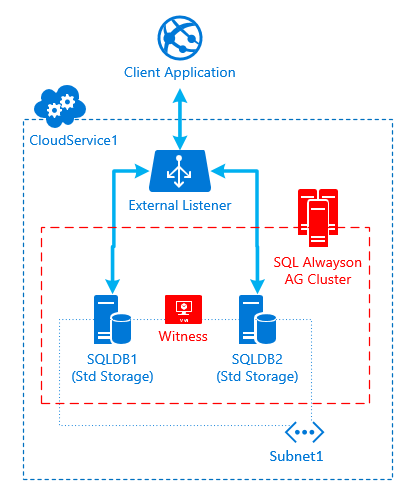 Fig.1 Initial Configuration[/caption]
The Client Application connects to the SQL AlwaysOn AG Cluster through the External Listener. The AG cluster is composed by node SQLDB1 and SQLDB2, both running on Standard Storage and connected to the Subnet1 of the same VNet. Both VMs are running under the same cloud service, in the example called "CloudService1". A Failover Witness is also configured, which might be an additional cluster node or a File Share Witness (not relevant for the scenario).
The idea of this solution is to keep the existing cluster nodes running as long as possible, meanwhile the 3rd and a 4th nodes are created with Premium Storage and then added to the Cluster. In this way the HA requirements will still be met. This intermediate situation is described by fig 2.
[caption id="attachment_275" align="aligncenter" width="457"]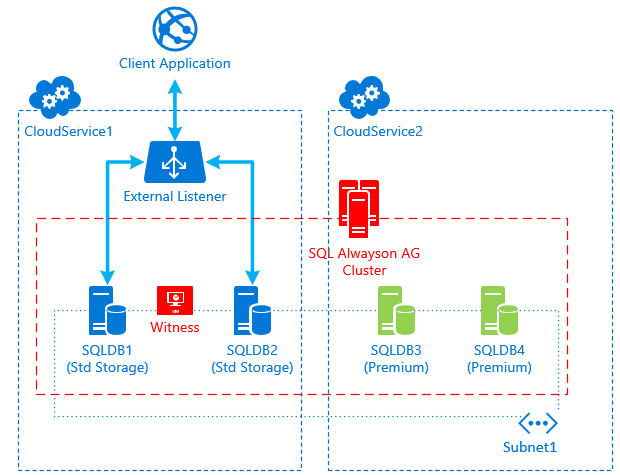 Fig2. Intermediate Situation[/caption]
NOTE: for a certain amount of time, there will be 4 AlwaysOn replicas running together. This time depends on the time necessary to configure the new nodes plus the time necessary for restore each DB in the Availability Group on the new nodes.
Please, evaluate the impact on costs accordingly.
Abstract
The process is divided into 4 stages.
In stage 1 node SQLDB3 and SQLDB4 will be created as DS-Series VMs with Premium Storage under a separated cloud service "CloudService2". These nodes will be configured as 2 additional SQL AlwaysOn Secondary Replicas of the same AG Cluster. Both VMs will be also connected on the same Subnet1 as the existing nodes.
Note: It is required to have 2 IP Addresses available from the Subnet.
In case there are no more available addresses, since it is not possible to resize the address space configuration of an existing Subnet unless it is empty, the only option would be to locate 2 resources and move them on a different subnet.
Stage 1 completes as soon as the 4 nodes will be all fully synchronized (the 4th node will actually be on status "Synchronizing", as only a maximum of 3 replicas can be set to "synchronous replication" at the same time.
In Stage 2, the the initial 2 nodes will be removed from the AG Cluster while the new nodes will become primary replica and synchronous secondary replica.
In our scenario, it will be assumed that the existing CloudService1 does not support DS-Series VMs, therefore the new nodes have to be created on a separated new cloud service: “CloudService2”.
For classic deployments, there is a high chance that the allocation request to create DS VMs on the existing cloud service might fail. The allocation request is actually submitted to the specific cluster in the Azure datacenter that was uniquely associated to the cloud service, when it was created the first time. If the type of resource requested (DS VMs requires specific hardware to run Premium Storage) is not supported by that cluster, the allocation request then fails. This behavior is known as “Cluster Pinning” and it is documented in this article: “Troubleshoot allocation failures when you create, restart, or resize Windows VMs in Azure”.
As a consequence, since node 3 and 4 do not belong to CloudService1, they cannot be addressed by the existing External Listener, hence the AG Listener will only be able to automatically failover between node 1 and 2.
In stage 3 the behaviour explained above will be hanlded. All 4 VMs will be destroyed by keeping their disks. The cloud services will be removed as well, but the CloudService1 will be eventually be recreated within the re-deployment of nodes 3 and 4, and keep the original FQDN of the cloud service 1, leaving the client configuration unchanged.
These steps are necessary in order to keep the original FQDN of the cloud service 1 and leave the client configuration unchanged. The final configuration is described by fig 3.
[caption id="attachment_285" align="aligncenter" width="304"]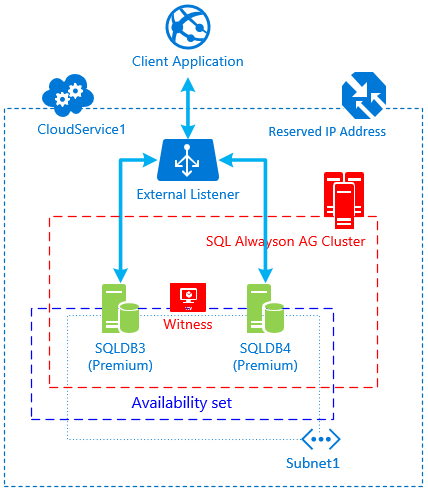 Fig.3 Desired Configuration[/caption]
In Stage 4 we will finalize the migration by ensuring that node 3 and 4 will run under the same Availability Set and that the cloud service will be configured with a resered IP Address.
Final step will be to recreate the External Load Balancer and the AG Listener.
Stage 1: Adding the new nodes to the AlwaysOn AG Cluster
Create the new DS-Series VMs on the same VNet/Subnet of the existing replicas. Select a new cloud service name, i.e. “CloudService2”.
Use an existing Image from the Azure Gallery with SQL Server already installed, or perform a manual installation of SQL Server (Enterprise Edition) on a Windows Server VM. It is important to run the same SQL Server version on all replicas.
Provision a SQL Server virtual machine in the Azure PortalIt is recommended to have a separated storage account for each VM in the same Availability Set.
This will reduce the impact of a potential service interruption event affecting the cluster on which your storage account is located.
Having the VMs running on different storage clusters, will reduce the probability to have the storage layer acting as a single point of failure.
I.E.:
For the SQL Server Availability Set:Node SQLDB3 --> storage account name = a0xstorageccountsqldb3 Node SQLDB4 --> storage account name = b9fstorageccountsqldb4Each storage account name should have a 3-digits prefix created by a custom hash function.
This hash prefix has the purpose to influence the allocator to most likely put the desired storage account in a different storage cluster. It might be necessary to recreate the storage account wiht a different hash prefix, in case it will be cretaed on the same storage cluster.
In order to check which storage cluster your storage account lays on, you can run the following command:nslookup storageaccountname.blob.core.windows.netThe results will show the actual cluster name. I.e:
blob.db5prdstr04a.store.core.windows.net"db5prdstr04a" is the actual storage cluster name.
For a full comprehension of this behavior, refer to this article:
Microsoft Azure Storage Performance and Scalability Checklist - AllServicesThis guide will assume that all VMs lay on the same subnet. Make sure that your subnet has 2 available IP Addresses available in its address space. In case you have no more available addresses, if possible, try to move 2 resources on a different subnet. Take in to account that you can’t resize the address space of an existing Subnet unless it is empty (no IP are assigned).Use this article to understand how to move VM to a different subnet:
How to move a VM or role instance to a different subnetAt a minimum, use 2 Premium Storage P20 disks where one disk contains the log file(s) and the other contains the data file(s) and TempDB.All details on performance optimization can be found on the following article: Performance Best Practices for SQL Server in azure Virtual Machines
It is recommended that, if possible, the file path (including the drive letter) of a given secondary database be identical to the path of the corresponding primary database. This is because if you move the database files when creating a secondary database, a later add-file operation might fail on the secondary database and cause the secondary database to be suspended.
Manually Prepare a Secondary Database for an Availability Group (SQL Server)Complete the configuration of the VM before joining it to the AG Cluster.
The following steps are taken and adapted from the following article:
Test Lab: Create an AlwaysOn Availability Group in Windows Azure End-to-End- Create firewall inbound rules for:
- TCP Port : 59999 (ILB probe port)
- TCP Port : 1433 (AG listener port)
- Program: sqlsrv.exe (SQL Server)
- Add server feature "Failover Clustering"
- Make sure that it is possible to run “nslookup” against the FQDN for the domain controller (i.e; dc1.contoso.com). If not, then you need either to set the DC as primary DNS for the VM, or add the DC as DNS server on the VNet:
Manage DNS servers used by a virtual network (VNet) - Join the VM to the Active Directory Domain and restart the VM
- Login as the built-in admin user and add a domain user to the VM local admins: In the Start menu, type “user“, then click Give administrative rights to a domain user.
- Connect to the SQL Server Instance and add the domain users as “sysadmins” role for the SQL Server Instance.
- From SQL Configuration Manager, set the SQL Server service account with the appropriate domain user.
- Assign a static IP to VM from one of the available addresses in the Subnet.
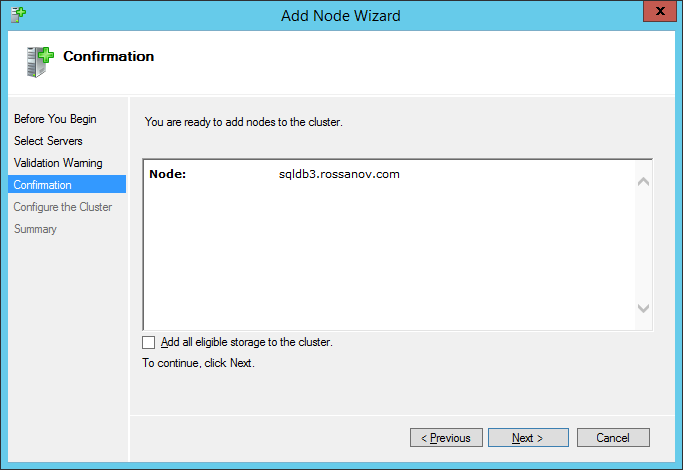
- Access to the Failover Cluster Manager and add node 3 to cluster:
 NOTE: disable “Add all eligible storage to the cluster”.
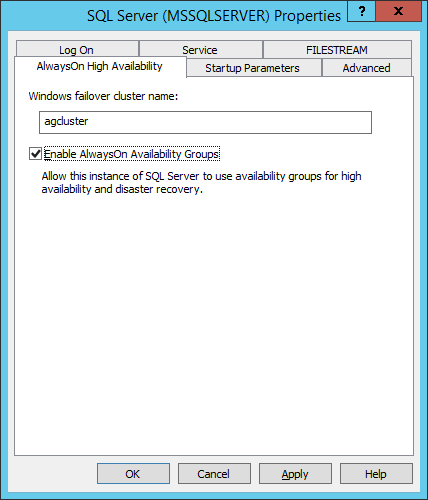
 - Connect to node 3 through RDP (use the domain user). From SQL Configuration Manager, open SQL Server Instance properties and enable AlwaysOn feature:

- Create firewall inbound rules for:
It is now possible to add the node as a secondary replica of the existing Availability Group. The below article explains in details how this operation should be done:
Add a Secondary Replica to an Availability Group (SQL Server)
Follow section : “Manually Prepare a Secondary Database for an Availability Group (SQL Server)”.
WARNING: this step could require very long time, depending on the amount of databases to restore and to their size.
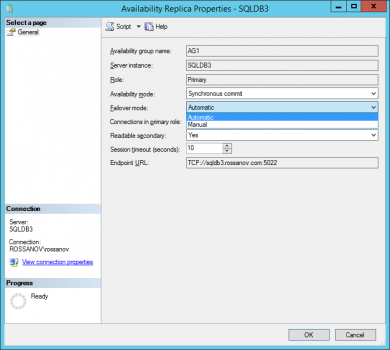
Node 3 should be configured as “Synchronous” replica in order to ensure no data loss. Manual failover will be required, since node 3 cannot be reached by the External Listener (and the LB). If the number of databases in the AG is too high, in order to prevent severe performance drain on the primary replica, the type of replication for node 3 can be set to “Asynchronous”, with risk of data loss.Create an additional DS Series VM (node 4) and repeat all the above steps. Node 4 can be configured as “Asynchronous” replica with Manual Failover option.
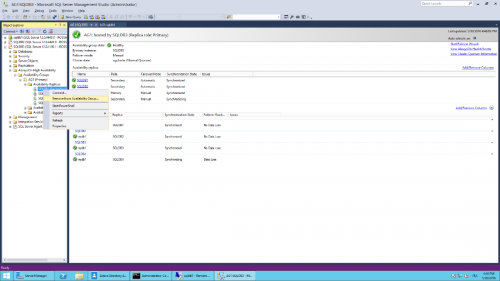
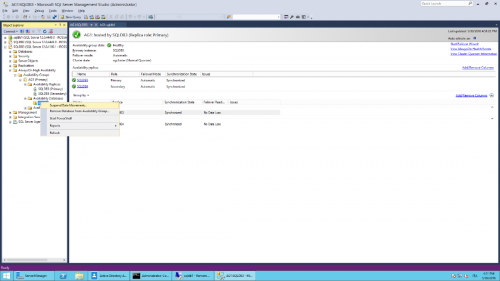
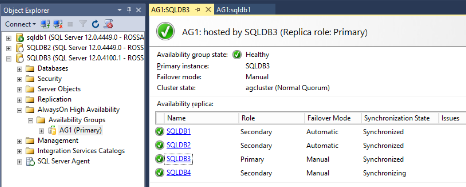
As soon as all the replicas will be fully synchronized, the situation on the AlwaysOn Dashboard should appear similar to the screenshot below:
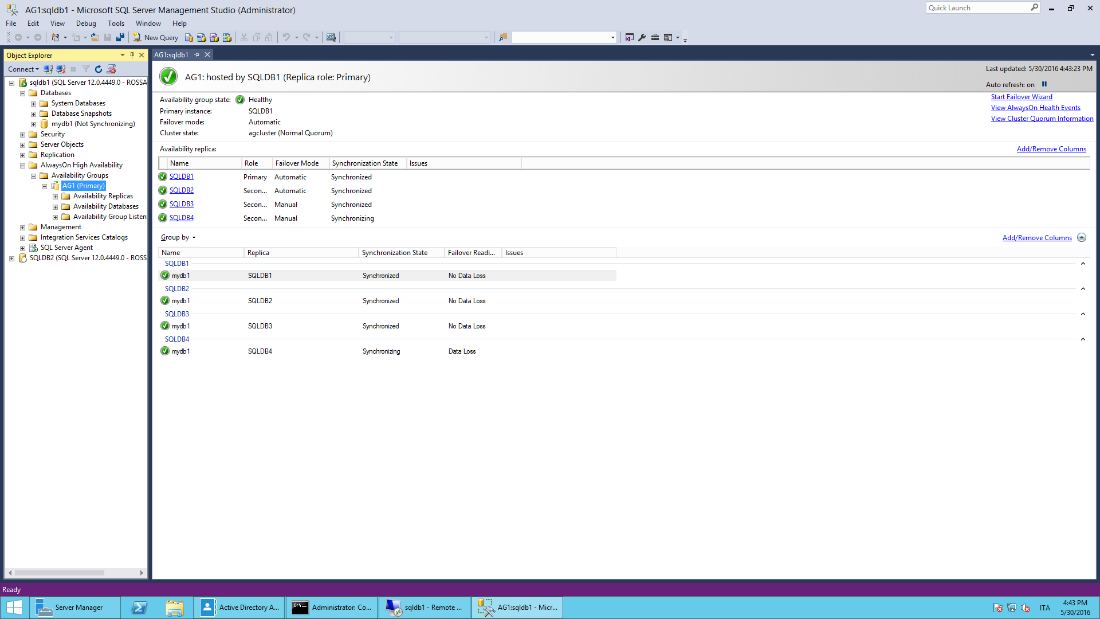 Note that SQLDB4 is being showed as "synchronizing" as it was configured as Asynchronous replica.
Stage 2: Reconfigure the AG Cluster
- Make sure that all the client applications are not reaching the DB. There should not be data modification from this point on.
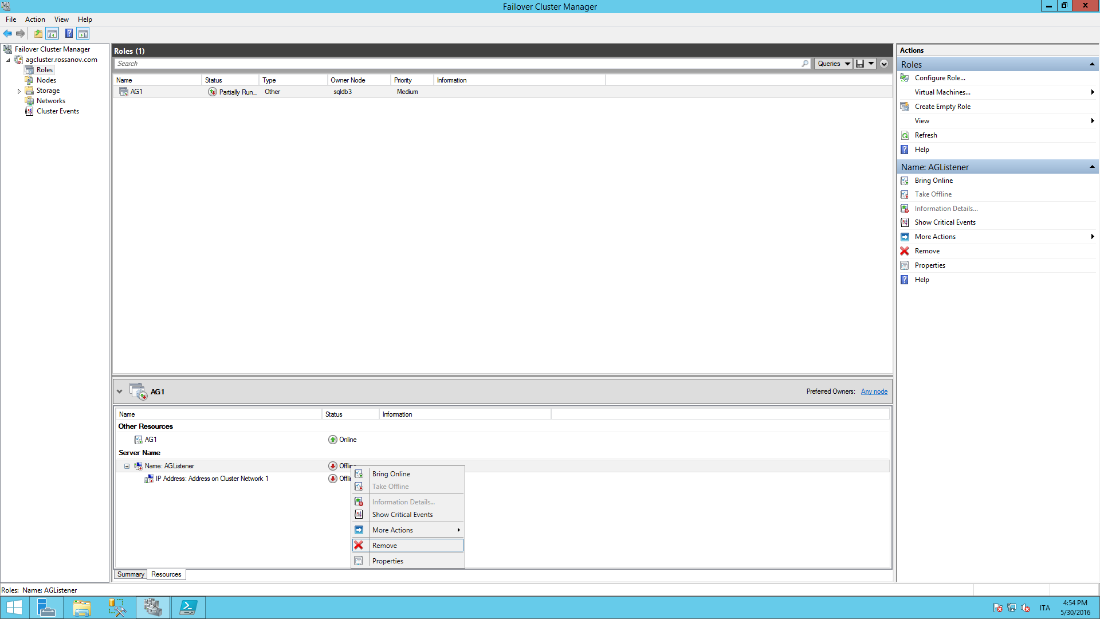
- From the Failover Cluster Manager, locate the resource related to the Availability Group, switch to “Resources” tab, right click on the client access point associated to the AG Listener and remove it (the AG Role will be brought offline due to its dependency on the Listener, you can ignore this now)

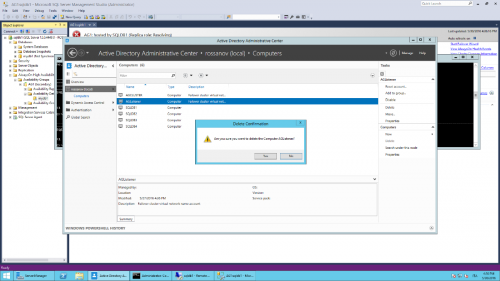
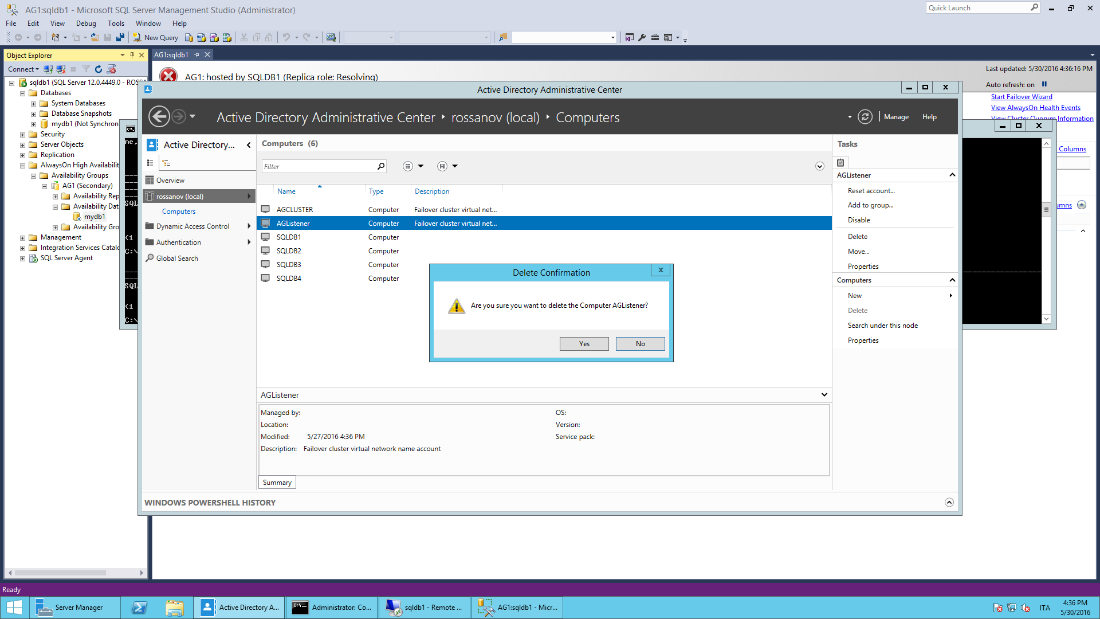
- On the Active Directory Domain Controller, open the AD Admin Center, locate “Computers” section and remove the computer object associated to the "AG listener".
- Connect with SSMS to the current primary node and perform a manual failover against node 3.

- Unjoin node 1 and 2 from AG (from SSMS connected to the primary role).
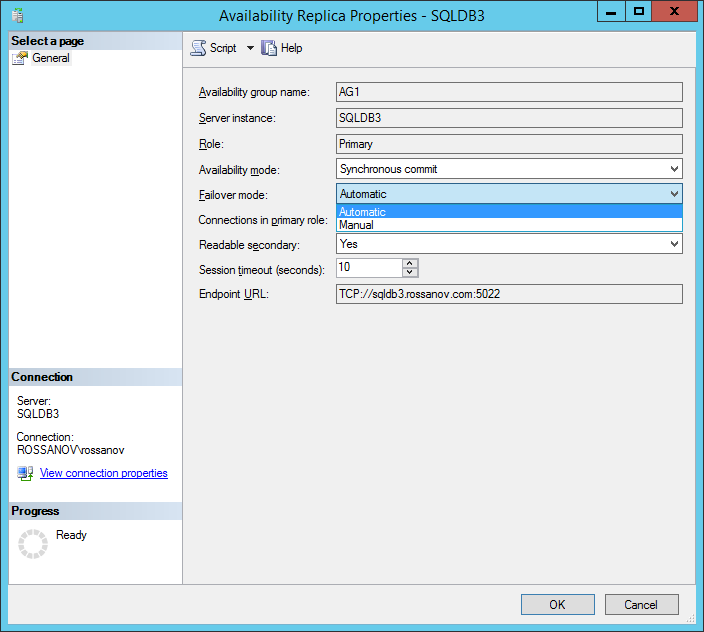
- Change failover mode to Automatic for node 3.
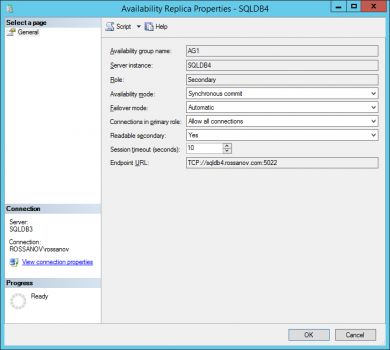
- Change availability mode to “synchronous commit” and failover mode to “Automatic” for node 4.
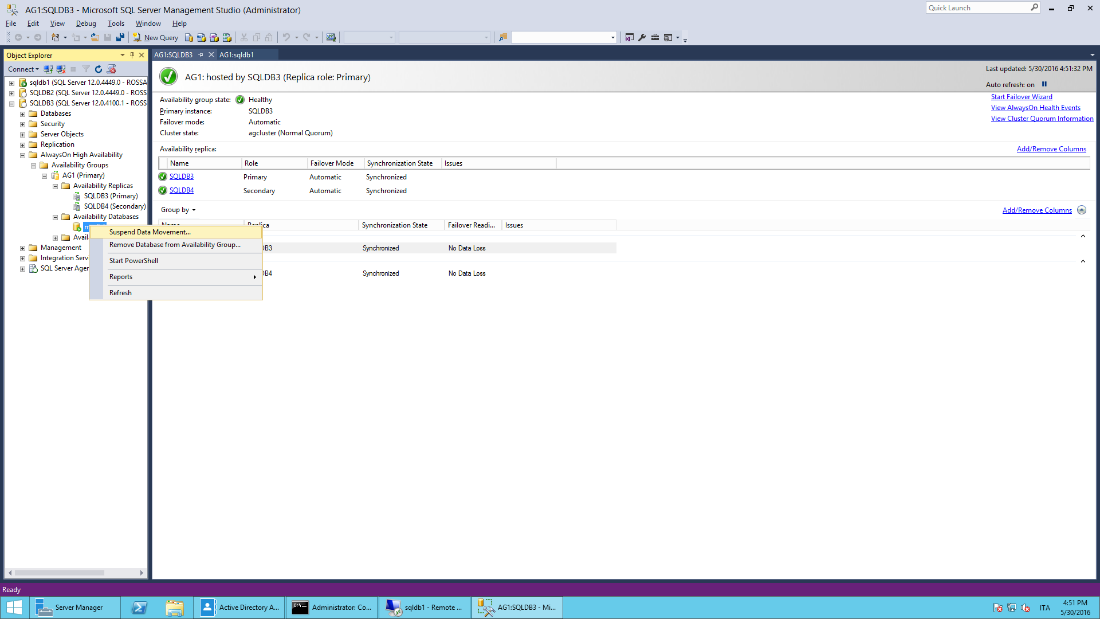
- Suspend data movement.
Availability group state will be set to Critical:
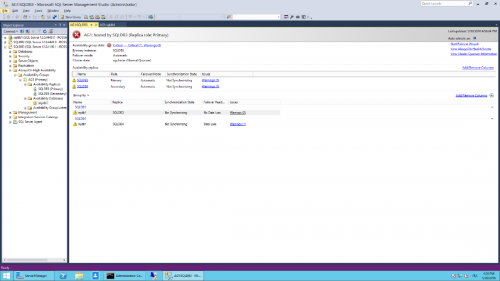
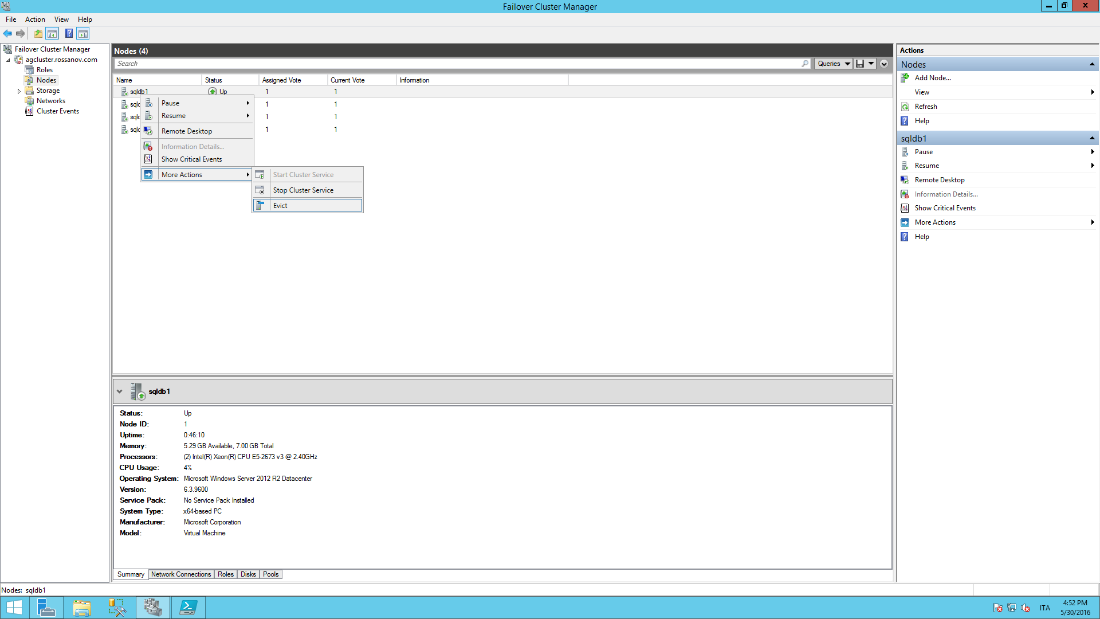
- Evict nodes 1 and 2 from the cluster.
From the Failover Cluster Manager locate the Nodes group, right click on Node 1, More Actions and Evict. Repeat for node 2.


Stage 3: Reconfigure the Cloud Service Deployments
Stop and deallocate all 4 VMs.
Run the PowerShell script below, to recreate the deployments. All nodes will be destroyed as well as the both cloud services.
Node 3 and 4 will be recreated on CloudService1.
Make sure that the variables are correctly set.#setup variables. Change these values accordinlgy to your environment $servicename1 = "CloudService1" $servicename2 = "CloudService2" $vmname1 = "sqldb1" $vmname2 = "sqldb2" $vmname3 = "sqldb3" $vmname4 = "sqldb4" $location = "North Europe" $actualvnetname = "the name of the VNET" #export VM configuration for node 3 and 4 on temporary folder. Export-AzureVM -ServiceName $servicename1 -Name $vmname1 -Path "C:\temp\$vmname1.config.xml" Export-AzureVM -ServiceName $servicename1 -Name $vmname2 -Path "C:\temp\$vmname2.config.xml" #backup VM configuration for node 1 and 2 Export-AzureVM -ServiceName $servicename2 -Name $vmname3 -Path "C:\temp\$vmname3.config.xml" Export-AzureVM -ServiceName $servicename2 -Name $vmname4 -Path "C:\temp\$vmname4.config.xml" #destroy all VMs (keeping the disks) Remove-AzureVM -Name $vmname1 -ServiceName $servicename1 Remove-AzureVM -Name $vmname2 -ServiceName $servicename1 Remove-AzureVM -Name $vmname3 -ServiceName $servicename2 Remove-AzureVM -Name $vmname4 -ServiceName $servicename2 #destroy all cloud services Remove-AzureService -ServiceName $servicename1 -Force Remove-AzureService -ServiceName $servicename2 -Force #import VM's config from xml file for node 3 and 4 $vms = @() $vms += Import-AzureVM -Path "C:\temp\$vmname3.config.xml" $vms += Import-AzureVM -Path "C:\temp\$vmname4.config.xml" #recreate the cloud service1 as empty New-AzureService -ServiceName $servicename1 -Location $location #Recreate VM 3 and 4 under CloudService1, on the specified VNet New-AzureVM -ServiceName $servicename1 -VNetName $actualvnetname -VMs $vmsFinal step: open SSMS, connect to node 3 and reactivate data movement (similarly to Stage 2 - step 8).
Stage 4: Finalize & Reconfigure External Listener
- Add VM 3 and 4 to a new Availability Set (AS) to ensure 99,95% HA as requested by Azure Service Level Agreement (SLA).
How to configure an availability set for virtual machines in the classic deployment model (Option 2) - It is recommended to reserve a Public IP Address to the cloud service and use it for the configuration of the Client Access Point. This will prevent the loss of the current VIP after an unexpected deallocation of all VMs under the same Cloud Service:
How to reserve the IP address of an existing cloud service - Follow the step-by-step guide below and reconfigure the external listener. In case you do not remember the probe port and listener port, you can open the XML configuration file exported from VM1 (Stage 3 - Step 2) and look after endpoint configuration.
Configure an external listener for Always On Availability Groups in Azure
Conclusion
The procedure described in this article has the purpose to help you organize your migration to Premium Storage with minimal impact on the Business Continuity.
Many steps were arbitrarely omitted, whereby a proper documentation is available.
In case you find any doubts or concern in the listed steps, please feel free to reach me out on this.
Thank you and have a nice time migrating to Premium!