Migrate Exchange On-Premise Mailboxes to Exchange online Using Cutover Migration. (Part I)
This blog covers insights about Cutover Migration and step by step process to Migrate your Exchange On-Premise Mailboxes to Exchange online. (Part I)
What is Cutover Migration :
Cutover Migration is one of the type of Exchange online migration where Mailbox are provisioned and corresponding mailbox content is migrated from Exchange on premise servers to Exchange online in single batch. It is the simplest way to get all your existing email into Office 365 and very suitable for the organizations who plan to move your entire email organization to Office 365 and manage user accounts in Office 365. Cutover migrations are supported for Exchange 2003, 2007,2010 and 2013 version of Exchange server.
Considerations:
- You can migrate up to 2000 mailboxes only.
- This migration method only moves mailboxes, mail users, mail contacts, and mail-enabled groups. Security Groups and system mailboxes are not Migrated.
- Cutover migration isn’t available for Microsoft Live@edu organizations.
- Partial Migration are not possible like folder exclusions , time range etc.
- Cache mode ost file of On premise mailboxes are not Migrated.
- Active Sync Devices need to reconfigure their profile post migration.
- Consider Time Factor to Migrate Mailbox Content
Preparation:
- Add your on-premises Exchange organization as an accepted domain of your Office 365 organization.
- Grant Full mailbox Access to Administrator Account (Admin who would be performing Migration) on User Mailboxes Which would be Migrated to Exchange online
- Ensure Windows Azure Active Directory Sync tool is Deactivated
- Disable Unified Messaging On on-premise Mailbox.
- Upto 2000 Mailboxes hosted on source onpremise Exchange server
- Configure and Validate if Outlook Anywhere is working well on your on-premises Exchange server.
How to check if Outlook Anywhere is functioning: Try any one of these methods to test your connection settings:
- Use the Microsoft Exchange Remote Connectivity Analyzer to test your connection settings. Use the Outlook Anywhere (RPC over HTTP) or Outlook Autodiscover tests
- Run Test-OutlookWebServices using on premise Exchange Powershell
- Check if User hosted on On premise Exchange server can Successfully Configure Outlook Profile outside the domain using Autodiscover.
- Run Test-MigrationServerAvailbility Powershell Command as mentioned below.
Launch Exchange Online PowerShell
$Credentials = Get-Credential
Test-MigrationServerAvailability -ExchangeOutlookAnywhere -Autodiscover -EmailAddress <email address for on-premises administrator> -Credentials $credentials
Example:
PS C:\Users\shahmul\Desktop> $Credentials = Get-Credential
PS C:\Users\shahmul\Desktop> Test-MigrationServerAvailability -ExchangeOutlookAnywhere -Autodiscover -EmailAddress alex@shahmul.msftonlinerepro.com -Credentials $Credentials
RunspaceId : 1ad9afcb-e806-47f2-aeca-e975b1efd980
Result : Success
Note: Your Outlook Anywhere configuration must be configured with a certificate issued by a trusted certification authority (CA). It can't be configured with a self-signed certificate.
How Cutover Migration process Works:
Here's some description about what all stuff happens when you kick the Cutover Migration.

The administrator creates and starts a cutover migration batch using the migration dashboard in the EAC or Shell.
Migration Service on Cloud makes a NSPI connection to the source server.
Once NSPI Connection is Successful after Batch is triggered- what now?
a) It uses the address book on your on-premises Exchange server to identify the mailboxes, distribution groups, and contacts that will be migrated to your Office 365 organization.
b) It provisions new Exchange Online mailboxes, It creates distribution groups and contacts
c) Exchange Online migrates mailbox data, which includes email messages, contacts, and calendar items, from each on-premises mailbox to the corresponding Exchange Online mailbox. This part is also called as Initial Synchronization.
key thing to note here it uses NSPI interface to provision Users, Groups, Contacts , whereas during Mailbox data Movement to cloud it uses RPC over HTTP connection.
4.Post provisioning process, and Mailbox Content is Moved to cloud. Exchange online sends status email to the Migration Admin which displays over all Migrations statistics like, Number of Mailbox Migrated successfully / Failed etc. along with 8 digit password per user
5.Once you discover the Mailbox are synced to Cloud in the Migration Dashboard, the mailboxes in the on-premises Exchange org. and the corresponding Exchange Online mailboxes start synchronizing every 24 hours. This process is called as incremental synchronization.
This means that any new messages sent to the mailboxes on the on-premises Exchange server are copied to the corresponding Exchange Online mailboxes. This incremental Sync continues until the administrator stops or deletes the migration batch.
Imp: During incremental synchronization, deletions made in an on-premises mailbox are synchronized to the corresponding Exchange Online mailbox. This means that if a user deletes an item from an on-premises mailbox that was previously migrated to Exchange Online, that item will be deleted from the Exchange Online mailbox
6.At this stage Mailbox are Migrated to Cloud and all users can successful log on to Exchange online mailbox. Admin updates Mx record to point to their Office 365 org. so that messages hit cloud mailbox directly instead of onpremise server.
7.After Mx record is updated and users on cloud are able to receive emails, Admin is all set to delete the Cut Over Migration batch and now On premise Exchange Mailbox stop Synchronizing to Exchange online Mailboxes.
8. At this point we seemed to be all good; However, there are few post migration tasks you need to take care of. you can refer my Post Migration Task section at the bottom part of this blog for more details.
What are Migration Steps :
This section will help you step by step how to migrate our on premise exchange Mailboxes to Cloud.
Log on to Office 365 Portal and Open Exchange Admin Center
Click New  and then click Migrate to Exchange Online
On the Select a migration type page, click Cutover migration, and then click Next. as per screen shot below

If outlook Anywhere is Configured Successfully on the Source Exchange Server,Connection settings are successfully discovered, the fully qualified domain name (FQDN) of your on-premises Exchange server and RPC proxy server are displayed on the Confirm the migration endpoint page. Verify the Settings and Click next as per Screen Shot below

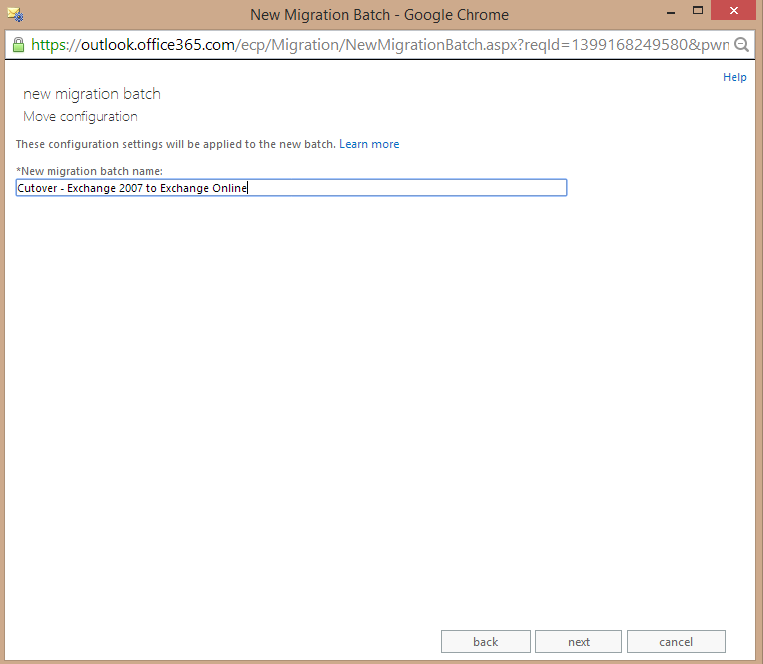
Enter Migration Batch Name and click Next.
On the Start the batch page, select the either of the option based on your migration Plan and click New

At this time the migration batch is displayed on the Migration Dashboard

You can also view the Migration batch and Migration Statistics details Using PowerShell
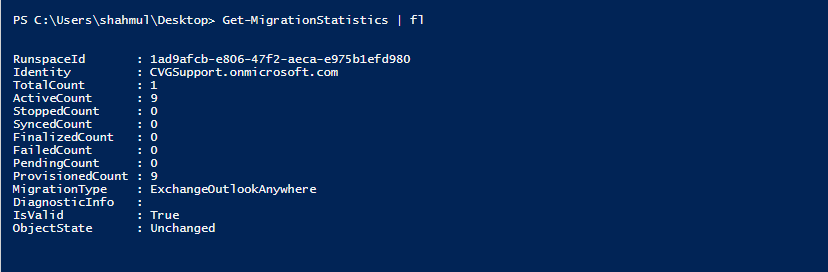
Syncing:

Synced:

Based on Size and Number of mailbox, Status will reflect as Syncing. Once all the users are provisioned and Mailbox content is migrated , Status changes to Synced.
At this stage , migration report is sent to the Administrator to review the Migration performance. if Report display's status as Complete, you are in good state :)
Now, that we have Migrated Mailboxes to Exchange Online, we still have some work to complete. If you noticed we have Mailbox residing on both places Exchange on premise and Exchange Online /DNS records still point to Exchange on premise Server and So called Migration batch still exists.
On premises Exchange mailbox and Exchange Online mailbox Sync once every 24 hours until you stop or delete the migration batch. Assuming that Mx record was still pointing to On premise Server , Users on Source server were still continue to receive emails and this emails gets Synced every 24 hour which needs to be fixed.
Post Migration Tasks
- Assign License to Users Provisioned In Exchange online Tenant.
- Configure Desktop Services
- Configure Autodiscover Record to Point to Office 365
- Configure your MX records to point to Office 365.
Once you change the MX record to point at Office 365, there is some DNS replication time. During this time, email will be delivered to either Exchange 2007 or Office 365. It’s important to keep your migration batch job running for up to 72 hours after switching the MX record.After you change the MX record and verify that all email is being routed to Exchange Online mailboxes, you're ready to delete the cutover migration batch.
Imp: When to Delete a Migration Batch:
- All users can successfully connect and user their Online Mailbox
- Emails is being sent directly to the Exchange Online mailboxes after you change your MX record to point to your Office 365 email organization.
- If you okay that after the batch is deleted, mail sent to mailboxes on the on-premises Exchange server will not be copied or Synced to the corresponding Exchange Online mailboxes.
Once DNS records are updated / Migration Batch is Deleted and after you verify that all email is being routed to Exchange Online mailboxes - you are almost Done!!. Its the time to decommission the On premise Exchange Server. However, Before we decommissioning your on-premises Exchange organization, we recommend that you contact Microsoft Support.
Common Error's and Troubleshooting : You can refer to my Part II section of this blog. https://blogs.technet.com/b/shahnawaz/archive/2014/05/12/part-ii-cut-over-migration.aspx which has got more insights about common error's and how to diagnose Cutover Migration Issues.
I hope you found this informative!!