Note
Access to this page requires authorization. You can try signing in or changing directories.
Access to this page requires authorization. You can try changing directories.
The other day I wanted a simple example on how to rotate a line from a center of an ellipse in a Windows Phone 7 Silverlight application. Much like a hand in a clock.
So I went about to do this and found that there are some good material out there. For example:
"Walkthrough: Creating a Silverlight Clock by Using Expression Blend or Visual Studio"
https://msdn.microsoft.com/en-us/library/bb404709(v=VS.95).aspx
but most of them contains a lot of code to make things look nice or required downloads of source code not related to the animation\rotation.
So this is my take on how to simply rotate a line in a clock like fashion.
Create a new Windows Phone 7 Silverlight application. Just add the following code for the Content Panel Grid:
<Grid x:Name="ContentPanel" Grid.Row="1" Margin="12,0,12,0" Loaded="onLoaded">
<Grid.Resources>
<Storyboard x:Name="ourStoryboard" >
<DoubleAnimation
Storyboard.TargetName="rotatingLineTransform"
Storyboard.TargetProperty="Angle"
Duration="00:00:15" RepeatBehavior="Forever" To="360" />
</Storyboard>
</Grid.Resources>
<!-- Ellipse is really not needed.
Included only for the line to have something to be related to -->
<Ellipse x:Name="outerEllipse" Width="200" Height="200"
VerticalAlignment="Top" HorizontalAlignment="Center"
StrokeThickness="4" Stroke="White"/>
<Rectangle x:Name="rotatingLine" Width="6" Height="100"
VerticalAlignment="Top" HorizontalAlignment="Center"
Stroke="Red" Fill="Red"
RenderTransformOrigin="0.5,1">
<Rectangle.RenderTransform>
<RotateTransform x:Name="rotatingLineTransform"/>
</Rectangle.RenderTransform>
</Rectangle>
</Grid>
Note that the Ellipse not needed, it is just there to act as a reference for the moving line.
Also note that the storyboard needs to be started (Begin()), this happens in, in this example, in the Loaded event of the Grid.
So add that event with the following code to the MainPage.xaml.cs:
private void onLoaded(object sender, RoutedEventArgs e)
{
ourStoryboard.Begin();
}
Now you should see something like this in Visual Studio:
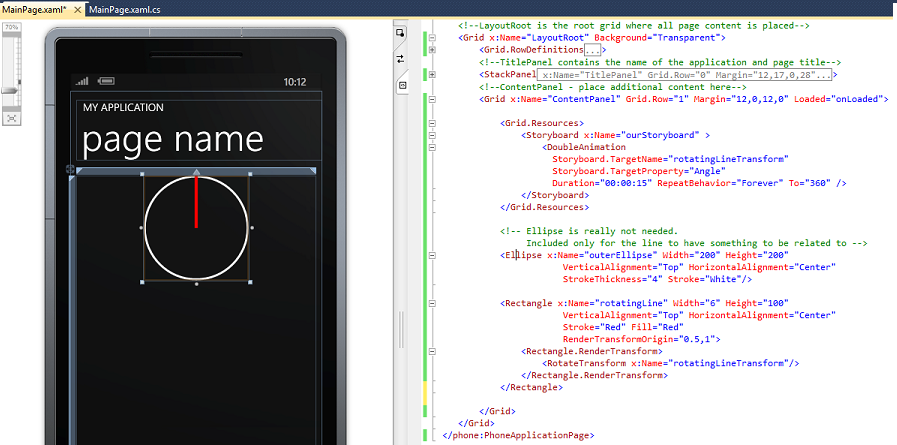
The thing of importance is the RenderTransformOrigin:
UIElement.RenderTransformOrigin Property
https://msdn.microsoft.com/en-us/library/system.windows.uielement.rendertransformorigin.aspx
This sets the point which the object rotates around. This is in relation to the bounds of the element.
This means in this case that it is set to:
The objects X property + 0.5 * the width. Which is 3 in this case (6 * 0.5)
The objects Y property + 1 * the height. Which is 100 in this case (100 * 1).
So this means that if we half the Height to 50 and set the RenderTransformOrigin to “0.5, 2” it will still rotate around the same point.
(If we would use half the height with the same RenderTransformOrigin ("0.5, 1") it would rotate around the end of the rectangle.)

Now just run the application and you should see the rotation in a clock like way.
Comments
- Anonymous
January 16, 2012
can you somehow escape or add quote or something to connect to a sqlserver which has a hyphen in the servername via sqlcmd Example: sqlcmd -S LOC-USR123MSSQLSERVER1 I get the error Sqlcmd: Error: Microsoft SQL Server Native Client 10.0 : A network-related or in stance-specific error has occurred while establishing a connection to SQL Server . Server is not found or not accessible. Check if instance name is correct and i f SQL Server is configured to allow remote connections. For more information see SQL Server Books Online.. Sqlcmd: Error: Microsoft SQL Server Native Client 10.0 : Login timeout expired