Note
Access to this page requires authorization. You can try signing in or changing directories.
Access to this page requires authorization. You can try changing directories.
This blog is part 4 of Automate Build and Deployment of Azure SQL Database with Continuous Integration and Continuous Deployment.
Content of Tutorial: Part 1. Prerequisite for Azure SQL Database Build and Deployment Automation Part 2. Automate Building Azure SQL Database with Continuous Integration Part 3. Create Nuget package for Azure SQL Database
Part 4. Orchestrate Azure SQL Database Release with Continuous Deployment (this page)
Part 5. Use your own Build and Deployment Agent
In part 4, we will play through how to automate release workflow for Azure SQL Database using continuous deployment. To successfully run this part, you must successfully run part 2 first.
In this scenario, I will use the following simplified release workflow.
- When a new build is successfully created, the database is automatically deployed to User Acceptance Test (UAT) server so that user acceptance test can be performed.
- Production server deployment is pending while UAT is in progress.
- When UAT is passed and approver signs off the deployment to PROD, deployment to PROD environment is executed.
In part 4, we will play through
- How to configure release environment and deployment workflow.
- How to configure deployment task.
- How to configure release trigger with continuous deployment.
Go to RELEASE page on your team project web portal and add new Release Definition by clicking +

Use Empty deployment template
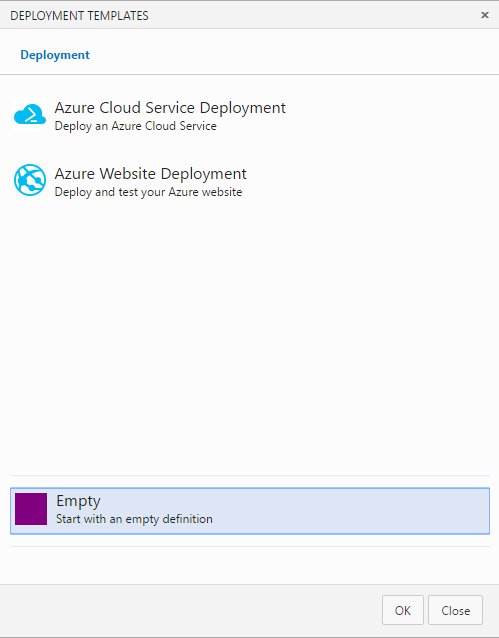
Provide a name for the definition.
Rename Default environment to UAT which represents User Acceptance Test environment in our scenario.
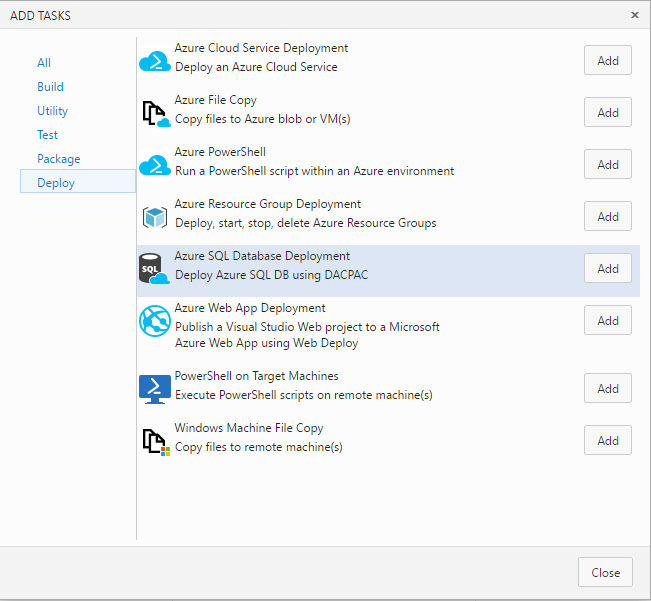
Click + Add tasks and add Azure SQL Database Deployment.
First, configure Deploy Azure SQL DACPAC task. It will start with following page.
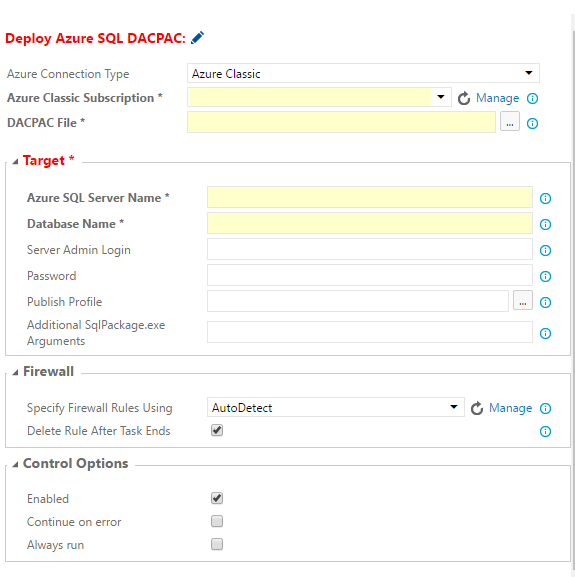
Click [Manage] for Azure Classic Subscription property. It will open Services control panel.
Click New Service Endpoint >> Azure Classic as shown below.
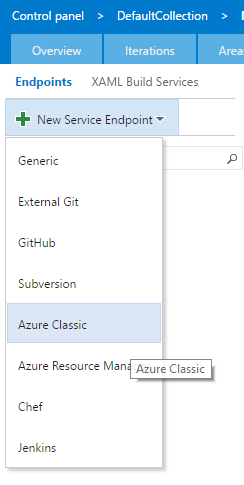
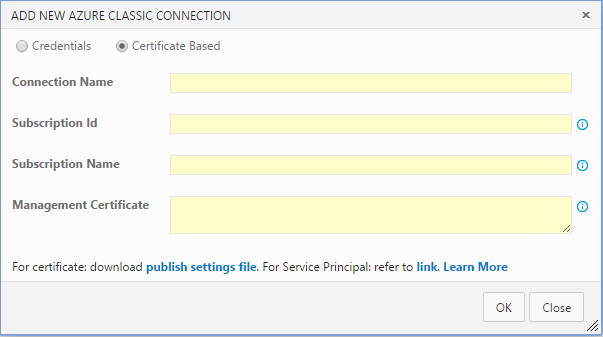
It will start ADD NEW AZURE CLASSIC CONNECTION page shown below.
Select Certificate Based and provide a name for the connection. e.g MyConnection
Get publish settings file by clicking download link at the bottom of the dialog and open the file. Copy and paste corresponding string values from the file to connection configuration dialog. Id, Name and ManagementCertificate.
Then click OK to create new connection.
 <?xml version="1.0" encoding="utf-8"?>
<PublishData>
  …
<Subscription
…
Id="yoursubscriptionid"
Name="yoursubscriptionname"
ManagementCertificate="yourmanagementcertificate " />
…
</PublishData>
Go back to Release Definition page and select the configured connection from drop down.
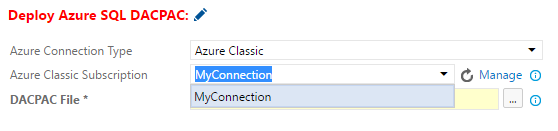
Click … on DACPAC File property.
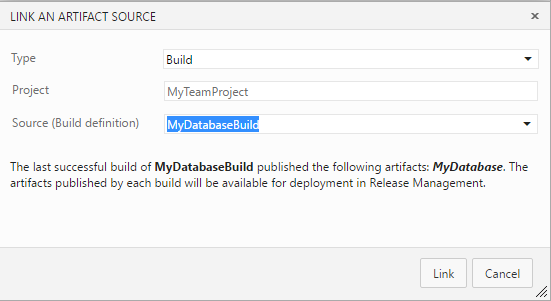
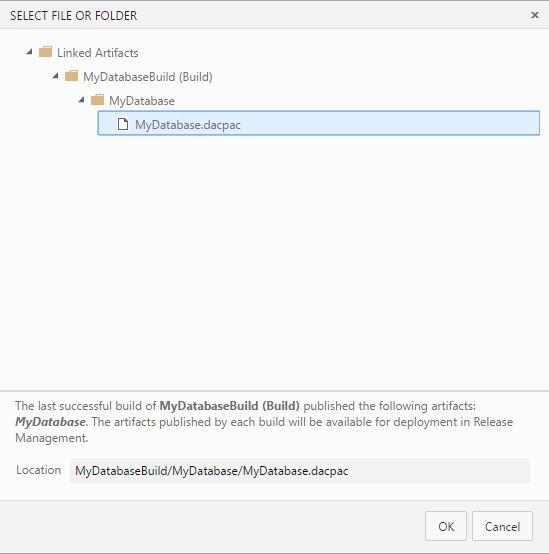
Link with your build definition. Then select a dacpac file.
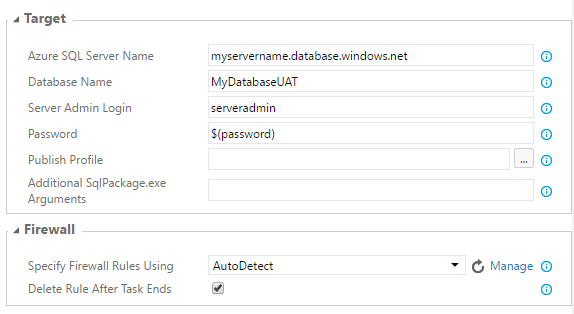
Set Target properties by providing your Azure SQL server name, database name for UAT environment. Let's name it as MyDatabaseUAT. PROD database name will be MyDatabase.
- Provide Server Admin Login name.
- For Password use variable $(password) to secure the password. You don't want to show your password in clear text here.
- Set Firewall to AutoDetect.
Go to Configuration section and add variable ‘password’ with value. Don't forget to lock it.

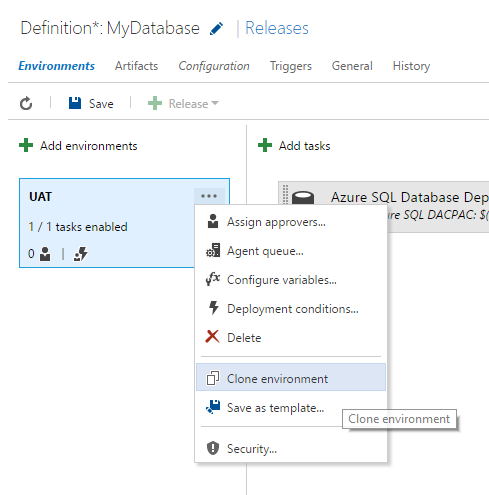
Save. Let's add PROD environment
Clone UAT to add PROD environment.
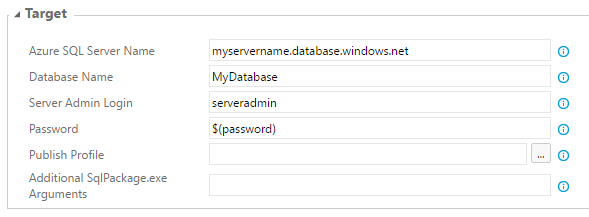
Change Database Name of Azure SQL Database Deployment task to MyDatabase in PROD environment.
The next step is configuring continuous deployment on this release definition and release workflow.
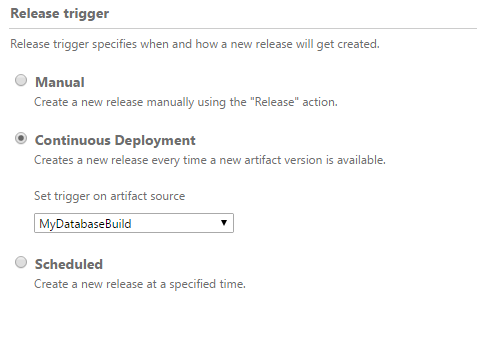
Go to Triggers page and select Continuous Deployment.
Select your database build definition for [Set trigger on artifact source to] property. When a build is successfully completed, the build process will create a new release workflow item for UAT and PROD environments.
For release workflow and orchestration, let's configure the following
- Start deploying database to UAT automatically whenever a new version of database is successfully built.
- PROD deployment stand-by with pending state until UAT deployment is successful AND all authorized personnel sign-off for the deployment to PROD environment.
Click Edit icon for each environment and configure UAT.
Configure UAT Trigger to [After release creation]

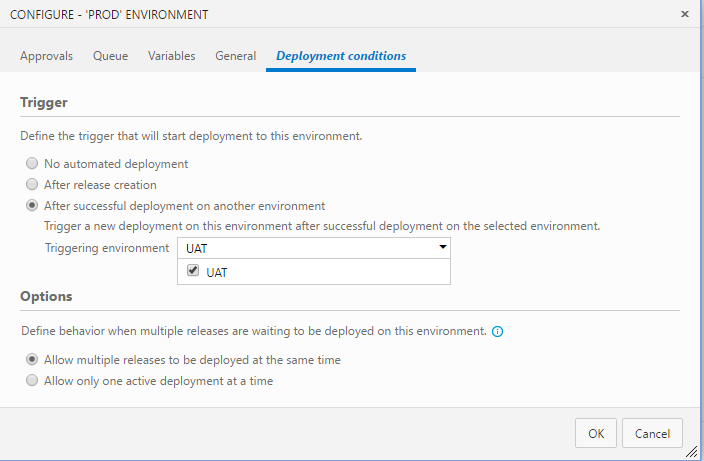
Configure PROD Trigger to [After successful deployment on another environment] and set Triggering environment to [UAT]
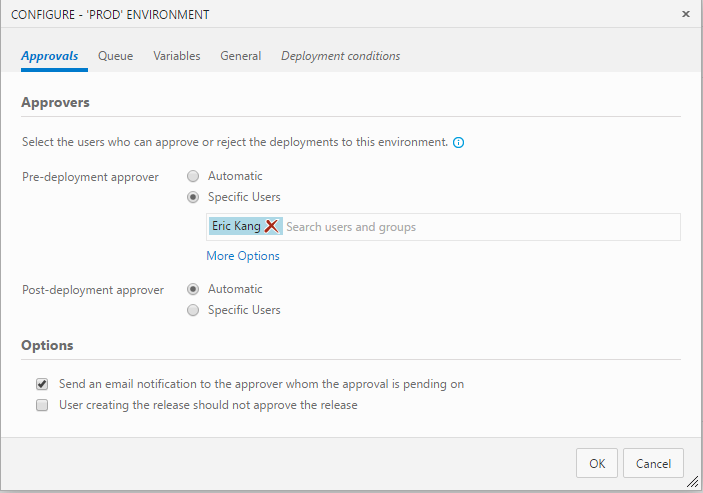
On Prod Configuration page, go to Approvals page.
Add Pre-deployment approver and enable email notification.
Save all changes.
Now we can test the end-to-end flow.
Go to Build page and select your build definition. Queue Build…
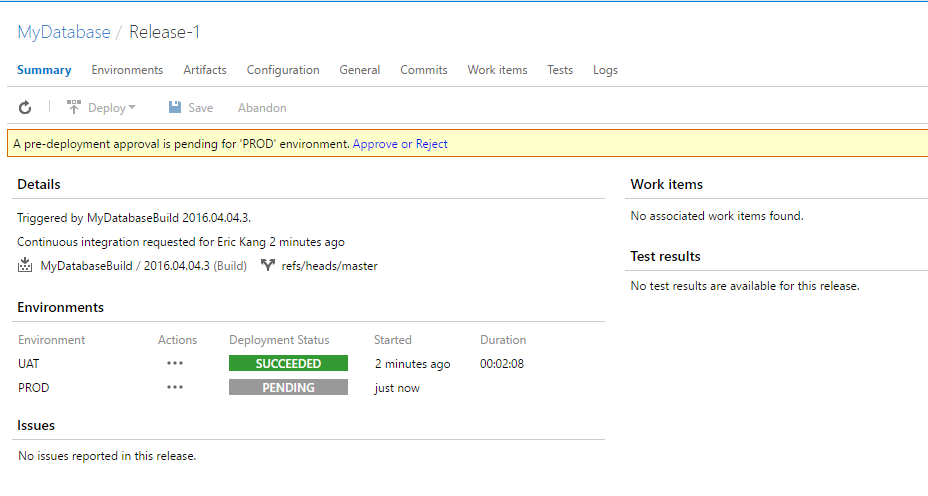
Upon successful build, Team Services creates a new release for UAT and PROD environments as we defined.
UAT deployment is performed automatically and PROD deployment is pending for approval.
Approve the PROD deployment. It will continue the release workflow and finish the deployment to PROD.
You have completed automation of deploying Azure SQL Database and you have a fully working environment to develop, build and deploy Azure SQL Database with CI and CD.
In Part 5. Use your own Build and Deployment Agent, we will go over a more advanced topic where you can bring your own build and deploy agent instead of using hosted agent. This way you can have more control over the build agent's resource, build tools version such as DACFx and SQLPackage.exe and target environment etc.
Comments
- Anonymous
April 06, 2016
I love SSDT but it seems that while it's really good at managing schema it's terrible at managing data. I don't understand how you can write these guides without providing some considerations for CI of the data in lock-step with the schema.SSDT has "Data Compare" but it's useless to compare your *.sqlproj model against production because production has (surprise!) production data. Notwithstanding more complex operations like migrating data between different tables/columns.PostDeployment.sql doesn't help you with migrations, you have to do the heavy lifting yourself.Liquibase seems to get this right but it looks like it stores the database structure and data as a series of incremental changes. I much prefer SSDT's approach to managing the schema (model it in its entirety then apply the differences). But Liquibase handles data much, much better.- Anonymous
April 07, 2016
The comment has been removed- Anonymous
April 07, 2016
The comment has been removed - Anonymous
April 07, 2016
Thanks for the response.I'm aware of the extensibility but having to install the extensions into Program Files wherever they're needed is a huge PITA. Other developer's PCs and build servers are things I don't always have control over.If you don't mind, could you let me know how SSDT could handle this situation below?Right now we have a legacy app with a legacy database that I've imported SSDT to help refactor. There was a table with the notion of a start and end time but it's modelled incorrectly: four VARCHAR(6) columns for start/end hour/minute.This should have been two TIME columns: StartTime and EndTime.Bearing in mind it's a legacy app so staging migrations like double-writing is a bit acrimonious, what I really want to do is have something like the following recorded in the refactorlog:1. Create a new column: StartTime2. Its value is CAST(StartHour + ":" + StartMin AS TIME)3. Drop StartHour, StartMin(repeat for EndTime)I think this plus the ability to associate SQL with a refactor (e.g. renaming a column adds an entry to the refactorlog, pre-refactor run this query, post-refactor run this query) would go a long way to getting us ... 90% of the way there?Thanks again.- Anonymous
April 14, 2016
I understand the pain of extensibility install - we have improving this on our backlog but do not have a firm ETA on when we would improve this. Regarding improved refactor support (e.g. for split table/split column) this is another one on the backlog but is a good deal higher effort and needs a deep investigation, so we do not have that scoped other than as a nice to have.-Kevin- Anonymous
April 19, 2016
"we do not have that scoped other than as a nice to have."Thanks for the frank feedback regarding its priority.After writing my comment I realised that certain types of refactoring support is actually a huge PITA. For example, allowing bespoke SQL queries to refactor the database - SSDT would have to keep track of the changes made by the query to keep its model in sync. And what if you have some non-determinate query that relies on something like the current date/time? It all dies in a flaming heap.If you get around to it, good luck!
- Anonymous
- Anonymous
- Anonymous
January 05, 2018
The comment has been removed
- Anonymous
- Anonymous
- Anonymous
May 09, 2016
This is really cool stuff. Does anyone know whether build / deploy of SSIS, SSAS and SSRS projects are going to be supported too in the future?- Anonymous
November 18, 2016
I'd like to know this also.
- Anonymous
- Anonymous
July 28, 2016
Nice tutorial, thanks guys! - Anonymous
August 27, 2016
Hi,I've followed the steps and it works but I still have some questions:1) How can I create a backup just before the deployment? 2) Does it automatically rollback if the deployment fails?3) Let's say I want to deploy a webapp after the database upgrade, does it rollback everything if it fails in the last step?Thanks - Anonymous
January 25, 2017
Deployment failing with message "You must have a user with the same password in master or target server". Same release definition worked before.In my case the the DB release definition was working few days back. Suddenly this issue started appearing during new releases.The database server and the database instance are correct and we have firewall settings set as auto detect in the release definition and in the portal database firewall settings allowed the deployment from azure services.Still the issue is present.