Change the Default IFilter Handler
IFilters are registered at the OS level and allow applications to convert binary file formats to raw text for search indexing. The IFilter that is registered to handle a certain file extension is called the Default Handler. Here we will see how to switch between Default Handlers when you have multiple IFilters installed. We will work with PDF handlers, specifically Adobe and Foxit, but the process can apply to any handler.
Add the Windows Search Service
Before you can manage Filter Handlers in Windows 2008, you need access to Indexing Options in the Control Panel. If this is not available, install the Windows Search Service Role Service, which is under the File Services role. You don't need to index any volumes.
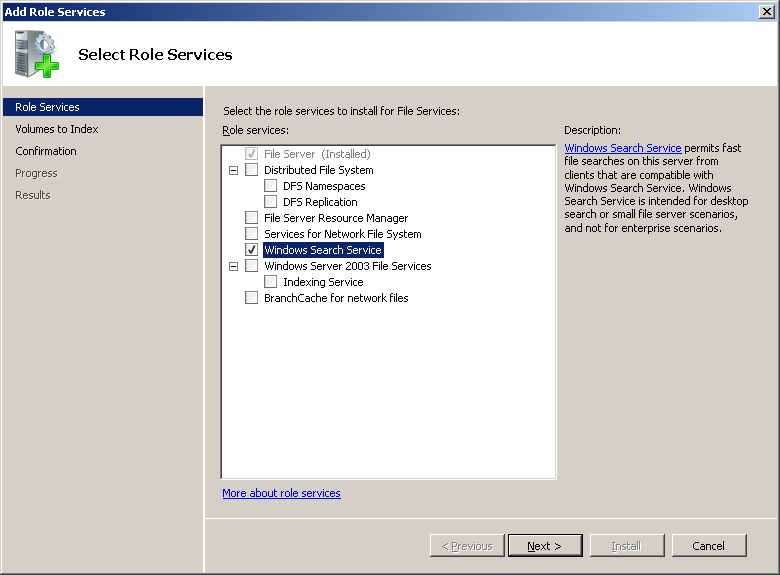
This makes Indexing Options available in Control Panel:

Inspect the Default Filter Handlers
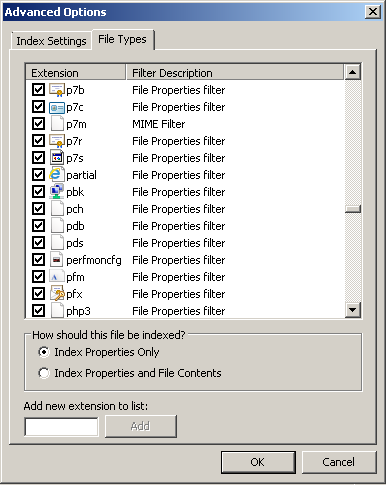
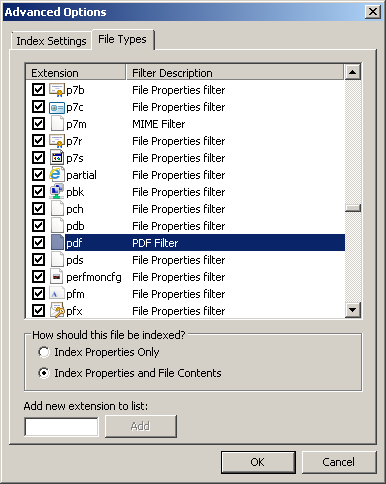
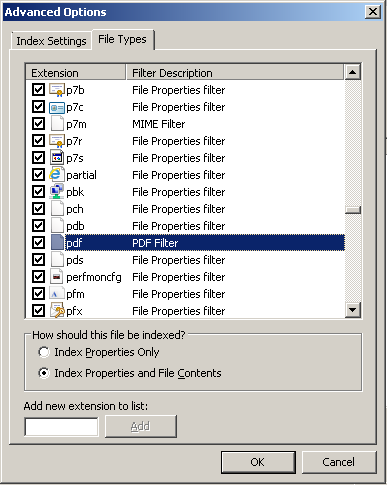
Now click on Indexing Options / Advanced / File Types. This shows you the list of file extensions and the default Filter Handler registered for it. Notice in my case that there is no handler for pdf, so I will be unable to index the contents of PDF files.
Install the IFilters
There are several options on the market for PDFs, the main ones being the Adobe PDF IFilter and the Foxit PDF IFilter. Suppose I wanted to install both, so I can compare their performance. Each installation will make itself the default handler, but short of reinstalling the other Filter, there is no easy way to switch between them.
After installing the Adobe Filter, you can see that it adds a Handler for PDF that it calls "PDF Filter". Notice that "Index Properties and File Contents" is selected, which is necessary if you want to extract the body of the document and not just its properties.
It's important to know the GUID for this Handler, because it'll be useful later. A quick scan of the registry for "PDF Filter" yields the following GUID: HKEY_LOCAL_MACHINE\SOFTWARE\Classes\CLSID\{E8978DA6-047F-4E3D-9C78-CDBE46041603}
Indeed you can verify this is the official Adobe IFilter GUID by looking at other articles describing how to configure it with SharePoint or how to replace it with Foxit. If you're curious, the InprocServer32 key below it points to the DLL for the Filter Handler.
For now, we just care that we know the GUID, which is {E8978DA6-047F-4E3D-9C78-CDBE46041603}.
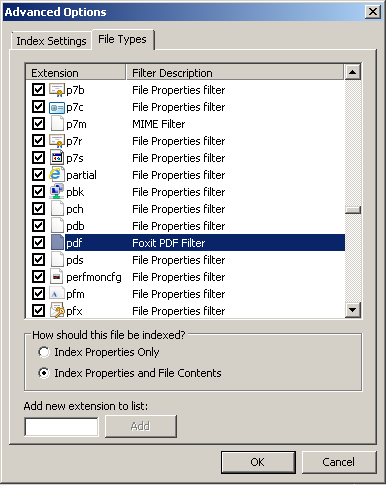
Any indexing of PDF content at this point will use the Adobe Filter. Now let's install Foxit. A fresh look at the Advanced Indexing Options shows us that Foxit replaces Adobe's Handler with its own, which it calls "Foxit PDF Filter".
What's the GUID for Foxit? Another quick scan of the registry, this time for "Foxit PDF Filter" gives us HKEY_LOCAL_MACHINE\SOFTWARE\Classes\CLSID\{987F8D1A-26E6-4554-B007-6B20E2680632} and thus the GUID {987F8D1A-26E6-4554-B007-6B20E2680632}.
As previously, you can verify this by reading the Foxit IFilter FAQ, but it's nice to figure it out ourselves.
So now we know the following
 Adobe GUID: {E8978DA6-047F-4E3D-9C78-CDBE46041603}
Foxit GUID: {987F8D1A-26E6-4554-B007-6B20E2680632}
That's great, but now what if you want to switch back and forth? It would be nice if the File Description right here was a dropdown, wouldn't it? But it isn't :(
Default Handlers in the Registry
How do we find out where the Default handler is configured in the Registry?
Let's look at HKEY_CLASSES_ROOT\.pdf. In my case, it contains a PersistentHandler sub-key with the GUID {3C3DCD30-E62D-49A4-A746-039334AFDE59}. This GUID is a registry branch that defines the Filter Handler for PDFs.
Note: this GUID is not constant like the IFilter GUIDs are. Yours will be different.
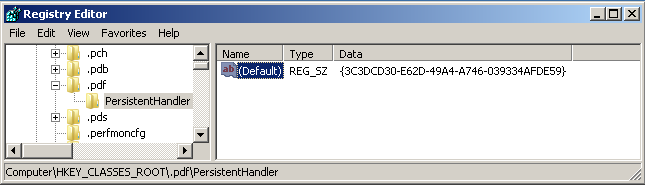
So let's take a look at {3C3DCD30-E62D-49A4-A746-039334AFDE59} by searching for it. This brings us to HKEY_CLASSES_ROOT\CLSID\{3C3DCD30-E62D-49A4-A746-039334AFDE59}.

And there it is, under PersistentAddInsRegistered, the (Default) key pointing to the Foxit GUID of {987F8D1A-26E6-4554-B007-6B20E2680632}. As you've probably guessed, to change the default handler back to Adobe, we just have to replace this GUID with the Adobe one. Let's try it.

Now let's take another look at Advanced Indexing Options:
And we're back to Adobe "PDF Filter". That's it!
Summary
Here is how the registry entries are structured to define the default handler:
 HKEY_CLASSES_ROOT\.pdf
 PersistentHandler
 (Default)={PDF Handler GUID}
 |
 ˅
HKEY_CLASSES_ROOT\CLSID\{PDF Handler GUID}
 PersistentAddInsRegistered
 {Some other GUID}
 (Default)={Filter GUID} <-- Change this
If you need to change the default handler for any different filter, the process would be the same:
- Find the Filter GUIDs, either from the vendor, or by looking them up in the registry
- Find the extension you're working on under
HKEY_CLASSES_ROOT\.<extension> - Its
PersistentHandlerwill point you to the GUID of the registered handler - Locate that handler GUID under
HKEY_CLASSES_ROOT\CLSID\{Handler GUID} - Expand
PersistentAddInsRegisteredand its child GUID - The
(Default)value is the GUID of the Filter that handles it - Change this to the GUID of the Filter you want
Packaging it up
There's a couple things I wanted to do to make it easier to switch them.
Firstly, I added adjacent keys with the 2 Filter GUIDs so I can remember them. I think it's harmless to add keys that aren't used by the system.

This way I can just copy/paste whichever key I need into (Default).
To make things even easier, I generated a .reg file for each configuration by exporting the HKEY_CLASSES_ROOT\CLSID\{3C3DCD30-E62D-49A4-A746-039334AFDE59}\PersistentAddinsRegistered\{89BCB740-6119-101A-BCB7-00DD010655AF} key. Now all I need to do is double click the appropriate .reg file to switch to that handler.