Note
Access to this page requires authorization. You can try signing in or changing directories.
Access to this page requires authorization. You can try changing directories.
Since the beginning of time, IIS has allowed you to configure multiple virtual directories and applications within a single website. There are a bunch of situations where this is useful, but let’s go with a common example. Suppose I have a website than has a bunch of pages, and a REST API which is accessed from scripts in the website. There are a few ways you could set this up, assuming the use of ASP.NET MVC and Web API:
- A single web project hosting both the web pages and API
- One web project for the web pages, and another for the API, deployed to different websites on different servers
- One web project for the web pages, and another for the API that is deployed to the same servers as an IIS application (/Services).
All of these options are valid, but the third option is tempting as it provides a degree of isolation between the two projects while minimising the deployment footprint. It also has the advantage of allowing you to share things like cookies and certain configuration between the two projects.
If you’re hosting your solution in Microsoft Azure, you’re probably already familiar with how to do this in a Web Role (using the <Sites> section in ServiceDefinition.csdef) or in a Virtual Machine (where you can set it all up yourself). But the best place for this solution is Azure Websites – and the good news is that it is also possible to replicate this configuration in a single Azure Website.
Set up the solution
The first step is to set up your solution by creating separate web projects in Visual Studio. Here you can see I have the Web project for my website and the Services project for my API. I also changed the project properties for my Services project to run it in the /Services virtual directory on my local IIS Express web server for development purposes.
Publish the root project
Once my solution is ready to deploy, the next step is to publish the root project (Web) to Azure websites. After choosing the appropriate subscription and website, I kept all the defaults in the Publish dialog.
Set up the Virtual Directory or Application
Now comes the important part. Before attempting to deploy the second project, go into the Azure Management Portal and configure the details for the IIS virtual directory or application in the website’s configuration. You need so specify the name of the directory, the file system location, and whether you want to mark it as an IIS application. Be sure to save your settings to apply the changes to Azure.
Publish the child project(s)
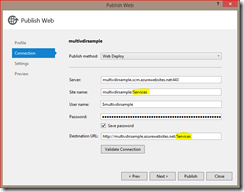
Once your IIS virtual directory or application is set up, you can deploy your child projects. When using the Publish dialog, make sure you select the same Azure subscription and website that you used for your root project. Then you need to include the virtual directory path in the Site Name and Destination URL sections on the Connection tab.
Once the publishing is done, you’ll have your multi-project solution successfully deployed in separate virtual directories within a single Azure Website.
Comments
Anonymous
September 21, 2014
Great article Tom, you may want to checkout some of the work we have been doing around using git and Kudu to deploy mutliple applications to a single Azure Website. Everything is on GitHub github.com/.../Escc.AzureDeployment and well documented. In summary, each application on a large website has a separate git repository, but each Azure Website has a single git repository, so we have to combine our projects into a single git repository for deployment. We do this using subtree merging. We then push the repository to Azure, where it is deployed by Kudu. By default Kudu deploys only the first project it finds, so we use a custom deployment script to deploy each project to a specific folder. Our custom deployment script: runs unit tests before deployment using NUnit manages dependencies using NuGet package restore signs assemblies using MSBuild and XSL to point to our strong name key manages secrets using web.config transforms Hope people find this helpful, we will be putting our stuff up on GitHub so check it out.Anonymous
November 15, 2014
Good article Tom - but what about those of us using PowerShell and resource groups - any pointers for that?Anonymous
April 24, 2016
Hi,I tried to publish in Azure virtual directory but got the following runtime error. I have tested on my desktop and works fine. Need help to resolve.##################Server Error in '/Api' Application.Runtime Error Description: An application error occurred on the server. The current custom error settings for this application prevent the details of the application error from being viewed remotely (for security reasons). It could, however, be viewed by browsers running on the local server machine. Details: To enable the details of this specific error message to be viewable on remote machines, please create a tag within a "web.config" configuration file located in the root directory of the current web application. This tag should then have its "mode" attribute set to "Off". Notes: The current error page you are seeing can be replaced by a custom error page by modifying the "defaultRedirect" attribute of the application's configuration tag to point to a custom error page URL. ######Rgds,Kumar


