Note
Access to this page requires authorization. You can try signing in or changing directories.
Access to this page requires authorization. You can try changing directories.
Blockchain as a Service is now available within Microsoft Azure DevTest Labs.
Developers and testers are looking to solve the delays in creating and managing their environments by going to the cloud. Azure solves the problem of environment delays and allows self-service within a new cost efficient structure. However, developers and testers still need to spend considerable time configuring their self-served environments. Also, decision makers are uncertain about how to leverage the cloud to maximize their cost savings without adding too much process overhead.
Azure DevTest Labs is a service that helps developers and testers quickly create environments in Azure while minimizing waste and controlling cost. You can test the latest version of your application by quickly provisioning Windows and Linux environments using reusable templates and artifacts. Easily integrate your deployment pipeline with DevTest Labs to provision on-demand environments. Scale up your load testing by provisioning multiple test agents, and create pre-provisioned environments for training and demos.
Simply search for the keyword "Blockchain" and you will see Blockchain Labs in the list of available resources.

Select Create and fill in the details of your lab and you'll be off to the races. You can then select from a wide variety of blockchain artifacts to create your own private, permissioned, public or consortium blockchain labs. see https://azure.microsoft.com/en-us/documentation/articles/devtest-lab-create-lab/

Use your choice of open source stacks and third party offerings to get started.

Blockchain is becoming a very interesting are and crossing many business verticals PokitDok and their vision for blockchain in healthcare called DokChain both UCL and Imperial in the UK have developed specific BlockChain institutes so I expect to see lots more exciting opportunities around BlockChain over the next few months.
If you want to understand more about how to setup BlockChain as a Service hosted on Azure see the following tutorial which walks you through the setup process.
Step1. Sign in to your Azure Subscription
1. Navigate to https://portal.azure.com
a. Enter the credentials for your Microsoft Azure account
b. Once authenticated, you will be redirected to the Azure portal
Step 2. Create a new DevTest Lab Instance
1. Start to create a new DevTest lab
a. Click on the “New” button
b. Type “devtest” into the search box
c. Select “DevTest Labs for Blockchain as a Service” from the autocomplete dropdown
d. Under “Results” select “DevTest Labs for Blockchain as a Service”
e. Click the “Create” button
2. Complete the properties for your new DevTest Lab
a. Give the lab a name
b. Select a Subscription (only required if you have multiple subscriptions)
c. Select a location (Data Centre). North Europe is a good choice for the UK.
d. Auto-shutdown will schedule labs VMs to be shutdown automatically (daily @ 7pm is the default). This will ensure that VMs inadvertently left running will not incur undue costs against the subscription. It’s a good idea to leave this enabled unless there’s a specific reason to leave the VMs running overnight.
e. Select the Storage type. Premium allows for faster VMs but carries an extra cost.
3. Create the Lab
a. Hit the “Create” button at the bottom of the “blade”
4. Lab Creation
a. You will likely see some status notifications appear as the lab is provisioned and deployed
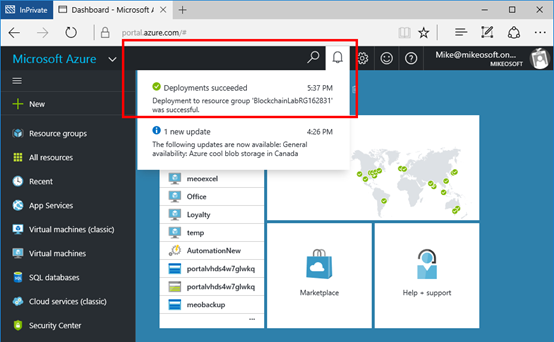
b. If you click on the “Notifications” button (the bell icon) you should ultimately see a message indicating that the deployment succeeded
c. Should the deployment fail, clicking on the notification will take you to a detailed logging page showing each stage of the process and its outcome. This may help to pinpoint the issue.
Step3. Connect to an Artifect Repository
1. Navigate to the newly created DevTest lab
a. On the left-hand navigation select “Browse”
b. Find DevTest Labs in the list and check the star to make it a favourite
c. Select “DevTest” labs on the left-hand navigation and then select the lab you’ve just created (eg “Blockchain Lab”)
d. This will bring up the lab info blade and settings blade
2. Configure the new repository
a. Click on “Artifect Repositories” in the Settings blade
b. Then click “Add” to add a new repository
c. In the Artifact repositories properties blade, enter the following
i. Name for the repo (eg “MyBlockchainRepo”)
ii. Git clone URI: https://github.com/Azure/azure-blockchain-projects.git
iii. Folder path: baas-artifacts
iv. Branch: (leave blank)
v. Access Token: Get this from GitHub (see Note 1 below)
d. Hit “Save” at the bottom of the blade to create the new repository
Step 4. Create a new virtual machine configured for Ethereum Homestead
1. From your DevTest Lab configuration blade, click on “+ Virtual Machine” to add a new VM
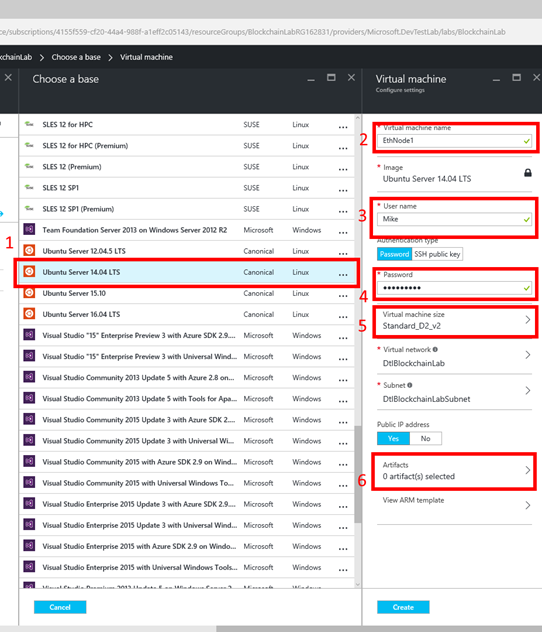
2. Configure the Virtual Machine
a. Select “Ubuntu Server 14.04 LTS” as the base image
b. Give the machine a name eg EthNode1
c. Provide a username and password
i. Make sure to store these securely for future reference
d. Set a machine size eg Standard_D2_v2
e. VirtualNetwork and Subnet should be preconfigured
f. Leave the IP address as public
g. Click on “Artifacts” to add the required Ethereum components
h. You could of course add additional or different components at this stage, eg if you wanted to create a Manifold node
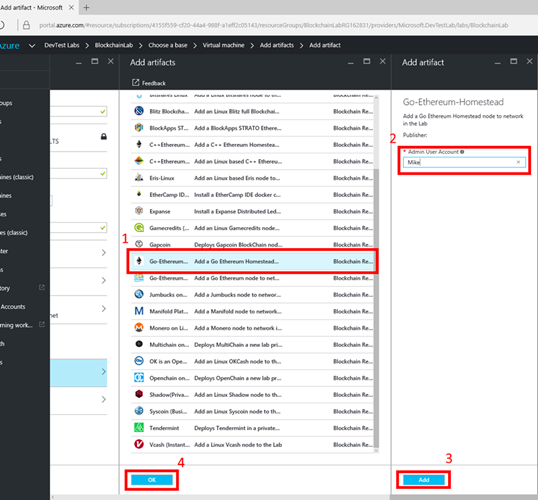
3. Select “Go-Ethereum-Homestead”
a. In the blade that appears, enter the username you created earlier into the Admin User Account field
b. Click Add on the artefact configuration (username) blade
c. Click OK on the “Add artifacts” blade
d. Click Create on the “Virtual Machine” blade which will now have 1 artifact selected
4. Azure will now create an Ubuntu VM and install the Ethereum Homestead components
a. You may want to repeat section 4/ to create a 2nd Ethereum node in the network
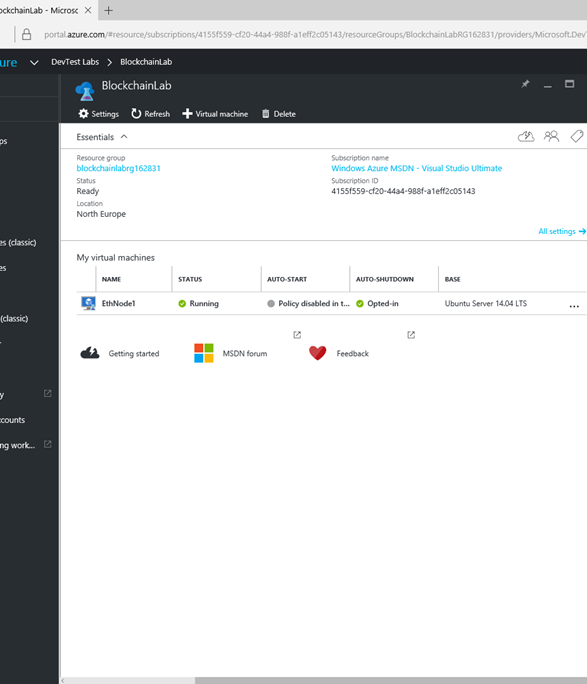
5. When completed you should see the new VM(s) appear in the DevTest Lab under “My virtual machines”
Step 5.Connect to the Virtual Machine
1. We are going to use SSH (Secure Shell) to connect to the newly created VM
a. You will need an SSH client such as Putty to connect
b. Eg https://www.putty.org
2. In the DevTest Lab blade, click through to the VM you want to connect to
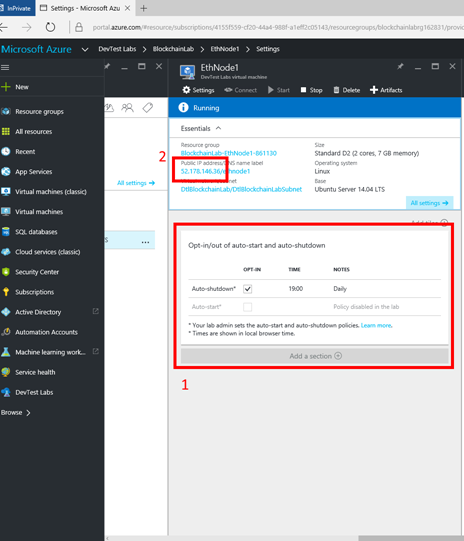
a. Note the auto-start and auto-shutdown tile. You can opt-in to have your VMs automatically shutdown out of hours ensuring they don’t incur unnecessary costs
3. Capture the public IP address of the VM so we can connect to it over SSH.
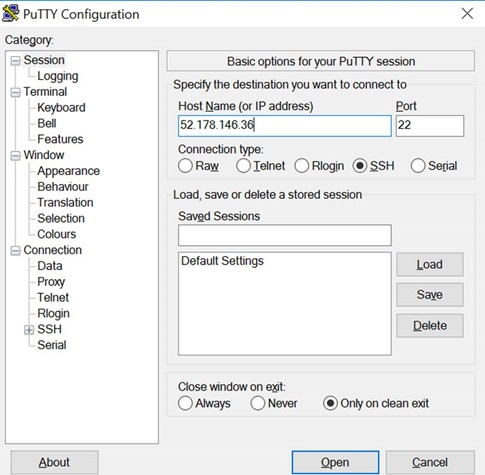
4. Open your SSH client and set the host to be the public IP address of the VM
5. Open a connection
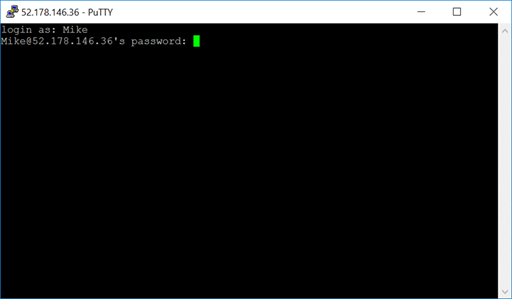
6. Login using the credentials you provided when creating the VM
7. You are now ready to get started with Ethereum. You can choose to participate in Ethereum’s public networks or create a private network
a. https://github.com/ethereum/go-ethereum#running-geth
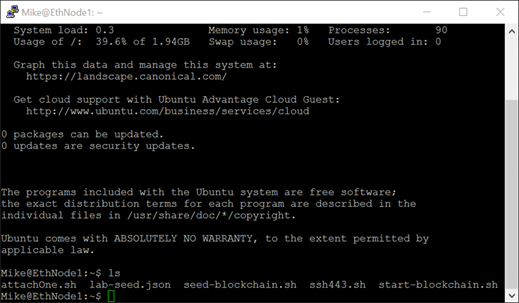
8. The home directory contains a number of scripts to simplify the process of creating a private Ethereum network
a. lab-seed.json – this is the “genesis state” file
b. seed-blockchain.sh – run the blockchain for the first time (seed it)
c. start-blockchain.sh – restart the blockchain (ie run once seeded)
d. attachOne.sh – attach console
Note 1 – Acquiring a personal access token from GitHub
1. Sign in to GitHub (or create a new account): https://github.com
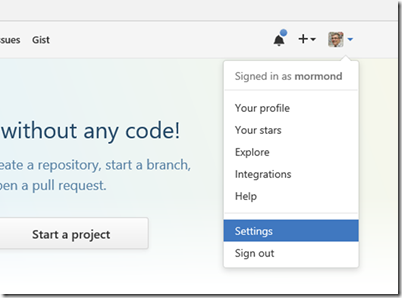
2. Select Account “Settings”
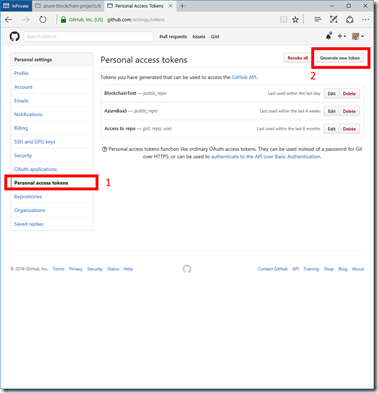
3. Select “Personal access tokens” in the left-hand navigation
4. And click on “Generate new token”
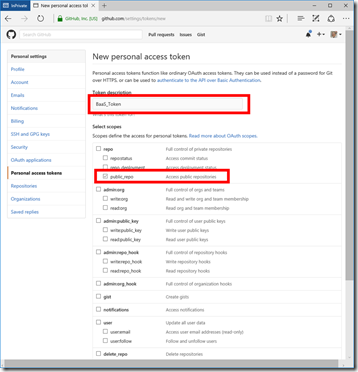
5. Give the token a name (eg “Baas_Token”)
6. Give it “public_repo” scope
7. Click on “Generate new token” at the bottom of the page
8. Copy the newly generated personal access token to the clipboard
As we build out our blockchain middleware stack more detailed information and documentation will become available on GitHub. Future topics include: writing secure SmartContracts, Microsoft Blockchain data services and a deep dive into Cryptlets.
Comments
- Anonymous
August 01, 2016
The comment has been removed- Anonymous
August 29, 2017
This guide is old, you can paste the new URL and it will work.- Anonymous
August 30, 2017
Hi please see https://azure.microsoft.com/en-us/solutions/blockchain/
- Anonymous
- Anonymous
- Anonymous
December 18, 2016
The comment has been removed- Anonymous
January 10, 2017
The comment has been removed
- Anonymous
- Anonymous
January 10, 2017
For the latest information and announcement on Azure and Blockchain see https://azure.microsoft.com/en-gb/blog/topics/blockchain/ - Anonymous
June 16, 2017
Hello Lee Stot,Is there any updated version of this document as most of the screenshots doesn't match to what is available on Azure today ......any help will be appreciated ...- Anonymous
June 29, 2017
The comment has been removed - Anonymous
September 27, 2017
------UPDATED TUTORIAL FOR BLOCKCHAIN-------------Now available under workshops at https://github.com/MSFTImagine/computerscience/tree/master/Workshop/19.%20Blockchain%20on%20Azure
- Anonymous
- Anonymous
August 21, 2017
For the most update blockchain announcements see https://azure.microsoft.com/en-us/blog/topics/blockchain/


