Setting up Azure Classroom Labs for your students with Azure Lab Services
Using Azure to Manage your student Classes and students use of Azure
Welcome to Azure Labs Managed Cloud Services for custom lab environments
With Azure Lab Services, you can now easily and quickly create a lab fit for your needs, without worrying about the technical details of Azure infrastructure. For managed labs, you can simply input the types of virtual machines you need, when you need it, and how many users can access the lab. The service itself takes care of creating ad maintaining the lab and its resources with built-in scaling and resiliency. For those of you who want to manage all infrastructure and configuration yourself within your own subscription, you can continue to do this by creating a custom lab (which is the same as Azure DevTest Labs). To learn more about which lab type is best for you, see the documentation on the different types of labs.
Here a quick tutorial on building your first lab and infrastructure for a group of students
If you don't have an Azure subscription, create a free account before you begin.
Create a lab account
The following steps illustrate how to use the Azure portal to create a lab account with Azure Lab Services.
Sign in to the Azure portal.
From the main menu on the left side, select Create a resource.
Search for Lab Services in the Azure Marketplace, and select Lab Services in the drop-down list.
Select Lab Services (Preview) in the filtered list of services.
In the Create a lab account window, select Create.
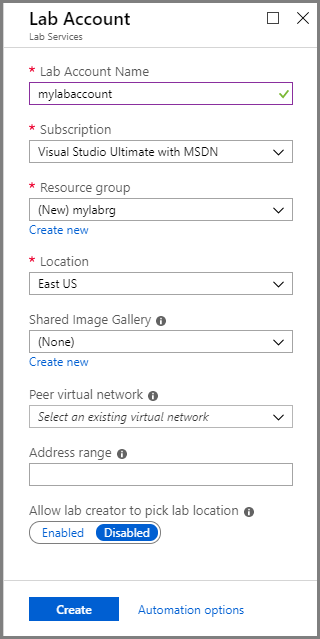
In the Lab account window, do the following actions:
For Lab account name, enter a name.
Select the Azure subscription in which you want to create the lab account.
For Resource group, select Create new, and enter a name for the resource group.
For Location, select a location/region in which you want the lab account to be created.
Select Create.
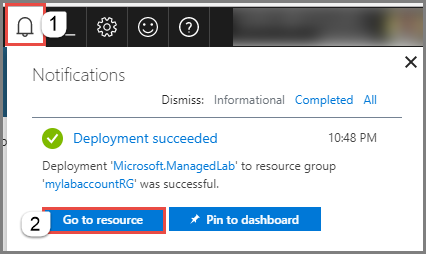
If you don't see the page for the lab account, select the notifications button, and then click Go to resource button in the notifications.
You see the following lab account page:

Add a user to the Lab Creator role
To provide educators the permission to create labs for their classes, add them to the Lab Creator role:
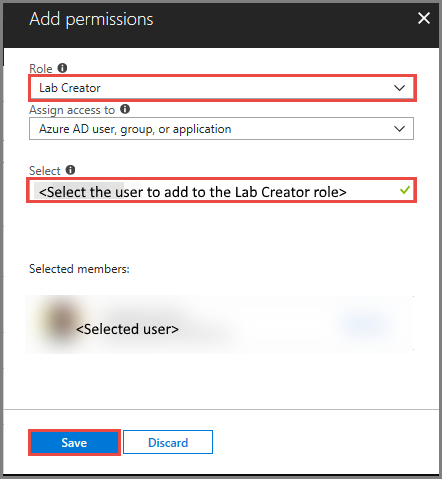
On the Lab Account page, select Access control (IAM) , and click + Add on the toolbar.

On the Add permissions page, select Lab Creator for Role, select the user you want to add to the Lab Creators role, and select Save.
Create a classroom lab
Navigate to Azure Lab Services website.
In the New Lab window, do the following actions:
Specify a name for the classroom lab.
Select the size of the virtual machine that you plan to use in the classroom.
Select the image to use to create the virtual machine.
Specify default credentials for logging into virtual machines in the lab.
Select Save.

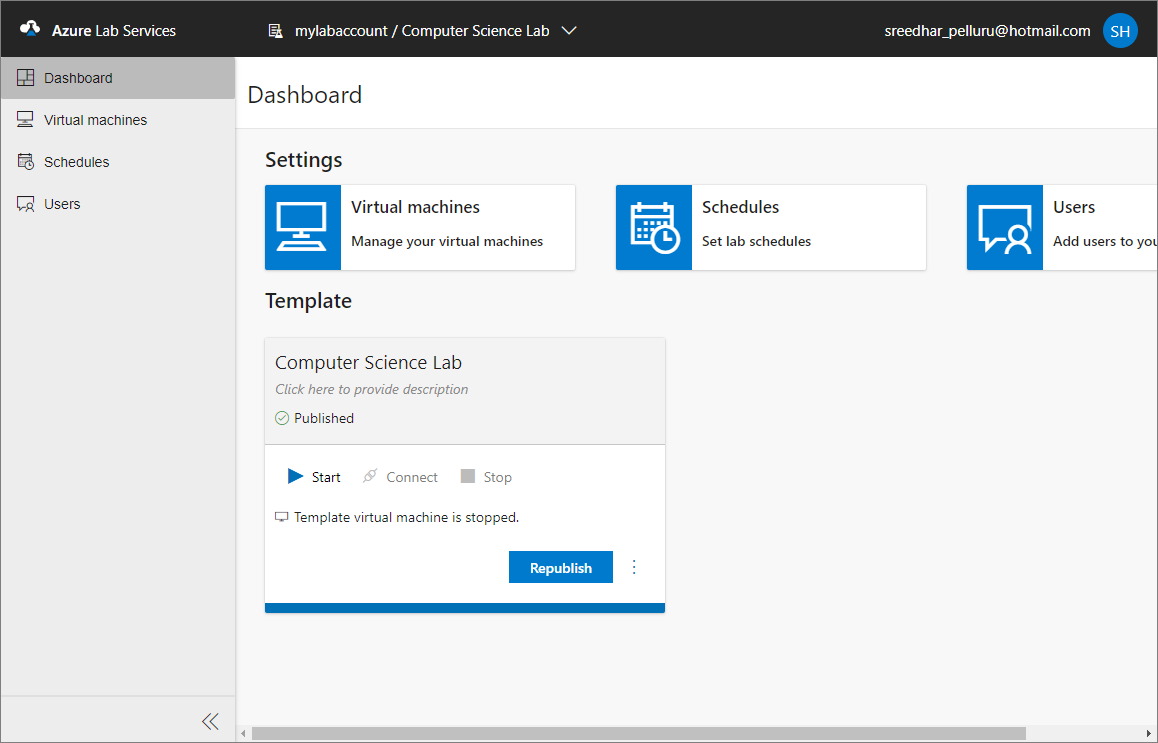
You see the home page for the lab.
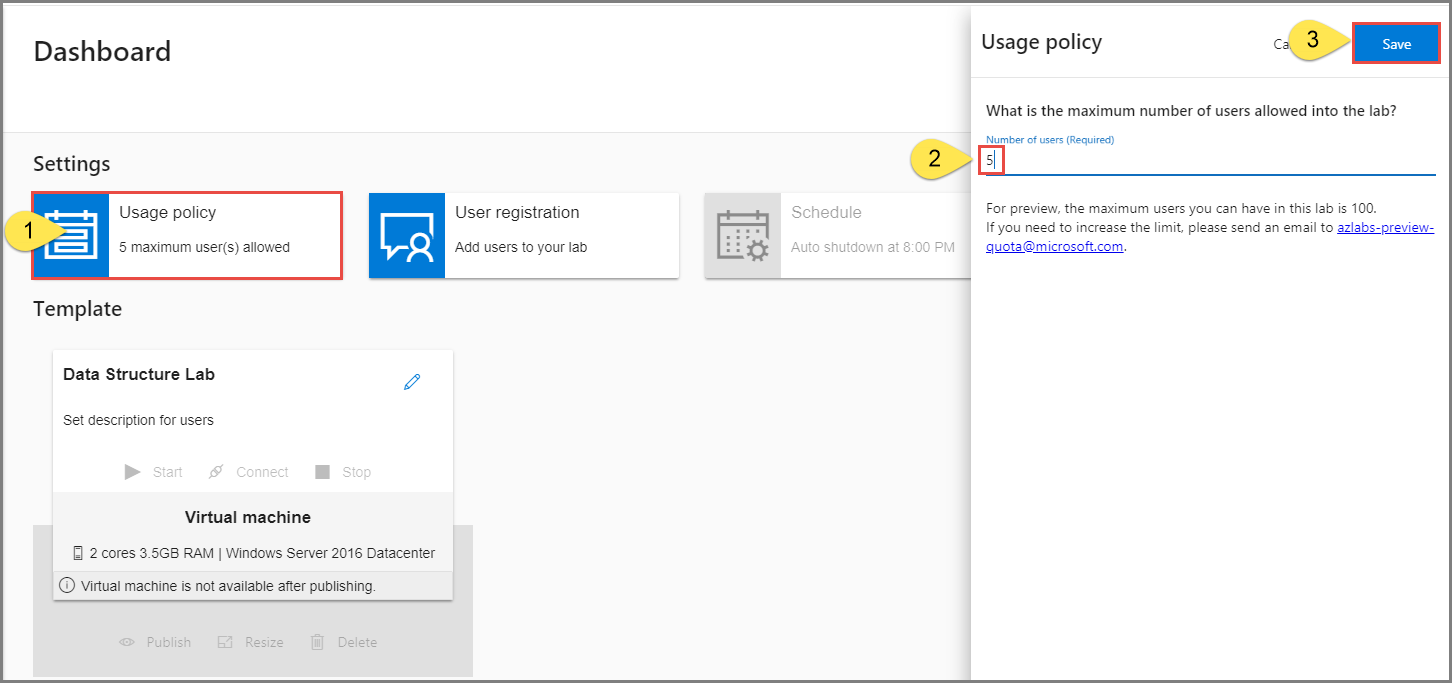
Configure usage policy
Select Usage policy.
In the Usage policy, settings, enter the number of users allowed to use the lab.
Select Save.
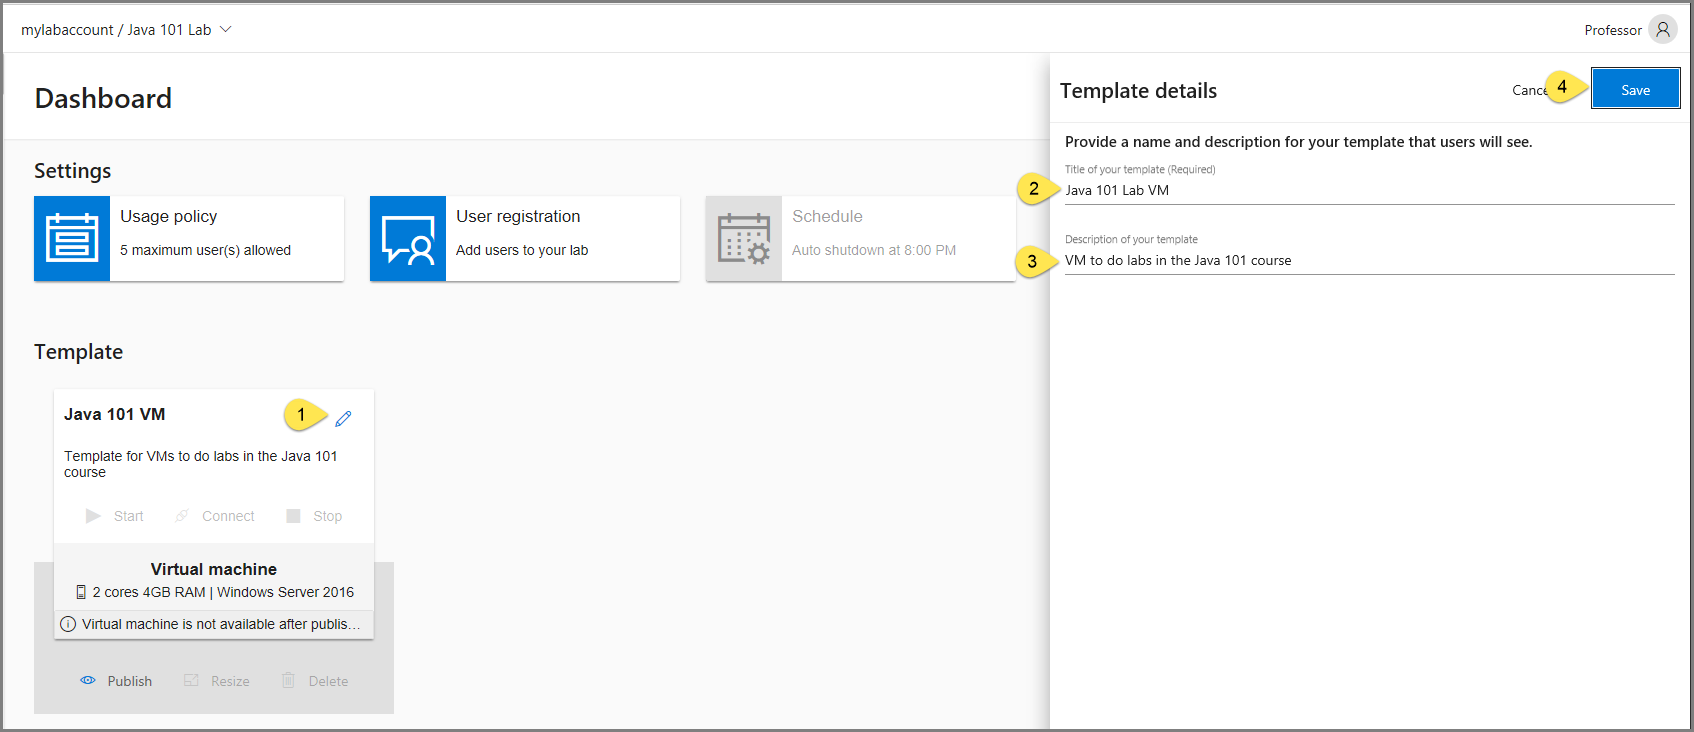
Set up the template
A template in a lab is from which all users’ virtual machines are created. Set up the template virtual machine so that it is configured with exactly what you want to provide to the lab users. You can provide a name and description of the template that the lab users see, and set the visibility to “Public” to make instances of the template VM available to your lab users.
Set title and description
In the Template section, select Edit (pencil icon) for the template.
In the User view window, Enter a title for the template.
Enter description for the template.
Select Save.
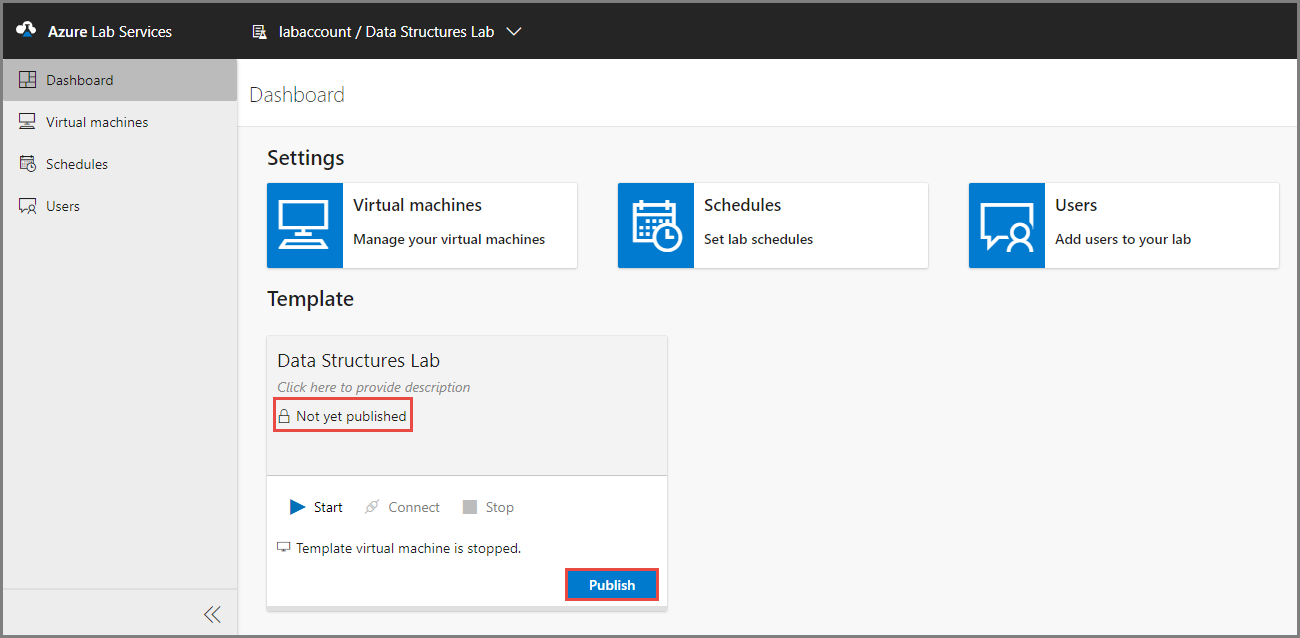
Make instances of the template public
Once you set the visibility of a template to Public, Azure Lab Services creates VMs in the lab by using the template. The number of VMs created in this process are the same as the maximum number of users allowed into the lab, which you can set in the usage policy of the lab. All virtual machines have the same configuration as the template.
Select Visibility in the Template section.
In the Availability page, select Public.
Important
Once a template is publicly available, its access can't be changed to private.
Select Save.
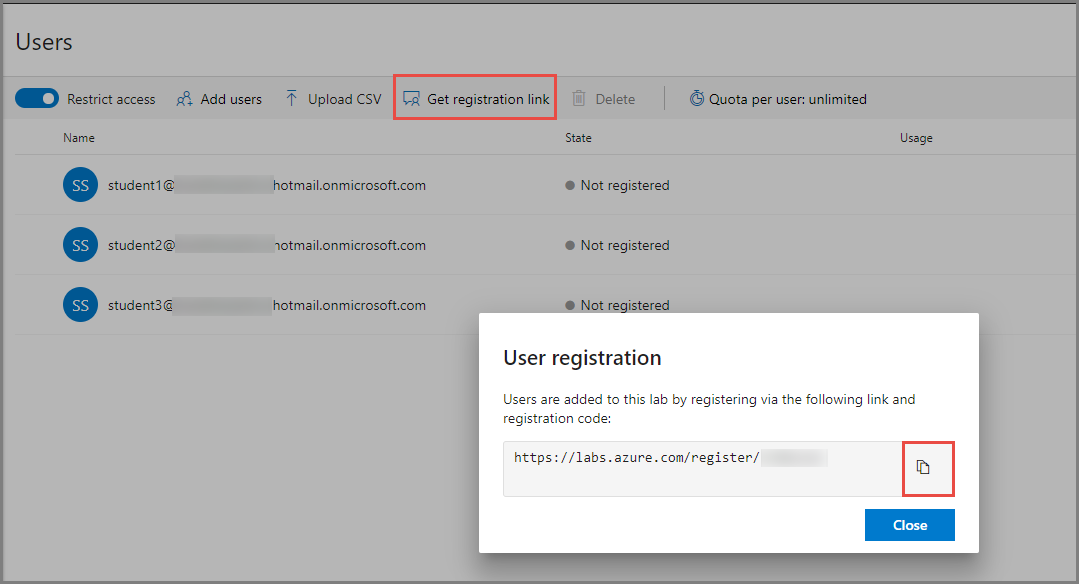
Send registration link to students
Select User registration tile.
In the User registration dialog box, select the Copy button. The link is copied to the clipboard. Paste it in an email editor, and send an email to the student.
Use the registration link
Navigate to the registration URL that you received from the professor/educator.
Sign in to the service using your school account to complete the registration.
Once registered, confirm that you see the virtual machines for the labs you have access to.
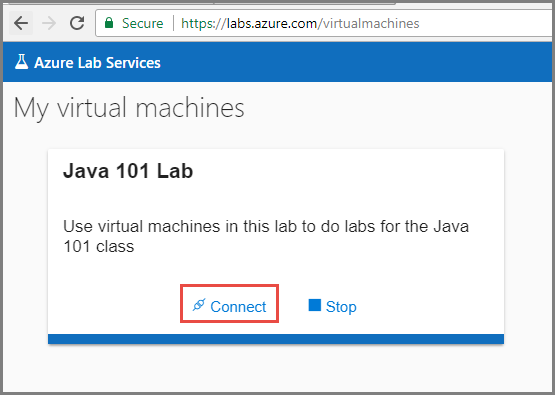
Connect to the virtual machine
- Select Connect on the tile that represents the virtual machine of the lab that you want to access.
- Save the RDP file to the hard disk and open it.
- Use the user name and password you get from your educator/professor for logging in to the machine.
Conclusion
Classroom lab
Currently, Azure Lab Services supports only the classroom lab as a managed lab. The classroom lab enables professors and educators to provide students with a lab of virtual machines that are configured with exactly what’s needed for a class. They can also control the students’ usage and set policies to optimize the cost of the lab. Learn how to create a classroom lab here.
Simplified user experience
Azure Lab Services enables a simple and focused user experience through the new website https://labs.azure.com, whether you are creating a lab or accessing a lab’s resources. As a lab owner, you can define what to make available to your users in the lab, and set policies such as usage limits and schedules to automatically shut down and start up the lab’s virtual machines. Lab users can register to a lab with a registration code, and get a single view of all resources they have access to across multiple labs.
Both the managed lab types and the custom lab (DevTest Lab functionality) will continue to evolve as a single service, Azure Lab Services. With the introduction of managed labs, we envision that our lab offerings will expand to optimize experiences for hackathon, research labs, trial sessions, online training, development/testing scenarios, and so on.
A lab is an environment where exciting things happen. Azure Lab Services aims to ensure everyone can use the power of Azure to optimize their lab experience, regardless of their expertise in the cloud. Do you want to try Azure Lab Services? Get started!