Azure Applications (Explained)
What is Windows Azure?
Windows Azure is a cloud computing platform. It allows the deployment of cloud based applications that are managed at Microsoft datacenters.
How do I get Azure?
In order to start building Azure applications, you need to have Visual Studio 2008 or higher to install the SDK and tools.
Windows Azure SDK and tools: https://go.microsoft.com/fwlink/?LinkId=128752
In order for Azure to install correctly, you may need to enable IIS 7.0 ASP.NET application development components – you will receive an error if you have it disabled. To enable it, go to Control Panel -> Programs -> Programs and Features - > Turn Windows Features On or Off.
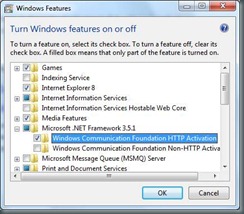
Enable Windows Communication Foundation HTTP Activation.
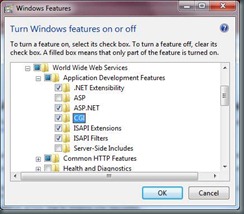
Enable IIS -> WWWS -> ASP.NET and CGI.
Building Your First Azure Application
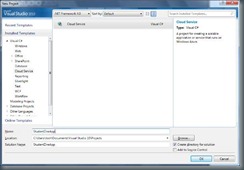
Now you have the runtime and fabric installed, we can build our first application! To begin with, create a new Cloud Service project:
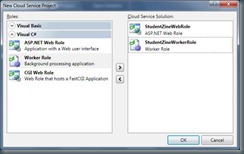
Next, you’ll get a screen asking you about Web and Worker roles. These are the types of applications you can create with Windows Azure. Web roles act as your web user interface (ASP.NET) and the worker role is a console application that deals with intensive background processing. For our demo, go ahead and add a Web Role and a Worker Role.
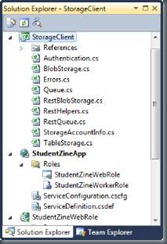
Now we have our Azure solution, we can start building the application. One great thing about the Windows Azure Platform Kit is that is comes with a solution that allows you to immediately make use of Tables, Queues and Blobs. Add the StorageClient solution (found with the Platform Kit) to your project.
Now that we have our solution setup, we need to configure the ServiceConfiguration.cscfg and the ServiceDefinition.csdef. Open the ServiceConfiguration.cscfg and change it to look like the following:
<?xml version="1.0"?>
<ServiceConfiguration serviceName="StudentZineApp" xmlns="https://schemas.microsoft.com/ServiceHosting/2008/10/ServiceConfiguration">
<Role name="StudentZineWebRole">
<Instances count="1" />
<ConfigurationSettings>
<Setting name="QueueStorageEndpoint" value="https://127.0.0.1:10001"/>
<Setting name="AccountName" value="devstoreaccount1"/>
<Setting name="AccountSharedKey" value="Eby8vdM02xNOcqFlqUwJPLlmEtlCDXJ1OUzFT50uSRZ6IFsuFq2UVErCz4I6tq/K1SZFPTOtr/KBHBeksoGMGw=="/>
</ConfigurationSettings>
</Role>
<Role name="StudentZineWorkerRole">
<Instances count="1" />
<ConfigurationSettings>
<Setting name="QueueStorageEndpoint" value="https://127.0.0.1:10001"/>
<Setting name="AccountName" value="devstoreaccount1"/>
<Setting name="AccountSharedKey" value="Eby8vdM02xNOcqFlqUwJPLlmEtlCDXJ1OUzFT50uSRZ6IFsuFq2UVErCz4I6tq/K1SZFPTOtr/KBHBeksoGMGw=="/>
</ConfigurationSettings>
</Role>
</ServiceConfiguration>
If you were accepted on to the CTP for Windows Azure and have an account, you can replace the AccountName and AccountSharedKey with your own details and deploy it to your Azure account. After you have configured the ServiceConfiguration.cscfg, you need to configure the ServiceDefinition.csdef to look like the following:
<?xml version="1.0" encoding="utf-8"?>
<ServiceDefinition name="StudentZineApp" xmlns="https://schemas.microsoft.com/ServiceHosting/2008/10/ServiceDefinition">
<WebRole name="StudentZineWebRole" enableNativeCodeExecution="false">
<InputEndpoints>
<!-- Must use port 80 for http and port 443 for https when running in the cloud -->
<InputEndpoint name="HttpIn" protocol="http" port="80" />
</InputEndpoints>
<ConfigurationSettings>
<Setting name="QueueStorageEndpoint"/>
<Setting name="AccountName"/>
<Setting name="AccountSharedKey"/>
</ConfigurationSettings>
</WebRole>
<WorkerRole name="StudentZineWorkerRole" enableNativeCodeExecution="false">
<ConfigurationSettings>
<Setting name="QueueStorageEndpoint"/>
<Setting name="AccountName"/>
<Setting name="AccountSharedKey"/>
</ConfigurationSettings>
</WorkerRole>
</ServiceDefinition>
Configuration is out of the way! Now what about the application? We’re going to create a simple application that allows you to enter some text on the WebRole ASP.NET page, adds that to the queue and then the worker role is going to process the information from that queue and output it to the development fabric! Sounds easy, right? So let’s begin!
Creating the ASP.NET page
Open the default.aspx pagein the StudentZineWebRole solution. Add an <asp:TextBox> control and an <asp:Button> control. Label these txtMessage and btnSubmit.
<%@ Page Language="C#" AutoEventWireup="true" CodeBehind="Default.aspx.cs" Inherits="StudentZineWebRole._Default" %>
<!DOCTYPE html PUBLIC "-//W3C//DTD XHTML 1.0 Transitional//EN" "https://www.w3.org/TR/xhtml1/DTD/xhtml1-transitional.dtd">
<html xmlns="https://www.w3.org/1999/xhtml" >
<head runat="server">
<title></title>
</head>
<body>
<form id="form1" runat="server">
<div>
<asp:TextBox ID="txtMessage" runat="server" />
<asp:Button ID="btnSubmit" runat="server" Text="Submit" />
</div>
</form>
</body>
</html>
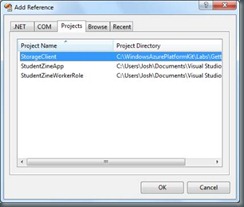
Now we’ve added our controls, we need to add some logic to take the submitted data and add that to the queue. Open up the Default.aspx.cs file. First, we need to add our StorageClient using namespace. To do this, right-click References -> Add Reference...
Add this line of code to your using namespace directive:
using Microsoft.Samples.ServiceHosting.StorageClient;
On the design page, double-click the button control. This will bring up the code behind with a function called btnSubmit_Click(). In that function, add the following line so that the function looks like the following:
protected void btnSubmit_Click(object sender, EventArgs e)
{
StorageAccountInfo account = StorageAccountInfo.GetDefaultQueueStorageAccountFromConfiguration();
}
This initializes the account information and uses the configuration information you provided previously. Now, you need to create the queue. This is a simple if statement to check if the queue is already there:
QueueStorage service = QueueStorage.Create(account);
MessageQueue queue = service.GetQueue("messages");
if (!queue.DoesQueueExist())
{
queue.CreateQueue();
}
Now that we have a queue, we need to add things to it. To do this, add the following lines of code within the same function:
Message msg = new Message(txtMessage.Text);
queue.PutMessage(msg);
txtMessage.Text = string.Empty;
This takes the information from the Textbox control and puts this on to the queue. It then empties the Textbox control text. Your completed function should now look like this:
protected void btnSubmit_Click(object sender, EventArgs e)
{
StorageAccountInfo account = StorageAccountInfo.GetDefaultQueueStorageAccountFromConfiguration();
QueueStorage service = QueueStorage.Create(account);
MessageQueue queue = service.GetQueue("messages");
if (!queue.DoesQueueExist())
{
queue.CreateQueue();
}
Message msg = new Message(txtMessage.Text);
queue.PutMessage(msg);
txtMessage.Text = string.Empty;
}
Now that we have a queue and the ability to add items to that queue, we need to process them and report them to the development fabric. In the StudentZineWorkerRole solution, open up WorkerRole.cs and add the StorageClient reference in the same way you did for the WebRole.
For the WorkerRole, you’ll notice two functions. Start() and GetHealthStatus(). Start() works like the Main() function in normal console applications and GetHealthStatus() returns the current state of the WorkerRole. For this demonstration, you can delete all the code within the Start() function, so that it looks like the following:
public override void Start()
{
}
Similar to the WebRole, we need initialize our storage account. Add the following line to the Start() function:
StorageAccountInfo account = StorageAccountInfo.GetDefaultQueueStorageAccountFromConfiguration();
Now we need to add some code to reference the queue we created in the WebRole:
QueueStorage service = QueueStorage.Create(account);
MessageQueue queue = service.GetQueue("messages");
As you can see, it’s pulling the same queue, “messages”, that was created by our WebRole. Now that we have that, we need to pull the messages from the queue. We do this by creating an infinite loop to check the queue. Once we have a message in the queue, we pull that from the queue, report it and then delete it from the queue. Remember, queues work in a FIFO prioritisation!
while (true)
{
Thread.Sleep(10000);
if (queue.DoesQueueExist())
{
Message msg = queue.GetMessage();
if (msg != null)
{
RoleManager.WriteToLog("Information",
string.Format("Message '{0}' processed.", msg.ContentAsString()));
queue.DeleteMessage(msg);
}
}
}
So now, you’re completed WorkerRole Start() function should look like the following:
public override void Start()
{
StorageAccountInfo account = StorageAccountInfo.GetDefaultQueueStorageAccountFromConfiguration();
QueueStorage service = QueueStorage.Create(account);
MessageQueue queue = service.GetQueue("messages");
while (true)
{
Thread.Sleep(10000);
if (queue.DoesQueueExist())
{
Message msg = queue.GetMessage();
if (msg != null)
{
RoleManager.WriteToLog("Information",
string.Format("Message '{0}' processed.", msg.ContentAsString()));
queue.DeleteMessage(msg);
}
}
}
}
And that’s all there is to it! A fully working WebRole and WorkerRole communicating with a queue!
