Single Sign On with Windows Azure Active Directory: a Deep Dive
Are you excited about the Developer Preview of Windows Azure Active Directory? I sure am!
In this post I am going to give a pretty deep look at the machinery that’s behind the Web Single Sign On capabilities in AAD in this Preview, demonstrated by the samples we released as part of the Preview.
Before we take the plunge, here there’s the usual disclaimer I pull out in these cases.
THIS IS A PREVIEW. The Windows Azure Active Directory Developer Preview is, to channel my tautological self, a preview. As such:
- It still has rough edges, things that are not as simple to use as they will be once we’ll get to general availability time. We already know about some of those; we fully expect to find various others thanks to your feedback.
My here goal is to help you to experiment with the preview: in this post I describe things as they are today, in the Developer Preview. If you want to know what is their intended final state please refer to John’s and Kim’s posts. - Given that you are willing to work with a preview, with rough edges and all (pioneers! Oh pioneers! ) , I assume that both your thirst for fine grained details and your tolerance for complexity are higher than the norm. Most of what I am going to describe here is NOT necessary for you to operate the service: if you just want to see the SSO flow work, skip the tome here and go straight to the step-by-step samples’ manual. Read on if instead you are interested in understanding a bit more of how AAD operates and how things relate to what you already know about Web SSO.
SSO for a LoB App in the Cloud
Let’s start with a pretty simple scenario, which also happens to be extremely common in my experience.
Say that you have one line of business app that you want to run in the cloud, for one of the many reasons that make it a good idea. You already have one Windows Azure Active Directory tenant - perhaps you are an O365 subscriber – and you want your users to sign in the LoB app in the same way as they do for your SharePoint online instance.
Implementing the scenario entails two steps:
- Provision the application in your directory tenant
- Establish trust between the app and the SSO endpoint of the directory
Anybody surprised? This is precisely what we’ve been doing for a good 1/2 decade by now: in ADFS2/WIF terms you could say that #1 corresponds to establishing a “relying party trust” (for the record I always hated the term, but I have to admit that it gives the idea) and #2 corresponds to running the WIF tools on the app against ADFS2. Pick any federation based products, on any platform, and I am sure you’ll be able to come up with concrete ways of making those abstract steps happen.
Windows Azure Active Directory is no exception, although you’ll notice some extra provisions here and there due to the multi-tenant nature of the service. Let’s examine those two steps in details, and use the opportunity to explore how the directory works.
Provision the Application in the Directory Tenant
Quick, how do you identify a service within a realm in Kerberos?
That’s right: you use a Service Principal Name. In line with the tradition, Windows Azure Active Directory does the same with just a couple of multi-tenancy twists. Provisioning one application to enable Web single sign on is just a matter of creating the proper ServicePrincipal object for it, and AAD will take care of the rest.
If you fully understood the last couple of paragraphs, chances are that you are a system administrator (or you have been at a certain point in your career).
If you didn’t, don’t feel bad: if you are a developer you likely never had a lot of exposure to the innards of a directory, given that you leverage it though contracts which abstract away the details. Think ADFS2 endpoints: you can happily set up Web SSO with it from your web app without the need to know anything about forests, LDAP attributes, schemas and whatnot.
With Windows Azure Active Directory you are still not strictly required to learn about how a directory works, however in this preview there are a number of places in which directory-specific concepts are surfaced all the way to the Web SSO layer. Although it is perfectly possible to manipulate those without knowing what they mean (even without invoking Searle ![]() ) I think you’ll appreciate a tad of context-setting here (pionieers! ).
) I think you’ll appreciate a tad of context-setting here (pionieers! ).
The Directory in Windows Azure Active Directory
Let’s take a look at the main artifact we’ll have to work with: the directory itself.
As of today, the best way of experiencing the directory is to get an Office 365 tenant. All of the walkthroughs and samples in the Developer Preview instruct you to get one, as the very first step. In the future this step won’t be required given that you can get a directory with your Windows Azure subscription.
Again as of today, you’ll find the most detailed technical information about the directory in the Office 365 documentation. You’ll have to be a bit careful as you read the Office365 docs to find information about Developer Preview scenario, as the terminology and the goals of the two are not 100% the same. For example: as an application developer, with “single sign on” you probably refer to the ability of users to sign in YOUR application by using their directory account; OTOH the O365 documentation talks to IT admins setting up the service for their companies, hence it refers to “single sign on” as the ability of signing in O365 applications using your local AD accounts. Both definitions are perfectly legit, they simply happen to refer to different scenarios which leverage different features. Keep that in the back of your mind as you read the docs, and you’ll find the info you need.
Here I’ll give you a super-concise mini-intro of what’s in the directory, hopefully that will help you to navigate the proper docs once you’ll decide to dig deeper. I’ll favor simplicity over strict correctness, hence please take this with a grain of salt.
In extreme synthesis, a directory is a collection of the following entities:
- Users
Users, passwords, password policies and the like - Groups
Security groups - Roles memberships
Who belongs to what. Note, only users (as opposed to groups) can be a role member - Service Principals
We’ll talk about those later - Domains
If you own one or more domains (in the DNS sense of the word) and you want to use it in O365 you can managed them via this collection - Subscriptions & licenses
- Company info
- Other stuff (often O365-specific)
The last 3 are what their names suggest: not super-relevant for the web SSO discussion anyway.
If you are watching closely the Windows Azure Active Directory news, you might have recognized the above list as a super-set of the entities you can query with the Graph API.
Every directory tenant gets these collections and the infrastructure which handles them. In our parlance, there are two main flavors of directory tenants:
- Federated. A federated tenant is connected to a local ADFS2 instance.
- The content of Users and Groups in the directory comes straight from the users and groups from the local AD instance.
The first time you establish the connection between local directory and your Windows Azure Active Directory tenant, a utility (the Directory Synchronization tool, DirSync for friends) makes a copy and configures itself to perform updates every 3 hours. Note that as of today DirSync will propagate to the cloud changes taking place on premises, but it won’t do anything in the opposite direction: DirSync is unidirectional. - All authentication flows will rely on federation: the local ADFS2 instance is responsible for authenticating credentials. No user password is replicated to the cloud.
- The content of Users and Groups in the directory comes straight from the users and groups from the local AD instance.
- Managed. A managed tenant does not have any footprint on-premises. Users, groups and everything else are cloud-native: they are created in the cloud, and in the cloud they live. That includes the user credentials, which will be verified by leveraging suitable could-only authentication endpoints.
For the purposes of the Web SSO discussion, the two tenant types are equivalent: the user experience at authentication time will differ (namely, the credentials will be gathered in different places) but the scenario setup is exactly the same in both cases.
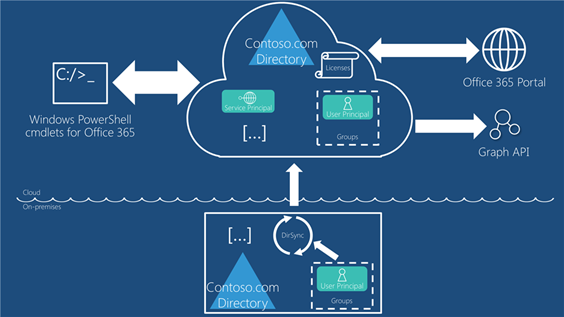
How do you get stuff in and out of those collections? There are four main routes, as shown below.
Here there’s the rundown, counterclockwise from the bottom.
- DirSync. As described, for federated tenants it’s the way in which your users and groups collections are first populated from your local AD. Nothing else is copied up. You can ignore this route for managed tenants, where there’s no on-premises collections to sync from. As you can see in the diagram, today the arrow goes only in one direction.
- Graph API. In the Developer Preview, the Graph API allows you to read a subset of the entities in the directory: namely Users, Groups, Roles, Subscriptions, TenantDetails and some of the relationships which tie those together. As the interaction is read-only, the arrow reflects it by pointing only outward. For more details on the Graph, what it can do today and what it will be allow you to do in the future please refer to Ed’s session here.
- Office 365 Service Administration Portal. The management and subscriptions sections of the Office 365 management portal allow you to manage users, groups and licenses. The arrow goes both ways, given that you can use the portal to both read and write the selected subset of directory entities it is designed to manage today.
- PowerShell cmdlets for Office 365. As of today, the most powerful tool for manipulating the directory is the collection of PowerShell cmdlets which come with Office 365. Via the cmdlets you can pretty much read and write anything you need for the development scenarios in the Preview
From that list you can clearly get the sense that Windows Azure Active Directory is already a shipping product, powering Office 365 since its GA back in 2011. It’s important to remember that the Preview is about the new developer-oriented capabilities of AAD (SSO and Graph) but the service in itself is already being used in production by many, many customers.
Now that we got some terminology to play with, let’s get back to our main task: we want to provision our Web application in the directory.
Creating the ServicePrincipal
In a directory every entity that can be accessed is defined as a security object; every entity that can actively access those objects (hence needs to be authenticated) is represented as a security principal. There are user principals, typically representing people, and service principals. With some oversimplification, service principals are used to represent anything that is not a person and can actively access resources. As you have guessed by now, provisioning our application in AAD means creating a ServicePrincipal object for it.
| Note. At this point you might say: “Wait a minute. Isn’t an RP a resource? As such, shouldn’t it be a service object rather than a service principal?“. That’s a fair point, but only because in the SSO flow we are focusing on the resource aspect of being an application and ignoring the other roles that an application can play. In a real system, an application will actively try to access other resources just as often: think of the expense reporting app we showcased at TechEd, which is configured to be accessed via web SSO but that also calls back to the Graph API to find out more about the incoming user and its graph. Also: AAD supports completely different types of applications, such as the ones extending SharePoint online, where all communications take place between servers and where the app does obtain a security token and uses it to secure resource requests. Using a service principal to represent an application affords us the freedom of modeling all those behaviors. We’ll get in more details about the nature of AAD service principals later: for the time being, hopefully this note clarified why we are using them here. |
As of today (yes, I say this a lot in this post) the only tool you can use to create a service principal is the set of PowerShell cmdlets coming with Office 365. You can download the cmdlets here. The Preview walkthrough give full steps by steps instructions for downloading and installing the cmdlets, launching the console and connecting the console session to your tenant: here I assume you followed all those steps.
The command you use for creating the service principal might look like the following:
PS D:\Users\admin\Desktop> New-MsolServicePrincipal -ServicePrincipalNames @("OrgIdFederationSample/localhost") -AppPrincipalId "7829c758-2bef-43df-a685-717089474505" -DisplayName "Federation Sample Web Site" -Type Symmetric -Usage Verify -StartDate "02/02/2012" -EndDate "11/11/2013"
The most interesting values here are:
- The ServicePrincipalNames. In classic Active Directory, service principals are identified following a fixed naming schema (service principal name, or SPN) which helps to identify a specific service type, where it is running, and so on. Windows Azure Active Directory uses a comparable naming schema. The ServicePrincipalNames value represent the service and its host; it will be used as part of the service’s SPN. You derive its value from what you know about the application you are provisioning.
- The AppPrincipalId is the unique identifier of the principal. Any GUID will do.
We can gloss over the rest for now. The command generates the following output:
The following symmetric key was created as one was not supplied qY+Drf20Zz+A4t2w
e3PebCopoCugO76My+JMVsqNBFc=
DisplayName : Federation Sample Web Site
ServicePrincipalNames : {OrgIdFederationSample/localhost}
ObjectId : 59cab09a-3f5d-4e86-999c-2e69f682d90d
AppPrincipalId : 7829c758-2bef-43df-a685-717089474505
TrustedForDelegation : False
AccountEnabled : True
KeyType : Symmetric
KeyId : f1735cbe-aa46-421b-8a1c-03b8f9bb3565
StartDate : 02/02/2012 08:00:00 a.m.
EndDate : 11/11/2013 08:00:00 a.m.
Usage : Verify
Here there’s a lot of stuff that is not used for the Web SSO case (like the symmetric key or the trusted for delegation bit), feel free to ignore them for now. However there’s a key info that is still missing for the Web SSO scenario, and that’s the return URL of the application represented by the service principal. New-MsolServicePrincipal just happens to not have a parameter for it, which is why we didn’t add it in the first place. Now that we have a handle for our service principal we can simply add it with the following command sequence:
PS D:\Users\admin\Desktop> $replyUrl = New-MsolServicePrincipalAddresses –Address "https://localhost/OrgIdFederationSample"
PS D:\Users\admin\Desktop> Set-MsolServicePrincipal –AppPrincipalId "7829c758-2bef-43df-a685-717089474505" –Addresses $replyUrl
Alrighty, we have a ServicePrincipal representing our LoB application in our directory. Fabulous! Now what?
The Developer Preview STS Endpoint
As soon as you create a service principal in your tenant, AAD decides that you need token issuing capabilities and starts to prepare the infrastructure that will give you all the necessary endpoints you need for lighting up the Web SSO scenario (or any other developer-oriented scenario).
This preparation (internally we call it SYNC, but we won’t likely use the term with you given the potential confusion with DirSync, completely different animal) is the reason for which you might at times experience a few mins delay between the ServicePrincipal creation and the availability of the associated endpoints.
| Note: This is also the reason for which - at least in this preview – the order with which you perform the tasks described here is important. If for example you’d skip to the “Establishing Trust…” section without adding a ServicePrincipal first you’d find that the necessary infrastructure is not there yet. |
Here there’s where things get interesting. If you are familiar with the “traditional” ACS tenants (“namespaces”), you know that when you create a namespace you get (among other things) a number of endpoints rooted on a base URL and offering the ability to process and issue tokens using different protocols:
- https://yournamespace.accesscontrol.windows.net/v2/wsfederation
- https://yournamespace.accesscontrol.windows.net/v2/Oauth2-13/
- https://yournamespace.accesscontrol.windows.net/v2/wstrust
- …
See slide 7 of last year’s TechEd NA ACS presentation. To be 100% clear, that basically means that in traditional ACS when you create a tenant you are actually creating a brand-new DNS entry, mapped to an actual endpoint living in a given region, and so on.
AAD does things differently. Instead of creating a brand-new DNS name for every tenant, AAD exposes a common multi-tenant endpoint of the form
- https://accounts.accesscontrol.windows.net/v2/wsfederation
| Note: In this preview this is the entry point for every tenant and every application wanting to do Web SSO; in the future we will add support for more protocols. Also note, although there are other endpoints appended there (which we will ignore for today), that does not mean that all the endpoints you’d find in a classic ACS namespace are active. |
The endpoint is always there: no need to create a new one when a tenant comes to life. What happens when you create a principal in your directory tenant is that new data is added in the ACS backed, so that requests to the endpoint asking for tokens for the app represented by the principal will be recognized and fulfilled.
It is a bit reductive, but how about the following: when you create a principal in your directory tenant, it is like if a new RP entry for the corresponding app is created in the accounts namespace. That’s for the SSO case; if we’d be creating a principal for another type of app, which needs to obtain tokens from ACS, it would be like a new Service Identity entity gets created for it in the accounts namespace. In fact, it’s like if both entities are created all the time given that we can’t predict how the principal will be used. I know that my colleagues will shoot me for having used such a coarse metaphor, so please help me out here and don’t take it too literally: that’s not exactly what happens, for example there is far more tenant isolation than my metaphor would imply.
The differences from the traditional ACS do not end here. For example, the home realm discovery experience follows a different path: let’s get in the details.
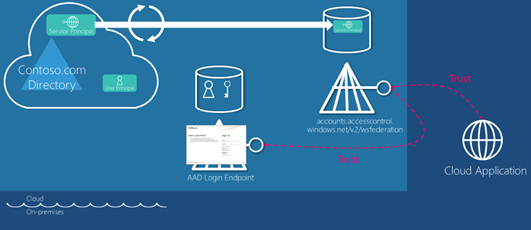
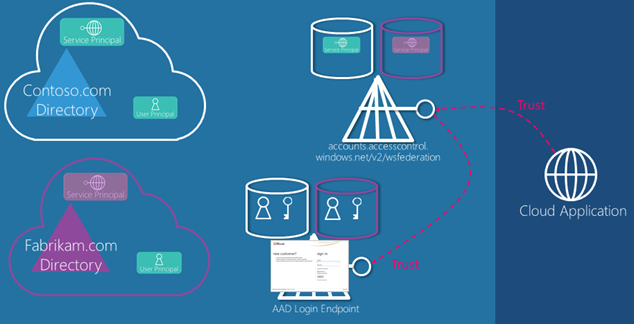
The https://accounts.accesscontrol.windows.net/v2/wsfederation endpoint acts as a federation provider, which trusts a single authority: the AAD login endpoint.
| Note: In this preview you cannot directly trust any identity provider other than AAD itself. If you need to trust other IdPs in your solution, you can introduce a traditional ACS namespace as well and take advantage of its capabilities: that would entail configuring your RP to trust tokens from two sources, the endpoint being described here and the one from the ACS namespace. |
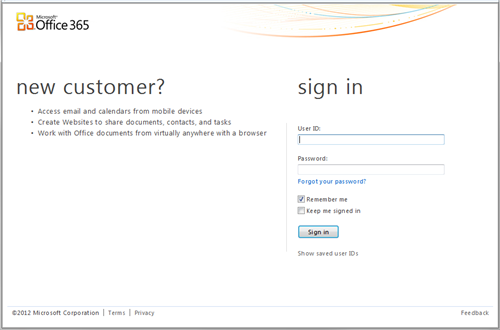
You can think of this endpoint as one RP-STS which trusts only one identity provider: the AAD login endpoint. The AAD login endpoint is what renders the credentials gathering UI. For the time being, that’s the Office365 –branded login UI: as we move forward, the look and feel will become more generic. Screenshot:
That certainly looks like the page an identity provider would display. If the user comes from a managed tenant (remember? it’s the case in which there is no on-premises directory at all, everything lives in the cloud) that is exactly the case; the user enters username & password, the AD login endpoint issues a token (via ws-fed) and the flow backtracks through ACS and (if everything is in order) back to the RP from where the request originated.
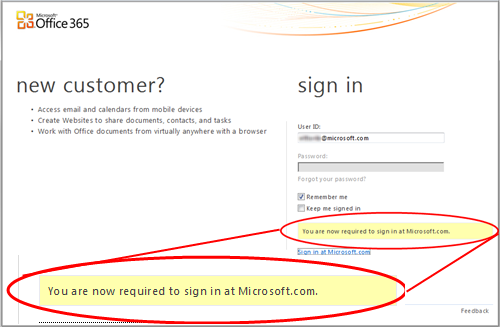
If the user comes from a federated tenant, then the competent authority for authenticating the user is the on-premises ADFS2 instance. In that case, the AD login endpoint will act as another federation provider in cascade from the accounts... one. The login UI provides home realm discovery capabilities: when the user types in a User ID whose domain corresponds to one federated tenant, the page greys out the password, informs the user that in order to log in he or she needs to authenticate with the appropriate endpoint and provides the necessary links to get there. In the screenshot below you can see this flow in action for my own user, which happens to belong to a federated tenant (microsoft.com itself).
Upon successful authentication at the local ADFS2 instance, the flow backtracks through all the federation providers and finally back to the application.
See? It’s all standard federation flows, it’s just a slightly different take from classic ACS to better accommodate multi-tenancy and ensure that everything is driven by the creation of the ServicePrincipal; as you surely noticed, since then all the rest of the configuration took place autonomously without the need of further intervention from you.
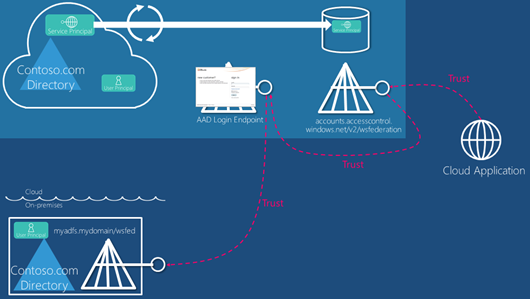
Let’s summarize in a diagram the various endpoints coming into play and the relationships that tie them. We can start with the case of the federated tenant:
In this case the application trusts the single-instance STS, which in turn trusts the AAD login endpoint, which in turn trusts the on-premises ADFS2 instance. The developer preview STS is willing to issue tokens for the application because the necessary info have been provided in form of ServicePrincipal.
Let’s see how the diagram changes in case the tenant is managed.
In the managed tenant case there is no on-premises footprint. The AAD login endpoint acts as identity provider, and authenticates users directly against a cred store in the cloud.
| Note: Don’t get too caught up by the fact that today the developer preview STS and the AAD login endpoint are two separated endpoints. I am just describing exactly what happens today so that you are not left with the doubt that we are doing who-knows-what in those redirects, but in fact you could just think at all the cred gathering/HRD functions as taking place at the developer preview STS without loss of generality. The logic currently residing in the AAD login endpoint could easily live directly at the developer preview STS endpoint. |
On the directory side that’s pretty much it for enabling a LoB cloud application. In order to close the loop we now need to get on the application’s side and see what it takes to establish a trust relationship with the developer preview STS.
Establish Trust Between the App and the Developer Preview STS Endpoint
Time to fire up Visual Studio!
The Developer Preview of Windows Azure Active Directory offers WebSSO capabilities through WS-Federation, hence we can use Windows Identity Foundation to connect our .NET apps.
| Note: As we mentioned during our TechEd sessions on Windows Azure Active Directory, other protocols (SAML-P, OpenID Connect and OAuth) are in our crosshair. But even with WS-Federation, you are by no means constrained to the .NET platform. You can pretty much get this done on any development platform: we have examples on Java and PHP to give you an idea of that. In fact, WS-Federation in itself is not hard: we even explicitly code it in our Java and PHP samples to make that point, despite the fact that the libraries we take advantage of do support it. The main thing that you don’t want to code (trust me on that |
In the LoB web application scenario, establishing trust follows pretty much the same flow you are used to for connecting with ADFS2 or traditional ACS: you point the WIF tools to the metadata of the authority you want to trust. We’ll just have to tweak few things along the way.
Here we have the chance to see multi-tenancy in action. Assuming that your Office 365 tenant is awesomecomputers.onmicrosoft.com, you’ll find the metadata of your STS endpoint at the following address:
This is where we start to see some new elements in the process. Windows Azure Active Directory identifies applications in the context of Web SSO according to a very specific naming schema. That naming is surfaced all the way to the protocol layer. AAD expects the application to use as realm a name of the form
spn:<AppPrincipalId>@<TenantID>
where AppPrincipalId is the GUID we used when creating the ServicePrincipal in the directory, and <TenantId> is a GUID which represents awesomecomputers.onmicrosoft.com in AAD. This guarantees that the entry is uniquely identifying the service we are targeting in the intended context (more about this in the multi-tenancy discussion).
As you know, we need to feed the realm to the WIF tools in order to configure trust correctly. At this point we know the value of AppPrincipalId (we supplied it in the first place) but we don’t yet know TenantId.
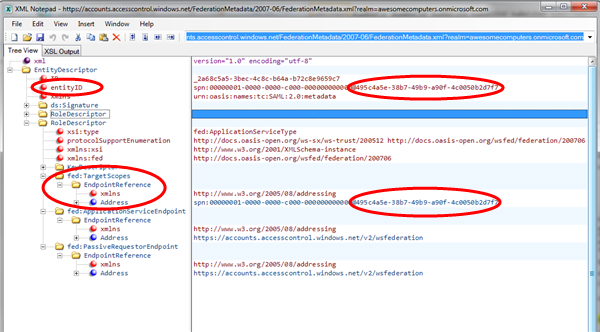
The good news is that the TenantID value is in the metadata document: the issuer itself is identified by an spn qualified per tenant (of the form spn:<AADInstanceId>@<TenantId>, where you can consider AADInstanceId pretty much a constant) hence you can find it on the right of the <‘@’> sign in the entityID and the RoleDescriptor/TargetScopes/EndpointReference/Address. You can see an Xml Notepad snapshot with those values highlighted in the document.
| Note: If you don’t want to scurry in the metadata document, you don’t have to. You can just use some placeholder text as application URI and run the WIF tools, and the right values will show up in your web.config as part of the elements describing the issuer. That’s the approach we follow in the samples walkthroughs. However that would still require you to go through XML, and given that this is meant to be a deep dive I wanted to give you more context here and highlight that the ____@TenantId qualifier is a generic mechanism applied across the board. |
Now that you have all the values you need, you can launch the WIF tools (1.0 or 4.5, doesn’t matter), feed in spn:<AppPrincipalId>@<TenantID> un the Application URI field and point to the metadata document of your tenant; accept the defaults for everything else.
The resulting WIF config section is going to look as the following:
  1: <microsoft.identityModel>
  2:   <service>
  3:     <audienceUris>
  4:       <add value="spn:7829c758-2bef-43df-a685-717089474505@495c4a5e-38b7-49b9-a90f-4c0050b2d7f7"/>
  5:     </audienceUris>
  6:     <federatedAuthentication>
  7:       <wsFederation passiveRedirectEnabled="true"
  8:        issuer="https://accounts.accesscontrol.windows.net/v2/wsfederation"
  9:        realm="spn:7829c758-2bef-43df-a685-717089474505@495c4a5e-38b7-49b9-a90f-4c0050b2d7f7" requireHttps="false"/>
  10:       <cookieHandler requireSsl="false"/>
  11:     </federatedAuthentication>
  12:     <applicationService>
  13:       <claimTypeRequired>
  14:         <!--Following are the claims offered by STS 'spn:00000001-0000-0000-c000-000000000000@495c4a5e-38b7-49b9-a90f-4c0050b2d7f7'. Add or uncomment claims that you require by your application and then update the federation metadata of this application.-->
  15:         <claimType type="https://schemas.xmlsoap.org/ws/2005/05/identity/claims/name" optional="true"/>
  16:         <claimType type="https://schemas.microsoft.com/ws/2008/06/identity/claims/role" optional="true"/>
  17:         <!--<claimType type="https://schemas.xmlsoap.org/ws/2005/05/identity/claims/nameidentifier" optional="true" />-->
  18:         <!--<claimType type="https://schemas.microsoft.com/accesscontrolservice/2010/07/claims/identityprovider" optional="true" />-->
  19:       </claimTypeRequired>
  20:     </applicationService>
  21:     <issuerNameRegistry type="Microsoft.IdentityModel.Tokens.ConfigurationBasedIssuerNameRegistry, Microsoft.IdentityModel, Version=3.5.0.0, Culture=neutral, PublicKeyToken=31bf3856ad364e35">
  22:       <trustedIssuers>
  23:         <add thumbprint="3464C5BDD2BE7F2B6112E2F08E9C0024E33D9FE0"
  24:          name="spn:00000001-0000-0000-c000-000000000000@495c4a5e-38b7-49b9-a90f-4c0050b2d7f7"/>
  25:       </trustedIssuers>
  26:     </issuerNameRegistry>
  27:     <certificateValidation certificateValidationMode="None"/>
  28:   </service>
  29: </microsoft.identityModel>
Lines 3 and 9 reflect what we said about the realm of the service (hence the intended audience) being expressed in the spn format.
Lines 6 to 11 show, as expected, the ws-federation coordinates for connecting to the developer preview STS endpoint and presenting the right WTRealm value.
Lines 23-24 show the entry for the developer preview STS endpoint: its certificate thumbprint and the issuer name, also in spn format and scoped for the tenant, as advertised in the ws-federation metadata document.
Do we have everything we need? Not yet ![]() but I am ready to be that at this point you’ll occasionally forget the next step and hit F5, hence it’s a good idea to see what happens so that you’ll recognize the error in the future should you stumble in it. Hit F5!
but I am ready to be that at this point you’ll occasionally forget the next step and hit F5, hence it’s a good idea to see what happens so that you’ll recognize the error in the future should you stumble in it. Hit F5!
| Note: This would be a good moment to point out that you need to host your application on HTTPS. If you don’t, you’ll get an error. For the benefit of you troubleshooters landing on this page via search engines, the error code in that case is ACS50011. |
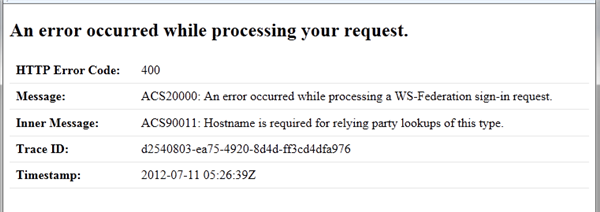
As predicted, you’ll get an error.
What happened? Well, without going too much in the details, there is one last piece of information we need to add in the web.config: that’s the return address for the application, the same that we added to the ServicePrincipal. Failure to do so will get you an ACS90011, as in this case. And since we are at it: the address you use is case-sensitive: if you misspell the reply address or get the cases wrong you’ll be prompted for authentication, but you’ll end up with an ACS50011.
You add the reply address in the <wsfederation>, via the reply attribute, as follows:
  1: <wsFederation passiveRedirectEnabled="true"
  2:  issuer="https://accounts.accesscontrol.windows.net/v2/wsfederation"
  3:  realm="spn:7829c758-2bef-43df-a685-717089474505@495c4a5e-38b7-49b9-a90f-4c0050b2d7f7"
  4:  reply="https://localhost/OrgIdFederationSample" requireHttps="false"/>
That’s it. It’s time to see what we’ve got!
Running the LoB App
Now we are finally ready. If you hit F5 you’ll see the classic ws-federation dance redirecting from your app to the developer preview STS, form that to the AAD login endpoint, and then back in the opposite order transforming tokens until the correct one hits your application.
For the fans of tracing, here there’s the sequence of requests. For simplicity I am omitting the body of the requests and the responses: it’s all the usual ws-federation here, nothing strange.
| GET https://accounts.accesscontrol.windows.net/v2/wsfederation?wa=wsignin1.0&wtrealm=spn%3a7829c758-2bef-43df-a685-717089474505%40495c4a5e-38b7-49b9-a90f-4c0050b2d7f7&wctx=rm%3d0%26id%3dpassive%26ru%3d%252fWAADWebSite1%252f&wct=2012-07-11T06%3a13%3a08Z&wreply=https%3a%2f%2flocalhost%2fOrgIdFederationSample | First leg to the developer preview STS endpoint. Note the realm of your app and the return address |
| GET https://login.microsoftonline.com/login.srf?wa=wsignin1.0&wreply=https%3a%2f%2faccounts.accesscontrol.windows.net%3a443%2fv2%2fwsfederation&wp=MBI_FED_SSL&wctx=cHI[.shortened.]YlNpdGUxJTI1MmY1 | The developer preview STS redirects to the AAD login endpoint. If you already played with Office365 you might recognize the address. Note the return address. |
POST https://login.microsoftonline.com/ppsecure/post.srf?wa=wsignin1.0&wreply=https%3a%2f%2faccounts.accesscontrol.windows.net%3a443%2fv2%2fwsfederation&wp=MBI_FED_SSL&wctx=cHI[.shortened.]&bk=1341987190 |
Assuming that we are working with a management tenant, the page served in the former step gathered the user credentials; this step is posting them back. |
| POST https://accounts.accesscontrol.windows.net/v2/wsfederation | The AAD login endpoint issues tokens via ws-federation, too: this post is the classic autopost form being sent back to the developer preview STS endpoint. The body contains, besides the user token, all the necessaire for the STS to match the request with the correct tenant. |
| POST https://localhost/OrgIdFederationSample | The developer preview STS issued a token via ws-federation, and this is the final auto-post which delivers the token to your application |
WIF will happily take care not only of kickstarting the flow shown above as soon as the first unauthenticated requests arrive, but will also validate the incoming token, create a session from it and make its content (claims) available. Now, aren’t you curious to take a peek at what we actually get in that token? Me too! ![]()
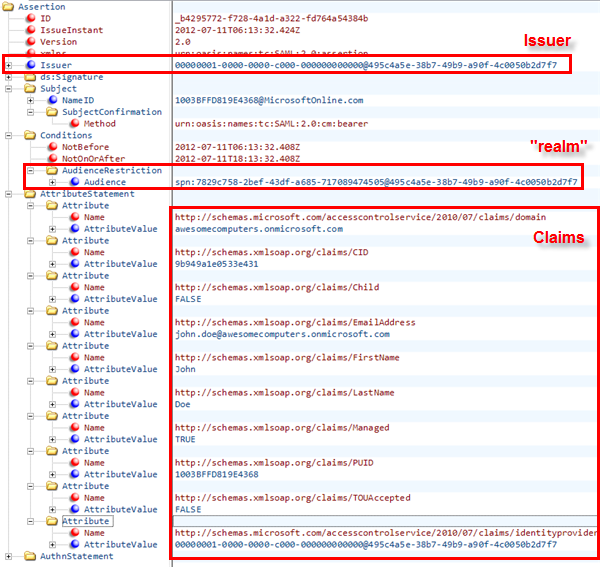
First of all: in this preview, the Web single sign on flow will give you a SAML2.0 token. I don’t want to hit you with pages and pages of XML, so once again I’ll show you a view form XML Notepad:
I expanded and highlighted the values of interest:
- The issuer matches the value that WIF got from the metadata and saved in the application’s web.config
- The AudienceRestriction, which establishes who the current token is meant to, is indeed in the format we expected: given that our web.config reflects that, the validation succeeds and everything is good
- The returned list of claims characterizes the authenticated user in the context of AAD: which domain he is from, essential personal info, unique identifiers, ad so on.
| Note: In the developer preview you will not get in the Web SSO token advanced information about the user, such as to which AAD groups he or she belongs to. However your application can obtain such info (and much more!) by using the Graph to query the directory. In order to get more info about a user you’ll need to use its email claim value. More about this in the Graph content. |
Whew, I really did get quite deep, didn’t I. Remember, you don’t need to understand all this stuff in order to set up the most basic Web SSO scenario with Windows Azure Active Directory: this is for you to understand how the preview works in finer details, so that when you’ll need to go beyond the basics you’ll know where to put your hands.
Let’s quickly summarize. Our original goal was to enable users to access a LoB application hosted in the cloud in the same way in which they access the apps in the Office 365 suite. In order to do that, we
- Provisioned in our directory tenant a ServicePrincipal for our application.
- This required understanding a bit more how the diirectory works, and picking the right tool for the job (cmdlets)
- Connected our application to Windows Azure Active Directory, Specifically, we
- Identified the settings of our tenant and how they are projected in ws-federation
- Used WIF to trust the developer preview STS endpoint
And that’s pretty much it. If that seemed long, that’s because I used the scenario as an excuse for giving you details about how things work: what things work exactly as in federation scenarios you already know about, which details are different, frequent gotchas you might stumble on, and so forth.
Now that you are a pro, you are ready for considering a scenario with more moving parts.
Handling Multi-Tenancy
Say that, instead of working with a LoB application for your own users, you are actually selling your cloud application to 3rd parties. The Windows Azure Active Directory subscribers are a very appealing audience, and you want to make sure that they can easily access your application.
At thigh level, the flow you have learned about provisioning applications remains unchanged: it just happens to apply to multiple tenants.
In practice, every customer will have to run the same cmdlet script with New-MsolServicePrincipal to provision your application in their own directory tenant. When I say the same, I literally mean the same: one approach you could implement would be to provide the script to your customer once they went through your application purchasing flow. As we’ll see below, this approach has the advantage of using a consistent AppPrincipalId across tenants.
Assuming that your customers have managed tenants, the scenario would roughly look like the following diagram.
The developer preview STS endpoint and the AAD login endpoint know about both tenants. What changes, then? The STS endpoint remains the same, but the parameters we’ll send around clearly do not.
Remember what we had to do to establish a trust relationship between our application and the developer preview STS endpoint: we had to hook up to the metadata document of the target tenant. That sounds like a good place to start for understanding how to tackle this scenario.
If you save the metadata documents of two tenants (say awesomecomputers and treyresearchinc) and run WinDiff on the two files, you’ll find that apart from the IDs there is only one difference: the SPN of the issuer.
That’s right! If you recall, the issuer ID was of the form spn:<AADInstanceId>@<TenantId> . As the two tenants have different TenantId values, the issuer in the two cases will be different. That means that our app will have to be ready to accept multiple issuers, as many as there are customers of our application.
This should remind you of another very important parameter, which is just as dependent from the TenantId: the realm of the application. Your application will need to attach a different wtrealm value to the signin message, depending on the intended tenant, and will need to expect tokens with a different AudienceRestriction according to the tenant which originated them.
| Note: Although dealing with multiple issuers is reasonably common, we observed that having to change the realm of the application itself according to the issuer can be confusing for developers. Also, the spn format is not always super-clear if the service developer is not directly involved with tenant-related work. After all, isn’t the service developer that usually decides how to identify his own service? Those are legitimate questions, however I would note that this approach has advantages for multi-tenant apps: if you already have a partitioned app, this is just one of the elements that will be tenant-specific. Please give it a try and let us know what you think! |
What did not change between the two metadata document? The signing key. That means that from the pure crypto perspective, all tokens issued for Web SSO purposes by the developer preview STS endpoint will all be signed with the same key and can be validated with the same certificate. Another thing that does not change per-tenant is the reply URL (although that might not be true if the way in which you partition your app for your own tenants entails using different URLs; in that case, remember that the ServicePrincipal creation would need to reflect that for every individual tenants).
So, how do we handle trust with all those moving parts? Let’s break down what needs to happen in discrete tasks.
- We need to construct the signin message to the developer preview STS endpoint so that it uses the correct realm for the intended tenant
- We need to expect different issuer identifiers, according to our customer’s list
- We need to expect different AudienceUris, according to our customer’s list
WIF was not designed to accommodate those tasks out of the box: the assumption there is that you’ll trust a single authority, and that authority will take care of brokering relationships with others if the need arise. Luckily, WIF is also a super-flexible toolkit which can be easily customized in almost every aspect of the authentication processing and trust management.
Here there’s how we implemented those tasks in our samples: this is just one solution, but there are many other possible approaches that are just as valid.
For 1. Given that the WIF default would be to redirect all unauthenticated requests to the one authority it trusts, we
a. turned off the default blanket redirect
b. used forms authentication to redirect to one specific page (or route, for MVC)
c. In that page/route, created a dynamic experience which presents a list of links (one per customer’s tenant) whose HREF corresponds to the signin message crafted to attach the wtrealm containing the correct TenantId
In order to implement c, we maintain a file with a list of customers and corresponding TenantIds, the idea being that this file is dynamically extended whenever a new customer comes on board. The choice of showing a list is dictated by the desire of keeping things simple, but you can devise any mechanism (like asking the user to type somewhere their email and use it to match the domain of the target tenant) which would not expose your customer’s list.
For 2. Given that the certificate is the same in all cases, and the OOB IssuerNameRegistry is basically a way of assigning a name to token signing certificates, in terms of validation we’ll be fine with a single entry with any name and the thumbprint of the signing certificate from any tenant's metadata document.
For 3, WIF admits multiple AudienceUri values: however it is usually not a good idea to update the web.config while the application is running. As a result, we created a custom TokenHandler for SAML2 tokens, which refers to the same list as 1 to look up if the AudienceRestriction of the incoming token corresponds to one in the tenant’s list. Given that this is the only deviation from the default SAML validation behavior, the implementation is very, very simple.
In summary: if you are an ISV and you want to enable Web single sign on with Windows Azure Active Directory, we’ve got you covered. You only need to integrate the tenant tracking system as part of your customer onboarding process.
Next Steps
Well, I hope that this long post satisfied your thirst for details about the developer preview of Windows Azure Active Directory! Next in my pipeline are a couple of posts giving some more details on how we structured the Java and PHP examples: I won’t go nearly as deep as I have done here, but I’ll see how – module intrinsic differences between platforms – in the end claims-based identity is claims-based identity everywhere, and what you learn on one is easily transferable to the others.
And how about your pipeline? Hopefully A TON of feedback for us! I hope you’ll enjoy experimenting with our developer preview, and I cannot wait to see what you’ll achieve with it. In the meanwhile, if you have questions do not hesitate to drop us a line in the forums
Comments
Anonymous
July 14, 2012
Thank you Vittorio for this post! I for one have trouble fully implementing a new technology without this type of deep understanding of its internals. This will help me tons with O365 and SharePoint work. Looking forward to more deep dives on AAD.Anonymous
July 17, 2012
Excellent post!Anonymous
January 25, 2013
The comment has been removed
