Note
Access to this page requires authorization. You can try signing in or changing directories.
Access to this page requires authorization. You can try changing directories.
Overview
I wanted an easy way to leverage Azure AD Groups in my application. Thanks to Dushyant and my previous post on App Roles, I was able to throw together a sample. references: Authorization in Cloud Applications using AD Groups , Azure App Service Authentication – App Roles
NOTE: If your user/org uses many groups, it is possible that the groups claim will not be returned due to size of the claims. In that case you would need to give your application rights to read the directory and get the groups information by using the Graph APIs.
Configure Web App for Azure Active Directory Authentication
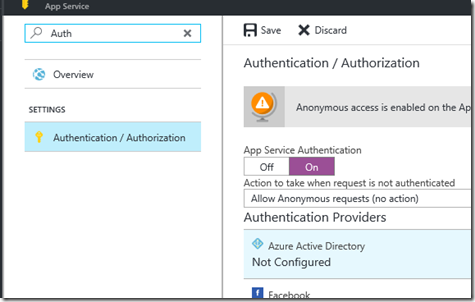
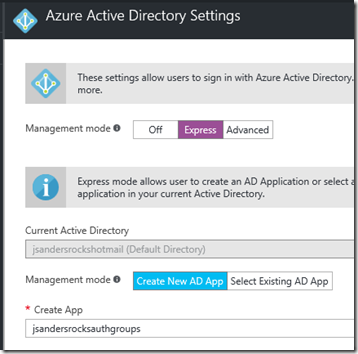
Configure Azure Active Directory for your application using the Express Settings:
This will create a new application in Azure Active Directory for you with the name of the App as default. Make sure you save your changes by hitting OK in this screen and then Save in the next:
Configure Manifest to include Group Claims in Auth Token
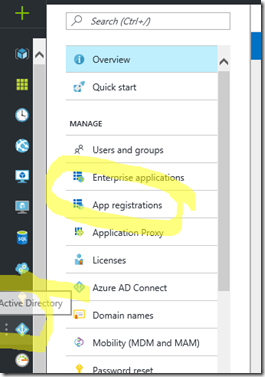
Go to Azure Active Directory to configure the Manifest. Click on Azure Active Directory, and go to App registrations to find your application:
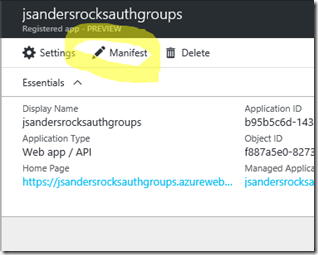
Click on your application (or search for it if you have a lot of apps) and edit the Manifest by clicking on it:
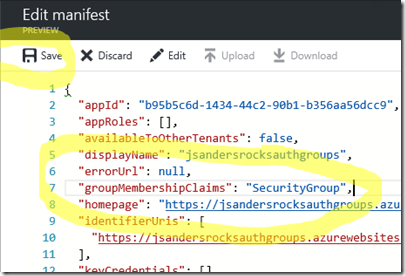
Locate the “groupMembershipClaims” setting. Set its value to either “SecurityGroup” or “All”. To help you decide which:
“SecurityGroup” - groups claim will contain the identifiers of all security groups of which the user is a member.
“All” - groups claim will contain the identifiers of all security groups and all distribution lists of which the user is a member
Here I set it to “SecurityGroup” for my application (NOTE: this could be a HUGE list if you choose “All” and the individual is member of lots of DLs so use judiciously for performance reasons). Now hit ‘Save’:
Now your application will include group claims in your manifest and you can use this fact in your Code!
Code to easily use Groups
You could test the OID of the groups you assign to users directly in code. For example if the groups claim contains the OID 3298384-3aaafe0-3343… But that is hard to read and implement everywhere you want to use it. Also you cannot take advantage of the classes that use the Roles type. For instance, you can deny access to a page based on the Role by specifying it in the Web.Config. Read my previous blog on this: Azure App Service Authentication – App Roles
I chose to implement the same strategy as the above referenced post. I read the groups and assign it to Roles in the authentication pipeline! Rather than use the ugly OID Guid, I will use a friendly name and I can easily add this to the Web.Config and/or App Settings in the portal as needed.
How to get OID
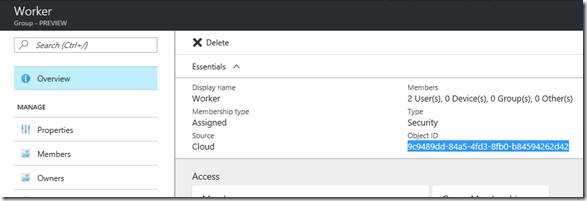
Simply look up the Group OIDs in your portal! Here is the ‘Worker’ group OID:
I did the same for the ‘Worker’ group and then added these as app settings to the Web.Config (you can also just add them to the portal).
The Key will be the OID and the Value is the friendly value:”"
 <configuration>
  <appSettings>
        <add key="7d04bcd3-3c48-49ab-a064-c0b7d69896da" value="Managers" />
        <add key="9c9489dd-84a5-4fd3-8fb0-b84594262d42" value="Worker" />
    </appSettings>
Now I will edit the previous code from the reference blog to fix up the Roles based on the user Groups membership:
                 foreach (Claim claim in ClaimsPrincipal.Current.FindAll("groups"))
                {
                    // use the OID and get a friendly name to use as the role (if it exists)
                    var groupStringValue = System.Configuration.ConfigurationManager.AppSettings[claim.Value];
                    if (groupStringValue != null)
                    {
                        // build the list
                        appRoles.Add(new Claim(claimsIdentity.RoleClaimType, groupStringValue));
                    }
                }
Finally add some access rules based on these assigned roles just like before!
    [Authorize(Roles = "Managers")]
    public class TestAdminAccessController : ApiController
    {
Summary
This is just one way to use Azure Active Director (AAD) Groups in your Azure App Service and configure it quickly and easily.
Note: Azure AD caps at 200 the number of groups that can be sent via JWT format. If the user belongs to more than 200 groups, Azure AD does not pass any group claims; rather, it sends an overage claim that provides the app with the URI to use for retrieving the user’s groups information via the Graph API. You should change the appRoles.Add section to accommodate this (subject of a later post or better yet read: Modern Authentication with Azure Active Directory for Web Applications)
If you found this helpful, please drop me a note!
Comments
- Anonymous
March 13, 2017
Great! - Anonymous
July 18, 2017
Dear Jeff, I try to implement in my azure webapp what you explain above. I find a unique problem: error CS0111: Type 'Startup' already defines a member called 'ConfigureAuth' with the same parameter types'ConfigureAuth' is also present in startupauth.cs. How can I resolve itThank you
