Note
Access to this page requires authorization. You can try signing in or changing directories.
Access to this page requires authorization. You can try changing directories.
Last Updated: October 12, 2018
- Added note for ACR app settings.
- Added clarification for environment variables.
- Added item related to permissions on the CIFS mount.
Azure App Service on Linux and Web App for Containers allow you to run your Web App on Linux and Apache. Azure App Service on Linux provides a collection of Microsoft-provided runtime stacks that you can use for your Web App. Web App for Containers makes it possible to use your own Docker container in Azure Container Registry, Docker Hub, or a private registry. You can even use multi-container deployments using Docker Compose or Kubernetes.
Note: Bookmark this post! I update it frequently as we uncover issues and as our Linux offerings evolve.
In this post, I cover both App Service on Linux and Web App for Containers. Each topic indicates which offering(s) it applies to using the following icons.
 Applies to Azure App Service on Linux
  Applies to Web App for Containers
If a topic applies to both App Service on Linux and Web App for Containers, both icons are used.
General Information If a feature is disabled in the portal, it's not available on Linux. If you don't see a feature you want, you can request the feature.
Deployment If you're deploying using Web Deploy, set WEBSITES_WEBDEPLOY_USE_SCM to false. To prevent down-time when you update your code, use Continuous Deployment. If you change your Docker container, it may take a minute or so for it to take effect. Custom images are stored on disk unless a worker change happens. Continuous Deployment requires that the image:tag combination remain the same.
Multi-Containers We have a great tutorial on multi-container deployments. You need to understand the concept of the "web" container. You can explicitly set the web container using an app setting. All containers must start or Web App startup will fail. All images must use the same registry. If you're using Azure Container Registry, you need to set some app settings.
Configuration You can enable and disable storage persistence with an app setting. You cannot change permissions on the /home directory when persisting storage. App Settings are injected into your app as environment variables at runtime. Some characters may be stripped out of environment variable names. Your environment variables won't appear in the Bash console. Set your default document in a Node.js app using JavaScript. You can now force SSL using the "HTTPS Only" option in the Azure portal. If you're persisting files, only the /home directory is persisted. To use SSH, your Docker image needs special sauce. You can use your favorite SSH client with Web Apps. To use SFTP, your Docker image needs more special sauce. Pay attention to your slash direction. You can use your own DNS servers.
Troubleshooting If your site doesn't start, check the Docker log. You can discover and download the latest Docker logs using Kudu. You can view the most recent entries in your Docker log in the Azure portal. If your container takes a long time to start, increase the start time limit. Your container must respond to an HTTP ping. You can remotely debug your Node.js app using VS Code.
Best Practices You shouldn't install components using SSH because they won't persist. The Bash console in Advanced Tools is a different Docker container. If you're persisting files, don't copy data to /home during build. You don't need (and should not have) SSL support in your app. You can only expose one port to the outside world. Don't use df to find your disk space usage. Don't worry about the SSH port in App Service.
General Information
If a feature is disabled in the portal, it's not available on Linux.

Azure App Service has a rich feature-set, but not all of those features are currently available for Linux apps. We're working on adding new features all the time, and once new features are added, they'll be enabled on the menu in the Azure portal. If the menu item for a particular feature is disabled (grayed out) in the menu for your Linux apps, it's simply because we haven't added that feature yet.
If you don't see a feature you want, you can request the feature.
If you want a feature that isn't currently available, please feel free to request the feature in our Web Apps Feedback forum. Please make sure to put "[Linux]" in the title so that we'll know it applies to App Service on Linux and Web App for Containers.
Deployment
If you're deploying using Web Deploy, set WEBSITES_WEBDEPLOY_USE_SCM to false.
You can use Visual Studio to deploy to App Service on Linux and Web App for Containers using Web Deploy. However, when you do, you want to make sure that the endpoint for deployment isn't the Kudu container. To configure that, add an app setting to your app with a name of WEBSITES_WEBDEPLOY_USE_SCM and set the value to false.
To prevent down-time when you update your code, use Continuous Deployment.
If you update your code, push a new Docker image, and then restart your site manually to pick up that change, you're going to experience some down-time while we pull the new image and start your container. You can avoid that by using the Continuous Deployment feature.
When you use Continuous Deployment, any time you push a new Docker image to your registry, Web App for Containers will pick up that change automatically. We'll pull the image and start the container, and we'll wait until that new container is running and ready for HTTP requests before we switch over to it. During that time, your old image will continue to serve requests into your app.
For more information on Continuous Deployment, see our documentation on it.
If you change your Docker container, it may take a minute or so for it to take effect.
If you change your Docker container settings to point to a new container and then click Save, it may take a minute or so before you'll see the new container when you browse to your site. While the new container is being pulled and started, we will continue to serve requests to your site using the old container. Only when the new container is started and ready to receive requests will we start sending requests to it.
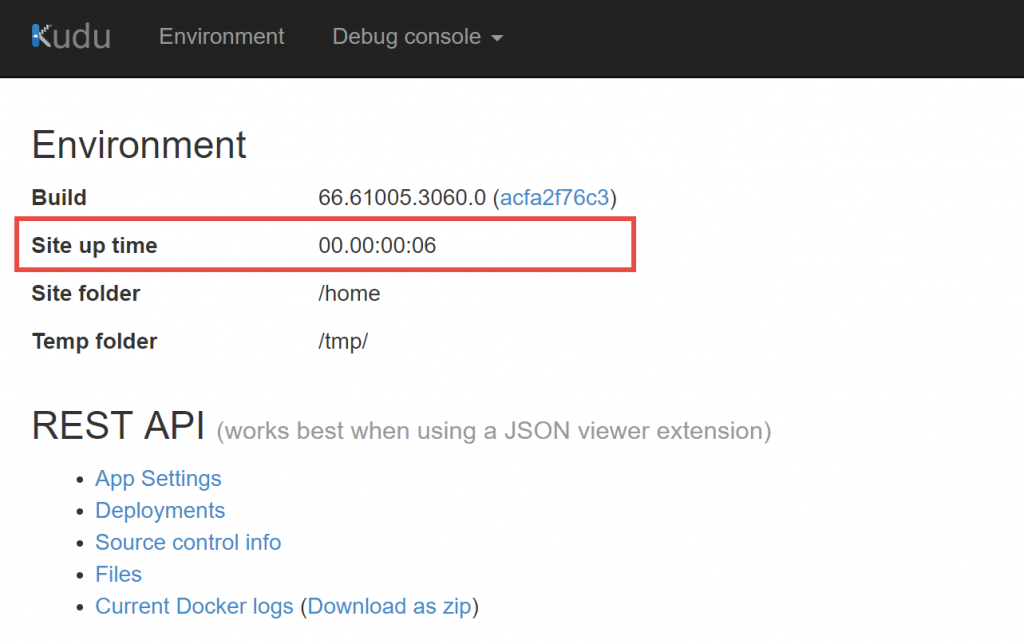
A good way to tell if your new site is up and running is to the check the "site up time" for the Kudu (Advanced Tools) site as shown below. When the new container is up and running, the Kudu site will restart. If you see that the Kudu site has restarted, your new container should be ready.
Custom images are stored on disk unless a worker change happens.
The first time you use a custom Docker image, we will do a "docker pull" and pull all layers. These layers are stored on disk just as if you were using Docker on-premise. When we do a "docker pull" after a site restart, we will only pull layers that have changed. If there have been no changes, we will simply use existing layers on disk.
If you change workers for any reason, however, we will have to pull down all layers again. Your worker will change if you scale up/down or if you scale out to add additional workers. There are also rare cases where your worker may change without a scale operation, but these cases are uncommon.
Continuous Deployment requires that the image:tag combination remain the same.
Docker containers in Web App for Containers are specified using an image:tag combination. Therefore, if you configure Continuous Deployment, you'll need to ensure that any updates to your Docker image don't change the tag.
We've seen quite a few cases where customers will initially tag the image with a "v1" tag and enable CI. At some later time, they update the image and tag the new image with "v2" and then wonder why CI isn't working. Once you change the tag on an image, it's considered a different image from the initially configured image, and that will cause CI to not pick up the changes.
Note: If you don't specify a tag, Docker will look for an image with a tag called "latest". Therefore, if your configuration doesn't explicitly use a tag and someone tags your image with anything other than "latest", it will break continuous deployment.
Multi-Containers
We have a great tutorial on multi-container deployments.
You can use either Docker Compose or Kubernetes to deploy multi-container apps to Web App for Containers. To get you started, we have a great tutorial on it in our documentation.
You need to understand the concept of the "web" container.
If you are using multi-containers, one of your containers will represent the actual website that users should see when they browse to your Web App's URL. That container is referred to as the "web" container.
We use specific logic to determine which container is the "web" container. It's important to understand that this logic could change in the future, but as of now, here it is. (These checks are applied in order.)
- If your YAML file has only one container in it, we'll use that container as the web container.
- If you have set the WEBSITES_WEB_CONTAINER_NAME app setting, we will use that as the web container.
- We will pick the first container in your YAML file that exposes either port 80 or port 8080.
- If we make it this far and we haven't picked the web container, we'll use the first container in the list of containers in your YAML file.
You can explicitly set the web container using an app setting.
You can explicitly control which container is the web container in your multi-container deployment by using the WEBSITES_WEB_CONTAINER_NAME app setting.
In a Docker Compose YAML file, the value for this app setting should be the service name listed in your YAML file. For Kubernetes, the value should be the container name specified in the spec section.
All containers must start or Web App startup will fail.
When you use a multi-container deployment with either Docker Compose or Kubernetes, all containers specified in your configuration file must start successfully in order for the deployment to succeed. If one of your containers fails to start, all of them will fail.
By the way, this isn't specific to App Service. It's the way Compose and Kubernetes work.
All images must use the same registry.
All of the images in your multi-container deployment must use the same Docker registry. In other words, you can't use Azure Container Registry (ACR) for one image and Docker Hub for another registry. Also, if you are using ACR, all images must be on the same ACR server.
If you're using Azure Container Registry, you need to set some app settings.
If you're using Azure Container Registry (ACR) for your multi-container deployment, Web App for Containers needs to know how to log into the ACR. We do that with a series of app settings. (These are set in the App Settings blade in the Azure portal.)
- DOCKER_REGISTRY_SERVER_USERNAME - The username for the ACR server.
- DOCKER_REGISTRY_SERVER_URL - The full URL to the ACR server. (For example, https://my-server.azurecr.io.)
- DOCKER_REGISTRY_SERVER_PASSWORD - The password for the ACR server.
We set these automatically if you configure the container settings in the portal. If you're using the CLI, REST, PowerShell, etc., you'll need to set these. Also, if you experience a problem with your ACR image, check these app settings to make sure they're correct.
Configuration
You can enable and disable storage persistence with an app setting.
You can use an app setting called WEBSITES_ENABLE_APP_SERVICE_STORAGE to control whether or not the /home directory of your app is mapped to Azure Storage. If you need files to be persisted in scale operations or across restarts, you should add this app setting and set it to "true". If you don't require file persistence, you can set this app setting to false.
The absence of this app setting will result in the setting being "true". In other words, if this app setting does not exist in your app, you will see the /home directory mapped to Azure Storage. The app setting will be missing if you created your app while Web App for Containers was in public preview or if someone has deleted the app setting.
Keep in mind that if you enable App Service Storage, when an Azure Storage changeover occurs (which does happen periodically), your site will restart when the storage volume changes.
Note: If App Service Storage is not enabled, any files written into the /home folder will not be persisted across instances (in the case of a scale out) or across restarts.
Even if storage persistence is disabled, the /home directory will be mapped to Azure Storage in the Kudu (Advanced Tools) container. That way, the /home/LogFiles directory will persist between restarts and scale out operations in the Kudu container. Therefore, if you need to get Docker logs or other logs, always use the Kudu Bash console instead of using SSH to access your app's container. (See this for more information on how to get the latest Docker logs from Kudu.)
Note: If you set this app setting on an Azure App Service on Linux app using a built-in image, it will have no impact.
You cannot change permissions on the /home directory when persisting storage.
When you persist storage with the WEBSITES_ENABLE_APP_SERVICE_STORAGE app setting, we mount a location in Azure Storage to the /home mount point. The permissions on this are 777. You cannot change these permissions, even if you attempt to do so from an initialization script or from SSH.
App Settings are injected into your app as environment variables at runtime.
If you need to set an environment variable for your application, simply add an App Setting in the Azure portal. When your app runs, we will inject the app setting into the process as an environment variable automatically.
Some characters may be stripped out of environment variables names.
We allow only alpha-numeric characters and the underscore character for an App Setting's name. (The value can contain special characters.) Any other characters will be stripped from the App Setting name (and, therefore, the environment variable name) at runtime. We also provide this information in our FAQ.
Your environment variables won't appear in the Bash console.
If you use the Bash console in Advanced Tools (Kudu) to look at environment variables, you won't see environment variables that you set using App Settings. That's because the Bash console runs in a separate context from your Web App. In order to see your environment variables, use the Environment page in Advanced Tools or use code to retrieve the environment variables.
Set your default document in a Node.js app using JavaScript.
When you create a Node.js app, by default, it's going to use hostingstart.html as the default document unless you configure it to look for a different file. You can use a JavaScript file to configure your default document. Create a file called index.js in the root folder of your site and add the following content.
var express = require('express'); var server = express(); var options = { index: 'index.html' }; server.use('/', express.static('/home/site/wwwroot', options)); server.listen(process.env.PORT);
This will configure index.html as the default document for your app.
You can now force SSL using the "HTTPS Only" option in the Azure portal.
We've now added the ability to force SSL traffic using the "HTTPS Only" option in the Azure portal. For details on how to do that, see our documentation.
If you're persisting files, only the /home directory is persisted.
By default, we don't persist files in your site. However, if you need to persist files, you can enable App Service Storage (see "You can enable and disable storage persistence with an app setting"). If you enable this, we mount the /home directory to Azure Storage. If your app is restarted, any files saved within the /home directory and sub-directories will persist. However, any files or directories outside of the /home directory will not be persisted between site recycles. This can impact you in a couple of different ways.
- If you use npm, apt, or similar to install something from the console after your app starts, once the app restarts, whatever you installed will be gone.
- If you save files outside of the /home directory, if your app restarts, those files will be gone.
If you need an extension or other component for your app to run, make sure that you install it via your Dockerfile. That way, it will be available always. If you need to persist files that your app is creating, make sure that you write them into the /home directory structure.
For more information on creating your own container for use with Web App for Containers, see our documentation.
To use SSH, your Docker image needs special sauce.
We provide the ability to SSH into your app, but if you're using a custom container, you need to take additional steps in order to add this ability to your app. We've provided all the steps necessary here.
You can use your favorite SSH client with Web Apps.
You can use any SSH client you want with Web Apps. Whether you're a Windows user, a macOS user, or a Linux user, you can easily SSH into your Web App. For all of the details on doing that, see our "Things You Should Know: Web Apps and SSH" article.
To use SFTP, your Docker image needs more special sauce.
Once you create a TCP tunnel to Azure App Service from your development machine, you can connect to your Web App using SFTP. However, if you are using Web App for Containers, your Docker image needs some special configuration for this to work. Specifically, the SFTP subsystem must be specified in the sshd_config file. (The sshd_config file is added to your app when you follow the directions here for enabling SSH into a custom container.)
To use SFTP, make sure the following line is in your sshd_config file.
subsystem sftp internal-sftp
This will enable you to successfully transfer files using SFTP.
Pay attention to your slash direction.
When specifying your image running in Docker Hub, make sure that you pay attention to your slash. Don't use a backslash because that won't work. You should separate the username and image name using a front slash (/).
You can use your own DNS servers.
Some customers want to use their own DNS servers within their containers. Configuring this is relatively simple using an initialization script. If you've followed our guidance on enabling SSH for your custom container, you should already have your container configured to use an initialization script. To use your own DNS servers, you simply need to include the following line in your initialization script.
echo "nameserver #.#.#.#" > /etc/resolv.conf
If you want to use multiple nameservers, you can do that with this code.
echo "nameserver #.#.#.#" > /etc/resolv.conf && echo "nameserver #.#.#.#" >> /etc/resolv.conf
Of course, replace "#.#.#.#" with the IP of the DNS nameserver you want to use.
Troubleshooting
If your site doesn't start, check the Docker log.
We log useful information into the Docker log that can help you troubleshoot your site when it doesn't start or if it's restarting. We log a lot more than you might be used to seeing in a Docker log, and we will continue to work on making this logging more useful.
There are several ways to access Docker logs.
- Docker logs appear on the Container Settings page in the portal. (These are truncated, but you can download them by clicking on the Download Logs button.)
- You can find the Docker log in the /LogFiles directory. You can access this via the Kudu (Advanced Tools) Bash console or by using an FTP client to access it.
- You can use our API to download the current logs. (See "You can discover and download the latest Docker logs using Kudu" in this post for info on that.) The naming convention for the Docker log is YYYY_MM_DD_RDxxxxxxxxxxxx_docker.log.
Note that if you try and download the Docker log that is currently in use using an FTP client, you may get an error because of a file lock. In that case, you can download it using our API (see "You can discover and download the latest Docker logs using Kudu" in this post) or you can use "tail" in the console to view it. (Our API gets you the current Docker log, so if you want to review a past log, use the "tail" option.)
To view the Docker log using tail, access the console, switch into the LogFiles directory, and run this command:
tail 2017_09_05_RD*0FA_docker.log
In this example, I'm viewing the Docker log for September 5. Note that I'm also using a wildcard replacement for the machine ID (the RD number) so that I don't have to type all the characters.
Tip: You can pipe the output of tail to a new file in case you want to download it. Simply append "> filename.txt" to the command above.
You can discover and download the latest Docker logs using Kudu.
We have an API that allows you to easily see the current Docker log details (such as the filename, etc.) and also download the current Docker logs in Zip format.
To see details on the current Docker logs in JSON format, you can use this URL:
https://[sitename].scm.azurewebsites.net/api/logs/docker
You can get to this easily by going to Advanced Tools (Kudu) and then appending "/api/logs/docker" to the URL. The output of this will be a JSON response with the most relevant and current Docker logs.
If you want to download the logs shown in the above API in Zip format, append "zip" to the URL. For example:
https://[sitename].scm.azurewebsites.net/api/logs/docker/zip
You can also click the link in Advanced Tools (Kudu) to download your latest Docker logs in Zip format.
You can view the most recent entries in your Docker log in the Azure portal.
To make it easier to see what's going on with your Docker container, we show you the latest entries in the Docker log in the Azure portal. Simply click on Container Settings in the portal menu and you'll see the Docker log as shown in the figure below.
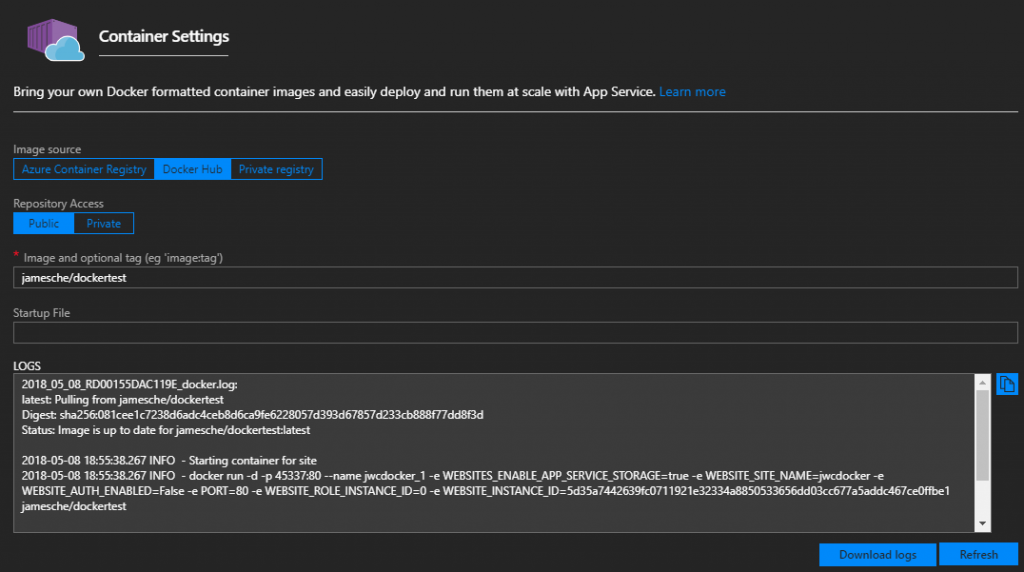
You can click the Copy button to copy the Docker log. You can also download the full Docker log by clicking on Download Logs.
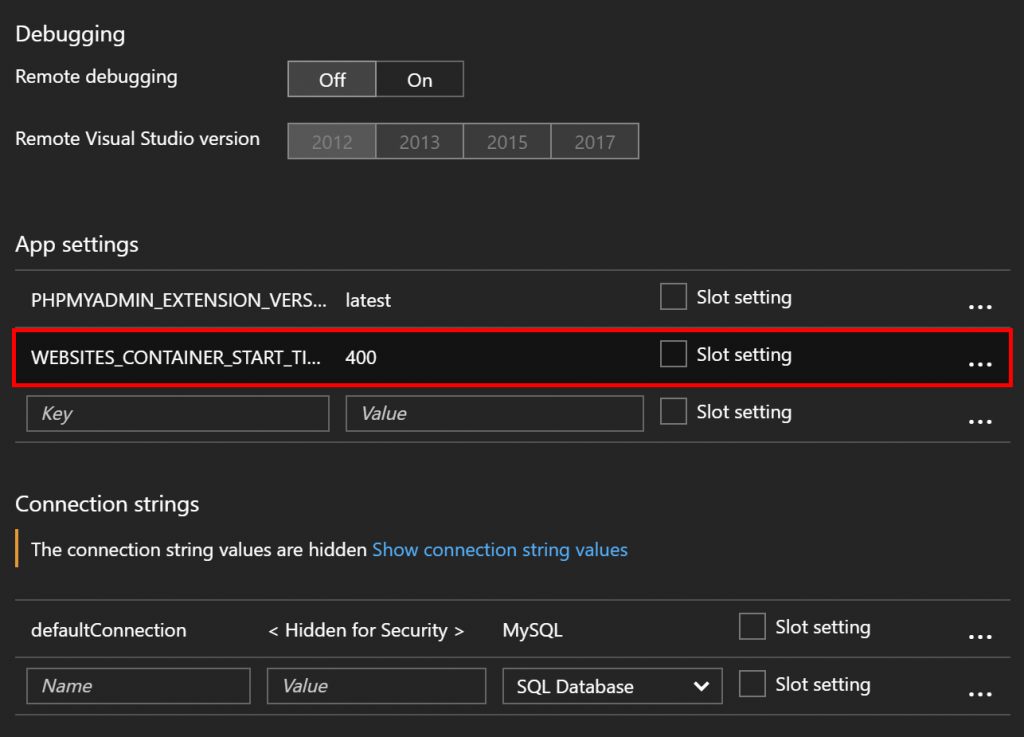
If your container takes a long time to start, increase the start time limit.
When we start your container, we'll wait a while for it to start and initialize. We consider the startup to be successful once the container is running and once we get a response to a ping so that we know it's ready to respond to HTTP traffic. We'll wait 230 seconds for that to happen. If we don't have a successful start within 230 seconds, we'll assume there's a problem and we'll stop the container.
We realize that some containers might need more time than that to start, so we allow you to increase that 230 second wait time up to a limit of 1800 seconds. To configure that, add an app setting called WEBSITES_CONTAINER_START_TIME_LIMIT and set it to the number of seconds you would like for us to wait for your container to start (up to a maximum of 1800) as shown in the image below.
Your container must respond to an HTTP ping.
As I've already said, we will wait a certain amount of time for your container to start before we consider it be a failed start. In order for us to consider a container to be successfully started, the container must start and it must respond to an HTTP ping. If the container starts but does not respond to a ping, we will eventually log an event in the Docker log saying that it didn't start.
Here's a snippet from a Docker log that illustrates an interesting problem.
2017-09-14 19:26:22.494 INFO - Starting container for site 2017-09-14 19:26:22.496 INFO - docker run -d -p 52879:80 --name customer-webapp . . . . . . 2017-09-14T19:26:34.628607412Z { engine: 'joenode', port: '3000', pid: 5 } 2017-09-14 19:30:14.428 ERROR - Container customer-webapp_0 for site customer-webapp did not start within expected time limit. Elapsed time = 230.0443067 sec>
I have truncated much of this output, but what you can see here is that the "docker run" command was run and we don't see any error messages. However, at the end of the log, we see a message that the container did not start within the expected time limit.
Notice in the next to the last line that the Node.js engine is listening on port 3000. The problem here is that port 3000 was never exposed, so when we attempt to ping the container, we aren't pinging on a port on which the container is listening. There are a couple of ways to resolve this.
- Use the EXPOSE instruction in your Dockerfile to expose port 3000.
- Use the WEBSITES_PORT app setting with a value of "3000" to expose that port.
You can remotely debug your Node.js app using VS Code.
If you're a Node.js developer, you can remotely debug your Web App using VS Code. You can set breakpoints, step through code, etc. on your Web App running in App Service from your development machine. For all of the details on how to remotely debug, check out this blog post from Kenneth Auchenberg on the VS Code team.
Remote debugging requires that you open a TCP tunnel from your development machine to App Service. You can find all of the details on doing that in our Things You Should Know: Web Apps and SSH blog post.
Best Practices
You shouldn't install components using SSH because they won't persist.
You can SSH into your app container and install components. However, when your site is restarted, anything that you install will be gone. Why is that? That's the way Docker works. When your site starts, we run your Docker image and create a Docker container. Your app runs inside of that container, and the file system contains only what is in the Docker image. If your Docker image doesn't install a particular component, it won't be there when your container starts.
If you want to install a particular component, make sure that you do it in a Dockerfile so that the component is included in your Docker image. See this documentation for full information on how to do that.
The Bash console in Advanced Tools is a different Docker container.
We offer a Bash console in Advanced Tools (also called "Kudu") that you can use to browse directory structure, etc. It's important to realize that this console is running inside of the Kudu Docker container. This is not the same container that your app is running in, so if you look at files and directories here, they won't reflect your app. The only exception to that is the /home directory. That directory is, by default, mounted from Azure Storage, and it's the same location in both the Kudu container and your app's container.
If you're persisting files, don't copy data to /home during build.
As is detailed in the previous and next topics, you can persist the /home directory using an app setting and we'll mount /home to Azure Storage. It's important to understand that when we do that, we will overwrite anything that's in the /home directory with the content from the Azure Storage location. (For a brand new app, we will remove what's currently in /home and the /home directory will then be empty.)
If you copy data to the /home directory in the build phase of your Docker image, that data will be removed when the Docker container is started. Therefore, you should make sure that any data you write to the file system in your build phase is written outside of the /home directory structure. (Again, this only applies if you are persisting files.)
You don't need (and should not have) SSL support in your app.
As pointed out above, we terminate SSL at the front-ends. That means that SSL requests never get to your Web App. That's good news for you because it means that you don't need to (and should not) implement any support for SSL into your app. Also as stated above, it's important to understand that the front-ends where SSL is terminated are inside of our Azure data centers. If you use SSL with your site, your traffic across the Internet will always be safely encrypted.
You can only expose one port to the outside world.
Web App for Containers currently allows you to expose only one port to the outside world. That means that your container can only listen for HTTP requests on a single port. Some apps need multiple ports. For example, you might have one port that is used for requests into the app and a separate port that is used for a dashboard or admin portal. As of today, that configuration isn't possible in Web App for Containers.
We will attempt to detect which port to bind to your container, but you can also use the WEBSITES_PORTapp setting and configure it with a value for the port you want to bind to your container.
Don't use df to find your disk space usage.
You're probably used to using "df" to find out disk space in your volumes. You can certainly do that in Azure App Service on Linux and Web App for Containers, but what you'll see isn't really going to be as helpful as you might think.
Assuming you are persisting files in the /home directory (which is currently the default), you will have a quota based on your pricing tier. However, if you use "df", the disk space you see won't reflect that quota. If you want to find out your disk usage, use Quotas in your Web App's menu, File System Storage in the App Service Plan's menu, or use the REST API to find your usage.
Don't worry about the SSH port in App Service
We use port 2222 for SSH into your app's container, but that doesn't mean that port 2222 is exposed over the Internet. No matter how you use SSH in your app, all SSH traffic is handled through an endpoint on port 443. If you're not using SSH, you don't have to worry about closing port 2222 because it's not exposed to the Internet.
Comments
- Anonymous
September 20, 2017
Regarding how to force SSL....I am deploying a container to azure container registry, which is then picked up by app service on linux and deployed. The article you link to suggests adding a .htaccess file to /site/wwwroot.How do we create this file? i tried via bash in the scm site, but it doesnt work- Anonymous
January 19, 2018
Sorry, Guy. I missed your comment!As indicated in this blog post, the Bash console in Kudu is a different Docker container, so that won't work. I have updated the blog post to reflect the new way to do this. In Custom Domains, there is now an option to enable HTTPS Only right inside of the Azure portal.
- Anonymous