Note
Access to this page requires authorization. You can try signing in or changing directories.
Access to this page requires authorization. You can try changing directories.
Opacity is a very useful property for creating graphical effects in a WPF/E application. This is particularly true when creating mashups, in which you overlay custom content on other Web content. This posting illustrates the use of opacity in a Microsoft Virtual Earth mashup that allows you to display selected landmarks in New York City.
At the bottom of this posting, you can find an attached Zip file (Landmarks.zip) that contains all the files used for this mashup. You can also view the WPF/E application at:
https://wpfesdk.members.winisp.net/samples/landmarks
Using Animated Opacity to Fade In Text
When the nyc landmarks mashup loads, the title fades into view:
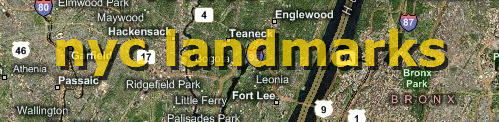
Title fades in as partially translucent text
The title is simply a pair of TextBlock objects whose parent Opacity property value is animated when the WPF/E control loads it. You can achieve this effect by creating a WPF/E control with the WindowlessMode property set to true, and setting the BackgroundColor value to be transparent. The BackgroundColor value setting, #00000000, represents a 16-bit RGB value with alpha transparency (#AARRGGBB). The end result is that the TextBlock text is overlaid directly on the map data.
new agHost(
"WpfeControlHost_1", // DIV tag id.
"WpfeControl_1", // WPF/E control id.
"440", // Width.
"80", // Height.
"#00000000", // Background is transparent,
// since alpha value is 0.
null, // SourceElement not used.
"xaml/Title.xaml", // Source property value.
"true"); // WindowlessMode enabled.
The title text fades in by defining an animation for the TextBlock objects. Notice that the To property is set to 0.7, which means the title is partially translucent, allowing the map to show through just a little:
<
Canvas.Triggers>
<EventTrigger RoutedEvent="Canvas.Loaded">
<EventTrigger.Actions>
<BeginStoryboard>
<Storyboard>
<DoubleAnimation
Storyboard.TargetName="title"
Storyboard.TargetProperty="Opacity"
BeginTime="0:0:3"
To="0.7"
Duration="0:0:3" />
</Storyboard>
</BeginStoryboard>
</EventTrigger.Actions>
</EventTrigger>
</Canvas.Triggers>
Creating a Drop Shadow Effect
The title text is defined as a pair of TextBlock objects. The top object displays the primary text, while the bottom object, offset slightly, displays the same text in a darker color. This creates a drop shadow effect. Notice that the TextBlock objects are contained within a Canvas object. Although the animation is applied to this containing Canvas object, the effects of the animation are applied to the Canvas object and all its descendants.
<
Canvas
x:Name="title"
Opacity="0.0" >
<!-- Shadow text below -->
<TextBlock
Canvas.Top="4" Canvas.Left="4"
FontFamily="Verdana" FontWeight="Bold" FontSize="48"
Foreground="Black" >
nyc landmarks
</TextBlock>
<!-- Primary text above -->
<TextBlock
FontFamily="Verdana" FontWeight="Bold" FontSize="48"
Foreground="Gold" >
nyc landmarks
</TextBlock>
</Canvas>
Using the WindowlessMode Property with an Alpha Value
The landsmarks list panel also fades into view using animated opacity. In order to allow the underlying map to show through, the Canvas and TextBlock objects that comprise the panel are set to less than 100% opacity:
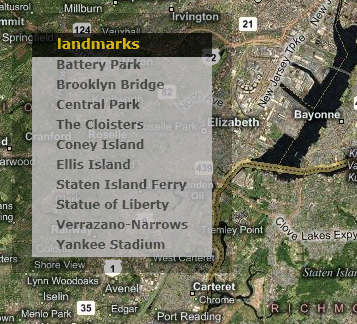
Panel fades in as partially translucent text and background
Notice the translucent outline around the border of the panel. Like the title, the panel is defined as a WPF/E control with the WindowlessMode property set to true. However, in this case the alpha value of the BackgroundColor property value, #40000000, is set to be semi-transparent, which means a black color value with 25% opacity is blended with the underlying map data.
new agHost(
"WpfeControlHost_2", // DIV tag id.
"WpfeControl_2", // WPF/E control id.
"220", // Width.
"260", // Height.
"#40000000", // Background partially transparent,
// since alpha value is 25%.
null, // SourceElement not used.
"xaml/LandMarks.xaml", // Source property value.
"true"); // WindowlessMode enabled.
Using the Opacity Property to Indicate Focus and Selection
When you move the mouse over a landmark name, the text in the TextBlock darkens. When you select a landmark name, a blue-green selection rectangle appears under the clicked TextBlock.
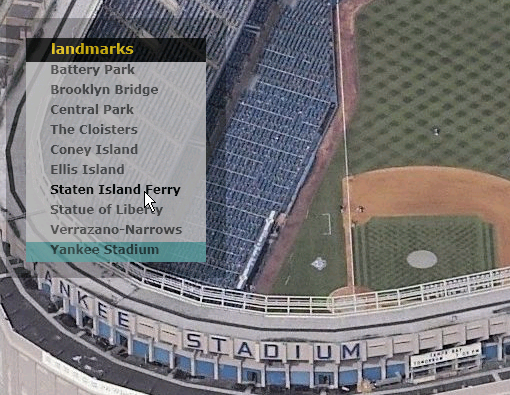
Focus and selection uses opacity
To indicate focus, each TextBlock object representing a landmark name defines a MouseEnter and MouseLeave event. Notice that the Opacity value is set to "0.8":
<
TextBlock
x:Name="Staten Island Ferry"
Canvas.Left="20" Canvas.Top="120"
FontFamily="Verdana" FontWeight="Bold" FontSize="12"
Opacity="0.8"
MouseLeftButtonDown="javascript:landmarkSelected"
MouseEnter="javascript:mouseEnter"
MouseLeave="javascript:mouseLeave" >
Staten Island Ferry
</TextBlock>
The event handling functions for all the MouseEnter and MouseLeave events are defined as:
//
// Toggle the opacity of the TextBlock to indicate focus.
//
function mouseEnter(sender) {
sender.opacity = 1.0;
}
function mouseLeave(sender) {
sender.opacity = 0.8;
}
To indicate selection, a transparent Rectangle object is defined, so that it is below the rendering order of the TextBlock objects:
<
Rectangle
x:Name="selectionRect"
Canvas.Left="0" Canvas.Top="-20"
Height="20" Width="180"
Fill="Teal" Opacity="0.0" />
The event handler function for the MouseLeftButtonDown event of each TextBlock object calls the custom SetMapToLandmark function which repositions the the selection rectangle underneath the clicked TextBlock object, and sets its Opacity value to 0.5:
//
// Set the selection rectangle.
// Then set the Birdseye view to the landmark.
//
function SetMapToLandmark(landmark, top) {
if (selectionRect["Canvas.Top"] == top) return;
selectionRect["Canvas.Top"] = top;
selectionRect.opacity = 0.5;
map.LoadMap(
new VELatLong(landmark.Latitude, landmark.Longitude),
2,
VEMapStyle.Oblique);
}
Creating Virtual Earth Mashups
This mashup uses the the Virtual Earth Map Control SDK, version 4.0, which allows you to create client-side Web apps. The Virtual Earth Development portal provides you samples, tutorials, and other developer content to get you started creating mashups.
Enjoy,
Lorin
WPF/E Developer Content Team
Comments
Anonymous
January 09, 2007
The good folks that created the WPF/E SDK and documentation have a blog and it is a great source of informationAnonymous
January 16, 2007
I was inspired by WPF/E and "Layering" Content and Using Opacity with a WPFE / Virtual Earth Mashup to