The XML Files
XML in Microsoft Office Word 2003
Aaron Skonnard
The information set out in this topic is presented exclusively for the benefit and use of individuals and organizations outside the United States and its territories or whose products were distributed by Microsoft before January 2010, when Microsoft removed implementation of particular functionality related to custom XML from Word. This information may not be read or used by individuals or organizations in the United States or its territories whose products were licensed by Microsoft after January 10, 2010; those products will not behave the same as products licensed before that date or licensed for use outside the United States.
Contents
XML Support in Word 2003
Introduction to WordML
Working with WordML
Custom Schemas
Schema Validation
Saving Documents
Applying Transforms
Summing It Up
Several years ago I began a new book project and decided to write the entire project in XML. I figured that producing the book in XML would allow me to reuse the content elsewhere, transform the content into different output formats, and make it easy to manipulate with myriad XML technologies including XPath, XSLT, the various XML APIs, and possibly even XQuery.
When I started to investigate how I might accomplish this, I opened Microsoft® Office Word 2000 and began to experiment. I was looking for ways to both author the chapters with the rich editing and formatting capabilities of Word and define a mapping between the Word document and an XML structure. This would have allowed me work in the familiar Word environment to produce the XML content. As I experimented with the Save as HTML functionality, the only technique available at the time for making Word produce a marked-up document, it quickly became apparent that a Save as XML option was needed. So I was back to good old Emacs to write the XML by hand. Thousands of angle brackets later, I swore never to do it again.
Having the entire book in XML has been extremely valuable, but the road was too painful. Luckily, Microsoft Office Word 2003 is now available.
XML Support in Word 2003
The new XML support in Word 2003 is one of its most exciting and powerful features. XML is no longer an afterthought; Word has been completely designed around XML from the ground up. It supports a native XML vocabulary called the Word Markup Language (WordML). More details on WordML can be found at Microsoft Office Word 2003 Preview.
Microsoft Office Word 2003 introduces the Save as XML command that produces WordML documents. Later, when you double-click on an XML document produced by Word, the Windows loader automatically associates the file with Word. WordML is powerful and flexible enough to capture all of the rich editing and formatting of a Word document with full round-tripping. If you create a typical document in Word, save it as WordML, and then later read it back in; the document is guaranteed to look like the original.
Here's the basic structure of a WorldML document:
<?xml version="1.0" encoding="UTF-8" standalone="yes"?> <?mso-application progid="Word.Document"?> <w:wordDocument xmlns:w="https://schemas.microsoft.com/office/word/2003/wordml" ... > <!-- WordML structure goes here --> </w:wordDocument>
Notice that it's just an XML document. The root element is named wordDocument from the https://schemas.microsoft.com/office/word/2003/wordml namespace (I'll use the prefix "w" to refer to this namespace in this column). When you double-click on this file from Windows Explorer, Windows® automatically determines that this is a WordML document (by inspecting the mso-application processing instruction at the top) and subsequently launches Word to process it.
The introduction of WordML is probably the most significant change in Microsoft Office Word 2003, but it's definitely not the only one. Developers can also attach custom XML Schema definitions and XSLT transformations to Word documents. Developers can mark up content with elements from the attached schemas, making it possible to inject meaningful business-specific markup that simplifies processing down the road. When you save a document in Word, it can validate the document against the attached schema and apply a custom XSLT transformation during the process. The remainder of this column looks at some of these compelling new features in more detail.
Introduction to WordML
The WordML schema was designed to mirror the information found in a traditional .doc file. The schema for WordML is part of the Microsoft Word XML Content Development Kit (CDK) Beta 2, which you can download from MSDN at Microsoft Office 2003 Downloads. The root element of a WordML document is always w:wordDocument. w:wordDocument contains several other elements that represent the complete Word document structure including properties, fonts, lists, styles, and the actual document body that contains sections and paragraphs, as illustrated in Figure 1.
Figure 1 WordML Basic Structure
<?xml version="1.0" encoding="UTF-8" standalone="yes"?> <?mso-application progid="Word.Document"?> <w:wordDocument xmlns:w="https://schemas.microsoft.com/office/word/2003/wordml" xmlns:o="urn:schemas-microsoft-com:office:office" ... > <o:DocumentProperties> <!-- generic office document properties --> </o:DocumentProperties> <w:fonts> <!-- fonts used in document --> </w:fonts> <w:styles> <!-- named styles used in document --> </w:styles> <w:docPr> <!-- Word-specific document properties --> </w:docPr> <w:body> <!-- document content --> </w:body> </w:wordDocument>
Figure 2 shows a Word document with typical formatting including named styles (such as Heading 1), inline styles (bold and italics), and a simple body.
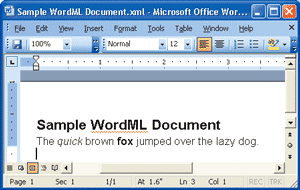
Figure 2** Doc in WordML **
The o:DocumentProperties element for the document shown in Figure 2 contains the document properties available for all Office documents such as title, author, last author, creation date, last saved date, and so on (see Figure 3). The o:DocumentProperties element is from a different namespace than WordML since it applies to all Office documents and will be shared across other Office XML vocabularies such as ExcelML.
Figure 3 Office Document Properties
<o:DocumentProperties> <o:Title>Sample WordML Document</o:Title> <o:Author>Aaron Skonnard</o:Author> <o:LastAuthor>Aaron Skonnard</o:LastAuthor> <o:Revision>2</o:Revision> <o:TotalTime>1</o:TotalTime> <o:Created>2003-08-14T12:44:00Z</o:Created> <o:LastSaved>2003-08-14T12:44:00Z</o:LastSaved> <o:Pages>1</o:Pages> <o:Words>10</o:Words> <o:Characters>59</o:Characters> <o:Company>DevelopMentor</o:Company> <o:Lines>1</o:Lines> <o:Paragraphs>1</o:Paragraphs> <o:CharactersWithSpaces>68</o:CharactersWithSpaces> <o:Version>11.5329</o:Version> </o:DocumentProperties>
The w:fonts and w:styles elements contain the font and style information used in the document. Every font or style used in the document will be represented using an XML element within one of these elements. Figure 4 illustrates the font and style information for the document you saw in Figure 2.
Figure 4 Document Font and Style Information
<w:fonts> ... <w:font w:name="Arial"> <w:panose-1 w:val="00000400000000000000"/> <w:charset w:val="00"/> <w:family w:val="Auto"/> <w:pitch w:val="variable"/> ... </w:font> ... </w:fonts> <w:styles> <w:style w:type="paragraph" w:styleId="Normal"> <w:name w:val="Normal"/> <w:rsid w:val="0052557F"/> <w:rPr> <w:rFonts w:ascii="Arial" w:h-ansi="Arial"/> <wx:font wx:val="Arial"/> <w:sz w:val="24"/> <w:sz-cs w:val="24"/> <w:lang w:val="EN-US"/> </w:rPr> </w:style> <w:style w:type="paragraph" w:styleId="Heading1"> <w:name w:val="heading 1"/> <wx:uiName wx:val="Heading 1"/> <w:basedOn w:val="Normal"/> <w:next w:val="Normal"/> <w:rsid w:val="0052557F"/> <w:pPr> <w:pStyle w:val="Heading1"/> <w:keepNext/> <w:spacing w:before="240" w:after="60"/> <w:outlineLvl w:val="0"/> </w:pPr> <w:rPr> <w:rFonts w:ascii="Arial" w:h-ansi="Arial" w:cs="Arial"/> <wx:font wx:val="Arial"/> <w:b/> <w:b-cs/> <w:kern w:val="32"/> <w:sz w:val="32"/> <w:sz-cs w:val="32"/> </w:rPr> </w:style> ... </w:styles>
The w:docPr element contains the Word-specific properties for the given document such as view and zoom settings, as illustrated in the following snippet:
<w:docPr> <w:view w:val="print"/> <w:zoom w:percent="100"/> <w:doNotEmbedSystemFonts/> <w:proofState w:spelling="clean" w:grammar="clean"/> <w:attachedTemplate w:val=""/> <w:defaultTabStop w:val="720"/> <w:characterSpacingControl w:val="DontCompress"/> ... </w:docPr>
And finally, w:body is where the document content goes. The w:body element contains sections, and sections contain paragraphs and tables. Paragraphs and tables are modeled using the w:p and w:tbl elements, respectively. Paragraphs and tables ultimately consist of text run elements (w:r), which can be annotated with additional properties and styles. Figure 5 illustrates the w:body element for the document shown in Figure 2.
Figure 5 Document Body
<w:body> <wx:sect> <wx:sub-section> <w:p> <w:pPr> <w:pStyle w:val="Heading1"/> </w:pPr> <w:r> <w:t>Sample </w:t> </w:r> <w:proofErr w:type="spellStart"/> <w:r> <w:t>WordML</w:t> </w:r> <w:proofErr w:type="spellEnd"/> <w:r> <w:t> Document</w:t> </w:r> </w:p> <w:p> <w:r> <w:t>The </w:t> </w:r> <w:r> <w:rPr> <w:i/> </w:rPr> <w:t>quick</w:t> </w:r> <w:r> <w:t> brown </w:t> </w:r> <w:r> <w:rPr> <w:b/> </w:rPr> <w:t>fox</w:t> </w:r> <w:r> <w:t> jumped over the lazy dog.</w:t> </w:r> </w:p> ... </wx:sub-section> </wx:sect> </w:body>
As you can see, all of the formatting in the original Word document is represented somehow in the WordML document. This makes it possible to move data between .doc and .xml files without losing any information.
Working with WordML
The major benefit of having your documents in WordML format is that you can process them using any XML API (DOM, SAX, XmlReader, and so forth) on any platform using any programming language. You can also process WordML documents using higher-level XML services like XPath and XSLT. For example, it would be trivial to open a WordML document and identify all w:p elements marked with the Heading 1 style using the following XPath expression:
//w:p[w:pPr/w:pStyle/@w:val = 'Heading 1']
You can also write XSLT transformations to move between WordML and other text-based formats. For example, the XSLT shown in Figure 6 illustrates one way to transform WordML into a simple HTML structure. Running this transformation against the WordML document shown in Figure 2 produces the HTML document shown in Figure 7. (Another transform can be found at WordML to HTML XSL Transformation.
Figure 6 Simple WordML to HTML Transformation
<xsl:transform version="1.0" xmlns:xsl="https://www.w3.org/1999/XSL/Transform" xmlns:w="https://schemas.microsoft.com/office/word/2003/ wordml"> <xsl:template match="/"> <html> <xsl:apply-templates /> </html> </xsl:template> <xsl:template match="w:body"> <body style="font-family: {//w:style[@w:styleId='Normal']/w:rPr/ w:rFonts/@w:ascii};"> <xsl:apply-templates /> </body> </xsl:template> <xsl:template match="w:p"> <p> <xsl:apply-templates/> </p> </xsl:template> <xsl:template match="w:pStyle[@w:val='Heading1']"> <xsl:attribute name="style">font-size:16pt; font-weight:bold;</xsl:attribute> </xsl:template> <xsl:template match="w:r"> <span> <xsl:apply-templates/> </span> </xsl:template> <xsl:template match="w:rPr"> <xsl:attribute name="style"> <xsl:apply-templates/> </xsl:attribute> </xsl:template> <xsl:template match="w:t/text()"> <xsl:value-of select="." /> </xsl:template> <xsl:template match="w:i">font-style:italic;</xsl:template> <xsl:template match="w:b">font-weight:bold;</xsl:template> <xsl:template match="text()" /> </xsl:transform>
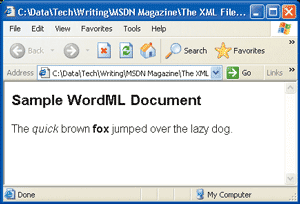
Figure 7** Doc Converted to HTML **
In addition to making it easier to process Word documents, WordML also makes it easier to generate Word documents. Since they're just XML, you can generate Word documents using any of the standard techniques available for producing XML. For example, it's trivial to write ASP.NET pages that generate WordML documents on the fly, a technique that's illustrated in Figure 8.
Figure 8 Generating WordML with ASP.NET
<%@ Page language="c#" %> <% Response.ContentType="text/xml"; %> <?mso-application progid="Word.Document"?> <w:wordDocument ...> ... <w:body> <wx:sect> <wx:sub-section> <w:p> <w:pPr> <w:pStyle w:val="Heading1" /> </w:pPr> <w:r> <w:t>Hello <%=Request.QueryString["name"]%></w:t> </w:r> ...
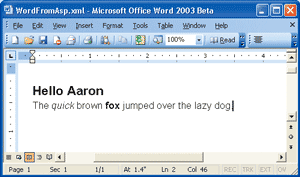
Figure 9** ASP.NET Page **
This ASP.NET page produces the same document, only the heading now contains "Hello [name]", where [name] is replaced with the value supplied in the query string. Browsing to this ASP.NET page with a query string of "?name=Aaron" produces the document shown in Figure 9.
Custom Schemas
In addition to WordML, Microsoft Office Word 2003 also includes support for custom XML schema definitions (XSDs), making it possible to attach one or more custom schemas to a given Word document. You can then annotate the document with the elements found in the attached schemas. This allows you to inject business-related markup into your documents so you can process documents around business identifiers instead of the more generic WordML markup.
For example, consider an XML document that contains information about a new employee. You can annotate this document with elements found in the employee schema shown in Figure 10. To accomplish this you must first attach the schema to the XML document in Word.
Figure 10 Employee Schema Definition
<?xml version="1.0" encoding="utf-8" ?> <xs:schema targetNamespace="urn:employees" elementFormDefault="qualified" xmlns="urn:employees" xmlns:mstns="urn:employees" xmlns:xs="https://www.w3.org/2001/XMLSchema" > <xs:simpleType name="SSN"> <xs:restriction base="xs:string"> <xs:pattern value="\d{3}-\d{2}-\d{4}" /> </xs:restriction> </xs:simpleType> <xs:simpleType name="Phone"> <xs:restriction base="xs:string"> <xs:pattern value="\d{3}-\d{3}-\d{4}" /> </xs:restriction> </xs:simpleType> <xs:complexType name="Name" mixed="true"> <xs:sequence> <xs:element name="First" type="xs:string" /> <xs:element name="Middle" type="xs:string" /> <xs:element name="Last" type="xs:string" /> </xs:sequence> </xs:complexType> <xs:complexType name="Employee" mixed="true"> <xs:all> <xs:element name="ID" type="SSN" /> <xs:element name="Name" type="Name" /> <xs:element name="Phone" type="Phone" /> </xs:all> </xs:complexType> <xs:element name="Employee" type="Employee"/> </xs:schema>
You attach an XML Schema definition to a Word document by selecting Tools | Template and Add-Ins from the menu. The dialog that comes up has an XML Schema tab where you can manage your schema library and choose the schemas you want to attach to this particular document (see Figure 11). You can also indicate if Word should validate documents and whether it should even allow users to save invalid documents.
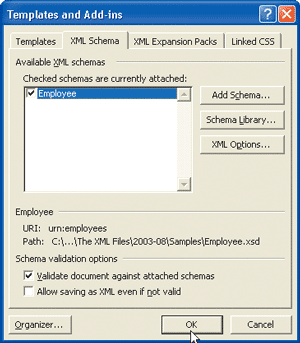
Figure 11** Managing Schemas **
After you've attached the schema, you can start annotating the document with the elements found in it. The XML Structure pane in Word (displayed on the right-hand side) lets you inject custom elements from the attached schemas into the document. The XML Structure pane also gives you an interface to the custom elements currently found throughout the document by displaying the logical tree structure of these elements within the pane.
Figure 12 shows the XML Structure pane and how you can select a custom element to insert in the document. In this example, I'm selecting the Employee element from the urn:employees namespace into the document. When I double-click on a custom element, Word wraps the element around the currently highlighted text. The first time you insert a custom element, Word asks you if it should surround the entire document, which is what you'll usually want.
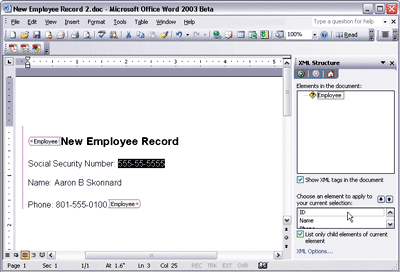
Figure 12** Inserting a Custom Element into a Doc **
After you do this, Word will display the XML tags in the document so you can see where they appear. Figure 12 illustrates what the document looks like after inserting the Employee element around the entire document. If you don't want to see the visual XML tags, you can hide them by deselecting the "Show XML tags in the document" checkbox.
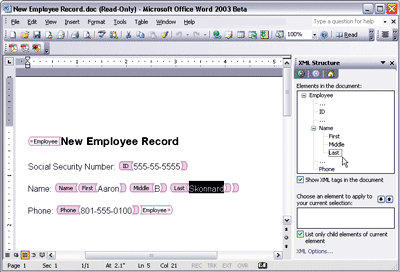
Figure 13** Tree Structure of Embedded Elements **
As you insert additional elements into the document, Word displays the logical tree structure of the custom elements at the top of the XML Structure pane. This view only shows the embedded custom elements, making it easy to select the text within them (as illustrated with the Last element in Figure 13).
Schema Validation
Once you insert a custom element, Word will begin validating the content (assuming you selected that option when you attached the schema). The purple line appearing down the left side of the document (in Figure 12) indicates that the Employee element's content is currently invalid (because it's missing some required child elements, in this case). The yellow icon next to the Employee element in the XML Structure pane indicates the same thing. Right-clicking on either of these items displays the problem.
When you put the cursor within the Employee element, Word automatically determines which child elements are allowed under Employee according to the schema and displays them at the bottom of the XML Structure pane. In this example, Word shows the ID, Name, and Phone elements, making it easy to select some text and apply them quickly (see Figure 12).
Word also validates text content against the simple type definitions found in your schema. For example, the schema in Figure 10 contains two simple types: one called SSN and the other called Phone. Both of these simple types restrict strings using a pattern facet (a regular expression). Figure 14 illustrates simple type validation in action. Notice that a purple line shows up underneath the text if it isn't within the simple type's value space. If you right-click on it in this case, Word indicates that the text doesn't follow the required pattern (\d{3}-\d{2}-\d{4}). All of this happens on the fly while you're typing.
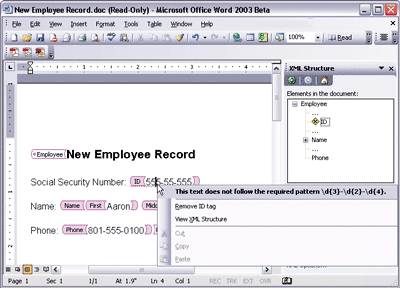
Figure 14** Type Validation **
Once you've added all of the required elements and made the text conform to the simple type definitions in play, the document should look like Figure 13. You know the document is valid when all of the purple lines disappear. By default, Word doesn't let you save docs with validation problems as XML. However, selecting the "Allow saving as XML even if not valid" option (see Figure 11), makes it possible to save docs even though they're not completely valid yet. When you save a doc with custom elements you have to decide whether to include the WordML markup in the output.
Saving Documents
You have two options when saving a Word document with custom elements. The default option is to save the document as WordML with the custom elements nested throughout the tree. The other option is "Save data only", which removes WordML markup and only persists the custom element tree structure.
For example, Figure 15 illustrates where the Employee and ID elements would appear in the WordML for the document shown in Figure 13. One thing to notice is that according to the schema, the Employee element isn't officially allowed to have child elements other than ID, Name, and Phone—so the child w:p element makes the document invalid. You may ask yourself how Word can consider the document to be valid, since there weren't any purple indicators before saving. It turns out Word is smart enough to determine validity, ignoring the presence of WordML markup since you can choose to exclude it.
Figure 15 WordML with Custom Elements
<w:body> <wx:sect> <wx:sub-section> <ns0:Employee> <w:p> <w:pPr> <w:pStyle w:val="Heading1"/> </w:pPr> <w:r> <w:t>New Employee Record</w:t> </w:r> </w:p> <w:p/> <w:p> <w:r> <w:t>Social Security Number: </w:t> </w:r> <ns0:ID> <w:r> <w:t>555-55-5555</w:t> </w:r> </ns0:ID> </w:p>
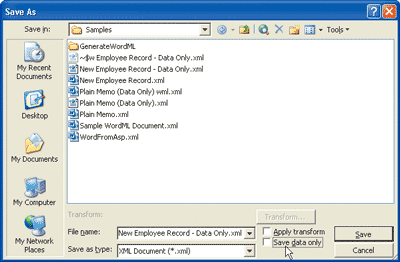
Figure 16** Saving As Data Only **
When you choose "Save data only" (see Figure 16) Word removes the WordML markup and only saves the custom elements found in the document. Doing this, however, causes you to lose any special formatting you may have applied to the document. Figure 17 shows what the employee document looks like when saved this way. Notice it's a much simpler and cleaner XML document that completely conforms to the attached schema.
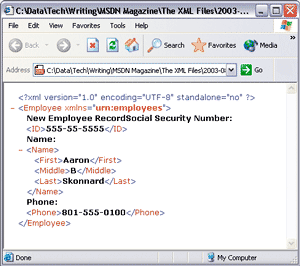
Figure 17** Doc Without Formatting **
Applying Transforms
When saving a document, you might want to generate a completely different format altogether (perhaps not even XML). To accommodate this, Word makes it possible to apply an XSLT transformation during the save process. You can specify a transform by selecting the Apply transform option available in the Save As dialog (see Figure 16). Simply choose an XSLT from disk and Word will run the transformation and output the result every time you save the document.
You can associate multiple transformations with a given schema through the Schema Library, creating what's known as a Word solution. This makes the transformations available for all documents that implement the given schema. When you have multiple XSLT transformations available for a given document, Word makes them available to you in the XML Document pane (located on the right), allowing you to easily switch between views of the same document within Word.
Word also supports using transformations when you open a document. Word provides an Open as XML option in the Open dialog that lets you choose the particular transformation you'd like to use. When you select this option, Word opens the result of applying the transformation instead of the original document that you selected to open.
Summing It Up
Microsoft Office Word 2003 is miles ahead of its predecessors when it comes to XML support. The native support for WordML makes it possible to build powerful and flexible content solutions without leaving the comfort of your XML APIs. Plus, the built-in support for XML Schema, real-time validation, and different XSLT techniques makes working with custom XML schemas and output formats a breeze.
In addition to the core XML functionality described here, Microsoft Office Word 2003 is also completely programmable through Visual Basic® for Applications and the Microsoft Word XML CDK Beta 2. Microsoft Office Word 2003 will revolutionize the way organizations work with the documents that drive their business. For a complete example, check out the DocLibrary (Contoso, LLC) sample that's included in the CDK (Microsoft Office 2003 Downloads).
Send your questions and comments for Aaron to xmlfiles@microsoft.com.
Aaron Skonnard is an Assistant Professor and Director of .NET Projects at Northface University, where he's working to establish the finest university in the world for software developers. Aaron coauthored Essential XML Quick Reference (Addison-Wesley, 2001) and Essential XML (Addison-Wesley, 2000). Reach him at https://www.skonnard.com.