The XML Files
IntelliSense for XSLT, Namespace Collisions, and More
Aaron Skonnard
Q Is there some way that I can enable IntelliSense® for my XSLT files in Visual Studio® .NET?
Q Is there some way that I can enable IntelliSense® for my XSLT files in Visual Studio® .NET?
A There are at least two ways that you can get IntelliSense for XSLT in Visual Studio .NET. One way is to buy a third-party product like the ActiveState Visual XSLT plug-in, and the other is to take advantage of the generic XML IntelliSense in Visual Studio .NET, which is driven by XML Schema definitions. The former option requires spending a little cash while the latter choice simply requires finding an XML Schema definition for XSLT.
A There are at least two ways that you can get IntelliSense for XSLT in Visual Studio .NET. One way is to buy a third-party product like the ActiveState Visual XSLT plug-in, and the other is to take advantage of the generic XML IntelliSense in Visual Studio .NET, which is driven by XML Schema definitions. The former option requires spending a little cash while the latter choice simply requires finding an XML Schema definition for XSLT.
Unfortunately, the authors of the XSLT specification didn't include an official XML Schema definition when they first authored the language, so don't bother looking around the W3C site. There are, however, a handful of different XSLT schemas that have been written over the years for personal or company use.
Visual Studio .NET provides XML IntelliSense for all of the XML Schemas that it knows about. Visual Studio .NET automatically knows about the XML Schema definitions found within a given project as well as a set of global XML Schema definitions found in the C:\Program Files\Microsoft Visual Studio .NET 2003\Common7\Packages\schemas\xml directory. You'll notice that this directory already contains several schema files including the schema for XML Schema.
Once you've obtained the XSLT schema you want to use for IntelliSense, simply add it to your project or drop it in the C:\Program Files\Microsoft Visual Studio .NET 2003\Common7\Packages\schemas\xml directory and you're ready to go. To test IntelliSense, create a new XSLT file by selecting New | File | XSLT File from the File menu. You should see a template XSLT file that contains an empty stylesheet element from the https://www.w3.org/1999/XSL/Transform namespace. Put your cursor between the stylesheet start and end tags, type "<", and you should see IntelliSense kick in, listing information about the allowed XSLT elements.
Visual Studio .NET uses the element's XML namespace to determine which schema to use. For example, if you create a new XSLT file and use xsl:transform as the root element (instead of xsl:stylesheet), IntelliSense will work identically as long as you specify the same namespace again.
Visual Studio .NET can even assist you in choosing the correct namespace by providing IntelliSense for all of the namespace names it knows about within a given project or the global schema directory. Notice that Visual Studio .NET now includes the XSLT namespace in the list since I dropped it in the global schema directory (see Figure 1).
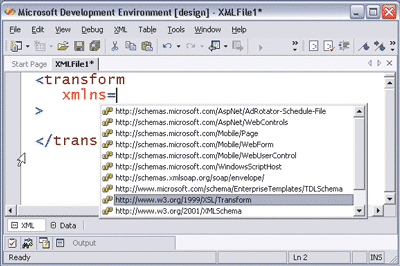
Figure 1** XSLT IntelliSense **
These techniques work with any XML Schema definition. If you have some custom schemas that you commonly author against, then you might want to take advantage of this somewhat underutilized feature in Visual Studio .NET.
Q Can you customize the XSLT template used when creating new XSLT files in Visual Studio .NET?
Q Can you customize the XSLT template used when creating new XSLT files in Visual Studio .NET?
A Yes, there are several New File templates found in the Visual Studio .NET installation directory. There are some global templates for creating new files from the File menu found in C:\Program Files\Microsoft Visual Studio .NET 2003\Common7\IDE\NewFileItems and there are also project-specific templates found in some of the different language subdirectories (see C:\Program Files\Microsoft Visual Studio .NET2003\VC#\CSharpProjectItems for C#-specific templates).
A Yes, there are several New File templates found in the Visual Studio .NET installation directory. There are some global templates for creating new files from the File menu found in C:\Program Files\Microsoft Visual Studio .NET 2003\Common7\IDE\NewFileItems and there are also project-specific templates found in some of the different language subdirectories (see C:\Program Files\Microsoft Visual Studio .NET2003\VC#\CSharpProjectItems for C#-specific templates).
The template for new XSLT files is called XSLTFile.xslt. Simply modify this file to fit your preferences. If you're like me and prefer to use transform (instead of stylesheet) and the "xsl" prefix (instead of a default namespace declaration), you can change the default XSLT templates to look like the following document:
<?xml version="1.0" encoding="UTF-8" ?> <xsl:transform version="1.0" xmlns:xsl="https://www.w3.org/1999/XSL/Transform" > </xsl:transform>
With this in place, every new XSLT file you create in Visual Studio .NET will look like this template.
Q I need to write an XSLT transformation that generates another XSLT document as output and I seem to be running into namespace problems. What's the best way to handle this?
Q I need to write an XSLT transformation that generates another XSLT document as output and I seem to be running into namespace problems. What's the best way to handle this?
A Trying to output XSLT elements from within an XSLT transformation is problematic because you run into a namespace conflict that confuses the processor. For example, consider the following XSLT fragment that's attempting to output an xsl:transform element from within the root template:
<xsl:transform version="1.0" xmlns:xsl="https://www.w3.org/1999/XSL/Transform"> <xsl:template match="/"> <!-- the transform element I'm trying to output --> <!-- THIS DOESN'T WORK --> <xsl:transform version="1.0"> <xsl:template match="/"> ••• </xsl:template> </xsl:transform> </xsl:template> </xsl:transform>
The problem is that the transform element that I'm trying to output is in the same namespace as the "real" transform element that the XSLT processor is designed to understand as representing the start of the program. So when the processor gets to the nested xsl:transform element (meant for output), it thinks it has found another program construct.
There are two ways to get around this problem. The first is to use the xsl:element and xsl:attribute elements to dynamically generate the XSLT elements, as illustrated in Figure 2.
Figure 2 Dynamically Generate XSLT
<xsl:transform version="1.0" xmlns:xsl="https://www.w3.org/1999/XSL/Transform"> <xsl:template match="/"> <!-- the transform element I'm trying to output --> <xsl:element name="transform" namespace="https://www.w3.org/1999/ XSL/Transform"> <xsl:attribute name="version">1.0</xsl:attribute> <xsl:element name="template namespace=" https://www.w3.org/ 1999/XSL/Transform"> <xsl:attribute name="match">/</xsl:attribute> ••• </xsl:element> </xsl:element> </xsl:template> </xsl:transform>
Now I don't have a namespace conflict because I'm dynamically generating the XSLT elements (as opposed to writing them into the template). But as you can see, this approach is tedious, incredibly hard to read, and even harder to test and validate.
The other approach XSLT provides for dealing with this problem is called namespace-aliasing. XSLT has an element named xsl:namespace-alias that essentially tricks the processor into believing that the XSLT elements I want to output are in a different namespace than the real XSLT constructs that make up the program. The syntax for xsl:namespace-alias is as follows:
<xsl:namespace-alias stylesheet-prefix ="alias namespace prefix" result-prefix ="real namespace prefix"/>
You use this element to specify which namespace prefix is mapped to the "real" namespace (using the result-prefix attribute) and which one is the temporary alias (using the stylesheet-prefix attribute). For example, the following transformation indicates to the processor that the "alias" prefix is the alias used in the transformation. Notice that it's mapped to a different namespace than that of XSLT (I just tacked "alias" onto the end of the XSLT namespace). Now I can simply write the XSLT transformation I'm trying to produce using the "alias" prefix, which makes the transformation much easier to author and read, as you can see in Figure 3.
Figure 3 Using the Alias Prefix
<xsl:transform version="1.0" xmlns:xsl="https://www.w3.org/1999/XSL/Transform" xmlns:alias="https://www.w3.org/1999/XSL/TransformAlias"> <xsl:namespace-alias stylesheet-prefix="alias" result-prefix="xsl"/> <xsl:param name="column">name</xsl:param> <xsl:template match="/"> <alias:transform version="1.0"> ••• <alias:template match="/"> <results> <alias:for-each select="/rowset/row"> <alias:sort select="{$column}"/> <alias:apply-templates/> </alias:for-each> </results> </alias:template> </alias:transform> </xsl:template> </xsl:transform>
Then, when the XSLT processor executes the transformation and produces the result document, it replaces the namespace name for the "alias" prefix with the one mapped to the result-prefix (in this case "xsl"). Hence, the output document for Figure 3 will contain the correct XSLT namespace, as you can see here:
<alias:transform version="1.0" xmlns:alias="https://www.w3.org/1999/XSL/Transform"> ••• <alias:template match="/"> <results> <alias:for-each select="/rowset/row"> <alias:sort select="name"/> <alias:apply-templates/> </alias:for-each> </results> </alias:template> </alias:transform>
This technique is especially useful if you have large XSLT libraries that have to be maintained and upgraded to newer versions every once in a while.
Q Can you explain how built-in numbering works in XSLT?
Q Can you explain how built-in numbering works in XSLT?
A The built-in numbering functionality is one of XSLT's best-kept secrets, which is unfortunate because it can simplify complex numbering tasks used by many transformations. XSLT provides an element named xsl:number that makes it possible to insert a formatted number into the result document. You can influence how the number is generated and formatted in the result document using the element's various attributes shown here:
<xsl:number level = "single" | "multiple" | "any" count = pattern from = pattern value = number-expression format = { string } lang = { nmtoken } letter-value = { "alphabetic" | "traditional" } grouping-separator = { char } grouping-size = { number } />
The xsl:number element first evaluates the expression provided in the value attribute and the result object is then converted to a number as if by calling the XPath number function. The number is then rounded to an integer and formatted according to the last five attributes shown (format, lang, letter-value, grouping-separator, and grouping-size). See Figure 4 for descriptions of all xsl:number attributes.
Figure 4 xsl:number Attributes
| Name | Default | Description |
|---|---|---|
| level | "Single" | Specifies which levels of the source tree should be considered during the counting process. |
| count | The pattern that matches the current node's type and name (if any) | A pattern that specifies which nodes should be counted at the specified levels (see the level attribute). |
| from | / | A pattern that specifies where counting starts. |
| value | Position (based on other attributes) | An XPath expression whose result is coerced to a number. If not specified, the value is evaluated as the current node's position with respect to the level, count, and from attributes. |
| format | 1 | Specifies the format to use for numbering. |
| lang | Determined from system environment | Specifies which language's alphabet to use when numbering with an alphabetic sequence (same value space as xml:lang). |
| letter-value | (None) | Disambiguates between different numbering schemes for a given language. In English, the "a" format token identifies an alphabetical sequence (such as a, b, c, ..., aa, ab, ac, ...) while the "i" format token identifies a numeric-alphabetic sequence (for example, i, ii, iii, iv,...). In some languages both numbering schemes start with the same letter. In these cases, a letter-value of "alphabetic" identifies the alphabetical sequence while a letter-value of "traditional" identifies the other form. |
| grouping-separator | (None) | Specifies the separator used as a grouping separator in decimal numbering sequences (such as 1,000,000). |
| grouping-size | (None) | Specifies the size of the grouping (such as 3 in the grouping-separator example). |
For example, consider the following XSLT statement:
<xsl:number value="5000000 div 3" grouping-separator="," grouping-size="3" />
This expression displays the following value in the result tree:
1,666,667
It's more common, however, to omit the value attribute and use xsl:number for automatic counting. When you don't specify the value attribute, xsl:number calculates and uses the position of the current node as the value. The level, count, and from attributes influence how the position of the current node is calculated. The from attribute takes a pattern that identifies where the counting starts in the tree while the count attribute takes a pattern that identifies exactly which nodes should be counted. The level attribute specifies which levels of the source tree should be considered during the counting process.
There are three possible level values: "single," "any," and "multiple." A value of "single" counts the siblings that precede the target node (same as XPath preceding-sibling axis). If the current node matches the count pattern or count is not specified, it is the target node. Otherwise, the target node is the first ancestor to match the count pattern. The first ancestor node (of the current node) that matches the from pattern identifies the start node where counting begins. Only those nodes that come after the start node up to the current node are considered in the count.
A value of "any" counts the nodes, identified by the count pattern, that come before the current node in document order (same as the union of XPath's preceding and ancestor-or-self axes). The first node (that comes before the current node) that matches the from pattern identifies the start node where counting begins. Only those nodes that come after the start node up to the current node are considered in the count.
A value of "multiple" produces a sequence of numbers, each of which is produced in the same way as a single level count (such as 1.1.1, 1.1.2, 1.2.1, and so on). The count of the outermost ancestor that matches the count pattern becomes the first number in the sequence. The count of the next outermost ancestor that matches the count pattern becomes the second number in the sequence, and so on. The count of the innermost ancestor that matches the count pattern becomes the last number in the sequence. The count of each ancestor is determined like a single level count.
Let's take a look at some examples. Consider the following XML document that contains a sample book structure:
<books> <book title="Sample Book"> <chapter title="Sample Chapter"> <section title="Sample Section"> <p>This is some sample text.</p> •••
In this particular schema, the books element may contain several book elements, each book element may contain multiple chapter elements, and each chapter element may contain multiple section elements. The following transformation uses the default xsl:number functionality (level="single") to number each of the books, chapters, and sections:
<xsl:transform version="1.0" xmlns:xsl="https://www.w3.org/1999/XSL/Transform"> <xsl:output method="text"/> <xsl:template match="book"> <xsl:number/>. <xsl:value-of select="@title"/> <xsl:apply-templates/> </xsl:template> ••• </xsl:transform>
This transformation generates the text shown in Figure 5 (with white space added to improve readability). Notice that the book, chapter, and section counts are kept independently. Now consider the transformation in Figure 6, which uses level="any."
Figure 6 Transform Using Any
<xsl:transform version="1.0" xmlns:xsl="https://www.w3.org/1999/XSL/Transform"> <xsl:output method="text"/> <xsl:template match="book"> <xsl:number level="any"/>. <xsl:value-of select="@title"/> <xsl:apply-templates/> </xsl:template> <xsl:template match="chapter"> <xsl:number level="any"/>. <xsl:value-of select="@title"/> <xsl:apply-templates/> •••
Figure 5 Independent Numbering
1. Sample Book 1. Sample Chapter 1. Sample Section 2. Sample Section 3. Sample Section 2. Sample Chapter 1. Sample Section ••• 2. Sample Book 1. Sample Chapter 1. Sample Section 2. Sample Section 3. Sample Section 2. Sample Chapter 1. Sample Section •••
With "any," the chapter numbering is no longer scoped by the containing book, and the section numbering is no longer scoped by the containing chapter. Now the chapters and sections are numbered from start to finish in a continuous fashion throughout the entire document as shown in Figure 7.
Figure 7 Continuous Numbering
1. Sample Book 1. Sample Chapter 1. Sample Section 2. Sample Section 3. Sample Section 2. Sample Chapter 4. Sample Section 5. Sample Section 6. Sample Section 3. Sample Chapter 7. Sample Section 8. Sample Section 9. Sample Section 2. Sample Book 4. Sample Chapter 10. Sample Section 11. Sample Section 12. Sample Section 5. Sample Chapter 13. Sample Section •••
If you want each numbered item to include ancestor-level numbers (such as 1.2.1), you use the "multiple" level value. With "multiple," you specify a pattern that indicates which nodes you want to count from the ancestors, as shown here:
<xsl:template match="book"> <xsl:number level="multiple"/>. <xsl:value-of select="@title"/> <xsl:apply-templates/> </xsl:template> <xsl:template match="chapter"> <xsl:number level="multiple" count="chapter|book"/>. <xsl:value-of select="@title"/> <xsl:apply-templates/> </xsl:template>
Notice that you don't have to do anything special for the "book" element because it's the outermost element as far as the counting goes. With the "chapter" element, however, you have to specify that you want to count both "book" and "chapter" elements, and with the "section" element you have to specify that you want to count the "section," "chapter," and "book" elements. This example produces the numbered list shown in Figure 8.
Figure 8 Multiple Levels
1. Sample Book 1.1. Sample Chapter 1.1.1. Sample Section 1.1.2. Sample Section 1.1.3. Sample Section 1.2. Sample Chapter 1.2.1. Sample Section 1.2.2. Sample Section 1.2.3. Sample Section 1.3. Sample Chapter 1.3.1. Sample Section 1.3.2. Sample Section 1.3.3. Sample Section 2. Sample Book 2.1. Sample Chapter 2.1.1. Sample Section 2.1.2. Sample Section 2.1.3. Sample Section 2.2. Sample Chapter 2.2.1. Sample Section •••
You can also use the format attribute to control how the numbers are formatted when using these techniques. I hardcoded the period to follow the generated number in the previous examples, but I could have also accomplished this by using the format attribute as follows:
<xsl:template match="book"> <xsl:number level="multiple" format="1. "/> <xsl:value-of select="title"/> <xsl:apply-templates/> </xsl:template>
You may also want to use Roman numerals (such as I, II, III, IV, and so on) or alpha characters (such as A, B, C, D) in your numbering scheme. This is made possible by specifying a special format token in the format attribute. Figure 9 provides some examples of format tokens and what the numbering sequence would be like for each one. For example, the transformation in Figure 10 uses Roman numerals for book numbering, alpha characters for chapter numbering, and digits for the section numbering.
Figure 10 Scheme with Several Numbering Systems
<xsl:transform version="1.0" xmlns:xsl="https://www.w3.org/1999/XSL/Transform"> <xsl:output method="text"/> <xsl:template match="book"> <xsl:number level="multiple" format="I. "/> <xsl:value-of select="@title"/> <xsl:apply-templates/> </xsl:template> <xsl:template match="chapter"> <xsl:number level="multiple" count="chapter|book" format="I.A. "/> <xsl:value-of select="@title"/> <xsl:apply-templates/> </xsl:template> <xsl:template match="section"> <xsl:number level="multiple" count="section|chapter|book" format="I.A.1. "/><xsl:value-of select="@title"/> </xsl:template> ••• </xsl:transform>
Figure 9 xsl:number Format Token Examples
| Token | Sequence |
|---|---|
| 1 | 1, 2, 3, 4, ..., 10, 11, 12, ..., 20, 21, ... |
| 01 | 01, 02, 03, 04, ..., 10, 11, 12, ..., 100, 101, ... |
| A | A, B, C, D, ..., Z, AA, AB, AC, ... |
| a | a, b, c, d, ..., z, aa, ab, ac, ... |
| I | I, II, III, IV, V, VI, ..., X, XI, ... |
| i | i, ii, iii, iv, v, vi, ..., x, xi, ... |
This transformation produces the same numbered list as before but with different level formatting:
I. Sample Book I.A. Sample Chapter I.A.1.Sample Section I.A.2.Sample Section I.A.3.Sample Section I.B. Sample Chapter I.B.1.Sample Section ••• II. Sample Book II.A. Sample Chapter II.A.1.Sample Section II.A.2.Sample Section •••
As you can see, the numbering functionality provided by XSLT can be a powerful and flexible addition to your transformations as long as you understand how it works.
Q Can you explain the rules for white space in XSLT? It's not clear to me when white space is significant and when it's not.
Q Can you explain the rules for white space in XSLT? It's not clear to me when white space is significant and when it's not.
A Before an XSLT processor executes a transformation against a given source document, it first strips all white space-only text nodes from both documents. A white space-only text node is a text node that contains only space, tab, and carriage return characters.
A Before an XSLT processor executes a transformation against a given source document, it first strips all white space-only text nodes from both documents. A white space-only text node is a text node that contains only space, tab, and carriage return characters.
Developers often trip over this behavior when they need to explicitly output white space in the result tree because they usually first try typing the white space directly into their transformations. However, unless the text node also contains non-white space characters, it's going to be stripped out before the transformation runs. For example, consider the following transformation that attempts to output a space character between the two xsl:value-of statements (so the first and last names are spaced in the output tree):
<h1><xsl:value-of select="//first"/> <xsl:value-of select="//last"/> </h1>
The text node containing the space is an example of a white space-only text node that will be stripped by the XSLT processor before executing and, as a result, it won't appear in the rendered HTML document. Now consider the text node between the xsl:value-of expressions for the middle-initial and last elements shown here:
<h1><xsl:value-of select="//first"/> <xsl:value-of select="//middle- initial"/>. <xsl:value-of select="//last"/> </h1>
Since this text node contains a non-white space character (the period), it will be preserved by the XSLT processor.
Luckily XSLT provides a special element, xsl:text, that's able to get around this issue. The xsl:text element explicitly preserves white space in text nodes. The following example preserves the space between the two xsl:value-of elements:
<h1><xsl:value-of select="//first"/><xsl:text> </xsl:text> <xsl:value-of select="//last"/></h1>
Although XSLT also strips white-space-only text nodes from the source document by default, it does provide a way to influence this behavior. You can use xsl:preserve-space to specify which elements in the source document should not be subject to white space stripping. For example, the following transformation specifies that white space should not be stripped from the story, poem, and song elements in the source document:
<xsl:transform version="1.0" Xmlns:xsl="https://www.w3.org/1999/XSL/Transform"> <xsl:preserve-space elements="story poem song"/> ••• </xsl:transform>
The elements attribute takes a white space-separated list of name tests that can include QNames and "*". XSLT also provides xsl:strip-space that can be used with xsl:preserve-space when you primarily want to preserve white space in the source document with a few exceptions. Consider the following example:
<xsl:transform version="1.0" Xmlns:xsl="https://www.w3.org/1999/XSL/Transform"> <!-- preserves white space for all elements in source document --> <xsl:preserve-space elements="*"/> <xsl:strip-space elements="author title"/> ••• </xsl:transform>
In this case, the transformation only strips white space-only text nodes within the author and title elements and preserves white space everywhere else.
In addition to these XSLT techniques, XML 1.0 also provides a way for authors to request white space preservation in the context of a particular element. This is accomplished through the global xml:space attribute that's used like this:
<!-- some source document --> <foo xml:space="preserve"> ... </foo>
XSLT processors are required to respect this attribute in source documents, allowing the author of the source document (as opposed to the author of the XSLT document) to indicate whether white space preservation is important.
Send your questions and comments for Aaron to xmlfiles@microsoft.com.
Aaron Skonnard teaches at Northface University in Salt Lake City. Aaron coauthored Essential XML Quick Reference (Addison-Wesley, 2001) and Essential XML (Addison-Wesley, 2000), and frequently speaks at conferences.