Mutant Power
Create A Simple Mutation Testing System With The .NET Framework
James McCaffrey
This article discusses:
|
This article uses the following technologies: .NET Framework, C# |
Code download available at:MutationTesting.exe(353 KB)
Contents
The DLL and Test Harness
The Mutation Testing System
Preparing for Mutation Analysis
The Main Mutation Loop
Mutation Analysis Results
Conclusion
Mutation testing is the least common and most misunderstood type of testing analysis. With mutation testing, the system/program under test is changed to create a faulty version called a mutant. You then run the mutant program through a suite of test cases, which should produce new test case failures. If no new failures appear, the test suite most likely does not exercise the code path containing the mutated code, which means the program isn't fully tested. You can then create new test cases that do exercise the mutant code.
Mutation testing is rarely used because the technical issues have been considered difficult and resource-intensive. One benefit of the Microsoft® .NET Framework is that it makes mutation testing dramatically easier to perform. In this article, I will show you a simple yet complete mutation testing technique implemented in the C# language.
Let's take a look at a lightweight .NET Framework mutation analysis. Figure 1 shows that I am analyzing a library named LibUnderTest.dll. It's just a demo library containing a single Max method. In the first part of my mutation analysis, an existing test suite named TestHarness.exe runs on the DLL. For simplicity, the test suite has only 10 test cases. Notice that all 10 test cases pass. As I'll explain later, in general you'll want to begin mutation analysis with a test suite containing only test cases that pass when run against your program.
.gif)
Figure 1 Mutation Analysis Output
After establishing baseline test results, the DLL under test is examined for potential mutations. This is one of the tasks that you'll find dramatically easier to do with the .NET Framework. I'll explain how to examine a system or program under test for possible mutations later; for now it's enough to say that I disassemble the DLL under test and examine the resulting .il file for branching instructions. In this example the DLL has three ble (branch on less than or equal) instructions. The mutation analysis then enters a main processing loop. On each pass through the loop, the original DLL is mutated, creating a new DLL. The new mutant DLL is built and then the test suite runs against the mutant.
In the example here, the first mutant did not produce any test failures. This is not good—my test suite probably misses the code path containing the mutated code. The second and third mutants do produce test case failures (good) and contribute to the beta power of the test suite. The mutation analysis finishes by printing the relative mutation alpha and beta powers. The alpha power (0.67 in my example) is just the proportion of mutations that produce test case failures. I'll explain the beta power later.
In this article, I will briefly describe the DLL under test, and then I will present the simple mutation analysis code that produced the results shown in Figure 1. You will be able to modify and extend the mutation system to meet your own needs. I will conclude with a very brief discussion of how and when to use mutation testing and its relationship to other types of testing, code coverage in particular.
The DLL and Test Harness
To keep things simple, my DLL under test contains a single Utility class with an instance method Max:
public int Max(int a, int b, int c) { if (a > b && a > c) return a; else if (b > c) return b; else return c; }
Method Max is implemented correctly, but in the real world you could not make this assumption—otherwise you wouldn't need to be testing at all!
For this article I've created a demo test harness designed for maximum simplicity (see Figure 2). Notice that the test harness has 10 hardcoded test cases. Each test case has a test case ID, a field to instruct the harness which method to test, three input arguments for Max, and an expected result. You'll notice that the cases do not thoroughly test the Max method. In all 10 cases, the maximum value is the third input argument. This is easy to see in a tiny example, but in a production environment with thousands of test cases it will not be obvious if your suite of test cases thoroughly tests the code. This is exactly what mutation testing is designed to determine.
Figure 2 Test Harness
static void Main(string[] args) { try { ArrayList testCases = new ArrayList(); testCases.Add("0001:Max:1:7:9:9"); testCases.Add("0002:Max:7:1:9:9"); testCases.Add("0003:Max:2:9:9:9"); testCases.Add("0004:Max:9:7:9:9"); testCases.Add("0005:Max:9:9:9:9"); testCases.Add("0006:Max:-3:3:5:5"); testCases.Add("0007:Max:3:-3:5:5"); testCases.Add("0008:Max:-2:5:5:5"); testCases.Add("0009:Max:5:3:5:5"); testCases.Add("0010:Max:5:5:5:5"); Console.WriteLine("Begin test run"); int numPass = 0, numFail = 0; for (int i = 0; i < testCases.Count; ++i) { string raw = (string)testCases[i]; string[] tokens = raw.Split(':'); string id = tokens[0]; string method = tokens[1]; if (method == "Max") { int arg1 = int.Parse(tokens[2]); int arg2 = int.Parse(tokens[3]); int arg3 = int.Parse(tokens[4]); int expected = int.Parse(tokens[5]); LibUnderTest.Utility u = new LibUnderTest.Utility(); int actual = u.Max(arg1, arg2, arg3); if (actual == expected) ++numPass; else ++numFail; } } // end test loop Console.WriteLine("Num pass = " + numPass); Console.WriteLine("Num fail = " + numFail); string finishTime = DateTime.Now.ToShortTimeString(); using(FileStream ofs = new FileStream( "..\\..\\..\\TestHarness\\Results\\Results.txt", FileMode.Create)) using(StreamWriter sw = new StreamWriter(ofs)) { sw.Write(numPass + ":"); sw.Write(numFail + ":"); sw.WriteLine(finishTime); } Console.WriteLine("End test run"); } ... } // Main()
The test harness iterates through each test case, parses out each test case field, creates an instance of a LibUnderTest object, calls method Max with the test case inputs, and compares the actual result with the expected result to determine whether the test case passes or fails. The test harness emits results to an external file named Results.txt in a single-line, comma-delimited format with the number of cases that pass, the number of cases that fail, and the time the test run finished. A results file might look like this:
8,2,9:55 AM
When you are going to perform mutation testing, you will likely inherit existing test suites and test harnesses. As long as you can programmatically execute the harness and retrieve the test run results, you will be able to conduct mutation testing. You will run into trouble only if the test harness has been designed so that you cannot programmatically retrieve results (a pure GUI test framework, for example). If you are designing a test harness, remember that the more automation-friendly you can make the harness, the easier it will be to create the mutation testing system.
The Mutation Testing System
Now I'll walk through the mutation program that produced the output shown in Figure 1. A high-level skeleton of the program is presented in Figure 3. You can find the entire program in the code download that accompanies this article.
Figure 3 Mutation Testing Program Structure
static string[] brInstructions = { "beq", "bge", "bge.un", "bgt", "bgt.un", "ble", "ble.un", "blt", "blt.un", "bne.un" }; static string[] brComplements = { "bne.un", "blt", "blt.un", "ble", "ble.un", "bgt", "bgt.un", "bge", "bge.un", "beq" }; [STAThread] static void Main(string[] args) { Console.WriteLine( "\nBeginning mutation analysis of: LibUnderTest.dll"); // Copy original DLL into default location. // Run test harness against original, unmutated DLL under test. // Use ildasm to produce file LibUnderTest.il. // Read file LibUnderTest.il into an ArrayList in memory. // Find all potential lines to mutate and save that info in an // ArrayList of Info objects. // Verify the listInfo list. for (int i = 0; i < listInfo.Count; ++i) // main loop { // Create mutated, in-memory, asm version of the DLL under test, // then build a new DLL from the mutation. // Run the test harness and read test results from mutated DLL. } // Display results of mutation testing. Console.WriteLine("\nDone"); }
The mutation analysis program starts by declaring two key string arrays named brInstructions and brComplements. The first problem you'll face when writing a mutation testing system is deciding exactly what you want to mutate. Remember that you want the mutant code under test to fail if the test suite exercises the mutated code.
You can mutate just about anything—text strings, arithmetic operators like + and -, and so forth. There is quite a bit of research available on the topic of exactly what you should mutate, but a reasonable compromise choice from both a theoretical and practical point of view is to mutate Boolean comparison operators such as >, <, and ==.
After you've decided what to mutate, you need to decide how to perform the mutation. Before the .NET Framework, often the only choice was to write a routine that parsed the code under test, looking for the Boolean operators. This is extremely difficult. Fortunately, the .NET Framework makes it much easier to write mutation tests. Because .NET-based programs compile to an intermediate language (IL), instead of parsing C# or Visual Basic® source code, you can parse the IL, which is much easier.
I'll illustrate with a tiny example. Suppose your system under test contains a statement like this:
if (x <= y) ++z;
Parsing source code for <= is much tougher than you might expect because you have to worry about whether you're in a comment, a string literal or not, and so on. But the IL that corresponds to that deceptively simple source code looks something like this:
IL_0006: ldloc.0 // x IL_0007: ldloc.1 // y IL_0008: bgt.s IL_000e IL_000a: ldloc.2 // z IL_000b: ldc.i4.1 IL_000c: add IL_000d: stloc.2 // z = z+1 IL_000e: ...
The <= Boolean operator in the source code translates to the bgt instruction in the IL (meaning branch on greater). You might have expected <= to translate to ble (branch on less than or equal), but it turns out that the compiler will usually optimize control flow by translating a Boolean operator into its IL complement branching instruction. If you can get the IL for your system under test—and you can—then parsing for Boolean operators reduces to finding IL branching instructions, which is relatively easy.
The last issue is to determine exactly what IL branching instructions you want to mutate, and what to mutate them into. The IL reference guide lists 12 branching instructions, as shown in Figure 4.
Figure 4 Common IL Branching Instructions
| IL Branching Instruction | Instruction Title | Complement |
|---|---|---|
| beq | branch on equal | bne.un |
| bge | branch on greater than or equal | blt |
| bge.un | branch on greater than or equal (unsigned) | blt.un |
| bgt | branch on greater than | ble |
| bgt.un | branch on greater than (unsigned) | ble.un |
| ble | branch on less than or equal | bgt |
| ble.un | branch on less than or equal (unsigned) | bgt.un |
| blt | branch on less than | bge |
| blt.un | branch on less than (unsigned) | bge.un |
| bne.un | branch on not equal | beq |
| brfalse | branch on false, null, or zero | brtue |
| brtrue | branch on non-false, or non-null | brfalse |
Because you want to cause a test case failure, it makes sense to mutate each IL branching instruction into its logical complement. So a bgt will mutate into a ble and so forth.
I'll point out now that using this approach does not absolutely guarantee that a mutation will produce a test case failure. Suppose your system under test contains source code like this:
if (s > t) i = i;
Mutating the IL counterpart to the > operator will not have any effect on your test case results.
With this knowledge in hand, you can declare the brInstructions and brComplements arrays and write the following tiny substitution method that accepts a branching instruction and returns its complement/mutation:
static string mutatedInstruction(string instruction) { for (int i = 0; i < brInstructions.Length; ++i) if (brInstructions[i] == instruction) return brComplements[i]; return null; }
Like all the samples in this article I have removed most of the error-checking code to keep the main points as clear as possible. But in a production environment you'll want to liberally add error-checking code. Here I just traverse the brInstructions array and return the counterpart in the brComplements array. Notice that I arbitrarily decided to leave out the brfalse and brtrue instructions. The design of the mutation testing system I present here allows you to easily modify what you want to mutate and how you want to mutate it.
Preparing for Mutation Analysis
In the first phase of the preparation, run your test suite against the original, unmutated DLL under test so you can establish the baseline results for later comparison. Start by grabbing the unmutated DLL under test from its drop point and copying it into the same folder as the test harness executable:
Console.WriteLine( "\nCopying original DLL under test into test harness folder"); File.Copy( "..\\..\\..\\LibUnderTest\\bin\\Debug\\LibUnderTest.dll", "..\\..\\..\\TestHarness\\bin\\Debug\\LibUnderTest.dll", true);
You have to be a bit careful here. I make the important assumption that the test harness references the DLL under test in the test harness executable folder. If your test harness was created with Visual Studio®, as is usually the case, you will have a project reference to the DLL under test. Project references bind by file name and will physically copy the DLL they point to into the test harness executable folder. If your test harness references a folder other than the one containing the harness executable, then when your mutation analysis copies a mutated DLL into the test harness executable folder, it could be overwritten by the original, unmutated DLL. The true argument in the static File.Copy method causes the code to overwrite any existing DLL from previous mutation analyses.
The next step in the mutation analysis preparation is to execute the test harness, as shown here:
Console.WriteLine( "\nRunning test suite on original DLL under test"); using(Process test = Process.Start( "..\\..\\..\\TestHarness\\bin\\Debug\\TestHarness.exe")) { test.WaitForExit(); }
Here I run the harness simply by calling the static Process.Start method. As I described earlier, the design of your mutation analysis will be influenced by the design of the existing test harness. As you'll recall, in this case the test harness just writes its results to a text file. After running the test harness against the original DLL, I fetch the test run results as shown in Figure 5.
Figure 5 Retrieving Test Results
string result; using(StreamReader sr = new StreamReader( "..\\..\\..\\TestHarness\\Results\\Results.txt"); { result = sr.ReadLine(); } int basePass = int.Parse(result.Split(',')[0]); int baseFail = int.Parse(result.Split(',')[1]); Console.WriteLine( "Baseline number pass, fail = " + basePass + " " + baseFail); if (baseFail > 0) Console.WriteLine( "** Warning: baseline should not contain test case failures **");
There is nothing fancy going on here. I just use a StreamReader object to read the single line in the test case results file. Recall that the results output format looks like this:
8,2,9:55 AM
So if I call String.Split with a comma character argument, the number of test cases that passed will be in index location [0] of the resulting string array, and the number of test cases that failed will be in index location [1]. A realistic test harness will produce more complicated output, possibly in an XML file or a SQL Server™ database.
Throughout this example, I use hardcoded paths, which you'll most likely want to parameterize. I also have avoided using helper methods to keep the explanation as simple as possible. You may want to recast the system presented here into helper methods. For example, you could refactor the previous lines of code into a GetBaselineResults method that accepts a string representing the file name of the test harness results, and returns an int array where [0] holds the number of cases which pass and [1] holds the number of failed test cases. The call might then look like:
int[] baseResults = GetBaselineResults(testResultFile);
The next step in the mutation analysis preparation is to produce the IL version of the DLL under test. Fortunately, you can use the ildasm.exe tool that ships with Visual Studio to do this:
using(Process p = Process.Start("ildasm.exe", "..\\..\\..\\TestHarness\\bin\\Debug\\LibUnderTest.dll " + "/OUT=..\\..\\LibUnderTest.il")) { p.WaitForExit(); }
I use the Process.Start method to launch ildasm.exe. I point ildasm.exe to the original unmutated DLL under test and specify an /OUT switch. This instructs ildasm.exe to emit output to a text file rather than use the default graphical interface. I save the IL version of the original DLL as LibUnderTest.il in the root folder of the mutation analysis system. The following shows a small snippet of the resulting text file:
.maxstack 2 .locals init (int32 V_0) IL_0000: ldarg.1 IL_0001: ldarg.2 IL_0002: ble.s IL_000c
Apart from the technical details of writing mutation analysis, there are also a lot of files and folders to juggle. Do not underestimate the difficulty of keeping track of all the files and folders being created! Each of the three systems involved—the code under test, the test harness, and the mutation system—will have source files, executables, input and output files, configuration files, and directory structures.
After you have created and saved the IL disassembly of the original DLL, you can read the IL instructions into memory:
using(StreamReader sr = new StreamReader("..\\..\\LibUnderTest.il")) { string line; ArrayList listLibUnderTestOrig = new ArrayList(); while ((line = sr.ReadLine()) != null) { listLibUnderTestOrig.Add(line); } }
I use a StreamReader object, read the IL file into memory line by line, and save it into an ArrayList object named listLibUnderTestOrig. The idea is that I will use this in-memory data store as the basis for all mutations (with larger projects, you could also process and mutate each line individually, rather than reading in and storing everything). Using an ArrayList object is simple and effective, but depending on your needs you may want to store the original IL code of the DLL under test into some other type of data structure. Notice that this mutation testing technique has the huge advantage of being language independent. Working with IL lets you avoid all the source code differences between C#, Visual Basic, and other .NET-compliant languages.
The next step in the mutation analysis preparation is to examine the IL code of the original DLL, looking for lines containing potential IL instructions to mutate. I store this potential mutation information into an ArrayList object named listInfo as shown in the code in Figure 6.
Figure 6 Analyze IL for Potential Mutations
ArrayList listInfo = new ArrayList(); string currMethod = "unknown"; for (int i = 0; i < listLibUnderTestOrig.Count; ++i) { string s = (string)listLibUnderTestOrig[i]; if (s.IndexOf(".method") >= 0) currMethod = (string)listLibUnderTestOrig[i+1].ToString().Trim(); for (int j = 0; j < brInstructions.Length; ++j) { if (s.IndexOf(": " + brInstructions[j]) >= 0) { Info info = new Info(i, currMethod, brInstructions[j]); listInfo.Add(info); // lineNum, method, branch instruction break; } } }
Because I saved the IL instructions into the ArrayList named listLibUnderTestOrig, I just iterate through that collection one object (a string) at a time. Although not absolutely necessary, in addition to keeping track of which line the mutable instruction occurs on, it will be very useful to keep track of which method the instruction occurs in. Within IL code produced by ildasm.exe, all methods are preceded by a .method tag:
.method public hidebysig instance int32 Max(int32 a, int32 b, int32 c) cil managed { // Code size 26 (0x1a) .maxstack 2 .locals init (int32 V_0) IL_0000: ldarg.1 ... IL_0019: ret } // end of method Utility::Max
Notice that the method name typically (but not always) comes on the line following the line containing the .method string. So, every time I hit a line with .method, if I grab the next line, I will usually get the first part of the current method signature. This is a very lightweight approach; a robust solution would have more advanced string parsing logic in place.
If you need better method name information, you can take advantage of the fact that ildasm.exe conveniently finishes each method with a comment beginning with "// end of method" that contains the name of the method, but not the parameter list or return type. You can perform a first pass through the IL code to determine the starting and ending line numbers for each method. Then, on a second pass through the IL code, when you hit a .method string you'll know what line you are on and can look up which method you are in.
When analyzing the IL code of the DLL under test, you can look for any of the branching instructions in the brInstructions string array. If you find one of these instructions, capture the instruction found, the line number on which it occurs, and the method name in which it occurs. Save this information for later when you actually perform the mutations. The easiest approach is to create a very lightweight object that has fields for IL instruction, line number, and method, and save that object into an ArrayList. I define such a lightweight class as follows:
class Info { public int lineNum; public string method instruction; public Info(int lineNum, string method, string instruction) { this.lineNum = lineNum; this.method = method; this.instruction = instruction; } }
I consider this the least amount of information you need to capture. You may want to add additional information such as the current IL offset, the parent class name, or the operand associated with the branching instruction. Because each Info object holds one IL branching instruction, the listInfo.Count property will return the number of potential mutations. In the example here, I execute every possible mutation. In a large-scale project with a huge test suite, this may not be feasible. There, the approach to take is to mutate randomly selected branching instructions instead of every one. I'll explain this idea in more detail in the next section.
The last step in the mutation analysis preparation process is to display information about the potential mutations:
for (int i = 0; i < listInfo.Count; ++i) { Info info = (Info)listInfo[i]; Console.WriteLine( "On line " + info.lineNum + " inside method " + info.method + " found mutatable instruction '" + info.instruction + "'"); }
This step is optional, but is really helpful when you are tracking down problems with the mutation analysis. One option to consider is adding a verbose switch to your analysis program that controls whether to print diagnostic information like this.
The Main Mutation Loop
At this point in the mutation analysis program, all the preparation work is done. I copied the original, unmutated DLL under test into the test harness executable folder. I ran the test harness against the original DLL and grabbed those baseline test results. I created an in-memory data store (listLibUnderTestOrig) of the IL code image of the DLL under test. And I analyzed the IL code image for branching instructions, which are possible mutations, and stored line number, instruction, and containing method name into memory as listInfo. See Figure 7 for a high-level overview of the main mutation loop.
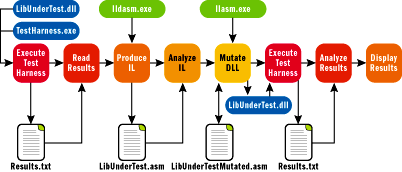
Figure 7** Main Mutation Loop Overview **
Now comes the main mutation loop where I create an in-memory version of mutated IL code of the tested DLL, build the mutant, and execute the test harness against the mutant. If I'm going to mutate all branching instructions in the original DLL under test, I can iterate through the listInfo object:
for (int i = 0; i < listInfo.Count; ++i)
Inside this loop I first make a copy of the unmutated IL code:
listLibUnderTestMutated = (ArrayList)listLibUnderTestOrig.Clone(); Info info = (Info)listInfo[i]; int lineNum = info.lineNum; string instruction = info.instruction;
I create an ArrayList named listLibUnderTestMutated, then I copy all the lines from listLibUnderTestOrig in. Next I fetch just the one line that contains the mutable branching instruction, replace that instruction with its Boolean complement using the mutatedInstruction helper method I described earlier, and replace the original line with the line containing the mutated instruction:
string originalLine = (string)listLibUnderTestOrig[lineNum]; string mutatedLine = originalLine.Replace(instruction, mutatedInstruction(instruction)); listLibUnderTestMutated[lineNum] = mutatedLine;
Next I write the information in listLibUnderTestMutated to an external text file:
using(StreamWriter sw = new StreamWriter("..\\..\\LibUnderTestMutated.il")) for (int j = 0; j < listLibUnderTestMutated.Count; ++j) { sw.WriteLine((string)listLibUnderTestMutated[j]); } }
There's nothing tricky here except making sure you know where you are saving this new file. I named it LibUnderTestMutated.il and saved it in the root mutation analysis program folder. Next I build a mutated DLL from the mutated IL code using the ilasm.exe program, as shown here:
using(Process assemble = Process.Start( "ilasm.exe", "..\\..\\LibUnderTestMutated.il " + "/OUTPUT=..\\..\\..\\TestHarness\\bin\\Debug\\LibUnderTest.dll /DLL")) { assembly.WaitForExit(); }
Here's where another big advantage of the .NET Framework comes in handy. Instead of recompiling source code, I can assemble IL code, which is generally much faster and easier. The ilasm.exe Intermediate Language Assembler program ships with the .NET Framework SDK. I specify an /OUTPUT switch to control where my resulting DLL goes, placing it directly into the test harness executable folder. I need the /DLL switch because the default output is an .exe file. Finally, I name the mutant DLL as LibUnderTest.dll rather than giving it a new name, because the test harness binds by file name and will be looking for the original DLL name.
Now that I've created a mutated DLL, I can run the test harness against the mutant:
using(Process test = Process.Start( "..\\..\\..\\TestHarness\\bin\\Debug\\TestHarness.exe")) { test.WaitForExit(); }
Notice I don't have to do anything special. Because the test harness binds to the DLL it runs against by name, the test harness will use the new mutant DLL when it runs. After the test harness runs, I can grab the test suite results exactly as before.
Now comes a key concept of the whole mutation process: I check to see whether the test suite has yielded any test case failures when run against the mutated DLL under test:
Console.WriteLine( "Mutated number pass, fail = " + mutatedPass + " " + mutatedFail); if (mutatedPass == basePass) { Console.WriteLine( "\n** ALERT: Mutation did not creates failure(s) **"); Console.WriteLine( "** Likely that test suite misses this code path **"); }
The results are much easier to interpret if the original test suite has a 100 percent pass rate. If that is true, any failures must have been due to the mutation. But if the original DLL has test failures, you can't really be sure what test results against the mutant mean. If you get test case failures, you should create a subset test suite containing only test cases that pass and use that subset for the mutation analysis.
To track summary results, I record the cumulative number of test cases that pass and fail and the number of mutations that have produced one or more test case failures:
cumPass += mutatedPass; cumFail += mutatedFail; if (mutatedFail > baseFail) ++numMutationsWhichIncreaseFailures;
I'll discuss how to interpret these values in the next section. I mentioned that it might not be feasible to run your system against every potential mutation. In this case, for the main loop, instead of iterating through every object in the listInfo collection, you can decide how many mutations you want to create and select random mutations. The code could look like this:
int numMutations = 100; Random r = new Random(0); for (int i = 0; I < numMutations; ++i) { int whichMutant = r.Next(listInfo.Count); // etc.
You can create a Random object and seed it so you can get reproducible results. Calling Random.Next(5) for example will return an integer between 0 and 4 inclusive, so calling r.Next(listInfo.Count) will return a random index that points to one of the Info objects. You might consider adding a bit of additional logic to prevent testing the same mutation twice.
Mutation Analysis Results
The last part of the mutation analysis is to display and interpret results. Here's the code that produced the output in Figure 1:
double alphaPower = ( numMutationsWhichIncreaseFailures * 1.0) / listInfo.Count; double betaPower = (cumFail * 1.0) / (cumFail + cumPass);
There are three ways to use the results of a mutation analysis. First, whenever you have a mutant that does not create test case failures, it is likely that your test suite does not test the code path containing the mutant. This was shown in Figure 1. You need to investigate and create new test cases.
The second way to use mutation results is as a measure of your test suite effectiveness relative to mutation testing. I call this the test suite relative alpha power. It is the ratio of the number of mutants that do create failures to the total number of mutants. For example, if you create 100 mutations and 90 of them yield test case failures, the alpha power is 90/100 = 0.90. Alpha will range between 0 and 1, with larger numbers being better. If you track alpha power as you add test cases to your test suite over time during product development, you can gauge the progress of your test suite effectiveness.
A third way to use mutation results is to compare the overall number of test case failures produced by mutants to the total number of test cases. This test suite mutation beta power correlates highly with the test suite alpha power. Suppose you have a test suite with 1,000 test cases. You run against 20 mutants and produce a total of 80 test case failures. The beta power would be:
80 / (1,000 * 20) = 0.004
The more failures you create, the higher the beta power will be. So beta power is also a number between 0 and 1, with larger values indicating a more effective test suite. Beta power is less meaningful as an indicator of test suite effectiveness than alpha power, but is still useful as a way to validate alpha power metrics.
Conclusion
The term "mutation testing" is somewhat of a misnomer. The technique might better be called mutation analysis because the result is a measure of test suite effectiveness rather than a pass or fail result. Mutation testing/analysis is a close cousin to code coverage analysis. Code coverage is generally easier than mutation testing in unmanaged development environments.
Code coverage tells you which parts (which can mean methods, blocks, or individual statements) of your code under test are touched by your test suite, and mutation testing is one approach to obtain similar results. Because the system I've presented in this article is easy to deploy, it may make mutation analysis just as easy as code coverage. With Visual Studio 2005, which has comprehensive support for code coverage analysis, along with some mutation analysis tools, you can integrate all of the methods discussed here into your testing suite.
James McCaffrey works for Volt Information Sciences Inc., where he manages technical training for software engineers working at Microsoft. He has worked on several Microsoft products including Internet Explorer and MSN Search. James can be reached at jmccaffrey@volt.com or v-jammc@microsoft.com.