Office Space
Features for SharePoint
Ted Pattison
Code download available at: Office Space Feature 2007_05.exe(190 KB)
Contents
What’s a “Feature”?
Structure of a Feature
Feature Deployment and Activation
Extending the Feature
Custom Application Pages
Summary
In my previous Office Space column, I discussed the Office Open XML file formats. In particular, I showed you how to write codebehind an ASP.NET page to generate a .docx file for Microsoft® Word using the packaging API provided by the Microsoft .NET Framework 3.0. This month, I am building upon what I’ve already shown you how to do with the Office Open XML file formats. I look at integrating this code into a business solution that can be deployed in either Windows® SharePoint® Services (WSS) 3.0 or Microsoft Office SharePoint Server (MOSS) 2007.
The focus of this month’s Office Space column is to introduce the fundamental building blocks you’ll use to create business solutions with WSS and MOSS. I explain what a WSS "feature" is and show you how to build one that automates the creation of new lists and document libraries within a site. Along the way I add a custom application page to the custom business solution. This contains the Visual Basic® code needed to generate Word documents from data within SharePoint lists and save these documents within a SharePoint document library.
What’s a “Feature”?
When developing custom business solutions for WSS and MOSS, the first thing you need to do is gain a firm understanding of features (and I’m not referring to the general feature set). Features are a new developer-focused innovation that has been added to WSS 3.0. Basically, this provides a mechanism for defining site elements, which can be automatically activated within the context of a target site or a target site collection. The element types that can be defined by a feature include list instances, list types, menu commands, page templates, page instances, event handlers, and workflows. The example I discuss in this column involves a feature, named OfficeSpaceFeature, that creates a list and a document library and adds a custom menu item to the standard WSS Site Actions menu, allowing the user to navigate to a custom application page.
A feature consists of a directory created within a special WSS system directory located within the file system of each front-end Web server. The directory for a feature contains one or more XML-based files that contain Collaborative Application Markup Language (CAML). By convention, each feature directory contains a manifest file named feature.xml. This file defines the high-level attributes of the feature, such as its ID and its user-friendly Title.
Besides the feature.xml file, a feature usually contains one or more additional XML files (elements.xml, for instance) that define the actual elements that make up the feature. The directory can also contain other types of files for things like list definitions and page templates as well as resources like images, cascading style sheets, and JavaScript. The feature directory in my example includes an extra file that serves as the document template for a document library.
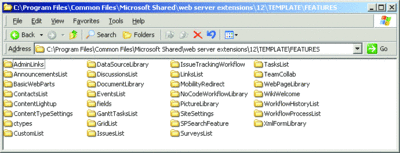
One good technique to help you get up to speed with features is to examine the standard set of features included with the basic WSS installation. Figure 1 shows an example of what the FEATURES directory looks like after you’ve installed WSS. As you can see, each feature has its own directory. The FEATURES directory will look very different if you have MOSS installed, since this will include more than 100 features.

Figure 1** Standard FEATURES Directory **(Click the image for a larger view)
After you’ve created the directory with all the files that make up your feature, you must then install it with WSS at a farm-level scope. Once a feature has been installed with WSS, it can then be activated within the context of a site or site collection using an administrative page accessible through the Site Settings page.
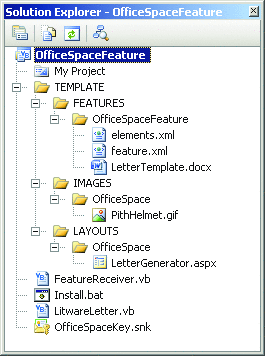
The download for this column contains a Visual Studio® project named OfficeSpaceFeature, which contains a feature by the same name. Figure 2 shows a view of the Solution Explorer to give you an idea of what types of files are involved when you create a Visual Studio project to develop a custom feature for WSS or MOSS. I have created this column’s example as a Visual Basic DLL project. You can, of course, use a C# DLL project instead if you prefer. The managed code inside the assembly DLL must be compiled with a strong name and installed in the Global Assembly Cache (GAC) so it can be used for the feature’s event handlers.

Figure 2** OfficeSpaceFeature **
Structure of a Feature
Before I examine the feature.xml file, consider that the files for this feature must be deployed in their own special directory inside the WSS system directory named FEATURES. The FEATURES directory is located within another WSS system directory named TEMPLATE, as shown in Figure 1. Given the requirements of feature deployment, it makes sense to create a parallel hierarchy of folders within a Visual Studio project used to develop a WSS feature. This makes it easier to copy the feature files to the correct location and test them as you do your development work.
Start by adding a folder named TEMPLATE to the root directory of the current project. Then create another directory inside TEMPLATE named FEATURES. Finally, create another directory inside FEATURES using the name of the feature project. In this case, the name of the project and directory is OfficeSpaceFeature, as you can see in Figure 2.
Now onto the CAML content inside the feature.xml file. The feature.xml file serves as a feature manifest where you specify the information that defines the high-level attributes of the feature itself. The feature.xml file for my example feature looks like that shown in Figure 3.
Figure 3 Sample Feature.xml File
<?xml version=”1.0” encoding=”utf-8” ?>

<Feature Id=”AAEC2E08-1CCF-4712-AE5E-A33BEA53A325”
  Title=”A Sample Office Space Feature”
  Description=
    “Demoware from Ted Pattison’s Office Space column in MSDN Magazine”
  Version=”1.0.0.0”
  Scope=”Web”
  ImageUrl=”OfficeSpace/PithHelmet.gif”
  ReceiverAssembly=”OfficeSpaceFeature, [full strong name]”
  ReceiverClass=”OfficeSpaceFeature.FeatureReceiver”
  xmlns=”https://schemas.microsoft.com/sharepoint/”>

    <ElementManifests>
      <ElementManifest Location=”elements.xml” />
    </ElementManifests>

</Feature>
You can see that a feature is defined using a Feature element that contains several attributes, such as Id, Title, Description, Version, Scope, Hidden, and ImageUrl. You must create a new GUID for the Id attribute so your feature can be uniquely identified. You create the feature’s Title and Description attributes using user-friendly text. These attributes are displayed directly to users on the WSS administrative pages that are used to activate and deactivate features.
The Scope defines the context in which the feature can be activated and deactivated. The feature I am creating has a scope equal to Web, which means it can be activated and deactivated within the context of a site. If, instead, you assign a Scope value of Site, your feature can then be activated and deactivated within the scope of a site collection. The two other possible scopes for defining a feature are WebApplication scope and Farm scope.
As you can see, the Hidden attribute has a value of FALSE. This means that, once installed within the farm, the feature can be seen by users who might want to activate it. If you create a feature with the Hidden attribute value set to TRUE, the feature will be hidden in the list of available features shown to users. Hidden features must be activated from the command line, through custom code or through an activation dependency with another feature.
You may have noticed that the ImageUrl attribute has a value that points to one of the graphic images that is part of the basic WSS installation. This image will be shown next to the feature in the UI.
The last part of the feature.xml file shown in Figure 3 is the ElementManifests element. This element contains inner ElementManifest elements that reference other XML files where you will define the elements that make up the feature. In this case, there is a single ElementManifest element that uses the location attribute to point to a file named element.xml.
Note that when you add and modify XML within CAML-based files, such as feature.xml and elements.xml, you want to add support for XML schema-driven IntelliSense®. Inside the TEMPLATE directory there is a directory named XML that contains several XML schemas including one named wss.xsd. If you associate this schema file with feature files, like feature.xml and elements.xml, Visual Studio will provide IntelliSense, making it much easier to author a custom feature.
Now it’s time to examine what’s inside the element.xml file. Say you want to instantiate a document library whenever the feature is activated. You can create an elements.xml file that looks like the one shown in Figure 4.
Figure 4 Sample Elements.xml File
<Elements xmlns=”https://schemas.microsoft.com/sharepoint/”>

  <ListInstance
   FeatureId=”00BFEA71-E717-4E80-AA17-D0C71B360101”
   TemplateType=”101”
   Id=”CustomerLetters”
   Description=”Letters sent to customers”
   OnQuickLaunch=”True”
   Title=”Customer Letters”
   Url=”CustomerLetters”>
  </ListInstance>

  <Module Name=”LetterTemplate” List=”101” Url=”CustomerLetters/Forms”>
    <File Url=”LetterTemplate.docx” Type=”GhostableInLibrary” />
  </Module>

  <!-- more elements to come... -->

</Elements>
The first element shown here, a ListInstance element, is used to create an instance of a list or a document library. Note that the ListInstance contains a FeatureId and a TemplateType to point to a specific list type and the ID for the feature in which that list type is defined. In this case, I am using the standard WSS document library type, which has a TemplateType identifier of 101 to create a new document library with a title of Customer Letters. Under the ListInstance element, there is also a Module element that contains an inner File element. This File element is used to provision a document template for the document library. More precisely, this File element provides WSS with the instructions to copy a file named LetterTemplate.docx from the feature directory into the WSS site. This makes it accessible to users.
While the declarative logic in elements.xml goes a long way to provide what you need to create elements within a WSS site, it often needs to be accompanied by programmatic logic. For my example, I have created a new document library and provisioned a file to serve as the document template. However, I need to supply some extra code that programs against the WSS object model to associate the document template with the document library.
In my feature.xml file, you’ll notice that the Feature element contains two attributes named ReceiverAssembly and ReceiverClass. These attributes are configured to point to a managed class known as a feature receiver, which supplies event handlers. The event handlers within a feature receiver class fire when a feature is installed or activated as well as when a feature is uninstalled or deactivated. You create a feature receiver by creating a class that inherits from the SPFeatureReceiver class as shown in Figure 5.
Figure 5 Class that Inherits from SPFeatureReceiver
Imports Microsoft.SharePoint

Public Class FeatureReceiver : Inherits SPFeatureReceiver

  Public Overrides Sub FeatureActivated( _
      ByVal properties As SPFeatureReceiverProperties)
    ‘*** fires when feature is activated
  End Sub

  Public Overrides Sub FeatureDeactivating( _
      ByVal properties As SPFeatureReceiverProperties)
    ‘*** fires when feature is deactivated
  End Sub

  Public Overrides Sub FeatureInstalled( _
      ByVal properties As SPFeatureReceiverProperties)
    ‘*** fires when feature is installed
  End Sub

  Public Overrides Sub FeatureUninstalling( _
      ByVal properties As SPFeatureReceiverProperties)
    ‘*** fires when feature is uninstalled
  End Sub

End Class
For my sample, I am only supplying code inside the FeatureActivated event handler. This code uses the WSS object model to associate the document template with the Customer Letters document library. Inside the event handler this is done by obtaining an SPWeb reference to the current site and then an SPDocumentLibrary reference to the target document library. This makes it possible to modify the DocumentTemplateUrl property and save this change using a call to the Update method, like so:
Public Overrides Sub FeatureActivated( _
    ByVal properties As SPFeatureReceiverProperties)

  Dim site As SPWeb = CType(properties.Feature.Parent, SPWeb)

  Dim libLetterTemplates As SPDocumentLibrary
  libLetterTemplates = CType(site.Lists(“Customer Letters”), _
    SPDocumentLibrary)
  Dim templateUrl As String = _
    “CustomerLetters/Forms/LetterTemplate.docx”
  libLetterTemplates.DocumentTemplateUrl = templateUrl
  libLetterTemplates.Update()

End Sub
Feature Deployment and Activation
Now that I have created both the feature.xml file and the elements.xml file, I want to install my feature for testing purposes. There are four steps involved in installing my feature. First, I must install the assembly file named OfficeSpaceFeature.dll into the GAC. Then I have to copy the OfficeSpaceFeature directory to the WSS system FEATURES directory. The next step is to run an Stsadm.exe operation to install the feature with WSS. Finally, I need to activate the feature inside the context of a WSS site.
I can automate the first three steps by creating a batch file named install.bat at the root directory of my OfficeSpaceFeature project and adding the command-line instructions shown in Figure 6. If I wanted, I could also automate the fourth step by running the ActivateFeature operation with the Stsadm.exe utility. However, I’ve opted not to do this in my example because I want to take you through the process of manually activating the feature, as users will do through the WSS user interface.
Figure 6 Commands for Automating Installation
@SET TEMPLATEDIR=”c:\Program Files\Common Files\Microsoft Shared\
                  web server extensions\12\TEMPLATE”
@SET STSADM=”c:\Program Files\Common Files\Microsoft Shared\
             web server extensions\12\bin\stsadm.exe”
@SET GACUTIL=”c:\Program Files\Microsoft Visual Studio 8\
              SDK\v2.0\Bin\gacutil.exe”

Echo Installing OfficeSpaceFeature.dll in GAC
%GACUTIL% -if bin\debug\OfficeSpaceFeature.dll

Echo Copying source files to WSS \TEMPLATE directory
xcopy /e /y TEMPLATE\* %TEMPLATEDIR%

Echo Installing feature with WSS
%STSADM% -o installfeature -filename  OfficeSpaceFeature\feature.xml -force

Echo Restarting IIS worker process
IISRESET
After I have finished adding instructions to the install.bat file, I configure Visual Studio to run it each time I rebuild the OfficeSpaceFeature project. I do this by going to the Build Events tab within the Project Properties and adding the following Post-build event command-line instructions:
cd $(ProjectDir)
Install.bat
The first line is required to change the current directory to that of the project directory. The second line runs the batch file to copy the feature files to the correct location and then install the feature with the InstallFeature operation of the command-line Stsadm.exe utility.
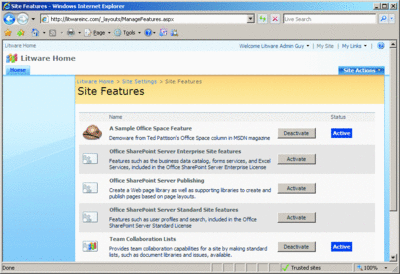
Now that the feature has been properly installed, I can activate it in context of a site. You can do this within any site in a WSS or MOSS farm by navigating to the Site Settings page. Under the Site Administration section, just click the link with the title Site Features. This should take you to a page like the one shown in Figure 7. Note that if you are working within a farm that has MOSS installed, you will see many more features than if you are working within a farm with just WSS.

Figure 7** Activating and Deactivating Site Features **(Click the image for a larger view)
The title and description of the OfficeSpaceFeature appear on the Site Features page, so I easily locate it and click the Activate button. At this point, all the elements defined with declarative logic in the elements.xml should be provisioned within the current site. WSS then loads the receiver assembly from the GAC, creates an instance of the receiver class, and executes the receiver class’s FeatureActivated method.
My sample is quite simple. However, as you might imagine, you can provide a far more complex mixture of declarative CAML elements and WSS object model code in the FeatureActivated.
Extending the Feature
If you examine the elements.xml file, you’ll see that there is a second ListInstance element. It is used to create a list, titled Customers, using the built-in WSS Contacts list type. This ListInstance also demonstrates how to add a few default items to the list to provide some sample customer data.
I’ve shown you how to use declarative CAML logic for creating lists and document libraries. Now I want to point out that you can create a list or document library using custom code in the feature activation event that programs against the WSS object model.
The sample feature includes code inside the FeatureActivated event handler to create another list from the standard WSS Custom List type with the title Letter Templates. When you create a new list from the standard WSS custom list type, the list automatically contains one field named Title. My code creates a second column named Body, and it uses the WSS object model to add a few list items that supply the data used as the templates for creating customer letters. The code to do this is shown in Figure 8.
Figure 8 Create a List and Add a New Column
Dim template As SPListTemplate = site.ListTemplates(“Custom List”)
Dim listLetterTemplatesID As Guid
listLetterTemplatesID = site.Lists.Add(“Letter Templates”, “”, template)
Dim listLetterTemplates As SPList = site.Lists(listLetterTemplatesID)
listLetterTemplates.Fields.Add(“Body”, SPFieldType.Text, True)
listLetterTemplates.OnQuickLaunch = False
listLetterTemplates.Update()

Dim newLetterTemplate As SPListItem

newLetterTemplate = listLetterTemplates.Items.Add()
newLetterTemplate(“Title”) = “Initial Greeting”
newLetterTemplate(“Body”) = “Thanks for your recent interest in Litware.”
newLetterTemplate.Update()

newLetterTemplate = listLetterTemplates.Items.Add()
newLetterTemplate(“Title”) = “Follow Up”
newLetterTemplate(“Body”) = “Thanks for your recent purchase.”
newLetterTemplate.Update()
Custom Application Pages
The concept of features and how to work with them is important to understand, but there is a second fundamental building block for designing and developing solutions for WSS and MOSS. The WSS architecture supports a special type of page known as an application page. The standard Site Settings page (settings.aspx) is a good example of an application page. The settings.aspx page is deployed once per front end Web server, yet it can be accessed from any site within a WSS farm.
Application pages are deployed as physical files on the file system of the front end Web server in a directory at the following path:
%PROGRAMFILES%\common files\microsoft shared
   \web server extensions\12\TEMPLATE\LAYOUTS
WSS maps the physical LAYOUTS directory to the virtual directory named _layouts whenever it provisions a new Web application. Using this mapping scheme, along with some additional processing logic, the WSS runtime makes each application page accessible within the context of any site in the farm. For example, assume there are three different sites in a WSS farm accessible through these three URLs:
https://Litwareinc.com
https://Litwareinc.com/sites/Vendors
https://Litwareinc.com:1001/sites/Accounting
An application page can be accessed by adding its relative path within the _layouts directory to the end of a site’s URL. For example, you can access the Site Settings page using any of these URLs:
https://Litwareinc.com/_layouts/settings.aspx
https://Litwareinc.com/sites/Vendors/_layouts/settings.aspx
https://Litwareinc.com:1001/sites/Accounting/_layouts/settings.aspx
Since there is only one version of an application page scoped at the farm level, it can be compiled into a single DLL and loaded into memory once. You never have to worry about there being different versions of an application page for different sites. Furthermore, application pages are not subject to attack from users who have permissions to customize site pages. Therefore, WSS does not prohibit them from containing in-line code.
Application pages are used extensively by the WSS team to supply much of the standard functionality for provisioning and administrating sites and the elements inside them. WSS also supports custom application pages for custom business solutions. The sample in this month’s column contains a custom application page named LetterGenerator.aspx, which is deployed like any other application page inside the LAYOUTS directory.
Note that LetterGenerator.aspx is not deployed directly in the LAYOUTS directory but instead in a directory named OfficeSpace that resides inside the LAYOUTS directory. It is best to create your own directory inside the LAYOUTS directory to host custom application pages so you can avoid any potential naming conflicts.
An application page is a special type of ASP.NET page that is typically written to inherit from a base class named LayoutsPageBase and to link to the standard Master Page, named application.master, created by the WSS team. Figure 9 gives an example of the classic Hello World custom application page.
Figure 9 Hello World Custom Application Page
<%@ Assembly Name=”[Full assembly name for Microsoft.SharePoint]” %>
<%@ Page Language=”VB” MasterPageFile=”~/_layouts/application.master”
         Inherits=”Microsoft.SharePoint.WebControls.LayoutsPageBase” %>

<%@ Import Namespace=”Microsoft.SharePoint” %>

<script runat=”server”>
  Protected Overrides Sub OnLoad(e As EventArgs)
      MyBase.OnLoad(e)
      ‘*** get current site and web objects through WSS object model
      Dim siteCollection As SPSite = SPContext.Current.Site
      Dim site As SPWeb = SPContext.Current.Web
      ‘*** now program against WSS objects within the current site
      lblDisplay.Text = “Current site: “ & site.Title
  End Sub
</script>

<asp:Content ID=”Main” runat=”server”
             contentplaceholderid=”PlaceHolderMain” >
    <!-- ADD HTML elements and controls here for page content -->
    <asp:Label ID=”lblDisplay” runat=”server” />
</asp:Content>
As you can see, you can create an application page that contains standard ASP.NET controls along with code in standard ASP.NET page overrides, such as OnLoad. You can also add assembly references. If you add a reference to Microsoft.SharePoint.dll, you can then program against the current site collection and the current site by obtaining a reference through the SPContext class, as I’ve done in Figure 9.
Once you have added a custom application page to a solution, you need to provide a way for your users to navigate to it. By adding a CustomAction element to a feature, you can supply a link or a menu item. Here’s an example of the CustomAction element used in the OfficeSpaceFeature sample to add a menu item to the Site Actions dropdown:
<CustomAction
  Id=”OfficeSpaceLetterGenerator”
  GroupId=”SiteActions”
  Location=”Microsoft.SharePoint.StandardMenu”
  Sequence=”1001”
  Title=”OfficeSpace Letter Generator”
  Description=”Create letter using Open XML”
  ImageUrl=”/_layouts/images/crtpage.gif” >

    <UrlAction Url=”~site/_layouts/OfficeSpace/LetterGenerator.aspx”/>

</CustomAction>
This CustomAction element adds the custom menu item to the standard Site Actions menu. The UrlAction element inside the CustomAction element provides a Url attribute with a relative path to my custom application page. The string value assigned to the Url attribute has a dynamic token in the form of ~site. This will be replaced by WSS at run time with the actual path to the current site.
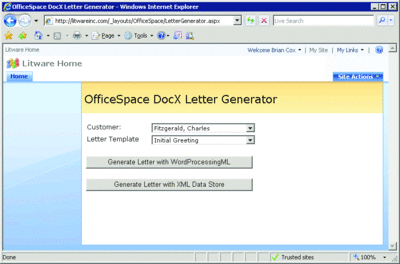
When users select the custom menu item, they are redirected to the custom application page named LetterGenerator.aspx, which displays the user interface shown in Figure 10. There is code in the OnLoad method of this page that populates two listboxes with the desired customer and letter type; it uses the WSS object model to pull data from the two lists that were created during feature activation. There are also two command buttons that provide two different approaches to creating customer letters as .docx files using the code I discussed in my previous Office Space column.

Figure 10** Custom Application Page **(Click the image for a larger view)
When the user clicks on either command button, the event handler runs code to generate a letter using the Office Open File Formats. This code is nearly identical to what I covered in my previous column. The only thing that is different is the code used to name the file and to save it inside the WSS document library with the title Customer Letters.
This example demonstrates how to automate the creation of customer letters using the Office Open XML File Formats, and the synergy that exists between WSS and these file formats.
Once you have created a new .docx file, you need somewhere to put it. WSS provides a great place to store documents where they can be versioned and accessed by a team working in a collaborative environment. Figure 11 shows the Customer Letters document library in a site that has activated my OfficeSpaceFeature.

Figure 11** Customer Letters Document Library **(Click the image for a larger view)
Summary
This month’s column introduces you to features and custom application pages—two essential building blocks used to design and implement solutions for WSS and MOSS. At this point, you should have a good idea about how to get started with development and testing. In the next installment of Office Space, I will discuss how you can package a solution, such as the one I just described, for deployment in a production environment.
Send your questions and comments for Ted to instinct@microsoft.com.
Ted Pattison is an author, trainer, and SharePoint MVP who lives in Tampa, Florida. Ted has just completed his book Inside Windows SharePoint Services 3.0 for Microsoft Press. He also delivers advanced SharePoint training to professional developers through his company, Ted Pattison Group.