Team System
Streamline Team Projects With Process Templates
Brian A. Randell
This article discusses:
|
This article uses the following technologies: Visual Studio Team Foundation Server 2008 |
Contents
Process Templates
Inside the MSF Templates
Process Template Customization
Creating Your Own Templates
Editing Customized Templates
Today you can collect and track all of your work and artifacts in Team Foundation Server (TFS) within a team project. A team project is simply a bucket that stores and partitions all of the artifacts you track and use during a development project. And using the New Team Project wizard from the Team Foundation Client (TFC) can help you on your way.
The wizard is deceptively simple. Clicking File | New team project starts the wizard. Once it has opened, you must provide a name for your team project. Click Next and pick a process methodology template using the combobox. Click Next yet again and add a description for your team project that SharePoint displays on your portal's home page. Clicking Next once more gives you the option to decide how you want version control defined. You can choose to create a new trunk, create a new trunk by branching from an existing trunk, or not create a trunk. After you have made your choices, click Finish and, after a few moments, you'll have a new team project ready for use.
If that were all there was to it, then this would be a very short article. My editor would most likely withhold payment and even reconsider my column's status. However, it's not that simple. In fact, the page of the wizard where you choose the process templates is critical to getting your development project off to a good start when using Visual Studio Team System (VSTS). This is because a process template defines the initial structure and contents of your team project.
Process Templates
As mentioned, a team project provides a collection mechanism for all of your team's artifacts. Naturally, you store version-controlled items, such as source files, in a team project. You also manage and store all of your work items and work item queries. You store documents in SharePoint document libraries that are a part of your team project's portal. And finally, you run reports against the data warehouse to track how well your team is working.
A process template defines the default artifact templates included in your team project. Specifically, it defines the work item types you'll have available to you. It also defines the user interface and structure of your SharePoint site as well as the default documents loaded into the document libraries—both files and templates. It also provides the default reports for your reporting services site and defines your default security groups, areas, iterations, and version control settings. And finally, a process template provides prescriptive guidance as part of your SharePoint site.
When you first install TFS, you will find that it provides you with two process templates. Their official names in the 2008 release of TFS are Microsoft Solutions Framework (MSF) for Agile Software Development (MSF Agile) and MSF for CMMI Process Improvement (MSF CMMI).
MSF promotes an iterative development process with heavy customer interaction. The current release of MSF is version 4.0 and influences the TFS process guidance, though it has its own rich set of MSF guidance resources. You can find further useful information in the book Microsoft Solutions Framework Essentials (Microsoft Press, 2006) by Michael Turner.
The prescriptive guidance included with the Microsoft process templates dives into how to run a development project and how to structure your work streams. This guidance is focused on the process of development, not the mechanics of Visual Studio or TFS. You access the guidance through the Process Guidance link off the home page of your team project's SharePoint portal home page. The guidance is also available for download on its own from Microsoft for both MSF Agile and MSF CMMI if you want to peruse it without needing live access to TFS.
Inside the MSF Templates
An easy way to contrast the MSF Agile and MSF CMMI process templates is agile versus formal. Both templates define different roles based on a team of peers broken down into seven logical areas. The MSF Agile template defines 8 roles as part of its team model. In contrast, MSF CMMI defines a whopping 20 roles. As shown in Figure 1, the CMMI template expands each logical area with more specific roles. These include managers and additional stakeholders that are not part of the core development team.
Figure 1 MSF Agile and MSF CMMI Team Member Roles
| Area | Role | CMMI | Agile |
|---|---|---|---|
| Architecture | Infrastructure Architect | Y | N |
| Architecture | Solution Architect | Y | N |
| Development | Build Engineer | Y | N |
| Development | Development Manager | Y | N |
| Development | Lead Developer | Y | N |
| Product Management | Auditor | Y | N |
| Product Management | Product Manager | Y | N |
| Product Management | Sponsor | Y | N |
| Product Management | Subject Matter Expert | Y | N |
| Program Management | Integrated Project Management (IPM) Officer | Y | N |
| Test | Test Manager | Y | N |
| User Experience | User Education Specialist | Y | N |
| User Experience | User Experience Architect | Y | N |
| Development | Database Developer | Y | Y |
| Development | Developer | Y | Y |
| Product Management | Business Analyst | Y | Y |
| Program Management | Project Manager | Y | Y |
| Release Operations | Database Administrator | Y | Y |
| Release Operations | Release Manager | Y | Y |
| Test | Tester | Y | Y |
| Architecture | Architect | N | Y |
| User Experience | Business Analyst | N | Y |
Beyond the roles, you find work items have a number of differences (see Figure 2), including differences in the actual work item types provided for each template. Microsoft composes each work item type from four facets: purpose, fields, workflow, and layout. Thus, while both templates have a bug work item, fundamentally they are different types. In fact, a key difference between the MSF Agile and the MSF CMMI work items is their workflow expressed as states and transitions. If you drill into the process guidance for an MSF Agile bug and examine the States and Transitions section, you'll note that an MSF Agile bug has three states and 23 transitions (see Figure 3). In contrast, the MSF CMMI bug has four states and 17 transitions (see Figure 4).
Figure 2 MSF Agile and MSF CMMI Work Item Types
| Work Item Type | Description | CMMI | Agile |
|---|---|---|---|
| Change Request | A change request identifies a proposed change to some part of the product or baseline. | Y | N |
| Issue | The issue work item documents an event or situation that may block work or is currently blocking work on the product. | Y | N |
| Requirement | Requirements capture and track what the product needs to do to solve the customer problem. | Y | N |
| Review | The review work item documents the results of a design or code review. | Y | N |
| Bug | A bug is a work item that communicates that a potential problem exists or has existed in the system. | Y | Y |
| Risk | A risk is any probable event or condition that can have a potentially negative outcome on the project in the future. | Y | Y |
| Task | A task work item communicates the need to do some work. | Y | Y |
| Quality of Service Requirement | Quality of service requirements document characteristics of the system such as performance, load, availability, stress, accessibility, serviceability, and maintainability. | N | Y |
| Scenario | A scenario is a type of work item that records a single path of user interaction through the system. | N | Y |
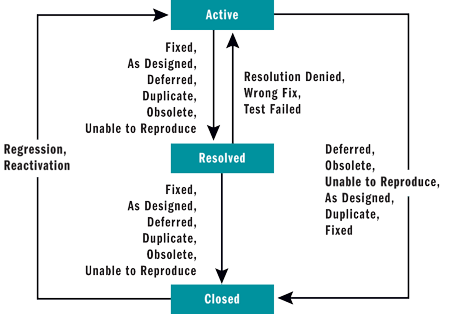
Figure 3 MSF Agile Bug States and Transitions
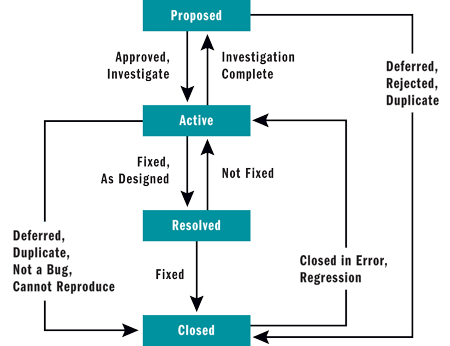
Figure 4 MSF CMMI Bug States and Transitions
You'll notice, for example, that the CMMI bug starts in a proposed state while an MSF Agile bug is active once created. Another difference you'll find between the two types of bugs is purpose. Microsoft made the MSF Agile bug a catch-all for all defects. If you examine a non-customized MSF Agile bug, you'll see that it contains a Boolean field named Issue. For the CMMI process template, Microsoft created a separate Issue work item type. This is just one example of the differences. However, differences such as these will affect your team's workflow when using a team project.
Each of the MSF work item types has a section in the documentation labeled Process Guidance. The process guidance is broken down into two sections: work streams and activities. Work streams are a logical flow of activities typically related to a given role. An activity is a group of steps focused on a particular task.
Each activity has both entry and exit criteria and is associated with one or more roles and a work stream. For example, if you look at the Reproduce the Bug activity in MSF Agile, you'll see it's a part of the Fix a Bug work stream and developer is the only participating role. Other activities such as Determine Iteration Length, which is also from the MSF Agile template's Plan an Iteration work stream, have both a responsible role (the project manger) and participating roles (developers and database developers).
Depending on how mature your team and process already is, you might adopt all, some, or none of the advice provided in the guidance. However, it's important to realize that Microsoft has designed the work items, reports, and documents included with each template to work within the design of each template's guidance. Thus, you should review the documentation and figure out what works and what doesn't for your team. You can then decide if you want to live within the framework presented or adapt it for your team.
Process Template Customization
While it may be possible for your team to work with one of the Microsoft templates out of the box, more than likely you will want to change something. Number one on most teams' lists is customization of work items. Beyond that there are check-in policies, the SharePoint portal site, and reports to create and customize.
Since my very first MSDN Magazine column, I have extolled the benefits of Team System's rich customization feature set, and process templates are no exception. Just about every single piece of a process template is changeable and customizable. In fact, a good way to find out just what's possible is for you to take the time to explore two of the more popular third-party templates that extol the virtues of the Scrum development lifestyle.
Conchango published the first Scrum public template that I'm aware of, and there are template versions for TFS 2005 and TFS 2008. As we go to press, Conchango provides both templates free to the community but requires that you register to get the download link.
Once you've downloaded the template, you extract the contents and run the setup package. Once configured, you'll find the template as a choice in the New Team Project wizard. If you create a team project, you'll note that the TFS 2008 version of the template defines six custom work item types, 16 team work item queries, 15 reports, a SharePoint template, and its own process guidance.
A second popular template is the VSTS Scrum Process Template (Lightweight Scrum). VSTS MVPs Mike Azocar, Steven Borg, and Willy-Peter Schaub started this as a community-driven project. Like the Conchango template, the project owners have made the template available for both TFS 2005 and TFS 2008. In addition, they've provided a version that supports working with the Microsoft Project Server 2007 VSTS Connector.
The TFS 2008 version of the Lightweight Scrum template comes with six custom work item types, 18 team work item queries, 5 reports, a SharePoint template, and its own process guidance. To install the template, you must first install the SharePoint template. Once you've done this, install the rest of the Lightweight Scrum template using the Process Template Manager, accessible via the Team | Team Foundation Server Settings menu inside Visual Studio. Unzip the Lightweight Scrum template into a folder, then open the Process Template Manager and click the Upload button. Navigate to the folder containing the ProcessTemplate.xml file and click the Upload button (see Figure 5).
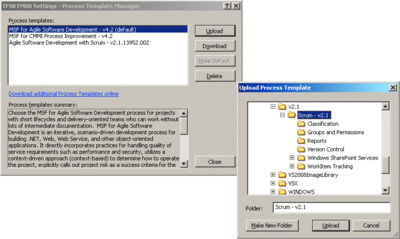
Figure 5 Importing the Lightweight Scrum Template (Click the image for a larger view)
Both Scrum templates give you a good idea as to the level of customization that is possible. If you search the Internet, you'll find additional templates out there. A few VSTS MVPs have set up a CodePlex project called Templex to create a community-driven Process Template Library.
Creating Your Own Templates
While it's possible for you to grab the documentation and build your own process template by hand, most customers I've worked with find it easier to take an existing Microsoft template and start from there. I'll be describing this approach to get you started.
Begin by creating a directory in order to download one of the Microsoft process templates. If you're serious about doing this, you should configure a location in version control to check in the template after you download it. Using the TFS Settings menu item off the Team menu, download the MSF Agile template using the Process Template Manager to C:\PMT. The Process Template Manager creates a folder called MSF for Agile Software Development–v4.2. Within this folder, you will find six folders and an XML file—ProcessTemplate.xml (see Figure 6).
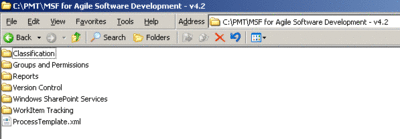
Figure 6 The Results of Downloading the MSF Agile Process Template
(Click the image for a larger view)
Most of the folders and their contents are self-explanatory. You describe a process template and its contents using a number of XML files. These XML files, in conjunction with the actual artifacts (report definition files, HTML documentation, and so on), come together to define the process template. Figure 7 lists the configuration files, their locations, and their purpose.
Figure 7 Process Template Configuration Files
| Folder\File | Purpose |
|---|---|
| %root%\ProcessTemplate.xml | ProcessTemplate.xml defines a template's core structure. It references all the other files except FileMapping.xml. |
| Classification\Classification.xml | Classification.xml defines a template's Areas and Iterations. In addition, it references FileMapping.xml. |
| Classification\FileMapping.xml | FileMapping.xml maps work item fields to fields in Microsoft Project. |
| Groups and Permissions\GroupsandPermissions.xml | GroupsandPermissions.xml defines the default groups and their permissions. |
| Reports\ReportsTasks.xml | ReportsTasks.xml defines the list of Reporting Services report definitions. |
| Version Control\VersionControl.xml | VersionControl.xml defines the permissions in the version control repository, default check-in notes, as well as default checkout behavior. |
| Windows SharePoint Services\WssTasks.XML | WssTasks.xml defines what SharePoint site template to use (something you must already have installed). In addition, it defines document libraries, folders, and any files including the template's process guidance. |
| WorkItem Tracking\workitems.xml | Workitems.xml defines the list of work item types and your process template's team work item queries. In addition, it contains the definitions for any default work items that the new team project should create during team project creation. |
You can modify the XML files a number of ways. Naturally, any text editor, such as Notepad, will work. If you're comfortable editing XML by hand and like the Visual Studio XML editor, you can hook up the XSD files by downloading the Visual Studio 2008 SDK. You'll find the XSD files at %SDK Install Folder%\VisualStudioTeamSystemIntegration\Process Templates\ProcessTemplateSchemas. In addition, the XSD files for work item definitions and global lists are found at %SDK Install Folder%\VisualStudioTeamSystemIntegration\Work Item Tracking\WorkItemTrackingSchemas. You can find the process template schemas documentation on MSDN.
You may find it more convenient (especially when you're new to the whole process) to use the visual Process Template Editor that comes as part of the VSTS 2008 TFS Power Tools (discussed in more detail in "Essential Power Tools"). You access the Process Template Editor from the Tools menu within Visual Studio.
Before you open any of the files from the download template, you should rename the folder to the name you want to use for the template—for example, "MSDN Magazine Agile 1.0." Once you've done this, with the latest version of the Power Tools installed, open the ProcessTemplate.xml file by clicking Tools | Process Templates | Open Process Template in Visual Studio. The template designer will open. Change the name and description to something reasonable (see Figure 8) and then save your changes. If you close the designer and reopen the file, the editor will show your new name. The tree view on the left side of the editor provides access to the core files described in Figure 7 as well as all of the work item type definitions and work item queries.
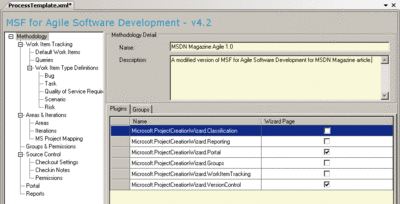
Figure 8 Edit the Name and Description of Your New Template (Click the image for a larger view)
Most of the items exposed with the main Process Template Editor are self-explanatory when it comes to editing. As mentioned earlier, work items tend to be the first big item changed. In the tree view, select the Bug work item under the Work Item Types Definitions node. Visual Studio opens the work item type in the Work Item Type definition editor. The editor lets you change the name and description using normal textbox controls.
The work item editor has three tabs (see Figure 9) that provide access to the work item type's definition: Fields, Layout, and Workflow. In addition, the View XML button provides you with an easy way to see the XML representation for the type. You'll see this button throughout the editors, and it is a good way for you to learn the effects of your changes to the raw XML files. As you get more comfortable, you might find editing the XML files is quicker and easier than using the Process Template Editor.
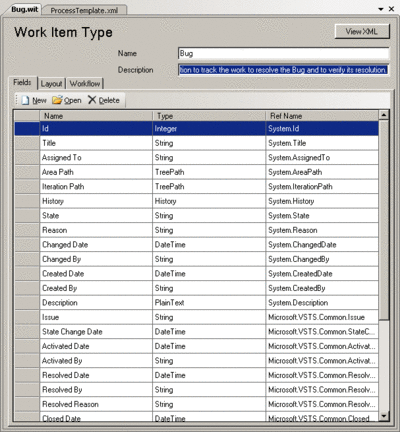
Figure 9 Editing the Bug Work Item Type (Click the image for a larger view)
The Fields tab lists all of the fields used by the work item type. Microsoft defines a field as having a name, a type, and a ref name. You can think of a ref name as a field's fully qualified name. It must have at least a two-part name separated by a period. Ref names serve as column display names in work item queries.
Click the New button to add a new field. In the Field Definition dialog, fill in the fields, as in Figure 10, and click OK. The name and type fields are obvious. Other valid data types you can choose include DateTime, Double, History, HTML, Integer, PlainText, String, and TreePath. History and TreePath are specialized controls for history fields and the areas and iterations fields, respectively. The Help Text shows up when you hover over the field when working with a work item instance.
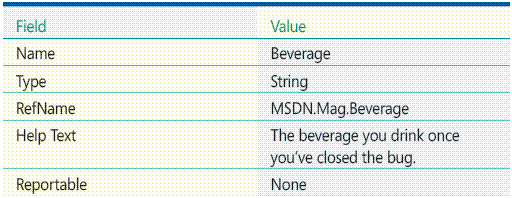
Figure 10 Values for a New Field Definition
The Reportable field controls whether or not TFS exports the field to the TFS data warehouse so that you are then able to include it in your reports. If you decide to make it a Reportable field, it is important that you choose whether it's a dimension, detail, or measure. You use a dimension for DateTime, Double, Integer, and String fields. You choose a dimension field if you want to filter using the field. This choice is best when the field uses a standard set of values.
Use the detail option when you have large text fields on which you want to report. TFS does not put detail fields into the data warehouse cube, only the relational warehouse database. You can use DateTime, Double, Integer, and String fields for detail fields.
Finally, you use a measure field, which only supports Double and Integer data, when you want to use a formula (such as sum or count) or do a similar operation on a field. If you choose measure, you'll want to pick an option from the formula field. It's important to note that the current documentation incorrectly states that only sum is valid.
It's important to remember that once you apply the Reportable attribute to a field, you cannot change it. However, you can apply the attribute to a field after you've already used it. Any revisions to a work item after you've made its field Reportable will be in the warehouse (if applicable). However, TFS will not backfill data into the warehouse for changes made prior to setting the field as Reportable.
Once you've created the field, you'll want to specify where it should appear on the form. Click the Layout tab in the Work Item Type editor. You can click the Preview Form button to examine the current work item. In the tree view, move down until you see the Tab Page—Details node. Under it you'll find a Group node and, below that, two Column nodes.
Under the first column node, beneath the Group—General node, you'll find a single Column node. Right-click on it and select New Control. Select the newly added control node and change the FieldName to MSDN.Mag.Beverage using the Property Grid to the right. Change the label to Beverage and then preview the results. If you're happy, save your work and close any open editors.
Using the Process Template Editor, click the Upload button and navigate to the folder that has your modified ProcessTemplate.xml file. Once you've uploaded your template, run the New Team Project wizard and create a team project called MSDNMagDemo. (I recommend you test this using a Virtual PC image, as discussed in the "Essential Power Tools" installment of Team System mentioned earlier.) Once you've created your team project, add a new Bug work item and switch to the Details tab. You should see your new field. Close the new Bug without saving it.
Editing Customized Templates
Imagine you'd like to change this newly created field to have a specific list of allowed beverages. In addition, you want to be able to run reports on the field. Because you'll want this change to take effect for both the team project you just created as well as any new team projects, you'll need to do a little extra work.
First, reopen the Bug work item template by clicking Process Editor | Work Item Types | Open WIT from File. Navigate to C:\PMT\MSDN Magazine Agile 1.0\WorkItem Tracking\TypeDefinitions and select the Bug.xml file. Locate the Beverage field, select it, and then select the Open command on the toolbar at the top of the fields list. Change the Reportable field value to dimension.
Next, click the Rules tab and then click New on the toolbar. As you can see from the Select a rule type dialog, each field can have a number of rules applied to it. Select ALLOWEDVALUES and click OK. In the ALLOWEDVALUES dialog, click New. In List Item Edit, enter Coffee and click OK. Repeat two more times adding Soda and Juice to the list (feel free to be as creative as you like, or as your project allows). Once you've completed the list, click OK to close the ALLOWEDVALUES dialog. Click OK to close the Field Definition dialog and save your changes using the Save command on the Visual Studio File menu.
At this point, you've changed the file on disk. You need to re-upload the template as before. When you attempt to do so without any additional changes to the ProcessTemplate.xml file, you'll receive a warning that the template already exists. Click Yes to overwrite the previous copy of the template.
This solves the problem for new team projects. However, you need to fix the existing Bug work item template in the MSDNMagDemo team project. Click Process Editor | Work Item Types | Import WIT from File Server. In the Import Work Item Type Definition dialog, click the Browse button and select the Bug.xml file at C:\PMT\MSDN Magazine Agile 1.0\WorkItem Tracking\TypeDefinitions. Then, in the list of team projects in the Project to import to tree, select the MSDNMagDemo team project and click OK. If the MSDNMagDemo team project doesn't appear, you'll need to close and restart Visual Studio.
Before you try to add a new Bug, you must refresh the Work Item definition cache by right-clicking on the Work Items folder under the MSDNMagDemo team project node in the Team Explorer window and select Refresh. Figure 11 shows what you should see.
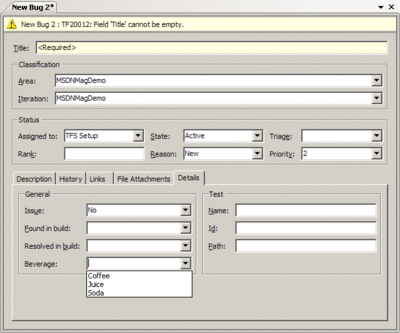
Figure 11 The Completed Bug Work Item with the New Beverage Field
(Click the image for a larger view)
I hope you've seen that Microsoft put a ton of effort into providing not only a tool but a tool with prescriptive guidance. I recommend you spend time getting to know both of the built-in templates (or even those produced by the community). Just give yourself time to understand the implications that picking a template will have on your team and your overall development progress.
Brian A. Randell is a Senior Consultant with MCW Technologies LLC. He spends his time speaking, teaching, and writing about Microsoft technologies. Brian is the author of Pluralsight's Applied Team System course and is a Microsoft MVP. Contact Brian via his blog at mcwtech.com/cs/blogs/brianr.