span.sup { vertical-align:text-top; }
Data Points
Service-Driven Apps With Silverlight 2 And WCF
John Papa
Code download available at:SilverlightWCF_CS(414 KB)
This column is based on the Beta 2 version of Silverlight 2. All information herein is subject to change.
Contents
The Sample Application
Cross-Domain Communications
The Silverlight Client
Binding the Product List
Asynchronous Communication
Product Details and Binding Modes
Change Events
Wrap-Up
It is true that Silverlight™ 2 makes it easy to build rich internet applications (RIAs) with tremendous graphical prowess. However, it is also true that Silverlight 2 makes it easy to build highly functional line-of-business (LOB) applications. Silverlight 2 supports a subset of the powerful XAML-based data binding that Windows ® Presentation Foundation (WPF) enables. The XAML binding markup extensions in Silverlight 2 simplify the process of binding entities to Silverlight controls. Because they run completely on the client computer, Silverlight applications are isolated from the entities that are managed on the server. Therefore service-based communication through technologies such as RSS, Representational State Transfer (REST), and Windows Communication Foundation (WCF) must be available. Fortunately, Silverlight 2 supports interaction with these and other communication pathways, enabling Silverlight applications to interact seamlessly with back-end LOB applications.
I'll demonstrate how to build a Silverlight 2 UI that communicates through WCF to interact with business entities and a database. The business logic, entity model, and data-mapping code can be consumed by any presentation tier. I'll create WCF services to be consumed by a Silverlight 2 app and I'll set up the server hosting the WCF services to allow cross-domain invocation. Note that you can download the examples from the MSDN ® Magazine Web site.
The Sample Application
Before diving into the code, let's take a high-level look at the sample. Figure 1 shows the completed application, which displays a list of products retrieved from the Northwind database. When a product is selected from the ListBox, the product is bound to the controls on the lower half of the page. When the user edits the product through the CheckBox and TextBox controls and clicks the Save button, the product information is then sent to the database by way of WCF. Clicking on the Cancel button gets a fresh list of products from the server through WCF and updates the ListBox and its bindings.

Figure 1 The Sample Silverlight App (Click the image for a larger view)
The Silverlight 2 sample application is made up of a handful of user controls and styles. The presentation layer communicates with the server using asynchronous calls through WCF. It uses a WCF service reference to allow the Silverlight application to communicate with the service according to the service's operation contracts and data contracts. The data contracts (such as the Product or Category entity classes) expose the structure of the entities from the server application. This makes it simple for the Silverlight application's controls to be bound to the instances of the entities and their properties. The operation contracts define the methods that the Silverlight application can invoke on the WCF service. Figure 2 shows the high-level overview of the architecture.

Figure 2 Architectural Model of the Sample Application
I began building the sample app with the lower layers, starting with the WCF service itself. You can build a WCF service that can communicate with a Silverlight app by creating a new WCF project in Visual Studio ® . A standard WCF service can be invoked by a Silverlight app as long as the Silverlight app has a binding of type basicHttpBinding. You must either make sure you change the default binding of the WCF service from wsHttpBinding to basicHttpBinding or create a new binding of type basicHttpBinding. For example, the web.config file of the sample WCF service host app contains the following XML that defines the service configuration. Notice the endpoint binding is defined as basicHttpBinding:
<service behaviorConfiguration=
    "MySilverlightWcfService.NWServiceGatewayBehavior"
    name="MySilverlightWcfService.NWServiceGateway">
    <endpoint address=""
        binding="basicHttpBinding"
        contract="MySilverlightWcfService.INWServiceGateway" />
    <endpoint address="mex" binding="mexHttpBinding"
        contract="IMetadataExchange" />
</service>
As an alternate approach to creating the WCF service, you can choose the file item template in Visual Studio to create a Silverlight-enabled WCF service. Figure 3 shows the new item template in Visual Studio. This template automatically sets the binding to basicHttpBinding and adds some attributes to make the service compatible with ASP.NET. And while this approach sets the correct binding configuration for you, remember that you can certainly still use existing WCF services as long as the bindings are set for basicHttpBinding.
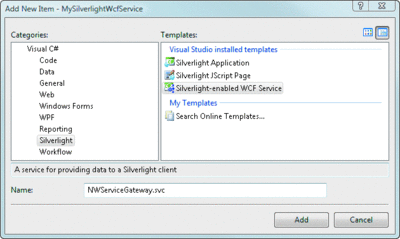
Figure 3 Silverlight-Enabled WCF Template (Click the image for a larger view)
The WCF service must be able to request a list of products to fill the ListBox, and it must be able to save any changes a user makes to a product. These are simple operations that require no Silverlight-specific techniques. The sample application uses a WCF service class named NWServiceGateway, which implements the interface INWServiceGateway. INWServiceGateway, shown here, is decorated as a ServiceContract, which enables any class that implements this interface to be exposed through WCF:
[ServiceContract(Namespace = "")]
public interface INWServiceGateway
{
    [OperationContract]
    Product FindProduct(int productId);
    [OperationContract]
    List<Product> FindProductList();
    [OperationContract(Name="FindProductListByCategory")]
    List<Product> FindProductList(int categoryID);
    [OperationContract]
    List<Category> FindCategoryList();
    [OperationContract]
    void SaveProduct(Product product);
}
The interface lists several methods decorated with the OperationContract attribute. OperationContracts can be invoked through the WCF service. Notice that the FindProductList method has two overloads. One accepts a parameter and the other does not. While this is perfectly acceptable in Microsoft ® .NET Framework methods, WCF cannot expose two methods with the same name. To work around this, you can either rename the method or use the Name property of the OperationContract to specify a different name in the service definition. Figure 4 shows how to expose the FindProductList method with the parameter to an operation with a new name in the WCF service.
Figure 4 Gathering Products in the Data Layer
public List<Product> FindProductList()
{
    var productList = new List<Product>();
    using (var cn = new SqlConnection(nwCn))
    {
        const string sql = @"SELECT p.*, c.CategoryName "
            + " FROM Products p INNER JOIN Categories c ON "
            + " p.CategoryID = c.CategoryID ORDER BY p.ProductName";
        cn.Open();
        using (var cmd = new SqlCommand(sql, cn))
        {
            SqlDataReader rdr = cmd.ExecuteReader(
                CommandBehavior.CloseConnection);
            if (rdr != null)
                while (rdr.Read())
                {
                    var product = CreateProduct(rdr);
                    productList.Add(product);
                }
            return productList;
        }
    }
}
The WCF service simply implements this service contract interface and calls a manager class that is tasked with getting the products from the database and mapping them to a List<Product> so they can be passed out of the service. Figure 4 shows the code that gets the list of products from the Northwind database, maps each product to a Product class, and adds each product instance to the List<Product>.
Entities returned by WCF must be decorated with the DataContract attribute to allow them to be properly serialized and sent on their way to the Silverlight app. The Product class referred to in Figure 4 has the DataContract attribute and all of its properties are decorated with the DataMember attribute. This tells WCF to serialize and make the entity and its DataMember properties available to the Silverlight app. When the WCF service's FindProductList method is invoked, the Silverlight client app will receive a List<Product> and will be able to refer to all of the properties decorated with the DataMember attribute.
Cross-Domain Communications
Silverlight applications will execute in the client computer's environment. This presents a few issues that ASP.NET Web-based applications do not currently face since they execute on the server and render HTML and scripting code on the client. Because Silverlight executes on the client, it must request information from the server using a service-oriented technology such as WCF. However, the WCF service must be secured against unwanted client applications who might take advantage of it. The sample Silverlight application is hosted on your trusted Web server, so it should be permitted to speak to the sample application's WCF services. If another application that is hosted by another Web server tries to communicate with the sample WCF service, it should be denied.
Controlling this kind of access to services is handled by cross-domain policy files. Adobe Flash applications have a standard file to handle this called CrossDomain.xml which lives in the root of the service's Web server. Silverlight applications behave similarly, first looking for a file called ClientAccessPolicy.xml in the Web server's root (not the Web application's root). If the file is found, the application will read it to determine whether the request will be allowed or denied. If it is not found, the application will then look for the CrossDomain.xml file. If neither is found, the request will be denied and the Silverlight client application will not be able to invoke the WCF services.
The contents of either of these files must allow the caller permission to the services. Since the sample application exists only on a protected development machine, its ClientAccessPolicy.xml allows all requests, as shown here:
<?xml version="1.0" encoding="utf-8"?>
<access-policy>
  <cross-domain-access>
    <policy>
      <allow-from http-request-headers="*">
        <domain uri="*"/>
      </allow-from>
      <grant-to>
        <resource path="/" include-subpaths="true"/>
      </grant-to>
    </policy>
  </cross-domain-access>
</access-policy>
The ClientAccessPolicy.xml file I created allows cross-domain access from all locations to all paths. A copy of this file is included in the sample application. When a WCF project is first created, the default option is to use the Visual Studio Development Server with an auto-assigned port. However, the sample application's WCF service project is set to "Use IIS Web Server", which can be changed in the property pages of the project on the Web tab. Either option will work, as long as the ClientAccessPolicy.xml file is placed at the Web site's root.
The policies can be restricted and secured to only allow certain URIs access to specific services in specific folder paths. To do this the Web server that hosts the Silverlight application must specified in this file so that it can talk to the WCF services. For example, a more restrictive cross-domain policy might look like this:
<?xml version="1.0" encoding="utf-8"?>
<access-policy>
  <cross-domain-access>
    <policy>
      <allow-from http-request-headers="*">
        <domain uri="https://johnpapa.net"/>
      </allow-from>
      <grant-to>
        <resource path="/MyAwesomeServices/" include-subpaths="true"/>
      </grant-to>
    </policy>
  </cross-domain-access>
</access-policy>
Note here that any request originating from a service from johnpapa.net is allowed to access services in the /MyAwesomeServices path on the server.
Debugging problems with cross-domain calls can be difficult. You can use a tool such as the Web Development Helper (my favorite) or Fiddler to inspect the traffic between your Silverlight application and your server-based services. These tools will show the individual HTTP requests and responses. You should also make sure your ClientAccessPolicy.xml file is put in the Web root and not the application root. I can't stress this enough.
Also, when hosting a service in a Visual Studio project (for example, not directly in IIS) and the project creates an auto-assigned port, the easiest way to test this service is just to put the ClientAccessPolicy.xml file in the root of the project itself. Because the project gets an auto-assigned port (such as localhost:32001/MyAwesomeService) it will look for the ClientAccessPolicy.xml file in root of the Web, which in this case would be localhost:32001.
The Silverlight Client
Once the services have been compiled and the cross-domain policies have been established, the Silverlight client can be set up to communicate with the WCF services. The sample app has a Silverlight client project called SilverlightWCF that needs a service reference to the sample's WCF services. Right-click on the references node in the Solution Explorer and choose Add Service Reference. Then enter the URL for the service, click the GO button, and the service will be displayed. Click OK and the service client configuration will be added to the Silverlight project along with generated proxy classes to simplify calling the services and consuming the entities (as defined by the DataContract). Figure 5 shows the dialog window that appears when adding the service.
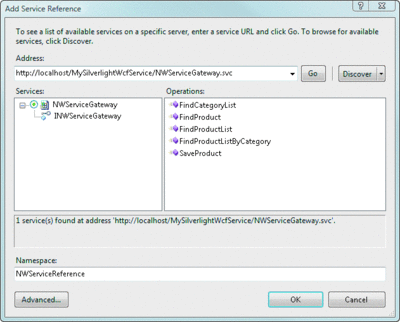
Figure 5 Adding a Service Reference (Click the image for a larger view)
Note that the sample uses a service that, by default, is located at localhost/MySilverlightWcfService/NWServiceGateway.svc. Naturally, if the service is moved, this endpoint address will need to be updated as well. If a minor change is implemented in the WCF service, such as the addition of a new method or DataContract, you can select Update Service Reference from the Solution Explorer.
Binding the Product List
The sample application needs to show the list of products to the user. Here a ListBox control is used with a DataTemplate so it can present the products with a little flare beyond simply listing the values in rows and columns (the ListBox was initially shown in Figure 1 ). By setting the ItemSource property of the ListBox, we indicate that the ListBox will get its values from a bound data source as shown by the following markup:
<ListBox x:Name="lbProducts" Height="220" HorizontalAlignment="Left"
    VerticalAlignment="Bottom" Margin="10,10,10,10" Width="480"
    Style="{StaticResource ListBoxStyle}"
    ItemsSource="{Binding}" >
Notice that the ItemSource property simply indicates that it will be bound, but not to any specific object or property. Since no source is specified, the ListBox will refer to any inherited DataContext object sources in the XAML. The DataContext can be inherited from any parent FrameworkElement. The sample application sets the DataContext of the ListBox named lbProducts in the codebehind after the WCF service has returned the list of products:
lbProducts.DataContext = productList;
Once this code has been executed, the ListBox is bound to the list of products and each ListBoxItem in the DataTemplate is bound to an individual product in the list. Figure 6 shows the XAML used to create the ListBox and bind the items represented in the DataTemplate to the source. Notice that the individual controls that are bound to the source use the binding markup extensions to indicate which property of the Product they will be bound to, as well as to use the OneWay binding mode. For example:
Text="{Binding ProductName, Mode=OneWay}"
Figure 6 ListBox XAML
<ListBox x:Name="lbProducts" Height="220" HorizontalAlignment="Left"
   VerticalAlignment="Bottom" Margin="10,10,10,10" Width="480"
   Style="{StaticResource ListBoxStyle}" ItemsSource="{Binding}" >
   <ListBox.ItemTemplate>
      <DataTemplate>
         <StackPanel Orientation="Horizontal">
            <StackPanel Style="{StaticResource TitlePanel}"
               Orientation="Vertical">
            <TextBlock Text="{Binding ProductName, Mode=OneWay}"
               Style="{StaticResource TitleTextBlock}" FontSize="14"/>
            <TextBlock Text="{Binding CategoryName, Mode=OneWay}"
               Style="{StaticResource SubTitleTextBlock}"/>
         </StackPanel>
            <Grid>
               <Grid.RowDefinitions>
                  <RowDefinition></RowDefinition>
                  <RowDefinition></RowDefinition>
                  <RowDefinition></RowDefinition>
               </Grid.RowDefinitions>
               <Grid.ColumnDefinitions>
                  <ColumnDefinition></ColumnDefinition>
                  <ColumnDefinition></ColumnDefinition>
               </Grid.ColumnDefinitions>
               <TextBlock Text="Product ID" Style="{StaticResource
                  TextBlockStyle}" Grid.Row="0" Grid.Column="0"/>
               <TextBlock Text="{Binding Id, Mode=OneWay}"
                  Style="{StaticResource TextBlockStyle}"
                  Foreground="#FF001070" Grid.Row="0" Grid.Column="1"/>
               <TextBlock Text="Price" Style="{StaticResource
                  TextBlockStyle}"
                  Grid.Row="1" Grid.Column="0"/>
               <TextBlock Text="{Binding UnitPrice, Mode=OneWay,
                  Converter={StaticResource
                  priceConverter}}"
                  Foreground="#FF001070" Style="{StaticResource
                  TextBlockStyle}" Grid.Row="1" Grid.Column="1"/>
               <TextBlock Text="Units" Style="{StaticResource
                  TextBlockStyle}" Grid.Row="2" Grid.Column="0"/>
               <TextBlock Text="{Binding UnitsInStock, Mode=OneWay}"
                  Foreground="#FF001070"
                  Style="{StaticResource TextBlockStyle}"
                  Grid.Row="2" Grid.Column="1"/>
            </Grid>
         </StackPanel>
      </DataTemplate>
   </ListBox.ItemTemplate>
</ListBox>
The binding mode for all of the bound TextBox controls is set to OneWay. This indicates that the source (the Product instance) should push its values to the target (the ListBox and any items bound within it) both on initial load and when anything changes in the source (see the Binding Modes section for more details on Modes).
Asynchronous Communication
Before the binding can occur, the product list must be fetched from the WCF service. All WCF service calls from Silverlight are made through asynchronous communications. The sample WCF service publishes an OperationContract named FindProductList. Since the communication with Silverlight is asynchronous, this contract is implemented in the generated proxy with an asynchronous method that kicks off the communication and an event that is raised when the operation has completed.
The following code creates an instance of the service proxy:
private void FindProductList()
{
    this.Cursor = Cursors.Wait;
    var proxy = new NWServiceGatewayClient();
    proxy.FindProductListCompleted += new
        EventHandler<FindProductListCompletedEventArgs>(
        FindProductListCompleted);
    proxy.FindProductListAsync();
}
After the proxy has been created, an event handler is added to the FindProductListCompleted event. This is the method that will receive the result of the asynchronous WCF service call. Finally, the FindProductListAsync method is executed.
When the asynchronous WCF service call has completed, the event handler is executed. The following code shows the event handler FindProductListCompleted receiving the list of products and binding them to the ListBox's DataContext:
private void FindProductListCompleted(object sender,
    FindProductListCompletedEventArgs e)
{
    ObservableCollection<Product> productList = e.Result;
    lbProducts.DataContext = productList;
    if (lbProducts.Items.Count > 0)
        lbProducts.SelectedIndex = 0;
    this.Cursor = Cursors.Arrow;
}
Product Details and Binding Modes
When an item in the ListBox has been selected, the code in the event handler fetches the selected Product from the ListBox's SelectedItem and sets it to a Grid layout control's DataContext. The Grid layout control is used as a container for the product details section, which contains a series of controls that allow the user to edit the selected product. Since the DataContext is inherited down the control tree, there is no need to set the DataContext on the individual TextBox and CheckBox controls. These controls all inherit the DataContext from their parent Grid control that was set in the lbProducts_SelectionChanged event handler.
There are several TextBlock, TextBox, and CheckBox controls in the Grid layout control which contain binding declarations. A few snippets of XAML from this section are shown here:
<TextBox Style="{StaticResource TextBoxStyle}"
    Text="{Binding UnitsInStock, Mode=TwoWay}"
    Grid.Row="1" Grid.Column="1" Margin="3,3,3,3" Height="30"
    x:Name="tbUnitsInStock" Width="100"
    VerticalAlignment="Bottom" HorizontalAlignment="Left"/>

<TextBlock Style="{StaticResource TextBlockStyle}" Text="{Binding
    CategoryName, Mode=OneWay}" Foreground="#FF001070" Grid.Row="1"
    Grid.Column="4" Margin="3,3,3,3" Height="22"
    HorizontalAlignment="Left" VerticalAlignment="Bottom"/>
Notice that the first snippet represents a TextBox that displays the UnitsInStock property from the Product source object. The second snippet shows the value of the Product instance's CategoryName property. Note that the binding Mode property is set to TwoWay on the TextBox and it is set to OneWay (which is the default setting) on the TextBlock.
The binding Mode property is a critical binding setting that determines how often and in which direction binding will occur between the target and its source. Figure 7 shows the three binding modes that can be used in Silverlight XAML and when they are updated.
Figure 7 Three Binding Modes in Silverlight XAML
| Binding Mode | OneTime | OneWay | TwoWay |
|---|---|---|---|
| Target is updated when DataContext is first set | Yes | Yes | Yes |
| Target is updated when source changes | No | Yes | Yes |
| Source is updated when target changes | No | No | Yes |
OneTime binding sends the source to the target when the application is started or the DataContext changes. OneWay binding sends the source to the target as well. However, if the source implements the INotifyPropertyChanged interface, the target will receive updates when the source is updated. TwoWay binding sends the source data to the target and if there are changes in the target property's value, those will go back to the source. Both OneWay and TwoWay binding only notify the target about changes if the source object implements INotifyPropertyChanged and if the source's property setters raise the PropertyChanged event.
In the previous example, OneWay binding is used for the CategoryName since it is displayed in a TextBlock and cannot be edited. TwoWay binding is used for the UnitsInStock since it is presented in a TextBox which can be edited. When the user edits the value of UnitsInStock in the TextBox and when the TextBox loses focus, the change is sent back to the source object.
OneTime binding is optimal for presenting read-only information that will never change while presented. OneWay binding is great for presenting read-only information that may change at some point while being presented. To illustrate, if OneTime binding was used instead of OneWay on the CategoryName TextBlock, when the Cancel button is clicked and the product list is refreshed the TextBlock using the OneTime binding mode would not be updated. Finally, TwoWay binding is the best choice when the user must be able to change the data in a control and have the change reflected in the data source
Change Events
One of the keys to having OneWay and TwoWay binding notify the target when the source has changed is to implement the INotifyPropertyChanged interface. The Product class implements this interface, which consists of a single event, PropertyChanged. The PropertyChanged event accepts as parameters the sender and the name of the changed property. Silverlight data binding listens for these events from data sources. If the class does not both implement this interface and raise the PropertyChanged event in the property setters, then the target will never receive updates. The PropertyChangedEventHandler is implemented in the Product class through the following line of code:
public override event PropertyChangedEventHandler PropertyChanged;
In this case, the event is overridden rather than simply defined because the Product class inherits from a custom EntityBase class which implements the INotifyPropertyChanged interface. The EntityBase class, shown here, implements the PropertyChangedEventHandler virtually so it can be overridden in the derived classes such as Product or Category:
[DataContract]
public abstract class EntityBase : INotifyPropertyChanged
{
    protected void PropertyChangedHandler(EntityBase sender,
        string propertyName)
    {
        if (PropertyChanged != null)
            PropertyChanged(sender, new PropertyChangedEventArgs(
                propertyName));
    }
    public virtual event PropertyChangedEventHandler PropertyChanged;
}
The EntityBase class also defines a PropertyChangedHandler method as a convenience to derived classes which, in turn, raises the PropertyChanged event. This is a simple refactoring to put the logic of raising the event into a single place and reduce code. For example, the product class has a UnitPrice property that sets the value of the product's price and calls the base class's PropertyChangedHandler method:
[DataMember]
public decimal UnitPrice
{
    get { return _unitPrice; }
    set
    {
        _unitPrice = value;
        base.PropertyChangedHandler(this, "UnitPrice");
    }
}
This method, in turn, raises the PropertyChanged event. This event is then sent to any OneWay or TwoWay bindings, which causes the bindings to update the target controls with the new value. Every property's setter in the Product class uses this pattern.
The property change notifications can be demonstrated through the sample application by selecting a product from the ListBox and editing the unit price in the TextBox. Since the tbUnitPrice TextBox uses TwoWay binding, this causes the new price to be sent to the source. Once the source is updated, the PropertyChanged event is raised. This causes any bindings that are listening for the event to update the target values. Since the ListBox implements OneWay binding, its value for the price will automatically update itself to the new price value.
As you can see, Silverlight 2 data-binding features are simple to implement using the declarative binding syntax shown in the sample application. The bindings listen for the PropertyChanged event so they can update their targets. In this column, I showed how easy it is to implement binding through Silverlight, how to communicate with WCF services to interact with business objects and a database, and how to define a ClientAccessPolicy.xml file to allow and restrict remote communications.
Send your questions and comments for John to mmdata@microsoft.com .
John Papa ( johnpapa.net ) is a Senior Consultant with ASPSOFT ( aspsoft.com ) and a baseball fan who spends summer nights rooting for the Yankees with his family. John, a C# MVP and INETA speaker, has authored several books and is now working on his latest, titled Data Access with Silverlight 2, to be published by O'Reilly in December 2008. He often speaks at conferences such as DevConnections and VSLive.