May 2009
Volume 24 Number 05
.NET RIA Services - Building A Data-Driven Expense App with Silverlight 3
By Jonathan Carter | May 2009
This article is based on a prerelease version of .NET RIA Services. All information is subject to change.
This article discusses:
|
This article uses the following technologies: Silverlight 3, .NET RIA Services, WPF |
Contents
Getting Started
Data Services Library
Domain Operations
Code Projection
Data Controls
ObjectDataSource
DataPager
DataForm
Metadata
Validation
Shared Code
Wrap Up
Within software development,there are many different styles of applications, each of which comes with its own purpose and requirements, strengths and weaknesses. When choosing a development platform or framework, part of your decision process will most likely rely on whether the framework can easily enable the type of application you are looking to build. No developer wants to spend hours writing plumbing or infrastructure code, and no customer wants to pay for that type of work to be done. Being able to primarily focus on business needs is important, so having a development platform that better enables that focus and increases productivity is an absolute must.
Silverlight is a great technology for creating compelling Web applications. While Silverlight 2.0 includes a subset of Windows Presentation Foundation (WPF), a fair amount of the functionality in WPF that made it easier to create data-driven applications wasn't inherited. This has caused many developers to ultimately pass up on using Silverlight because it would require too much work to implement the data-centric infrastructure of more sophisticated Web solutions. As part of the Silverlight 3 release, new controls and features are being introduced that specifically make data-driven applications easier to develop. This includes new data controls, navigation, validation, and embedded dialog windows.
While these client-side enhancements provide a substantial amount of value on their own, Silverlight is a multitiered environment, and as such requires knowledge of how to deal with client-server communication. To solve this problem, .NET RIA Services (code-named "Alexandria") provides a set of server components and ASP.NET extensions that ease the n-tier development process, making your applications almost as easy to develop as if they were running on a single tier. In addition, services such as authentication, roles, and profile management are provided. The combination of client and server enhancements to Silverlight 3 and ASP.NET, along with the addition of .NET RIA Services, streamline the end-to-end experience of developing data-driven Web applications—also known as Rich Internet Applications, or RIAs.
Figure 1 Default .NET RIA Services Project
In this article, I will show you how the enhancements made to Silverlight 3, in concert with the functionality introduced by .NET RIA Services, give you a rich environment for developing data-centric Web apps. To best illustrate the functionality that Silverlight 3 and .NET RIA Services provide, I am going to build out an expense report tracking application that will take advantage of the new feature sets. The application will allow employees to log in and manage and create their personal expense reports. Once an expense report is completed, it can then be submitted, awaiting the approval of a manager.
Getting Started
Once you've installed .NET RIA Services and Silverlight 3, Visual Studio includes a new project template called Silverlight Data Application that enables you to get up and running quickly. When your solution is created, you're presented with two projects: a Silverlight project and an ASP.NET project (see Figure 1). The Silverlight project represents your client application, and the ASP.NET project will contain your back-end logic.
What is the advantage of this default project structure? As far as the provided Silverlight project goes, it is identical to what you'd get if you created a regular Silverlight project. You have a standard App.xaml file and a default page. There are, however, subtle differences to this Silverlight project that will aid your development goals.
The ASP.NET project is straightforward as well, but if you look within the default.aspx page, you'll notice that it makes use of a new server control called SilverlightApplication.
<ria:SilverlightApplication ID="Xaml1" runat="server" Source="~/ClientBin/ExpenseReports.xap" MinimumVersion="1.0" Width="100%" Height="100%" />
This control is meant to make the act of hosting a Silverlight application within an ASP.NET WebForms application easier. The SilverlightApplication control is already configured to target the XAP that will be created from the Silverlight project.
At this point, you have a fully functional and hosted Silverlight application. Now you just need to begin adding custom business logic and UI.
Let's assume you've already got a database in place for this application, so the next thing to do is add an ADO.NET Entity Data Model to the server project. I'll be using the Entity Framework as the object-relational mapping (O/RM) in this article, but you could also use LINQ to SQL, NHibernate, traditional ADO.NET, or any other data access method.
The data model is very simple, containing only three entities: ExpenseReport, ExpenseReportDetail, and Employee (see Figure 2). For more information on the ADO.NET Entity Frameworkon MSDN.
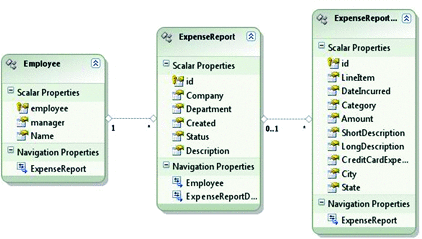
Figure 2 Data Mode
With the data model in place and the O/RM selection made, you can now begin implementing the back-end logic. Since this project employs Silverlight as the client and ASP.NET as the host, you need to decide on an approach for communicating between the two tiers. You could use any of the currently available communication frameworks such as Windows Communication Foundation (WCF) or ADO.NET Data Services, depending on your requirements.
Data Services Library
.NET RIA Services introduces a library of server components that make building data-driven RIAs easier. The library is not reliant on any specific UI framework, and while this article focuses on its consumption by Silverlight, that is only one of its possible client options. In future releases, .NET RIA Services will also work with ADO.NET Data Services.
.NET RIA Services primarily revolves around a new class called DomainService that acts as a server endpoint for business logic and data model interaction. Creating one is as simple as taking advantage of the Business Logic Class templates installed by .NET RIA Services in Visual Studio.
A DomainService can exist in two forms: data model–specific or generic. The data model–specific implementation effectively wraps a data model, allowing you the option of writing a combination of business logic and data access code. This makes it more convenient to get up and running quickly in scenarios where you already have a data model that you want to work with.
There are two data model–specific DomainService implementations provided with .NET RIA Services: ADO.NET Entity Framework and LINQ to SQL. If your application makes use of either of those, then you can select the appropriate option in the wizard when creating a DomainService. If you're using another type of data model or O/RM, you could create your own specific implementation of a DomainService as well.
For this article, since I already have an Entity Data Model in place, I'll go ahead and create an Entity Framework–specific DomainService. I receive a new class that inherits from LinqToEntitiesDomainService<T>:
[EnableClientAccess] public class ExpenseService : LinqToEntitiesDomainService<ObjectContext> { //public IEnumerable<Employee> GetEmployees() //{ // return this.Context.Employee; //} }
The generic parameter in this case represents the type of ObjectContext instance that represents the connection to the Entity Data Model. The first step is to heed the advice of the TODO comment and replace the type parameter placeholder with the actual ObjectContext, in this case ExpenseReportContext.
In addition to inheriting from DomainService (or a derivative), a domain service can have an EnableClientAccessAttribute attached to it. This attribute is what really signifies your class as being a domain service and allows you to specify whether it should be publically exposed. By publically exposed, I mean accessible to your client application. This gives you the choice to determine whether some logic is solely required on the server, or if it should also be available on the client.
Domain Operations
A domain service isn't very useful on its own unless you add some functionality to it in the form of domain operations. A domain operation represents an endpoint of your domain service and can perform create, read, update, and delete (CRUD) operations against your data model, your arbitrary business logic, or both. Each domain operation must map to a specific operation type, including query, insert, update, delete, service operation, and custom. The operation type mapping can occur either by convention or by configuration.
Depending on which operation type your domain operation is going to perform, it has to follow a specific signature. In addition, some operations have to either follow a specific naming convention or have an attribute that determines what type of operation it is. For instance, if it is a query operation, then its return type has to be either IEnumerable<T> or IQueryable<T> where T is an entity type it works with. It can accept any number of parameters, which can act as filters, but none are required.
Creating a domain operation for retrieving all expense reports might look like this:
public IEnumerable<ExpenseReport> GetExpenseReports() { return Context.ExpenseReports; }
ExpenseReport is an entity in the underlying data model and is, therefore, a valid return type. The DomainService class contains a property called Context that provides access to an instance of your data model (the type you provided as a generic parameter), which in this case allows you to query for a list of all expense reports. This operation is mapped to a type by convention.
Creating a data method for retrieving a specific expense report might look like this:
[Query(IsComposable = false)] public IEnumerable<ExpenseReport> GetExpenseReport(int id) { var expenseReport = from rep in Context.ExpenseReports where rep.Id == id select rep; return expenseReport; }
Notice that this data method takes a parameter for retrieving a specific expense report by ID. Because you have access to the underlying ObjectContext, you can also write the query using LINQ. This method is mapped by configuration, using the QueryAttribute, which also allows you to specify additional properties that can't be achieved conventionally. I'll touch on what the IsComposable property of the QueryAttribute does later in the article.
A DomainService can contain as many query methods as needed. In addition to retrieving data, you can create operations for persisting data back into the data model. Implementing basic persistence operations (insert/update/delete) for expense reports might look like this:
public void InsertExpenseReport( ExpenseReport expenseReport) { Context.AddToExpenseReports(expenseReport); } public void UpdateExpenseReport( ExpenseReport current, ExpenseReport original) { Context.AttachAsModified(current, original); } public void DeleteExpenseReport( ExpenseReport expenseReport) { Context.DeleteObject(expenseReport); }
You could define the persistence operations for expense report details in much the same way. You can have only a single insert, update, and delete method per entity type (ExpenseReport in this scenario) because, when a request comes in to the DomainService to save changes back to the data model, the DomainService needs to know which method to call.
One thing to notice about these operations is their signatures. When you create an insert or delete method, it must take a single parameter that conforms to the entity type the method is responsible for inserting or deleting. When you create an update method, it must take two parameters: the modified (or current) entity instance and the original entity instance. The method signature in conjunction with the method name is what signifies to the DomainService which method is responsible for which operation for which entity type.
The naming convention that can be used when defining persistence operations is to prefix your method names with the type of operation. For instance, because the method is called DeleteExpenseReport, the Delete prefix signifies that is it a delete operation by convention. The signature then defines what entity type it is associated with (ExpenseReport). As you would expect, the conventional method name prefix for update operations is Update and insert operations is Insert. This is why I didn't have to do any additional configuration for these operations to work.
If an operation doesn't follow the expected naming convention or you need to specify additional metadata for your operation (like I did with the GetExpenseReport method), then you can apply configuration attributes such as QueryAttribute, InsertAttribute, DeleteAttribute, and UpdateAttribute as I did with the GetExpenseReport method.
If you need to define business logic that isn't necessarily tied to a CRUD operation, but is associated with an entity type, you can create a service operation. In this case, I want operations for approving and rejecting expense reports. This simply means modifying the expense report's status value (see Figure 3). The signature for a service operation has to accept an instance of the entity type it is associated with and must return void. Note that there is no convention for defining service operations, so you must apply the ServiceOperationAttribute to configure any appropriate domain operation.
Figure 3 Service Operations
[ServiceOperation] public void ApproveExpenseReport( ExpenseReport expenseReport) { if (expenseReport.Status == 1) { if (expenseReport.EntityState == System.Data.EntityState.Detached) { Context.Attach(expenseReport); } expenseReport.Status = 2; } } [ServiceOperation] public void RejectExpenseReport(ExpenseReport er) { if (er.Status == 1) { if (er.EntityState == System.Data.EntityState.Detached) { Context.Attach(er); } er.Status = 0; } }
Now that you've got the domain service and operations created, how do you go about interacting with the service from the ASP.NET server host to the Silverlight client application? If you were using WCF or ADO.NET Data Services, you would create a reference in the Silverlight project that pointed to the service, which would generate a proxy. .NET RIA Services provides a slightly richer experience.
Code Projection
When you create the .NET RIA Services solution, the Silverlight project file had some special MSBuild tasks added to it that handle projecting specific server components to the client. When you create a domain service in the ASP.NET project that has an EnableClientAccessAttribute applied to it, the MSBuild task will project that domain service to the Silverlight application. (If you didn't create your solution using the new Silverlight Data Application project template, you can manually link a Silverlight project and ASP.NET project within Visual Studio to achieve the same effect.)
If you look in the code-behind of the Main.xaml file in the Silverlight project, you'll find both ExpenseContext and ExpenseReport types. When a data provider is projected to a Silverlight client application, it is no longer a DomainService (or subtype), but rather a DomainContext. In fact, if your domain service is suffixed with the word Service, it will be replaced with Context upon projection (which is why the ExpenseService class is reflected as Expense-Context in the Silverlight project). The DomainContext class acts as a client-side proxy for a DomainService and contains the logic necessary for communicating requests between the two tiers. It represents a unit of work and can build up a series of change sets made to any entity instance it is currently tracking.
In addition, certain methods (public methods that are deemed domain operations either by convention or configuration) will be projected along with their parent domain services. Of the six data method types, only three are projected: custom, service, and query. If a query method's name is prefixed with Get, upon projection Get will be replaced with Load. For example, because I defined a query method with the name GetExpenseReports, it will surface on the client as LoadExpenseReports. The two service operations were projected as well and are reflected as instance methods on DomainContext.
Finally, any entity types that are returned from a domain operation will also be projected. In my example, because the GetExpense-Reports method's return type is IEnumerable<ExpenseReport>, the ExpenseReport entity class will be projected to the Silverlight client. The projected entity classes inherit from a special class called Entity that provides behavior such as change tracking, validation checking, and WPF/SL-compatible editability. From an API perspective, your client-side entity class will look just like the entity on the server, but will contain additional functionality that is required for interacting with Silverlight data controls.
There are a lot more details surrounding the code projection behavior than are discussed here. This article doesn't touch on many additional scenarios that are possible, including the ability to customize the logic that determines how a specific type's code is shaped before projecting it to the client application.
I'm using the term code projection because I think it appropriately describes what is going on. The ExpenseService class isn't simply being copied from one project to another (there is actually an exception to this that I'll discuss later). It is being examined, shaped, and projected into the client application as an easy-to-use proxy. Hence, you can leverage the type from the client tier as if it were a local object.
Where is the projected domain service hiding? The Silverlight project looks untouched from its created state. If you turn on the option to show all files for the Silverlight project, you'll see the culprit (see Figure 4). A folder is created called Generated_Code that contains all of the code that has been projected from the partner server project. There is currently only a single file in there, ExpenseReportsServer.g.cs (the g stands for generated), which contains the code for the entire ExpenseReportsServer project and is the home of the ExpenseContext class.
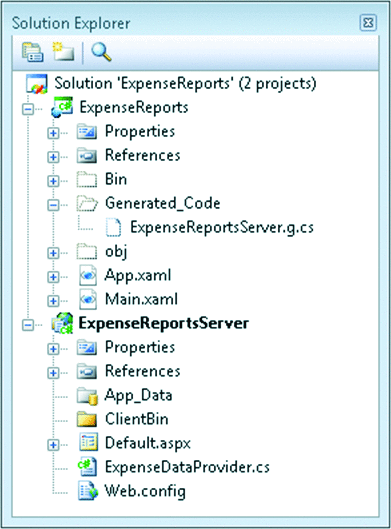
Figure 4 Code Generated For The Silverlight Project
If you create a new data provider or modify an existing one, the changes will be silently updated within the Silverlight project, keeping the client and server constantly in sync. In scenarios where services are created for the sole purpose of supporting an application's client, having to continually refresh service proxies during development can be a pain. This subtle behavior, in addition to the reshaping during projection, turns out to be a pretty useful feature.
Data Controls
So I've got a database, data model, services, and client-side proxies in place. Now I need to build out the UI for displaying and editing expense report data within the Silverlight client. When dealing with data-driven applications, there are typically two types of ways of presenting data: tabular and form-based. When dealing with data-driven RIAs, tabular and form-based data needs to be presented in a manner that makes the user experience highly informative and productive.
Silverlight 2 didn't have very strong support for tabular data presentation out of the box. Not even the ListView control (which provided basic grid presentation in WPF) is present in Silverlight, which made it somewhat difficult to build business software. Silverlight later received a DataGrid control, which definitely helped, but lots of necessary features were still missing. Intrinsic controls were available, such as TextBox, ComboBox, Button, ListBox, and RadioButton, which made developing forms possible, but there wasn't strong support for other behaviors that are necessary, such as data validation and error reporting.
Silverlight 3 introduces a set of new controls that are specifically aimed at making the creation of data-centric RIAs easier. These controls include DataGrid, DataForm, DataPager, FieldLabel, DescriptionViewer, ErrorSummary, and ChildWindow. I took advantage of DataGrid, DataForm, and DataPager to enable data presentation in both tabular and form-based styles for my sample app. FieldLabel, DescriptionViewer, and ErrorSummary provide the dynamic UI, data validation, and error reporting needed to develop responsive data entry. Finally, ChildWindow enables rich modal dialog boxes.
The DataGrid control that comes with Silverlight 3 is robust. Among other things, it includes reorderable and resizable columns, row grouping, inline editing, and validation. It allows you to define the columns displayed in the grid in two ways: generated and explicitly.
A DataGrid that has its AutoGenerateColumns property set to True will automatically create a column for every public property on the type to which it is bound—the exception being that if a property has a BindableAttribute attached to it that specifies it isn't bindable, then the DataGrid won't create a column for it. This is one example of how the new data controls take advantage of entity metadata.
When you explicitly define the columns in a DataGrid, you are scoping the displayed data to just the columns that you want to show. This gives you control over which column types to use as well as header text and numerous other column properties. A DataGrid that explicitly defines its columns for displaying expense report data might look like Figure 5.
Figure 5 DataGrid For Expense Report
<dataGrid:DataGrid x:Name="ExpenseReportDataGrid" AutoGenerateColumns="False"> <dataGrid:DataGrid.Columns> <dataGrid:DataGridTextColumn Binding="{Binding Company}" Header="Company" /> <dataGrid:DataGridTextColumn Binding="{Binding Department}" Header="Department" /> <dataGrid:DataGridTextColumn Binding="{Binding Description}" Header="Description" /> <dataGrid:DataGridCheckBoxColumn Binding="{Binding Status}" Header="Approved" /> </dataGrid:DataGrid.Columns> </dataGrid:DataGrid>
The properties that are specified in the column bindings refer to properties on the ExpenseReport entity. Remember that the class was projected to the Silverlight application, making it usable in the client. The DataGridTextColumn class will display the data as text in read-only mode and as a text box in edit mode. The DataGridCheckBoxColumn will display a field as a checkbox in all modes and accommodate three states.
To fill a DataGrid you simply set its ItemSource property to any IEnumerable object. Remember that when I defined the Expense-Service and the GetExpenseReports data method, its return type was IEnumerable<ExpenseReport>. Now I just need to figure out how to consume the client-side proxy for the data provider that was generated.
When the ExpenseService class was projected to the client application, its GetExpenseReports method was projected as well (after being renamed to LoadExpenseReports). This means you should be able to just create an instance of ExpenseService and call its LoadExpenseReports method. While that is the correct approach to take, it wouldn't produce any results on its own. Interestingly enough, the LoadExpenseReports method doesn't return anything. How do you get the expense report data?
Silverlight requires any blocking calls to be performed asynchronously so that the UI thread doesn't lock up. Because of this, when .NET RIA Services projects your domain services to a Silverlight client, it refactors all of its query operations so that they no longer return anything. This explains why .NET RIA Services will rename your query methods to be prefixed with Load instead of Get (or Fetch, Find, Query, Retrieve, or Select), because it reflects its behavior more appropriately.
Instead of employing a callback approach, the classes generated by .NET RIA Services use an event model for notifying you after an asynchronous call has completed. Hence, to respond to the loading of a query operation, you simply subscribe to the DomainContext's Loaded event, which will be triggered as soon as any query operation completes. Because the event handler is called on the UI thread, you can carry out any data binding within it.
Figure 6 Expense Report Data Loading
public partial class Main : Page { ExpenseContext _dataContext; public Main() { InitializeComponent(); this.Loaded += Main_Loaded; _dataContext = new ExpenseContext(); _dataContext.Loaded += dataContext_Loaded; } void dataContext_Loaded(object sender, LoadedDataEventArgs e) { ExpenseReportDataGrid.ItemsSource = e.LoadedEntities; } void Main_Loaded(object sender, RoutedEventArgs e) { _dataContext.LoadExpenseReports(); } }

Figure 7 Expense Reports Grid UI
Once the Loaded event handler has been triggered, there are two ways to retrieve your requested data: through the LoadedDataEventArgs.LoadedEntities property or through one of the strongly typed entity properties on your domain context (such as ExpenseContext). Accessing the data through the event arguments is the preferred approach since this will guarantee that you get only the data you want. Every time a query operation is called, the returned entity instances will be added to the domain context, therefore whenever you access its contents, you will be getting the accumulation of every query, not just the one you most recently performed.
Implementing the logic for retrieving all expense reports and filling the DataGrid with the returned data might look like Figure 6. At this point, our data-driven RIA looks like Figure 7.
In addition to being able to load data, the DomainContext class (and your generated subtypes) contains methods for managing change tracking and data persistence. Every change you make to an entity that was retrieved (or added or deleted) through a DomainContext will be tracked. When you want to save changes, you can simply call the SubmitChanges method:
private void SaveChangesButton_Click( object sender, RoutedEventArgs e) { if (_dataContext.HasChanges) { _dataContext.SubmitChanges(); } }
Since the DataGrid enables inline editing by default, you can modify any of the expense report records and click the Save Changes button to persist them to the server. When the SubmitChanges method is called, the DomainContext assembles a change set for all of its tracked entities and sends it to the corresponding DomainService. The DomainService then decomposes the change set and calls the respective domain operation for each entity that was inserted, updated, or deleted.
When you are editing data within the DataGrid control, it provides validation and error reporting automatically. If you enter invalid data, you'll be visually notified with an explanation of what is wrong (see Figure 8). This feature comes without any configuration or work on your part. As you'll see later on in the article, you can also define custom validation rules on your data model that will be picked up and ensured by the DataGrid.
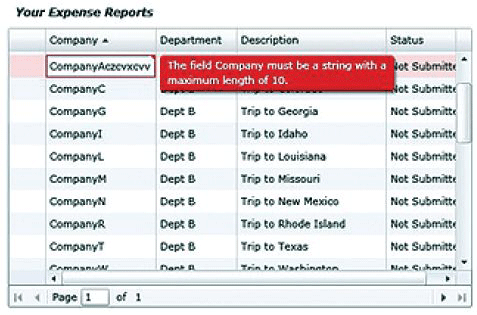
Figure 8 DataGrid Validation
This view of the expense reports is fine, but it would be a lot more useful to see expenses grouped by status. That way I could immediately figure out which reports are pending approval by a manager. Luckily, this can be achieved easily in Silverlight 3 by appending this code to the existing DataGrid definition:
<dataGrid:DataGrid.GroupDescriptions> <dataGrid:PropertyGroupDescription PropertyName="Status" /> </dataGrid:DataGrid.GroupDescriptions>
The result looks like Figure 9.
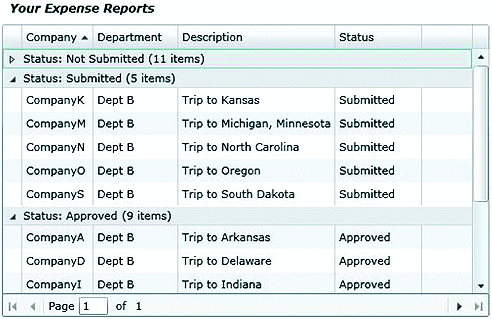
Figure 9 DataGrid Grouping
ObjectDataSource
While some developers will prefer the imperative data binding approach used thus far, others might like being able to perform data binding purely declaratively, much like the way they might work with the ObjectDataProvider in WPF. For this, Silverlight 3 introduces the ObjectDataSource control.
ObjectDataSource is a nonvisual control that knows how to work specifically with DomainContext types. It can be thought of as providing all of the functionality that the previous imperative approach did but by means entirely declarative (plus more). You simply tell it which DomainContext type you're working with and which of its query operations you want called. ObjectDataSource will handle the rest.
You could remove all of the code from the previous section and replace it with an ObjectDataSource, and it will automatically call the specified load method:
<ria:ObjectDataSource x:Name="ExpenseReportsObjectDataSource" DataContextType="ExpenseReports.ExpenseContext" LoadMethodName="LoadExpenseReports" PageSize="20"> <ria:ObjectDataSource.Filter> <data:FilterDescriptor Member="Department" Operator="IsEqualTo" Value="IT" /> </ria:ObjectDataSource.Filter> <ria:ObjectDataSource.Sort> <data:SortDescriptor Member="Status" Direction="Descending" /> </ria:ObjectDataSource.Sort> </ria:ObjectDataSource>
Using the ObjectDataSource control doesn't just provide a declarative means of data binding, it also makes queries composable. You can add sort, group, and filter expressions to an ObjectDataSource, as well as page size, that will be applied to the call to its query operation. The best part is that the ObjectDataSource will modify the request made to the domain service so that any specified sorting or filtering is applied on the server side, meaning no unnecessary data will be passed over the wire.
Remember the IsComposable property of the DomainOperationAttribute? That is what determines whether a domain operation allows additional query parameters to be passed to it, making its returned data composable. My GetExpenseReports method didn't add any sorting or filtering code, but because of the composability of the DomainService and the fact that the ObjectDataSource knows how to make composed queries, I can get that functionality automatically.
ObjectDataSource is actually a wrapper for a DomainContext instance and therefore benefits from the same change-tracking behavior. It contains the same Load and SubmitChanges methods that DataContext does, allowing you to programmatically control it like you would a DomainContext.
DataPager
Since the amount of data currently being displayed in the grid is a little unwieldy, it would probably make sense to page it for presentation purposes. While the DataGrid control itself doesn't include paging behavior, Silverlight 3 introduces a new DataPager control that works seamlessly with other data controls to easily provide paging functionality alongside them.
The DataPager control simply presents the necessary UI for paging through a provided data source. If you bind a DataPager to the same data source as another data control (such as DataGrid), paging through the data using the DataPager will also page the displayed data in the other bound controls. The code to add a DataPager to the list of expense reports might look like this:
<data:DataPager Source="{Binding Mode=TwoWay, Source={StaticResource ExpenseReportDataSource}, Path=Data}"/>
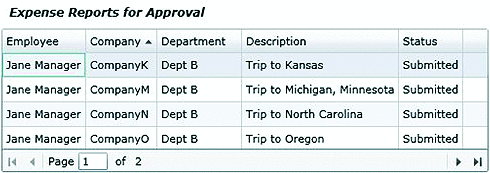
Figure 10 DataPager Placed At The Bottom Of A DataGrid
Notice that all I have to do is define the control and bind it to the correct source and the control will handle the rest (see Figure 10).
The DataPager has numerous modes you can select from that vary how it presents the available pages to the user. In addition, you can completely re-skin the DataPager to look however you'd like while still maintaining its existing functionality.
While the DataGrid and DataPager provide a great inline editing experience, what if you wanted to display data in a form-based layout? For creating or modifying expense reports, you want to provide the user with an intuitive form to use instead of having to rely on the grid. For that you can employ the new DataForm control.
DataForm
The DataForm control allows you to define a set of fields that will be displayed in a form-based layout and can be bound to either a single entity instance or a collection. It allows working with your data in read-only, insert, and edit modes, with the ability to customize the appearance of each. You can optionally show controls for switching between modes and, when bound to a collection, the DataForm can also show a pager for navigation. Just like the DataGrid, DataForm also comes in various forms: generated, explicit, and template.
The generated mode works just like DataGrid. It will create a field and label pair for every public property on the type it is bound to. DataForm respects the BindableAttribute as well, which allows you to define your bindable field list at the entity level. Defining an edit form for expense reports could be as simple as this:
<dataControls:DataForm x:Name="ExpenseReportDataForm" Header="Expense Report" ItemsSource="{Binding Source={StaticResource ExpenseReportsObjectDataSource}, Path=Data}" />
By using the generated mode, you're allowing the DataForm to make all UI assumptions based on the entity's metadata. The resulting form is shown in Figure 11.
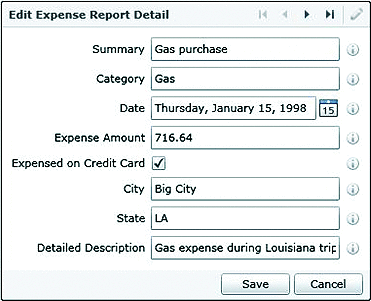
Figure 11 DataForm-Derived Expense Entry Form
Labels for any required fields (properties marked with Required-Attribute) are displayed in bold, indicating the requirement to the user. Also, to the right of the input controls, the information glyph provides a mouse-over tooltip description of the expected input. A description is optional and is retrieved by examining whether the field's corresponding property has a DescriptionAttribute attached to it. These are two more examples of how the new Silverlight 3 data controls enable data-driven scenarios, by adding to your UI in response to metadata on your data models.
Just like the DataGrid, the DataForm also provides data validation and error reporting. The two controls have a consistent appearance and functionality, which provides for an overall good user experience regardless of which data presentation you need.
Using the explicit form, you can declare which fields you want to display, what type of fields to use, and what label text to display (among other things). This form is useful when you don't want to leave the UI creation up to the DataForm and entity metadata. Declaring a DataForm explicitly might look like Figure 12.
Figure 12 Explicit Creation Of A DataForm
<dataControls:DataForm x:Name="ExpenseReportDataForm" ItemsSource="{Binding Source={StaticResource ExpenseReportsObjectDataSource}, Path=Data}" AutoGenerateFields="False"> <dataControls:DataForm.Fields> <dataControls:DataFormTextField Binding="{Binding Company}" Label="Company" /> <dataControls:DataFormTextField Binding="{Binding Department}" Label="Department" /> <dataControls:DataFormTextField Binding="{Binding Description}" Label="Description" /> <dataControls:DataFormCheckBoxField Binding="{Binding Status}" Label="Approved" /> </dataControls:DataForm.Fields> </dataControls:DataForm>
In addition to fields for text and checkboxes, there are fields available for date, combo box, template, separator, header, and field group. With these you can explicitly define the fields you want to show and give basic instruction to the DataForm for displaying them. Even with this flexibility, you're still restricted to a top-down form, where each field is a traditional label and input control pair. While the DataFormTemplateField allows you to define a template for all modes (display and edit), it is limited to the field level. What if you wanted to template the entire form?
When complete control over your UI is needed (or desired), the DataForm allows you to define custom data templates for each of its modes (display, insert, and edit). With this ability, you can break out of the default top-down form style and create whatever look makes sense for your situation.
Certain behavior is global to all three forms of the DataForm, such as navigation, validation, and error reporting. When you choose to redefine the data templates though, you lose the automatic field label and description viewer, which worked with your model's metadata. When developing a data-driven application, it would be a shame to lose this useful behavior just because you needed to customize your layout. Fortunately, the controls that are internally used by the Dataform and that provide this behavior are also usable manually.
Metadata
When you allow the DataForm to generate your list of fields for you, it automatically makes use of two controls to provide the label and description behavior: FieldLabel and DescriptionViewer. Both of these controls are easy to use and can be leveraged in any data-bound scenario, including custom DataForm templates.
FieldLabel is useful when you want to display a label for a control that is determined from the metadata of its associated bound property. The text used for the label is derived from the Name property of the DisplayAttribute attached to the property it is bound to. In addition, if the property is required (signified by having a RequiredAttribute marked as true attached to it), the field label text will be in bold.
In addition to being able to specify a custom name with the DisplayAttribute, you can specify a description for a property. If you'd like to display a field's description, you can use the DescriptionViewer control, which handles this for you automatically. It will display an information glyph that provides a tooltip containing the description of the property it is associated with.
With the FieldLabel and DescriptionViewer controls, you can develop custom data forms that take advantage of metadata from your data model without having to replicate information (such as field names and descriptions). If you use these controls throughout your application, any time a change is made to a property's name, description, or required status (at the model level), your UI automatically reflects the change due to its dependence on the data model. This is the type of behavior you'd expect when developing data-driven applications.
Validation
Since we're focusing on the development of data-driven applications, we'd like to keep our business logic and validation close to the data model. When using .NET RIA Services you can express validation logic in two ways: data annotations and custom/shared logic.
The Microsoft .NET Framework 3.5 SP1 release introduced a set of attributes called data annotations that are meant to attach metadata and validation rules to a data model. These annotations were initially used by ASP.NET Dynamic Data and are understood and respected by .NET RIA Services and the new Silverlight 3 data controls. With them you can express such validation aspects as string length, range, data type, and regular expression constraints:
[Bindable(true, BindingDirection.TwoWay)] [Display(Name = "Expense Amount", Description = "The amount of the incurred expense.")] [Range(0.0, 1000000.00)] public object Amount; [Bindable(true, BindingDirection.TwoWay)] [Display(Name = "Category", Description = "The category of expense, i.e., mileage.")] [StringLength(10)] public object Category;
When the .NET RIA Services projection process runs, it makes a point to flow any server-side data annotations to the client. As long as you take advantage of the generic data annotations to represent validation rules on your server-side data model, that validation will carry over to your Silverlight application and be fully usable by aware controls (DataForm, DataGrid, FieldLabel, and so on). This effectively gives you client and server validation.
Using the data annotations is easy, but they can't express every possible validation requirement. In fact, they can really represent only the most common scenarios. For other situations you'll most likely need to define your validation imperatively. While this is simple to do, the .NET RIA Services projection process can't just flow your custom logic to the client as that process is limited to the creation of your DataContext and entity proxy classes.
You can keep the custom logic on the server and make a service call to it from your Silverlight client, but that would kill the application's responsiveness and remove the ability for the data controls to automatically determine data validity. You can copy and paste the logic to the client, and manually perform validation on both tiers, but code replication is never a good thing, and the automatic validation problem would still exist. This is a scenario that warrants the use of the .NET RIA Services shared code feature.
Shared Code
For the expense report application, I need to ensure two custom validation rules: any export report over $1,000 must include a description outlining their purpose, and no expense reports can be filed for future purchases. Neither of these conditions can be met using data annotations, but I can easily express them imperatively.
.NET RIA Services includes a feature called shared code that allows you to define logic in your server project that will be synchronized and available in your client application as well. During the code projection process, any code marked as shared will be copied between projects instead of translated and proxied. To take advantage of this feature, you first create a new code file in your server project with the suffix of .shared.[language extension] (for example, ExpenseData.shared.cs). When the code projection process runs, it will specifically look for files within the project with that suffix and treat it as shared code.
There is a new data annotation in the .NET Framework 4.0 called CustomValidationAttribute that allows you to associate a custom validation rule with a data model at either the entity or the property level. Specifying my two custom validation rules might look like this:
[MetadataType(typeof(ExpenseReportDetailsMetadata))] [CustomValidation(typeof(ExpenseReportValidation), "ValidateDescription")] public partial class ExpenseReportDetails { } public partial class ExpenseReportDetailsMetadata { [Bindable(true, BindingDirection.TwoWay)] [CustomValidation(typeof(ExpenseReportValidation), "ValidateDateIncurred")] [Display(Name = "Date", Description = "The date of when this expense was incurred.")] public object DateIncurred;
The .NET RIA Services projection process is aware of the CustomValidationAttribute and will flow it to your client proxy. Because the custom validation is contained within a validation type (that you most likely want to define on the server), you can take advantage of shared code to handle its synchronization.
The signature for a custom validation method must follow a specific pattern:
[Shared] public static class ExpenseReportValidation { public static bool ValidateDateIncurred(object property, ValidationContext context, out ValidationResult validationResult) { validationResult = null; bool result = DateTime.Compare((DateTime)property, DateTime.Now) < 0; if (!result) validationResult = new ValidationResult(context.DisplayName + " must be today or in the past."); return result; } }
Notice the use of the SharedAttribute on the ExpenseReportValidation class. This signifies to the projection process that it doesn't need to be translated to the client because it will also be covered by being a part of shared code.
Wrap Up
In the old days you would develop expense report applications by wrapping CRUD operations around the expense report data. The new Silverlight 3 DataGrid, DataForm, DataPager, and ObjectDataSource let you create the UI rapidly without having to invest in infrastructure development or sacrifice functionality to employ built-in controls. In addition, using .NET RIA Services you can define server-side business logic complete with validation rules and data access, and have it be easily consumable thanks to the projection process.
My sample expense report still needs a report details section as well as navigation and authentication. To achieve this, I'll need to use some additional controls introduced in Silverlight 3 as well as a set of application services provided by .NET RIA Services. In a future article, I'll demonstrate how this works.
Jonathan Carter is a Technical Evangelist at Microsoft.