May 2009
Volume 24 Number 05
Toolbox - Easy File Backup, Exploring Files And Folders Inside Visual Studio, Multiple Monitor Software, And More
By Scott Mitchell | May 2009
All prices confirmed at press time and are subject to change. The opinions expressed in this column are solely those of the author and do not necessarily reflect the opinions at Microsoft.
Contents
A Blog of Note
Explore Files and Folders from within the Visual Studio IDE
Tools for Multiple Monitors
File Backup and Synchronization Made Easy
One of the benefits of working in a large company with an entrenched IT department is that the myriad of computer maintenance tasks and core developer tools are already in place. You don't have to worry about backing up your workstation's data or which source control system to use, or spend time installing software and applying security updates. But if you work for a smaller company with a limited IT staff, or if you make your living as an independent software consultant or run a micro-ISV, these important decisions are likely to fall on your shoulders.
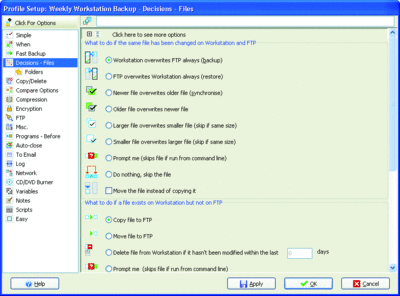
If the responsibility for creating, managing, and executing routine backups is yours, check out SyncBackPro (version 5.3) from 2BrightSparks. Getting started with SyncBackPro involves creating one or more profiles, where each profile spells out the source files, the destination location, options as to whether the files are compressed or encrypted when copied to the destination, whether to overwrite previous backup content or to version the data, and so forth. Once defined, a profile can be executed immediately, according to a schedule, every specified number of minutes or hours, whenever any of the source files or folders changes, or whenever Windows is shut down. SyncBackPro can also synchronize the files and folders between a source and a destination or mirror the contents of the source on the destination site.
SyncBackPro works with a variety of backup sources and destinations. In addition to using folders on the workstation or network, you can also perform backups using FTP or SFTP, e-mail, or removable media such as DVD burners. And the FTP and e-mail options can be used as either a backup source or destination. This is especially useful if you have a Web site managed by a Web host provider and you want to maintain a copy of the contents on your local computer—just create a SyncBackPro profile that periodically backs up your important data from the Web site's FTP server to your workstation.
What impressed me most about SyncBackPro is how it balances its many features with ease of use. With each profile there are countless settings and configuration options at your disposal. Take logging, for example. There are about a dozen choices as for which information is logged, who the log file should be e-mailed to (if anyone), and whether the log should only be e-mailed if certain circumstances unfold. And if the wealth of configuration options isn't sufficient, you can write your own scripts against SyncBackPro's runtime API to perform custom logic. Despite this level of customization, SyncBackPro remains easy to use. Creating a new profile launches a wizard that walks through the basic settings. The options screen offers an "Easy" mode that streamlines the number of configuration options to the most essential ones. And both the online and offline documentation is well written and rife with screen shots, videos, and step-by-step instructions.
A freeware edition of SyncBack is available as well. The freeware version provides basic backup and synchronization, but lacks many of the more advanced features found in SyncBackPro, such as backups to CDs/DVDs, backup via SFTP, and file versioning, among others.
Price: $49.95 per user license

SyncBack
A Blog of Note
When designing a software application it's tempting to plan on adding features to address every potential use case. While the majority of customers have similar requirements, there will always be someone with a demand for a feature that falls outside of your project's initial scope. Therefore, adding more and more features to cover these one-off needs increases the application's market size. While this approach sounds reasonable, it has several drawbacks. For starters, more features means more complexity, more bugs, and more time spent coding, debugging, and testing. It also results in an application with more buttons and menu options and screens and dialog boxes, making for a more challenging user experience.
In many cases, simpler is better. Focus on the core features and make sure that the most common use cases are easy to accomplish. And above all, don't waste your time or clutter your user interface with edge case features. One company that has embraced this sentiment is 37signals, a company that sells Web-based project management, contact management, and team collaboration software. These products all share a common design goal: offer just the features that customers need and nothing they don't.
The staff at 37signals maintains a blog with daily posts on Web design and programming topics, and is a great resource for anecdotes and lessons learned from developers building software that embraces the "less is more" philosophy. The 37signals blog also includes a number of insights on marketing and running a small business. If you currently sell a product or service, or are considering starting your own business, be sure to check out "The benefits of a monthly recurring revenue in tough economic times," where the pros and cons of recurring revenues and one-off sales are examined. "Beware of future creep" is another interesting read, which warns about adding code or modifying the architecture of an application to accommodate features that are not needed now, but may be useful at some point in the future.
In addition to the blog, 37signals published a book in 2006 titled Getting Real, which details their design and programming philosophies over the course of 91 essays. You can buy a paperback or PDF version of the book, or read it entirely online for free. And a new, upcoming book is in the works.
Explore Files and Folders from within the Visual Studio IDE
Visual Studio and Windows Explorer are two programs that are always running on my workstation, and it's not uncommon for me to use these two programs in an interrelated manner. I may be debugging code that logs diagnostic data to an XML file, or working on a program that generates PDFs, ZIP files, or other types of files as output. What's more, certain source control tools, like Subversion and Tortoise SVN, use Windows Explorer as the interface for checking files in and out of the repository. All of these cases require frequent toggling between Visual Studio and Windows Explorer.
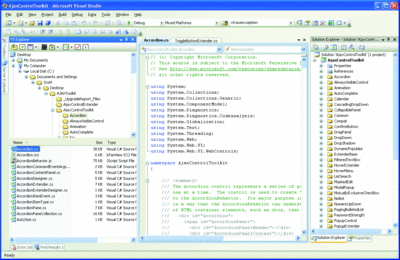
If you find yourself routinely switching between these two programs, check out LogicNP Software's VS Explorer (version 2009), a Visual Studio Add-In that provides a Windows Explorer–like interface directly within Visual Studio. Once VS Explorer is installed, go to the View menu and select the VS Explorer option to display the VS Explorer window, which can be positioned, pinned, and resized like any other window in Visual Studio.
Much like Windows Explorer, the VS Explorer window offers a variety of ways to view files and folders. You can view the file system as a tree, as a list of items, or in a dual-pane configuration that includes both views; the items can be displayed as icons, as a simple or detailed list, or as thumbnails. Right-clicking on a file or folder brings up the same context menu shown in Windows Explorer. What's more, the files displayed in VS Explorer appear with the same overlay icons as they do in Windows Explorer, which is great news if you use TortoiseSVN or other software that adds such overlays.
VS Explorer offers a number of features that are not found in Windows Explorer. For example, with the click of a button you can immediately browse to the Solution Folder of the currently loaded application, or to the active Project folder, output folder, or the selected item in the Solution Explorer window. There is also a button that drops you to the command line in the same directory that's currently selected in the VS Explorer window. You can add an item from the file system into your project by dragging a file or folder from the VS Explorer window to the Solution Explorer window. Copy the full path of a file or folder by right-clicking it in the VS Explorer window and choosing "Copy Path to Clipboard." And adding a reference to an assembly has never been easier. Simply browse to the .exe or .dll file, right-click on the file, and choose the "Add as Reference" option from the context menu.
VS Explorer works with the full versions of Visual Studio 2005 and Visual Studio 2008.
Price: $35 per user license

VS Explorer
Tools for Multiple Monitors
Several independent studies have found a high correlation between developer productivity and multiple monitors. Developers are commonly working on tasks that involve simultaneously processing information from two (or more) windows, such as a running application and the debugger. While Microsoft Windows has long supported multiple monitors, there is a noticeable lack of built-in tools for managing windows in multiple-monitor environments. Instead, developers who use multiple monitors must turn to third-party and open-source tools.
One must-have tool for multiple monitor setups is UltraMon by Realtime Soft, which extends the taskbar across all monitors and adds buttons for moving windows between monitors, along with other enhancements. UltraMon was reviewed in the December 2007 issue ("Live Chat, Code Conversion, Multiple Monitors, and More").
Another indispensible tool is WinSplit Revolution (version 9.02), a free utility created by Raphael Lencrerot that adds a number of keyboard shortcuts for moving, resizing, and positioning windows. By default, the WinSplit Revolution keyboard shortcuts take the form Ctrl+Alt+key, where different keys result in different behavior. For example, Ctrl+Alt+Left Arrow moves the current window one monitor to the left, while Ctrl+Alt+Right Arrow moves it one monitor to the right. Hitting Ctrl+Alt plus a number from the numeric keypad repositions the window in the current screen. Ctrl+Alt+1 resizes and repositions the current window so that it occupies the bottom left quadrant of the current screen. Ctrl+Alt+5 resizes the window so that it fills the entire screen, whereas Ctrl+Alt+9 repositions the window in the upper right quadrant.
With multiple monitors it's also fun to decorate your desktop. Do you want a single image stretched across monitors, or a separate image per screen? To manage your desktop backgrounds in a multi-monitor environment, check out John's Background Switcher (version 3.6), created by John Conners. With John's Background Switcher you can choose a specific background image for each monitor or define a collection of images from which random images are chosen. This collection of images can come from pictures on your computer; from picture sharing and social network Web sites like Flickr, Facebook, or Picasa, among others; and even from RSS feeds. What's more, the images selected for display can be scaled to fit the screen or combined in a variety of montage styles.
WinSplit Revolution: Free
winsplit-revolution.com
John's Background Switcher: Free
johnsadventures.com/software/backgroundswitcher
Send your questions and comments for Scott to toolsmm@microsoft.com.
Scott Mitchell, author of numerous books and founder of 4GuysFromRolla.com, is an MVP who has been working with Microsoft Web technologies since 1998. Scott is an independent consultant, trainer, and writer. Reach him at Mitchell@4guysfromrolla.com or via his blog at ScottOnWriting.NET.