Note
Access to this page requires authorization. You can try signing in or changing directories.
Access to this page requires authorization. You can try changing directories.
Introduction
This walkthrough will show you how to build a data provider and corresponding query that can be used by an Operations Manager 2012 (OM12) Widget that can be used in a dashboard created in the Operations Console. In this walk through you will learn the following:
- Create a [DataProvider] class that contains a [DataCommand] public method. Once the assembly that contains this class is registered in a management pack and is deployed to the server when the management pack is installed, a new dataProvider is then available for access via a query.
- Create a class that performs as a “query”. It uses the IDataGateway interface to access the dataProvider that was just implemented. This code, which runs on the client side, provides a public property titled Output. Visual components can bind to this property to receive the data supplied by the dataProvider.
1. Create Data Provider
The DataProvider component contains:
- Code to retrieve the data it is designed to provide. This data can be retrieved via the SDK, the Data Warehouse, or an external data source.
- One or more data commands that can be called to access the data.
The code must use attributes on classes and methods to identify the dataProvider’s entry points.
1.1 Create the DataProvider Project
- Start Visual Studio and select File | New | Project.
- Select Visual C#.
- In the right pane, select Class Library.
- Name the project SimpleDataProvider and click OK.
- Delete the Class1.cs file that was automatically added to the project.
- Add a new Class:
- Right click the project title and select Add | New Item.
- Select Class.
- Name the class SimpleProvider.cs and click Add.
- Add a reference to Microsoft.EnterpriseManagement.Presentation.Core assemblies:
- Copy Microsoft.EnterpriseManagement.Presentation.Core.dll from the SimpleDataProvider\bin\Debug folder of the sample files for this walkthrough.
- Right-click References in the Solution Explorer and select Add Reference.
- Select the Browse tab.
- Navigate to the assembly and then click OK.
1.2 Add DataProvider Class
It is possible to create multiple dataProvider classes in the assembly. Each dataProvider class can have one or more data commands defined. In this example only a single dataProvider will be created.
Replace the code in SimpleProvider.cs with the following:
using System;
using System.Collections.Generic;
using System.Linq;
using System.Text;
using Microsoft.EnterpriseManagement.Presentation.DataAccess;

namespace SimpleDataProvider
{
    [DataProvider]
    public class  SimpleProvider
    {

    }
}
Notable lines in this code include:
- Line 1: Creates a local data structure that will be used to receive data from OM12.
1.3 Add Data Command
A data provider must have at least one data command which retrieves the data provided by the data provider. The data command must return one of the following:
- Simple data type
- Collection of a simple data type
- IDataObject
- Collection of an iDataObject
The command method name can be whatever you choose and it can take whatever parameters you require. Note that the method must be marked with the [DataCommand] attribute. In this sample the dataProvider does not access any SCOM data or external data. To keep this sample as simple as possible the data provide generates a simple List of strings. You could replace this code with code that accesses a database or some other source of data.
Add the following code to SimpleProvider.cs within the SimpleProvider class:
[DataCommand]
  public ICollection<string> GetStrings()
  {
      return new List<string> { "Hello",  "World", "a", "b", "c" };
  }
Notable lines in this code include:
- Line 1: Identifies the method as a DataCommand.
- Line 4: Generates the data and returns a List of strings.
2 Add Data Provider to Management Pack
2.1 Create the Management Pack project
- Create the project:
- Right click on the solution and select Add | New Project.
- Expand Management Pack and select Operations Manager.
- In the right pane, select Operations Manager 2012 Add-on Management Pack.
- Name the project DataProviderPack and click OK.
- Add a Management Pack fragment:
- Right click on DataProviderPack project in Solution Explorer and select Add | New Item.
- Select Empty Management Pack Fragment.
- Name the fragment DataProvider.mpx and click Add.
2.2 Add configuration for the assembly:
Add the following code to DataProvider.mpx:
<ManagementPackFragment>
  <Categories>
    <Category
      ID="Microsoft.EnterpriseManagement.Monitoring.DataProviders.Category"
      Target="SimpleDataProvider"
      Value="Visualization!Microsoft.SystemCenter.Visualization.DataProviderAssembly"/>
  </Categories>
  <Resources>
    <Assembly
      ID="SimpleDataProvider"
      QualifiedName="SimpleDataProvider, Version=1.0.0.0, Culture=neutral, PublicKeyToken=null"
      FileName="SimpleDataProvider.dll"
      Accessibility="Public"
      HasNullStream="false"/>
  </Resources>
</ManagementPackFragment>
Notable lines in this code include:
- Line 4: Identifies the SimpleDataProvider component as a DataProvider.
- Lines 10-14: Identify the assembly that contains the dataProvider.
2.3 Add reference to assembly
- Right click References and select Add Reference.
- On the Projects tab, select SimpleDataProvider and click OK.
- Right click SimpleDataProvider and select Properties.
- Change the value for Package To Bundle to True.
3 Create Query
The query component, like the data provider component, provides no visualization. Its purpose is to pull data from a data provider. The data provider component runs on the server while the query component runs on the client.
3.1 Create a Query Project
Create the project:
- Right click on the solution and select Add | New Project.
- Select Visual C#.
- In the right pane, select Class Library.
- Name the project SimpleQueryWPF and click OK.
Delete the Class1.cs file that was automatically added to the project.
Add a new Class:
- Right click the project title and select Add | New Item.
- Select Class.
- Name the class Query.cs and click Add.
Add references to the following assemblies:
- **System.ComponentModel.Composition **
- Right-click References in the Solution Explorer and select Add Reference.
- On the .NET tab locate the assembly and then click OK.
Add references to the following assemblies:
- Microsoft.EnterpriseManagement.CompositionEngine
- Microsoft.EnterpriseManagement.CompositionEngine.Extensibility
- Microsoft.EnterpriseManagement.Presentation.Core
- ****Microsoft.Practices.Unity
- Copy Microsoft.EnterpriseManagement.Presentation.Core.dll from the SimpleQueryWPF\bin\Debug folder of the sample files for this walkthrough.
- Right-click References in the Solution Explorer and select Add Reference.
- Select the Browse tab.
- Navigate to the assembly and click OK.
Add the following directives to *Query.cs:
*using System.ComponentModel.Composition; using System.ComponentModel; using Microsoft.EnterpriseManagement.CompositionEngine; using Microsoft.Practices.Unity; using Microsoft.EnterpriseManagement.Presentation.DataAccess;Add the following code to Query.cs inside the Query class:*
*[Export] [PartCreationPolicy(CreationPolicy.NonShared)] [ComponentBuildUpRequired] public class SimpleQuery: INotifyPropertyChanged, INotifyInitialized { private bool initialized; private ICollection<string> output; private int maxItemCount = -1; public event PropertyChangedEventHandler PropertyChanged; [Dependency] public IDataGateway Gateway { get; set; } public ICollection<string> Output { get { return this.output; } set { this.output = value; this.OnPropertyChanged("Output"); } } public int MaxItemCount { get { return this.maxItemCount; } set { this.maxItemCount = value; this.RunQuery(); this.OnPropertyChanged("MaxItemCount"); } } private void OnPropertyChanged(string property) { if (this.PropertyChanged != null) { this.PropertyChanged(this, new PropertyChangedEventArgs(property)); } } public void Notify() { this.initialized = true; this.RunQuery(); } private void RunQuery() { if (this.initialized && this.maxItemCount > 0) { //Data Access - Call DataProvider var dataObjectsCommand = new AsyncDataCommand<string>("DemoDataProvider!SimpleProvider/GetStrings"); dataObjectsCommand.CommandCompleted += OnDataCommandComplete; this.Gateway.ExecuteAsync(dataObjectsCommand); } } private void OnDataCommandComplete( object sender, AsyncDataCommandCompletedEventArgs<IEnumerable<string>> args) { if (args.Error == null) { List<string> list = new List<string>(); int count = this.maxItemCount; foreach (string s in args.Result) { if (count == 0) { break; } list.Add(s); count--; } this.Output = list; } } }Notable lines in this code include:
- Lines 1-3: Class attributes that must be assigned to the class.
- Line 6: Declares the bool variable initialized. The design of this class is that the query should not return data unless this variable is true. This variable is set to true in the Notify() method, which is called by OM12() when all bindings have been initialized.
- Line 13: Declares a variable of the type IDataGateway. The IDataGateway class is used to make server side calls.
- Lines 15-27: Define the public property OutPut. This is a required property for a query.
- Lines 59-71: Make the call to the dataProvider.
3.2 Create a Silverlight Query Project
The Silverlight version of the SimpleQuery will share the xaml and code behind from the WPF project.
Create the project:
- Right click on the solution and select Add | New Project.
- Expand Visual C# and select Silverlight.
- In the right pane, select Silverlight Class Library.
- Name the project SimpleQuerySL and click OK.
- When prompted for the Silverlight version, select Silverlight 4 and click OK.
Delete the Class1.cs file that was automatically added to the project.
Add a link to the query in the WPF project:
- Right click the project title and select Add | Existing Item.
- Navigate to the SimpleQueryWPF folder.
- Select Query.cs.
- Click the dropdown on the Add button and select Add as Link.
Add a reference to the following assemblies**:**
- System.ComponentModel.Composition
- Right-click References in the Solution Explorer and select Add Reference.
- On the .NET tab locate the assembly and then click OK.
Add references to the Silverlight version of the following assemblies.
- Microsoft.EnterpriseManagement.CompositionEngine
- Microsoft.EnterpriseManagement.CompositionEngine.Extensibility
- Microsoft.EnterpriseManagement.Presentation.Core
- Microsoft.Practices.Unity.Silverlight
- Copy Microsoft.EnterpriseManagement.Presentation.Core.dll from the SimpleQuerySL\bin\Debug folder of the sample files for this walkthrough.
- Right-click References in the Solution Explorer and select Add Reference.
- Select the Browse tab.
- Navigate to the assembly and click OK.
4 Create Visualization
A user control is needed to display the data obtained from the data provider.
4.1 Create Control Project
Create the project:
- Right click on the solution and select Add | New Project.
- Select Visual C#.
- In the right pane, select WPF User Control Library.
- Name the project TestWPF and click OK.
- Right click the TestWPF project and select Properties.
- In Target framework, select .NET Framework 4.
Delete the UserControl1.xaml file that was automatically added to the project.
Add a new user control:
- Right click the project title and select Add | New Item.
- Select Visual C#.
- In the right pane, select User Control (WPF).
- Name the user control TestControl.xaml and click Add.
Add references to the following assemblies:
- System.ComponentModel.Composition
- Right-click References in the Solution Explorer and select Add Reference.
- On the .NET tab locate the assembly and then click OK.
Add references to the following assemblies:
- Microsoft.EnterpriseManagement.CompositionEngine
- Microsoft.EnterpriseManagement.Presentation.Core
- Copy Microsoft.EnterpriseManagement.Presentation.Core.dll from the TestWPF\bin\Debug folder of the sample files for this walkthrough.
- Right-click References in the Solution Explorer and select Add Reference.
- Select the Browse tab.
- Navigate to the assembly and click OK.
4.2 Configure the User Control
Replace the XML in TestControl.xaml with the following*:
*<UserControl x:Class="TestWPF.TestControl" xmlns="http://schemas.microsoft.com/winfx/2006/xaml/presentation" xmlns:x="http://schemas.microsoft.com/winfx/2006/xaml" xmlns:d="http://schemas.microsoft.com/expression/blend/2008" xmlns:mc="http://schemas.openxmlformats.org/markup-compatibility/2006" mc:Ignorable="d" d:DesignHeight="115" d:DesignWidth="395"> <Grid x:Name="LayoutRoot" Background="White" Height="87" Width="372"> <Grid.ColumnDefinitions> <ColumnDefinition Width="Auto"/> <ColumnDefinition Width="*"/> </Grid.ColumnDefinitions> <TextBlock Grid.Column="0">List from SimpleDataProvider: </TextBlock> <ListBox x:Name="listBox" Grid.Column="1"></ListBox> </Grid> </UserControl>Notable lines in this code include:*
*- Lines 15: Places a list box control on the page. This list box will display the set of strings received from the data provider.
Replace the contents of the code behind TestControl.xaml.cs with the following code: *
*using System; using System.Collections.Generic; using System.Linq; using System.Net; using System.Windows; using System.Windows.Controls; using System.Windows.Documents; using System.Windows.Input; using System.Windows.Media; using System.Windows.Media.Animation; using System.Windows.Shapes; using System.ComponentModel; using System.ComponentModel.Composition; using Microsoft.EnterpriseManagement.CompositionEngine; namespace TestWPF { [Export] [PartCreationPolicy(CreationPolicy.NonShared)] public partial class TestControl : UserControl, INotifyPropertyChanged { private ICollection<string> _stringList; public ICollection<string> StringList { get { return this._stringList; } set { if (value != null) { this._stringList = value; this.listBox.ItemsSource = value; } } } public TestControl() { InitializeComponent(); } public event PropertyChangedEventHandler PropertyChanged; protected void OnPropertyChanged(string propertyName) { if (PropertyChanged != null) { PropertyChanged(this, new PropertyChangedEventArgs(propertyName)); } } } }Notable lines in this code include:
- Line 23: The user control must inherit from the INotifyPropertyChanged class.
- Lines 26 – 44: Provide the StringList property that will receive the data from the data provider.
- Lines 52 – 60: Provide the PropertyChangedEventHandler, which is required because the class inherits from INotifyPropertyChanged.
4.3 Create a Silverlight user control project
The Silverlight version of the UserControl will share the xaml and code behind from the WPF project.
Create the project:
- Right click on the solution and select Add | New Project.
- Expand Visual C# and select Silverlight.
- In the right pane, select Silverlight Class Library.
- Name the project TestSL and click OK.
- When prompted for the Silverlight version, select Silverlight 4 and click OK.
Delete the Class1.cs file that was automatically added to the project.
Add a link to the query in the WPF project:
- Right click the project title and select Add | Existing Item.
- Navigate to the TestWPF folder.
- Select TestControl.xaml.
- Click the dropdown on the Add button and select Add as Link.
Add a reference to the following assemblies:
**System.ComponentModel.Composition
**
- Right-click References in the Solution Explorer and select Add Reference.
- On the .NET tab locate the assembly and then click OK.
Add references to the Silverlight version of the following assemblies.
- Microsoft.EnterpriseManagement.CompositionEngine
- Microsoft.EnterpriseManagement.CompositionEngine.Extensibility
- ****Microsoft.EnterpriseManagement.Presentation.Core
- Copy Microsoft.EnterpriseManagement.Presentation.Core.dll from the TestSL\bin\Debug folder of the sample files for this walkthrough.
- Right-click References in the Solution Explorer and select Add Reference.
- Select the Browse tab.
- Navigate to the assembly and then click OK.
5 Configure Management Pack
The management pack needs to define the following components:
- Data provider
- Query to access the data provider from Silverlight code
- Query to access the DataProvider from WPF code
- Silverlight UserControl to receive and display the data from the DataProvider
- WPF UserControl to receive and display the data from the DataProvider
- A composite component that will act as a dashboard to host the Silverlight/WPF UserControl
5.1 Add Management Pack Fragment for the Query
Right click on DataProviderPack project in Solution Explorer and select Add | New Item.
Select Empty Management Pack Fragment.
Name the fragment Query.mpx and click Add.
Replace the XML of the fragment with the following:
<ManagementPackFragment SchemaVersion="2.0" xmlns:xsd="http://www.w3.org/2001/XMLSchema">
  <Presentation>
    <ComponentTypes>
      <ComponentType ID="MySimpleQuery" Accessibility="Public">
        <Property Name="Output" Type="xsd://string[]" BindingDirection="Out"/>
        <Property Name="MaxItemCount" Type="xsd://int" BindingDirection="In"/>
      </ComponentType>
    </ComponentTypes>
  </Presentation>
</ManagementPackFragment>
Notable lines in this code include:
- Lines 4-7: Defines the query that will be used by the Silverlight and WPF components.
5.2 Add Management Pack Fragment for the Silverlight Query
Right click on DataProviderPack project in Solution Explorer and select Add | New Item.
Select Empty Management Pack Fragment.
Name the fragment QuerySL.mpx and click Add.
Replace the XML of the fragment with the following:
<ManagementPackFragment SchemaVersion="2.0" xmlns:xsd="http://www.w3.org/2001/XMLSchema">
  <Categories>
    <Category
      ID="SilverlightCategory"
      Target="SilverlightAssembly"
      Value="Visualization!Microsoft.SystemCenter.Visualization.SilverlightComponentAssembly"/>
  </Categories>

  <Presentation>
    <ComponentImplementations>
      <ComponentImplementation
        TypeId="MySimpleQuery"
        ID="MySimpleQuerySLImplementation"
        Accessibility="Public"
        Platform="Silverlight">
        <Unit>
          <ContractFactory>SimpleQuerySL.SimpleQuery</ContractFactory>
        </Unit>
      </ComponentImplementation>
    </ComponentImplementations>
  </Presentation>

  <Resources>
    <Assembly
      ID="SilverlightAssembly"
      QualifiedName="SimpleQuerySL, Version=1.0.0.0, Culture=neutral, PublicKeyToken=null"
      FileName="SimpleQuerySL.dll"
      Accessibility="Public"
      HasNullStream="false"/>
  </Resources>
</ManagementPackFragment>
Notable lines in this code include:
- Lines 3-6: Defines a category for the assembly using the Silverlight visualization from the library.
- Lines 11-19: Defines the implementation for the Silverlight query identifying it as a as a unit component contained in an assembly.
- Lines 24-29: Defines the assembly for the data provider referring to the compiled DLL.
Right click References and select Add Reference.
On the Projects tab, select SimpleDataProvider and click OK.
Right click QuerySL and select Properties.
Change the value for Package To Bundle to True.
5.3 Add Management Pack Fragment for the Silverlight User Control
Right click on DataProviderPack project in Solution Explorer and select Add | New Item.
Select Empty Management Pack Fragment.
Name the fragment UserControlSL.mpx and click Add.
Replace the XML of the fragment with the following:
<ManagementPackFragment SchemaVersion="2.0" xmlns:xsd="http://www.w3.org/2001/XMLSchema">
  <Categories>
    <Category
      ID="SLUnitComponentsCategory"
      Target="SLUnitComponentsAssembly"
      Value="Visualization!Microsoft.SystemCenter.Visualization.SilverlightComponentAssembly"/>
  </Categories>

  <Resources>
    <Assembly
      ID="SLUnitComponentsAssembly"
      QualifiedName="TestSL, Version=1.0.0.0, Culture=neutral, PublicKeyToken=null"
      FileName="TestSL.dll"
      Accessibility="Public"
      HasNullStream="false"/>
  </Resources>
</ManagementPackFragment>
Notable lines in this code include:
- Lines 3-6: Defines a category for the assembly using the Silverlight visualization from the library.
- Lines 10-15: Defines the implementation for the Silverlight query identifying it as a as a unit component contained in an assembly.
Right click References and select Add Reference.
On the Projects tab, select TestSL and click OK.
Right click TestSL and select Properties.
Change the value for Package To Bundle to True.
5.4 Add Management Pack Fragment for the WPF Query
Right click on DataProviderPack project in Solution Explorer and select Add | New Item.
Select Empty Management Pack Fragment.
Name the fragment QueryWPF.mpx and click Add.
Replace the XML of the fragment with the following:
<ManagementPackFragment SchemaVersion="2.0" xmlns:xsd="http://www.w3.org/2001/XMLSchema">
  <Categories>
    <Category
      ID="WPFCategory"
      Target="WPFAssembly"
      Value="Visualization!Microsoft.SystemCenter.Visualization.WpfComponentAssembly"/>
  </Categories>

  <Presentation>
    <ComponentImplementations>
      <ComponentImplementation
        TypeId="MySimpleQuery"
        ID="MySimpleQueryWPFImplementation"
        Accessibility="Public"
        Platform="Wpf">
        <Unit>
          <ContractFactory>SimpleQueryWPF.SimpleQuery</ContractFactory>
        </Unit>
      </ComponentImplementation>
    </ComponentImplementations>
  </Presentation>

  <Resources>
    <Assembly
      ID="WPFAssembly"
      QualifiedName="SimpleQueryWPF, Version=1.0.0.0, Culture=neutral, PublicKeyToken=null"
      FileName="SimpleQueryWPF.dll"
      Accessibility="Public"
      HasNullStream="false"/>
  </Resources>
</ManagementPackFragment>
Notable lines in this code include:
- Lines 3-6: Defines a category for the assembly using the WPF visualization from the library.
- Lines 11-19: Defines the implementation for the WPF query identifying it as a as a unit component contained in an assembly.
- Lines 24-29: Defines the assembly for the data provider referring to the compiled DLL.
Right click References and select Add Reference.
On the Projects tab, select SimpleQueryWPF and click OK.
Right click SimpleQueryWPF and select Properties.
Change the value for Package To Bundle to True.
5.5 Add Management Pack Fragment for the WPF User Control
Right click on DataProviderPack project in Solution Explorer and select Add | New Item.
Select Empty Management Pack Fragment.
Name the fragment UserControlWPF.mpx and click Add.
Replace the XML of the fragment with the following:
<ManagementPackFragment SchemaVersion="2.0" xmlns:xsd="http://www.w3.org/2001/XMLSchema">
  <Categories>
    <Category
      ID="WPFUnitComponentsCategory"
      Target="WPFUnitComponentsAssembly"
      Value="Visualization!Microsoft.SystemCenter.Visualization.WpfComponentAssembly"/>
  </Categories>

  <Resources>
    <Assembly
      ID="WPFUnitComponentsAssembly"
      QualifiedName="TestWPF, Version=1.0.0.0, Culture=neutral, PublicKeyToken=null"
      FileName="TestWPF.dll"
      Accessibility="Public"
      HasNullStream="false"/>
  </Resources>
</ManagementPackFragment>
Notable lines in this code include:
- Lines 3-6: Defines a category for the assembly using the WPF visualization from the library.
- Lines 10-15: Defines the implementation for the WPF query identifying it as a as a unit component contained in an assembly.
Right click References and select Add Reference.
On the Projects tab, select TestWPF and click OK.
Right click TestWPF and select Properties.
Change the value for Package To Bundle to True.
5.6 Add Management Pack Fragment for the Composite Component
Right click on DataProviderPack project in Solution Explorer and select Add | New Item.
Select Empty Management Pack Fragment.
Name the fragment CompositeComponent.mpx and click Add.
Replace the XML of the fragment with the following:
<ManagementPackFragment SchemaVersion="2.0" xmlns:xsd="http://www.w3.org/2001/XMLSchema">
  <Presentation>
    <ComponentTypes>
      <ComponentType ID="TestControl" Accessibility="Public">
        <Property Name="StringList" Type="xsd://string[]" BindingDirection="In"/>
      </ComponentType>
      <ComponentType ID="TestControlHost" Accessibility="Public"/>
    </ComponentTypes>

    <ComponentReferences>
      <ComponentReference
        ID="TestControlHostReference"
        Accessibility="Public"
        TypeID="TestControlHost"
        Parent="SC!Microsoft.SystemCenter.Monitoring.ViewFolder.Root"/>
    </ComponentReferences>

    <ComponentImplementations>
      <ComponentImplementation
        TypeId="TestControl"
        ID="TestControlImplementation"
        Accessibility="Public"
        Platform="All">
        <Unit>
          <ContractFactory>TestDataProviderControl.TestControl</ContractFactory>
        </Unit>
      </ComponentImplementation>
      <ComponentImplementation
        TypeId="TestControlHost"
        ID="TestControlHostImplementation"
        Accessibility="Public"
        Platform="All">
        <Composite>
          <Variable Id="SimpleData" Type="xsd://string[]"/>
          <Component TypeId="Visualization!Microsoft.SystemCenter.Visualization.ComponentContainer">
            <Binding PropertyId="Visual">
              <Component TypeId="TestControl">
                <Binding PropertyId="StringList">
                  <Reference>$Variable/SimpleData$</Reference>
                </Binding>
              </Component>
            </Binding>
            <Binding PropertyId="Objects">
              <Component TypeId="MySimpleQuery">
                <Binding PropertyId="MaxItemCount">
                  <SimpleValue Type="xsd://int" Value="10"/>
                </Binding>
                <Binding PropertyId="Output">
                  <Reference>$Variable/SimpleData$</Reference>
                </Binding>
              </Component>
            </Binding>
          </Component>
        </Composite>
      </ComponentImplementation>
    </ComponentImplementations>
  </Presentation>
</ManagementPackFragment>
Notable lines in this code include:
- Line 15: Places the host component at the root level of the Monitoring tree.
- Lines 24-26: Identifies the user control being provided from an assembly.
- Line 34: Provides a local variable that will be used to bind the user control to the output from the query.
- Lines 38-40: Bind the local variable SimpleData to the public property of the user control StringList.
- Lines 48-50: Bind the output of the query Output to the local variable SimpleData.
6 Install and Test Management Pack
To install the SimpleDataProvider management pack from Visual Studio, press F5 or select Debug | Start debugging.
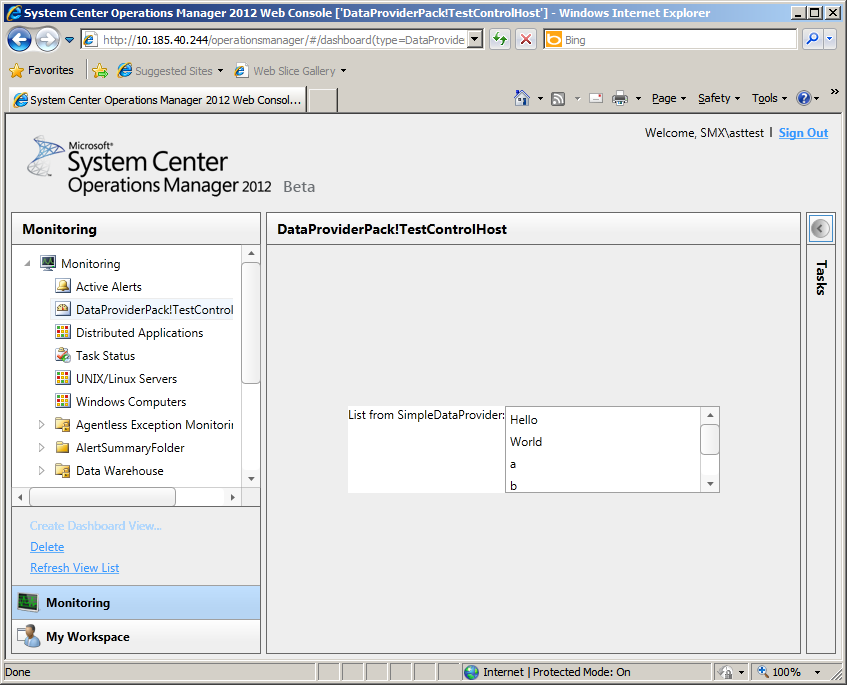
The management pack will be installed, and the component will be in the Monitoring Tree with the title DataProviderPack!TestControl.Click on the title to see the component displayed in the right pane.
The component should appear similar to the following image: