Installing and Configuring a LunaSA Hardware Security Module (HSM) with FIM CM 2010
Connecting to the HSM Using a Serial Connection
These instructions are written for using the free PuTTY terminal client software.
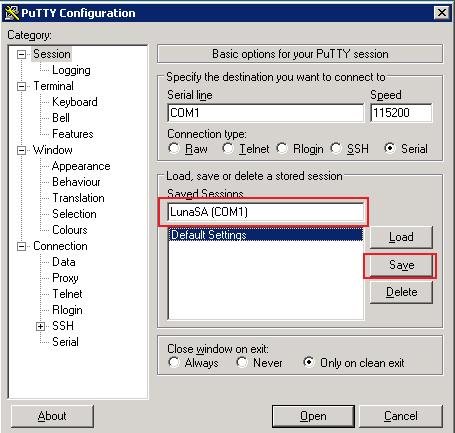
- In Session tab, select Serial as connection type and speed as 115200.
- In Terminal -> Keyboard tab, select Control-H and VT100+
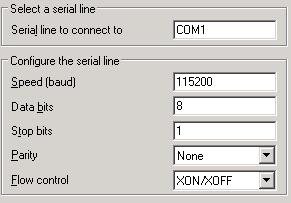
- In Connection -> Serial tab, verify the following
- Optionally, you can go use the Session tab and save your config
Setting up HSM for Windows
Warning: The following steps walk you through resetting your HSM (also known as zeroing). If you do this and there are existing keys on the HSM, you will lose them all. Only perform these steps if you do not have existing keys on the HSM or if you know that you do not need any of the existing keys. Ensure all keys that you need are backed up in a secure location.
- Connect to the HSM through the serial port (this is crucial) through PuTTY. If you see a blank screen, you might need to press ENTER a few times to see the login prompt.
- Enter username. Failing to login 3 times will force factory resetting the HSM.
- After a few failed attempts, you see a prompt to reset the HSM
- Type quit and press ENTER to skip recovering and type proceed to zeroize the HSM.
- Login again with factory default username and password.
- You will be forced to change the password.
Configure Network Connection
Type set hostname hostname
- Replace hostname in the command with the actual device name that you want to use for the HSM.
Type net domain your_fully_qualified_domain_name and then press ENTER
-
- Replace your_fully_qualified_domain_name with your organization's actual domain name, such as corp.contoso.com.
Type net interface delete -dev eth0 and then press ENTER
- Ignore the reported error
Type service restart network and then press ENTER
Type net show to see the configuration setup. This includes the hostname, domain name, and IP information.
To set the device to use DHCP, type net interface dhcp -device eth0 and then press ENTER.
Type proceed and press ENTER confirm the change.
- Consider reserving a static IP address for the HSM.
- Add an A (host) Record on the DNS server for the HSM.
Type net interface delete -device eth0 and then press ENTER.
Type net dns nameserver IP_Address (replace IP_Address with the one of the DNS server for your domain) and then press ENTER.
Type net dns searchdomain your_fully_qualified_domain_name and then press ENTER.
- Replace the bold italicized text in the command with the appropriate domain name.
- Type net interface static -device eth0 -ip IP_Address -netmask Subnet_Mask -gateway IP_Address_of_Gateway and then press ENTER.
- Replace the bold italicized text in the command above with the appropriate IP settings.
Tyep proceed and then press ENTER to confirm.
Type net ping domain_name and then press ENTER to test the connection.
- Replace the bold italicized text in the command above with the appropriate domain name.
Generate a New LunaSA Server Cert
- Type sysconf regenCert and then press ENTER.
- Type proceed and then press ENTER to confirm.
- Note: Ensure DNS is working before running this command. If there is no DNS in the environment, type sysconf regenCert IP_Address and then press ENTER. Replace the bold italicized text in the command with the IP address.
- Type ntls bind eth0 and then press ENTER.
- Type proceed and then press ENTER to confirm.
Initialize the HSM
- Plugin the keypad. When you see SCP mode… Awaiting command… Type hsm init -label MyLuna and then press ENTER.
- Type proceed and then press ENTER to confirm.
- Plugin the Blue PED keys to the keypad
- Follow the instructions on screen. Enter the pin for the Blue key. You may be prompted to remove all data. If you are initially setting this up, then that is a safe operation. Otherwise, check to ensure there is not already valuable information on the Blue key.
- You will be prompt to plugin the Red key. Follow the on-screen instructions.
Create a Partition on the HSM
- Type hsm login and then press ENTER to confirm (use the Blue key)
- Type partition create -partition CLMPartition1 and then press ENTER to confirm
- Type proceed and then press ENTER to confirm.
- Plugin the Black key and follow the on screen instructions. You might be asked to use a group PED Key, choose NO
Important: Write down the key on screen. It will only be shown once.

Setup the Network Trust Link (NTL)
- Install 64-bit version of “LunaSA Client software v4.3” on the client (FIM CM Server)
- Only install CSP, the JSP is not required.
- You may need to restart the FIM CM Server.
- On the client (FIM CM Server), open a Command Prompt and navigate to type CD %program files%\LunaSA and then press ENTER.
- Type ctp admin@CLMLuna:server.pem. (notice the DOT at the end)
- Type vtl addServer -n CLMLuna -c server.pem
- Type vtl createCert -n domainname and then press ENTER.
- Warning: Type only the domainname and not the FQDN.
- You should see that domainname.pem (private key) and domainname.pem (cert) are generated under .\cert\client directory.
- Type ctp cert\client\domainname.pem admin@CLMLuna and then press ENTER.
- Replace the bold italicized text in the command with the appropriate information.
- On the HSM, type client register -c CLMServer -hostname domainname and then press ENTER.
Important note about De-Registration: If you have multiple Luna appliances connected and registered with a client and you de-register that client from one of the Luna appliances, then you must also de-register that Luna appliance on the client side. Failure to do so will result in a “Broken pipe” error, which indicates an incomplete registration.
Assign the Partition to the Client
- On the HSM, type client assignPartition -client CLMServer -partition CLMPartition1 and then press ENTER.
- Verify the settings on the HSM, type client show -client CLMServer and then press ENTER.
- Verify the settings on the client (CLMServer), type vtl verify


Activate the Partition with FIM CM Partition
- On the HSM, type partition changePolicy -partition CLMPartition1 -policy 22 -value 1 and then press ENTER.
- Type partition changePolicy -partition CLMPartition1 -policy 23 -value 1 and then press ENTER.

3. Type partition activate -partition CLMPartition1 and then press ENTER.
Register LunaCSP on FIM CM Server
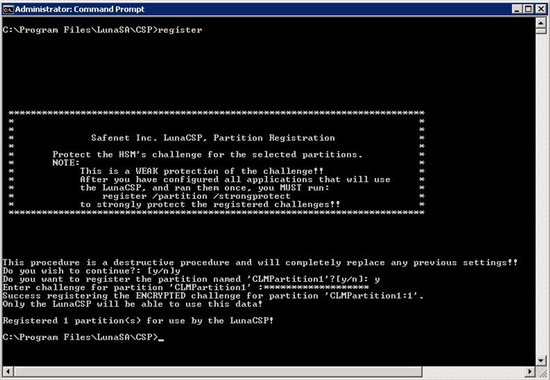
- On the FIM CM server, from the \Program Files\LunaSA\CSP directory, type register
- Type y and then press ENTER.
- At "Do you want to register the partition named 'CLMPartition1'?[y/n] prompt, type y and then press ENTER.
- At Enter challenge for partition 'CLMPartition1' : enter the 16 digit partition password and then press ENTER. A success message is displayed regarding the registration of the ENCRYPTED challenge for partition 'CLMPartition1:1'.
Installing a CA to Support LunaSA HSM
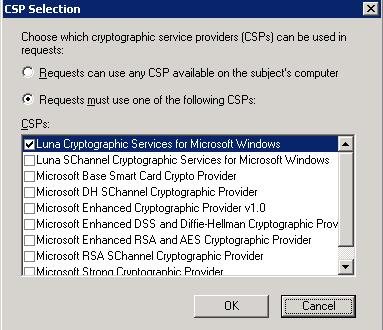
When you install a Certification Authority (CA) using an HSM, you must use the appropriate CSP (as shown in the figure).

Test the HSM using MMC Snap-In
- Open the CA MMC
- Right click Certificate Templates and then click Manage
- Right click on User, and then click Duplicate
- Select Windows 2003 Server, Enterprise Edition
-
- Change the Template display name to HSM User
- In the Request Handling tab, clear Allow private key to be exported and then click CSPs
- Ensure that only Luna Cryptographic Services for Microsoft Windows is selected.
- Click OK on all open dialog boxes to create the template.
- In the Certification Authority MMC, right click Certificate Templates, click New, and then click Certificate Template to Issue. Issue the HSM User Template.
- Run certmgr.msc as an Administrator. To do so, click Start. Type certmgr.msc and then right-click certmgr.msc when it appears in the Start menu and then click Run as administrator.
- In CertMgr.msc, right-click Personal, click All Tasks, and then click Request New Certificate.
- Select the HSM User certificate.

Configuring FIM CM to use the HSM
- Run the Certificate Management Config Wizard. The typical options should be selected (see Test Lab Guide: Demonstrate FIM CM for basic overview).
- Except: When configuring Certificates, be sure that use the Luna certificates when performing the configuration. This will generate the cert from the hsm and import it to the agent’s personal store and add the thumbprint in web.config.
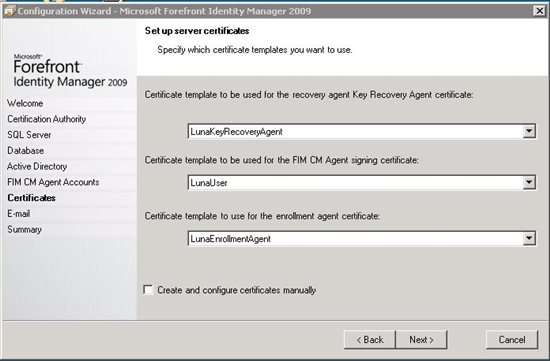
Note: If you use this method, you do not need to login using each account manually and then request the certificate, and then insert the thumbprint of each in the web.config file.
Post Configuration Testing
- Use a Manager account to Enroll Subscriber, which involves using the clmEnrollAgent.
- Run a recovery operation, which involves using the clmKRAgent account.
- Generate a Server Key
- Duplicate default User template as SKGUser
- Property of SKGUser
- Request Handling tab, select Archive subject’s encryption private key
- Publish SKGUser from the CA so others can enroll for it
- Add SKGUser to a profile template (you probably want to ONLY include SKGUser)
- Click Change General Settings in the profile template
- Check Generate encryption keys on the server
- Select custom server key generator
- Server key generator type, “Microsoft.Clm.BusinessLayer.StrongSkg, Microsoft.Clm.BusinessLayer”
- Server key generator data, “Luna Cryptographic Services for Microsoft Windows|20”. The format is “<CSP Name>|<seed for random number generator>”
- If you run into issues, check the Web.config file for <add name="Microsoft.Clm.BusinessLayer.Skg" value="4" /> (change 0 to 4)
- Run iisreset