Loading GeoLite City Data Into SQL Server Using Safe Software's Feature Manipulation Engine (FME)

Author: Ed Katibah (Microsoft)
You can use Safe Software's Feature Manipulation Engine (FME) to load the GeoLite City data files into SQL Server. This tutorial assumes that you have access to SQL Server 2008 or later and Safe Software's FME. For this tutorial SQL Server 2012 and FME Desktop 2013 were used. The GeoLite City data files...
- GeoLiteCity-Blocks.csv
- GeoLiteCity-Location.csv
...will be used. Both can be downloaded for free from the MaxMind GeoLite website.
Create a new database
The first order of business is to create a database to hold the GeoLite tables. For this exercise, a database, GeoLite, was created in SQL Server Management Studio (SSMS).
CREATE DATABASE GeoLite
Load the GeoLiteCity-Block.csv file
Add Reader
The next item is to load the GeoLiteCity-Blocks.csv file into SQL Server using FME. To do this, a "Reader" is opened from FME (Readers --> Add Reader...) as shown in Image 1:
*Image 1*There are 4 items which need to be addressed in the Add Reader menu (Image 2, below).
1. Format: Choose the "Comma Separated Value (CSV)" format
2. Dataset: Choose "GeoLiteCity-Blocks.csv" using the file browser (...)
3. Coordinate System: Choose "EPSG: 4326". *This item is not strictly necessary since this table will not contain and geospatial data
* 4. Parameters...: Select this menu button to pull up the Comma Separated Value (CSV) Parameters menu
Image 2Next, the Comma Separated Value Parameters menu must be addressed. This menu has 3 entries which are critical to this particular file. Note unreferened items, such as "Remove Duplicate Separators" are left in their default value.
- Separator Character: Make sure that this value is set to a coma (",")
2. Strip Quotes: all strings in the input file are quoted and must have their subtending quotes removed
3. Lines to Skip, Header: Their are 2 header lines in this file which must be skippedSelect the "OK" menu button when done.
* Image 3*The Add Reader menu is now done. Select the "OK" menu button to proceed (Image 4).


* Image 4
* The "Main" FME Workbench canvas will now show the reader item for the GeoLiteCity-Blocks.csv file as follows (Image 5):
 *
*
Image 5*
Add Writer
Next, the output of the workflow needs to be specified. In FME this is done with a "Writer". The Writer, in this case, will be a Microsoft SQL Server Non-spatial table.
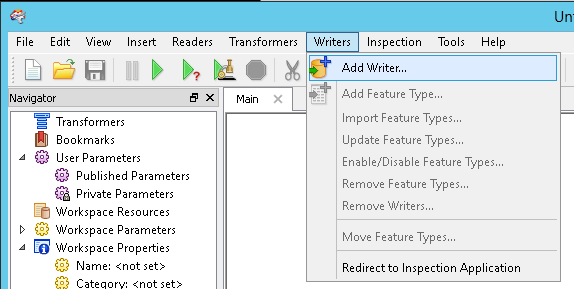
To create a Writer, go to Writers --> Add Writer in the main top level FME menu (Image 6)
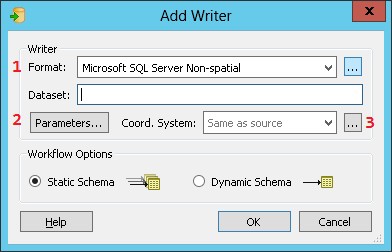
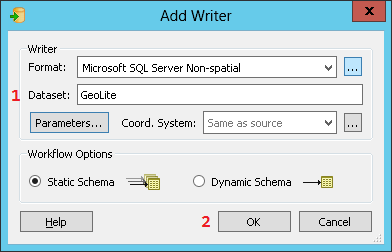
Image 6In the Add Writer menu there are 3 items that need to be addressed:
- Format: This needs to be set to "Microsoft SQL Server Non-spatial"
- Coordinate System: leave this as the default ("Same as source") even though it is irrelevant since this table will not contain any spatial columns.
- Parameters: This is where the core elements will be specified for the Writer
Image 7This screen (Image 8) is used to specify the database connection values. The Server will the SQL Server instance being used. The database will be the database elected to hold the GeoLite tables. Depending on your preferences, either use an authentication pattern of Username/Password or opt for "Use Windows Authentication". When done, select the "OK" menu button.
*Image 8*Selecting "OK" from the previous menu will take you back to the "Add Writer" menu. Note that the Dataset: field is now populated with the name of the database which will hold the resulting table (1). Select "OK" (2) to exit this menu.
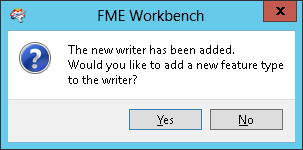
*Image 8Image 9*To the first time user, this menu can be a bit confusing. Since a database table is the intended output from the Writer, this menu is asking if you would like to add a new table (feature type) to the Writer. The answer is, of course, "Yes".
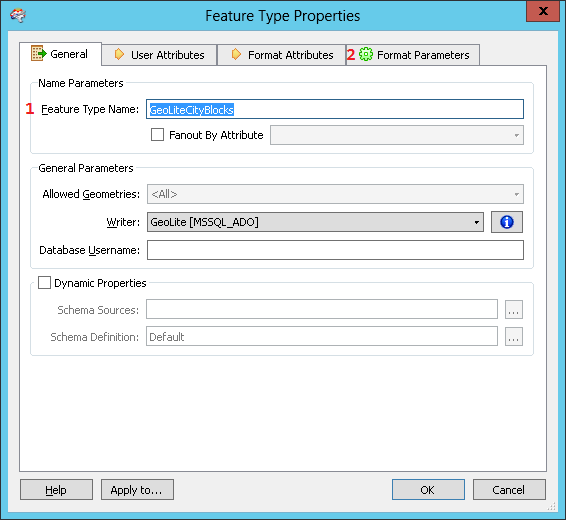
Image 10Item 1, Feature Type Name: is the name of the SQL Server table which will be created. After entering the table name, select the Format Parameters tab (2).
*Image 11*Next, the Feature Type Properties will be specified. Unreferenced items are left at their default values. Item 1, Drop Table First can be set to "Yes", allowing you to overwrite existing attempts to create this table. Otherwise, leave this menu item set to "No". Select the "OK" menu button to proceed.
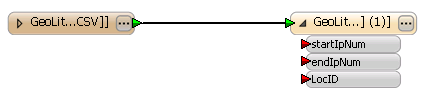
Image 12The Main FME canvas now displays the Writer element.
*Image 13
*Next, the Reader and Writer are connected to each other, expressing the data flow from Reader to Writer.
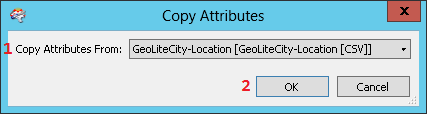
Image 14Next, the attributes from the input file defined by the Reader (think of these as the table columns) need to be specified to the Writer. You can think of these are the table column - basically, you are telling FME to transfer the data in the input file to the columns in the output table.
* Image 15*The Copy Attributes menu allows you to select where you want to copy the attributes from - in this case, the input file defined in the Reader.
Image 15Now, in the Main FME canvas, the attributes from the Reader show up on the Writer (col0, col1, col2). The green arrow associated with each attribute indicates that there is any established data flow between like entities in the Reader and the Writer.
*Image 16*Now, we need to define columns in the database table which will receive the that coming from the Reader. To do this, we need to right-click on the Writer in the [...] area. This will allow us to select the "Properties" entry from the resulting pull-down menu.
Image 17
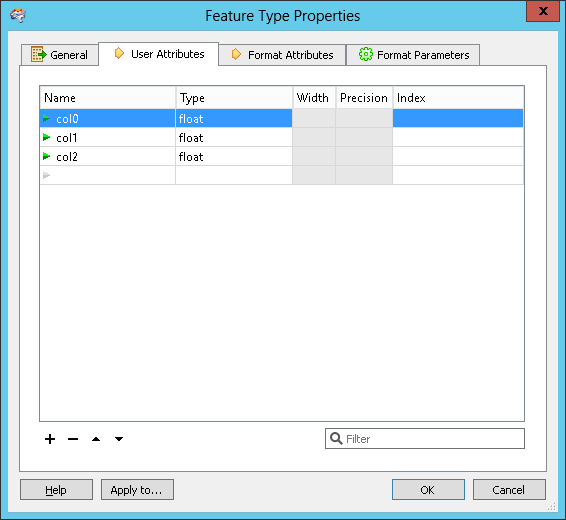
The Feature Type Properties menu displays the default table layout which is not what you want.
Image 18The desired columns names are now defined in the Name column along with the desired Type (Width, Precision) and "Index". The Index column is a compromised name but this is where you can specifiy that each column must be defined as "not null". Select "OK" when done.
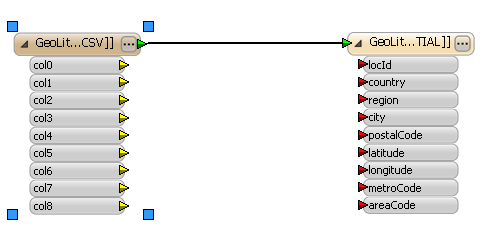
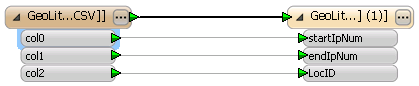
*Image 19*Now, on the Main FME canvas, we observe that the Writer attributes (columns) have the desired names but are no longer associated with their mates in the Reader as indicated by the red triangles.
*Image 20To reassociate the Reader attributes with the Writer attributes (columns), click on the triangle in the left-hand side of the Reader (highlighted in red box). This will display the Reader attributes.
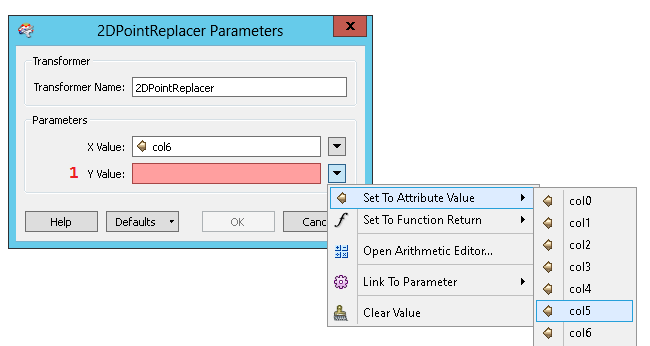
* Image 21Finish the reassociation by connecting the yellow triangles in the Reader with the corresponding red triangles in the Writer as follows:
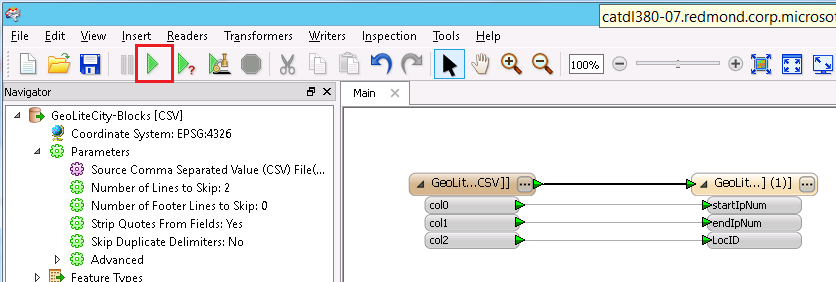
* Image 22*Run Project
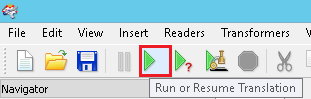
We are now ready to run this project (workflow) and create a populated table, GeoLiteCityBlocks form the file, GeoLiteCity-Blocks.csv. To run, select the green triangle on the top level menu bar in FME (highlighted by the red box).
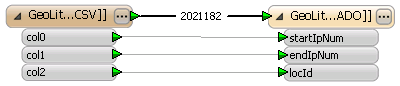
Image 23When the job has finished running, you will see the number of records processed in the main process connection between the Reader and the Writer.
Image 24


Load the GeoLiteCity-Location.csv file
Add Reader
The next item is to load the GeoLiteCity-Location.csv file into SQL Server using FME. The dataset loading procedure differs from the above procedure with the addition of a spatial data column in the Writer. Let's start by opening a Reader in FME (Readers --> Add Reader...) as shown in Image 25:
Image 25There are 4 items which need to be addressed in the Add Reader menu (Image 26, below).
1. Format: Choose the "Comma Separated Value (CSV)" format
2. Dataset: Choose "GeoLiteCity-Location.csv" using the file browser (...)
3. Coordinate System: Choose "EPSG: 4326". This is the coordinate system (WGS84) for the spatial component
4. Parameters...: Select this menu button to pull up the Comma Separated Value (CSV) Parameters menu
Image 26


Next, the Comma Separated Value Parameters menu must be addressed. This menu has 3 entries which are critical to this particular file. Note unreferened items, such as "Remove Duplicate Separators" are left in their default value.
- Separator Character: Make sure that this value is set to a coma (",")
2. Strip Quotes: all strings in the input file are quoted and must have their subtending quotes removed
3. Lines to Skip, Header: Their are 2 header lines in this file which must be skippedSelect the "OK" menu button when done.
*Image 27*The Add Reader menu is now done. Select the "OK" menu button to proceed (Image 28).

Image 28The "Main" FME Workbench canvas will now show the reader item for the GeoLiteCity-Blocks.csv file as follows (Image 29):
*Image 29*
Add Writer
Next, the output of the workflow needs to be specified. In FME this is done with a "Writer". The Writer, in this case, will be a Microsoft SQL Server Spatial table.
To create a Writer, go to Writers --> Add Writer in the main top level FME menu (Image 30)
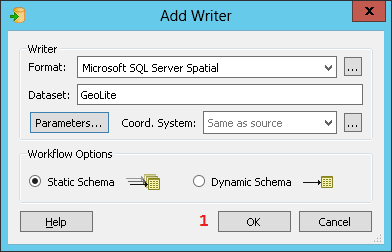
Image 30In the Add Writer menu there are 3 items that need to be addressed:
Format: This needs to be set to "Microsoft SQL Server Spatial"
Dataset: This menu item is not filled out directly. The Parameters...(4) menu item is where this is done.
Coordinate System: leave this as the default ("Same as source")
Parameters: This is where database, the login credentials and the spatial type information is supplied
Image 31This screen (Image 32) is used to specify the database connection values and the spatial type information. The Server will the SQL Server instance being used(1). The database will be the database elected to hold the GeoLite tables (2). Depending on your preferences, either use an authentication pattern of Username/Password or opt for "Use Windows Authentication" (3). The Spatial Parameters section is where you define the Spatial Type (4) and the Spatial Column (5). Note that the table name has not been specified at this point. When done, select the "OK" menu button.
Image 32Selecting "OK" from the previous menu will take you back to the "Add Writer" menu. Note that the Dataset: field is now populated with the name of the database which will hold the resulting table. Select "OK" (2) to exit this menu.
Image 33As mentioned earlier, to the first time user, this menu can be a bit confusing. Since a database table is the intended output from the Writer, this menu is asking if you would like to add a new table (feature type) to the Writer. The answer is, of course, "Yes".
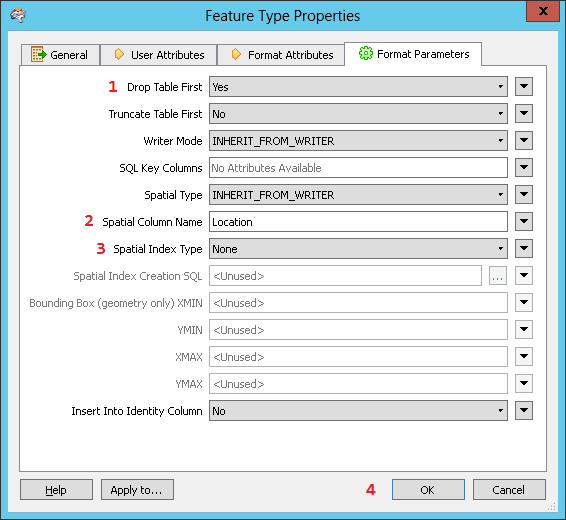
Image 34Item 1, Feature Type Name: is the name of the SQL Server table which will be created. After entering the table name, select the Format Parameters tab (2).
Image 35Next, the Feature Type Properties will be specified. Unreferenced items are left at their default values. Item 1, Drop Table First can be set to "Yes", allowing you to overwrite existing attempts to create this table. The Spatial Column Name should be the one set previously (see Image 32) (2). The Spatial Index Type (3) should be set to "None". The reason for this will be presented further on but it deals with setting up a compound clustered primary key which FME is not particular well suited to do. Select the "OK" menu button to proceed (4).
Image 36
Image 37
Image 38
Image 39
Image 40
Image 41
Image 42
Image 43
Image 44
Image 45
Image 46
Image 47
Image 48
Image 49
Image 50
Image 51
Image 52
Image 53
Image 54