Note
Access to this page requires authorization. You can try signing in or changing directories.
Access to this page requires authorization. You can try changing directories.
Lately, we needed to deploy custom Windows 7 image with SCCM 2012 (2007 should be the same).
In a search over the internet, we didn't find any full guide that goes through all the required steps, so we decided to document it.
The requirements were:
- Upgrade Windows XP with new Windows 7 image.
- Backup domain profiles only (except My Documents).
- Do not backup files on drive D.
- Backup printers. Format hard drive Configure additional language.
- Move computer to different OU
Create USMT package:
Copy the USMT folder (should be here: C:\Program Files\Windows AIK\Tools\USMT) to the SCCM packages folder (both x86 and amd64 folders).
Create a package with the source folder to the new folder you just created, and choose Do Not Create a Program.
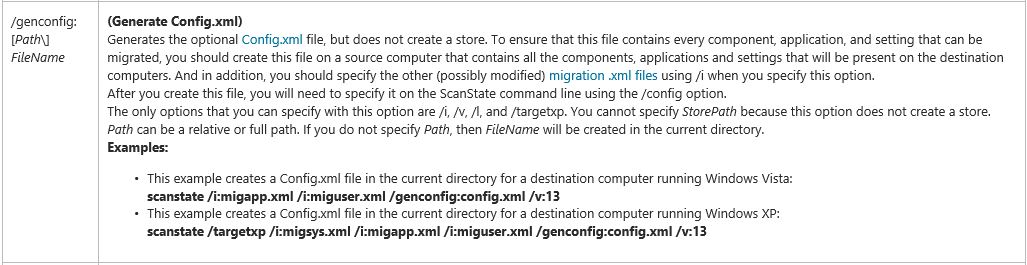
Create config XML file:
Config.xml is a file that contains components, application and settings you can edit for migration:
http://2.bp.blogspot.com/-7Fr3PptaTmM/UxShe7rtzmI/AAAAAAAABf8/VksHnxjHky0/s1600/genconfig.JPG
http://technet.microsoft.com/en-us/library/cc749015(v=ws.10).aspx
Updated Reference: /en-us/windows/windows-10/
Log on to the source XP\7 computer and copy the content of the x86 or and64 (depend on your architecture) from the USMT folder package.
Run command, navigate to the locally USMT folder and run the following:
Scanstate.exe /genconfig:Config.XML /i:MigUser.xml /i:MigApp.xml
This will create a Config.XML file for you to edit your special configuration.
Edit Config.xml file with "no" to exclude components and add the file to the USMT package location.
I edited the following to exclude My Documents from migration:
http://2.bp.blogspot.com/-W4m3GO2vaU4/UxS9HtnLxFI/AAAAAAAABgg/xCXwELOz9SQ/s1600/Config.jpg
Create Custom XML file:
Custom files are files that can be added to USMT folder and run with the migration process to exclude\include settings.
You can run the scanstate.exe /genmigxml:Custom.xml switch to create Custom.xml file that determines which files will be included in your migration, and edit it to your needs.
The following XML excludes all files located on the D drive:
<migration urlid="http://www.microsoft.com/migration/1.0/migxmlext/allfiles">
    <component type="Documents" context="System">
        <displayName>Test</displayName>
        <role role="Data>
            <rules>
  <unconditionalExclude>
                   <objectSet>
      <pattern type="File">d:\*[*]</pattern>
                   </objectSet>
  </unconditionalExclude>
            </rules>
        </role>
    </component>
</migration>
More examples:
http://technet.microsoft.com/en-us/library/hh824985.aspx
After creating the files you need to add it to the USMT package (both x86 and amd64 folders) and update the package.
Next, you need to add the files to your task sequence "Capture User State" step or add it to your command line step with /i:File.xml - later in this post.
Printers Migration:
Downloaded printers migration file from http://www.windows-noob.com website to backup printers, named it printers.xml and add it to the USMT package (both x86 and amd64 folders) and to the task sequence.
Don't forget to update the package each time you add\remove\change files in the package source.
Custom Language:
Configuring language settings by creating Unattend.xml file with Windows System Image Manager, which is part of Windows AIK and should be installed on your SCCM server.
Keep in mind that in the process of creating the Unattend.xml file you need to create catalog from your WIM file.
**The WIM image file should be the same architecture (x86 or x64) as the OS you run, otherwise you will fail to create the catalog.
**If your image is x86 architecture, you need to install Windows System Image Manager on x86 system and create the file.
Here is an excellent post of the process.
Migration Testing:
Before we run the task sequence, we can run the following command to check that scanstate runs and backup with no errors:
**scanstate.exe c:\mig /o /localonly /all /i:miguser.xml /i:migapp.xml /i: Custom.xml /i:printers.xml /config:Config.xml
**This command will backup your computers with all your custom XML files that you import to local storage (c:\mig).
You can open the USMT.mig file with MigRecover and check files\folder\profile was backup or exclude successfully.
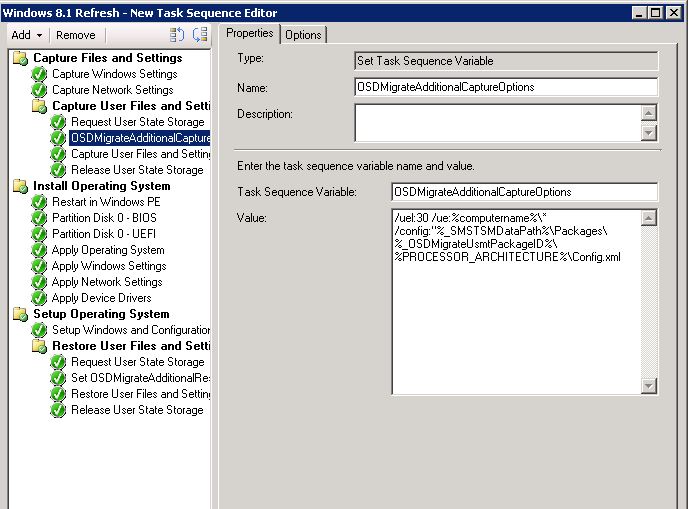
Edit Task Sequence:
In order to use the config.xml file and other custom USMT command line options, add Task Sequence Variable step right after Request State Store:
http://2.bp.blogspot.com/-MUKEnGFPQN4/UxTxpmZc6eI/AAAAAAAABg4/UyUyynUi8D8/s1600/TS+Variable.jpg
Name the Task Sequence Variable OSDMigrateAdditionalCaptureOptions and set the Value:
/uel:30 /ue:%computername%\ /config:"%_SMSTSMDataPath%\Packages\_OSDMigrateUsmtPackageID%\PROCESSOR_ARCHITECTURE%\Config.xml
**http://1.bp.blogspot.com/-efWiZK6OX8A/Ux1-SZqGaVI/AAAAAAAABi0/m3Sy5vikyvA/s1600/Load.JPG **
Values in details:
- /uel:30 - Exclude accounts not in use for more than 30 days.
- /ue:%computername%\ - Exclude local accounts.
- /config: - Set the command to run with config file.
- /config: - Set the command to run with config file.
- %_SMSTSMDataPath% - Root location for the package.
- %_OSDMigrateUsmtPackageID% - Package ID number.
- %PROCESSOR_ARCHITECTURE% - Computer architecture (x86 or x64).
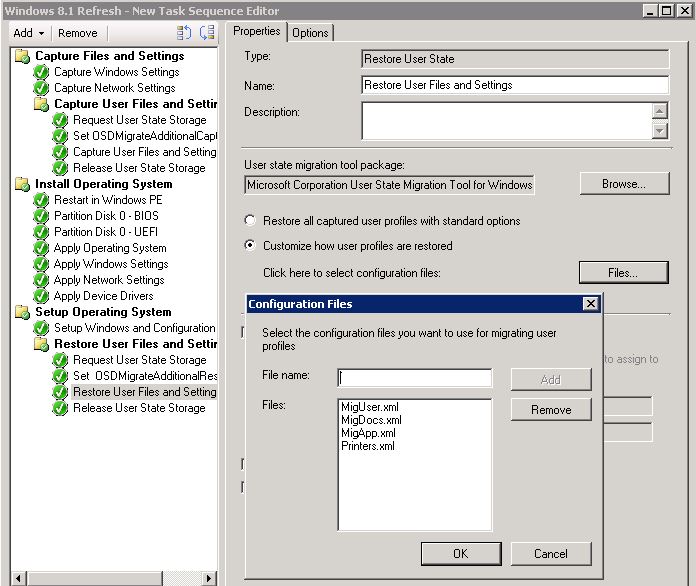
Add all XML files to Capture User Files and Settings (Do not use MigUser.xml and MigDocs.xml together):
http://1.bp.blogspot.com/-bLu9m_GQ_0M/UxT7b2UiDoI/AAAAAAAABhs/3keMRKT1SWw/s1600/XML+Files.jpg
To restore content, add Task Sequence Variable name OSDMigrateAdditionalRestoreOptions right after Request User State Restore and set the value:
/uel:30 /ue:%computername%\ config:"%_SMSTSMDataPath%\Packages\PackageID\PROCESSOR_ARCHITECTURE%\Config.xml"
http://1.bp.blogspot.com/-TH9a2VpFcs4/Ux19hh12l9I/AAAAAAAABis/MxJ4YemyKHI/s1600/Restore.JPG
Add all XML files you added before (at Capture State) to restore User Files and Settings step:
http://3.bp.blogspot.com/-2_nAYymcQeA/UxWiRGAlhRI/AAAAAAAABiI/rJAYDVzdqKg/s1600/Restore.JPG
From experience, in order to successfully restore complete profile (Outlook profile and other configurations) a reboot is needed after restore user state.
You can add a reboot step to your task sequence at the end of the task sequence.
Move Computer to Different OU:
When you re-imaging a computer that already exist in AD, you probably won't be able to move it to different OU even if you specify it in Apply Network Settings step of your Task Sequence because of permission issue.
In order to resolve it, we create a package with this script and add Run Command Line step at the end of the task sequence following by restart command:
http://3.bp.blogspot.com/-A_XSubtOEJU/UxcvGqhy3_I/AAAAAAAABic/6wvYZDTyrVk/s1600/Move+OU.JPG
Help for move computer step was taken from this post.