Note
Access to this page requires authorization. You can try signing in or changing directories.
Access to this page requires authorization. You can try changing directories.
Table of Contents |
| Understanding the WCF Adapter |
| internal structure and main Interfaces |
| Generating Adapter Skeleton Code from Wizard |
| Connection and Pooling Setup |
| Implementing the Connection |
| Implementing the Metadata Handlers |
| Implementing the Message Exchange |
| Deployment |
Understanding the WCF Adapter
Most people ask whether a WCF LOB Adapter is in fact a WCF service. The answer is no, it is not. WCF LOB Adapters are built on top of the WCF channel model and exposed as custom WCF bindings. To understand this better, let's take a very brief excursion into WCF fundamentals.
1. WCF Endpoints
To establish a communication process with clients, a service must expose at least one endpoint. The WCF endpoints consist of three parts known as the "A, B, and C" of the WCF. The three parts are as follows:
· Address: This takes the form of the URI that specifies the address where the service listening for incoming messages can be reached.
· Binding: Bindings specify a communication protocol when the message is sent to a particular address.
· Contract: Contracts specify what operations and data types are supported by the service.
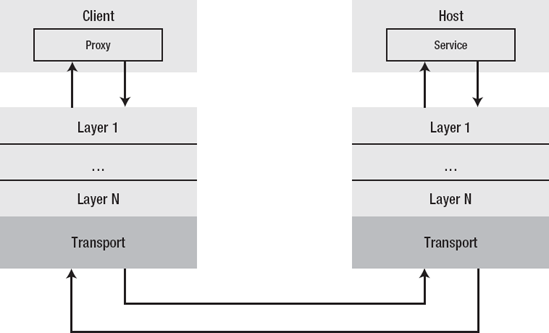
Communication between client and service is conducted through a so-called communication channel. When you instantiate the ServiceHost class, it builds a channel listener, which in turn builds a communication channel for the service. On the client side, the proxy creates a channel factory that is responsible for building an equivalent communication channel for the client. The channels have a layered structure where each layer or binding element in stricter terms performs its own part of message processing as the message goes from one layer to another, as shown in Figure 1. As you can notice, the bottom layer in the communication channel is a transport layer, and that's exactly where WCF LOB Adapter fits within the channel stack.
Figure 1. The layered structure of the WCF
2. WCF Transports
Out of the box, WCF supports a few predefined transports such as TCP, Named Pipes, HTTP, and MSMQ, but being designed with extensibility in mind, WCF allows you to use your own custom transport components tailored to your specific needs. If you take a look at the sample adapter code provided for this chapter, you will see that the core adapter class is derived from the System.ServiceModel.Channels.TransportBindingElement class. Figures 2 and 3 show the message flow for the WCF LOB Adapters in inbound and outbound exchanges.
As you can see in the outbound scenario, the WCF LOB Adapter, instead of sending the message over the network, just communicates with the LOB system and sends a response to the client application.
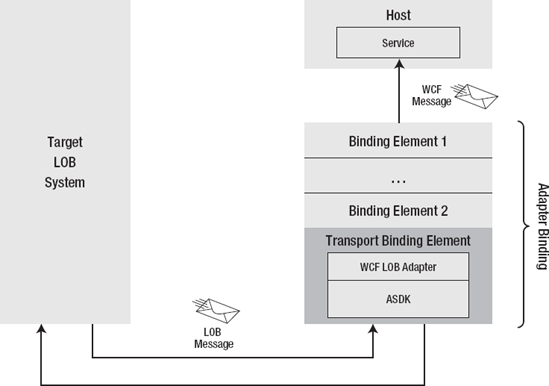
In the inbound scenario, the WCF LOB Adapter monitors the target LOB system for particular events and generates a notification message containing event-specific data for the hosting application.
NOTE
If you are interested in taking a deeper look at WCF channels, you can find detailed information at http://go.microsoft.com/fwlink/?LinkId=82614.
Figure 2. WCF LOB Adapter outbound exchange
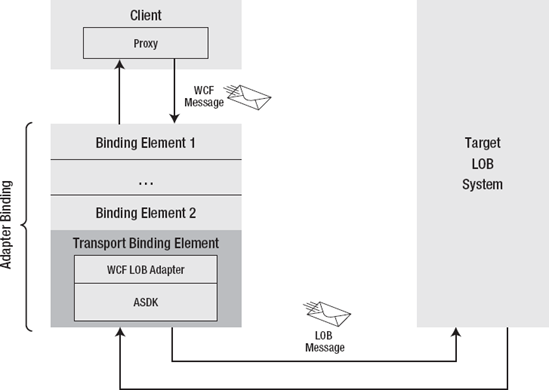
Figure 3. WCF LOB Adapter inbound exchange
WCF Adapter internal structure and main Interfaces
Now we are becoming familiar with the adapter fundamentals, it is time to take a look inside the WCF LOB Adapter in detail. Figure 1 shows the major components and how they interact with each other.
Figure 1. WCF LOB Adapter's internal structure

As you can see, the WCF LOB Adapter as a code entity can be split into two big parts; one part is provided by the ASDK, and the other part has to be implemented by the adapter developer. Essentially, a developer—that's you—has to provide the implementation for three blocks of functionality: the connection, metadata handlers, and inbound/outbound handlers. The WCF LOB Adapter Development Wizard generates skeleton classes supporting the required methods and interfaces; you as the adapter developer need to provide an implementation specific to the target LOB system.
1. The Connection
Creating and opening a connection to a LOB system is in many cases an expensive procedure in terms of machine resources. One of the key features provided by the WCF LOB Adapter SDK is connection management, which takes the form of connection pooling.
When a connection is required to perform a metadata or inbound/outbound operation, the WCF LOB runtime component either creates a new connection or gets an existing one from a connection pool. When the operation completes, the WCF LOB SDK runtime component returns a connection to the connection pool.
To enable connection management, you have to provide the implementation of three interfaces and classes defined in the Microsoft.ServiceModel.Channels.Common namespace. We've listed them for you in Table 13-1.
| Class/Interface | Description |
|---|---|
| IConnectionFactory | This interface is used by the WCF LOB SDK when it needs to create a new connection to the target LOB system. |
| IConnection | This interface encapsulates the methods required to connect to the target LOB system. |
| ConnectionUri | The WCF LOB SDK Wizard generates a class extending the abstract ConnectionUri class. You have to provide the implementation of the properties representing a connection string to the target LOB system. |
2. The Metadata Handlers
As we have discussed, metadata support is an important feature that distinguishes WCF LOB Adapters from WCF services. To enable an adapter's metadata capability, you as the adapter developer must implement two mandatory interfaces; there is also one optional interface (see Table 2). These interfaces are defined in the Microsoft.ServiceModel.Channels.Common namespace.
| Interface | Description |
|---|---|
| IMetadataBrowseHandler | This interface represents the browse capability of the WCF LOB Adapters. You must implement this interface regardless of your adapter functionality. |
| IMetadataSearchHandler | Optional. This interface represents the search capability of the WCF LOB Adapters. |
| IMetadataResolverHandler | This interface is used when the WCF LOB Adapter SDK needs to generate the proxy files in case of .NET applications or XSD specifications in case of BizTalk applications. You must implement this interface regardless of your adapter functionality. |
3. The Message Exchange Handlers
Message exchange handlers are represented by four interfaces from the Microsoft.ServiceModel.Channels.Common namespace. We've listed them for you in Table 3.
| Interface | Description |
|---|---|
| IOutboundHandler | Supports one-way send or request-response pattern. |
| IAsyncOutboundHandler | Optional. Supports asynchronous one-way send or request-response pattern. |
| IInboundHandler | Optional. Supports one-way receive or reply pattern. |
| IAsyncInboundHandler | Optional. Supports asynchronous one way receive or reply pattern. |
**
Step1:** WCF Adapter - Generating Adapter Skeleton Code from Wizard
Now we are familiar with the major classes and interfaces that the WCF LOB Adapters have to support, let's put all the pieces together and implement a simple Custom.
In the inbound scenario, an adapter polls (as per sets poll interval) the Data from database with help of configured procedure sends notification in form of XML to the User or next system. In the outbound scenario, an adapter accepts requests and returns the data in form of XML to the User or next system.
1. Step 1: Generating Adapter Skeleton Code
First, you have to create WCF LOB Adapter project. Begin by using Visual Studio's WCF LOB Adapter Development Wizard to generate some skeleton code. Here is the process to follow:
1. To create a WCF LOB Adapter project, open Visual Studio 2008. Select File => New Project. The New Project dialog box will open. Select a Visual C# project for the project type, and select WCF LOB Adapter from the Templates pane. Specify the project name and location, as shown in Figure 1.
2. Click OK. The WCF LOB Adapter Development Wizard, shown in Figure 2, will open.
3. Click Next.
Figure 1. Creating a WCF LOB Adapter project 
Figure 2. The WCF LOB Adapter Wizard 
4. On the Scheme, Namespace and URI Information page, specify the parameters shown in Figure 3. If you want to override the default namespace, select the "Override default namespace" check box, and type the desired namespace in the "Service namespace" field.
Figure 3. Scheme, Namespace, and URI Information page 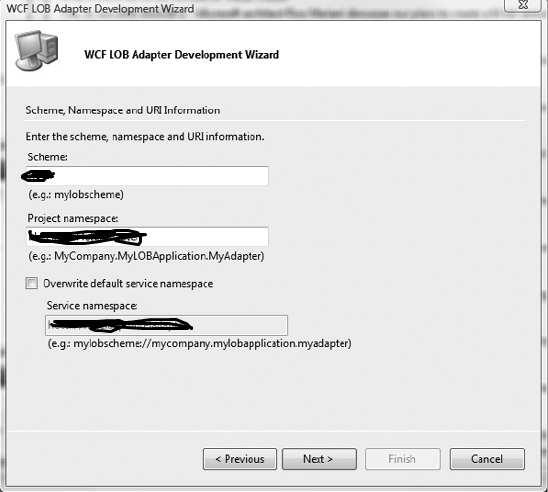
5. Click the Next button.
6. Specify the parameters shown in Figure 4, and click the Next button.
Figure 4. Data flows and metadata features 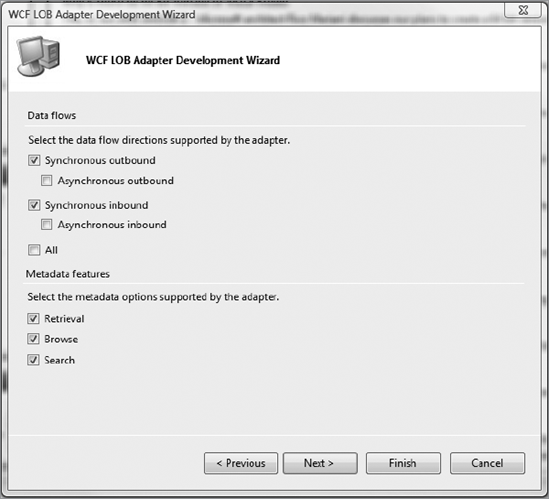
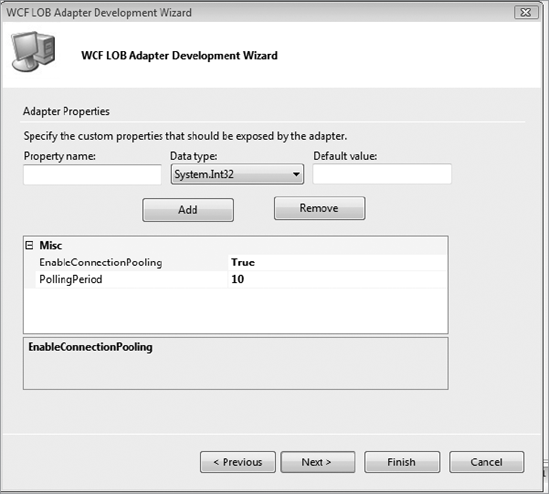
7. On the Adapter Properties page, add the binding properties listed in Table 1. The EnableConnectionPooling property is used by the ASDK to enable or disable the runtime connection pooling. Make sure that after adding the properties, the Adapter Properties page looks like Figure 5. Click the Next button.
| Property Name | Data Type | Default Value |
|---|---|---|
| EnableConnectionPooling | System.Boolean | True |
| PollingPeriod | System.Integer | 10 |
8.
9. Figure 5. Adapter Properties page
8. On the Connection Properties page, add the connection properties listed in Table 2. After adding the properties, the Connection Properties page should look like Figure 6.
| Property Name | Data Type | Default Value |
|---|---|---|
| Application | System.String | XYZApp |
| EnableAuthentication | System.Boolean | True |
| Host | System.String | XYZAppHost |
9. Click the Next button. On the Summary page, click the Finish button. Figure 7 shows the Solution Explorer with the files generated by the WCF LOB Adapter Development Wizard.
Figure 6. Connection Properties page
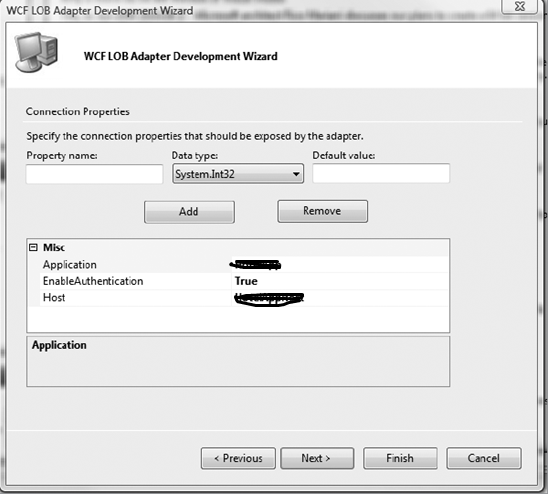
Figure 7. XYZAdapter generated project

Tables 3 to 7 give a brief description of the files generated by the wizard.
| File | Description |
|---|---|
| XYZAdapterConnection.cs | Contains the definition of the class implementing the IConnection interface. This class is responsible for a single connection to the target LOB system. |
| XYZAdapterConnectionFactory.cs | Contains the definition of the class implementing the IConnectionFactory interface. This class creates an instance of the class implementing the IConnection interface, that is, XYZAdapterConnection. |
| XYZAdapterConnectionUri.cs | Contains the definition of the class representing connection string to the target LOB system. |
| File | Description |
|---|---|
| XYZAdapterMetadataBrowseHandler.cs | Contains the definition of the class implementing the IMetadataBrowseHandler interface. This class is responsible for the metadata browse capabilities of the adapter. |
| XYZAdapterMetadataResolverHandler.cs | Contains the definition of the class implementing the IMetadataResolverHandler interface. This interface is used by ASDK to get the information about supported operations and data types. This information is used to generate proxy files or message type specifications. |
| XYZAdapterMetadataSearchHandler.cs | Contains the definition of the class implementing the IMetadataSearchHandler interface. This class is responsible for the search metadata capabilities of the adapter. |
| File | Description |
|---|---|
| XYZAdapterHandlerBase.cs | Contains the definition of the base class for adapter handlers. |
| XYZAdapterInboundHandler.cs | Contains the definition of the class implementing the IOutboundHandler interface. This class is responsible for listening to events or polling for data on the target LOB system. |
| XYZAdapterOutboundHandler.cs | Contains the definition of the class implementing the IInboundHandler interface. This class is responsible for sending data to the target system. |
| File | Description |
|---|---|
| XYZAdapterBinding.cs | Contains the definition of the class representing a binding for the WCF LOB Adapter. This class hosts a collection of the BindingElements, which the WCF channel is built upon. |
| XYZAdapterBindingCollection Element.cs | Contains the definition of the class used to register the adapter with WCF. |
| XYZAdapterBindingElement.cs | This class is used to apply configuration properties to the adapter binding. |
| XYZAdapterBindingElementExtensionElement.cs | Contains the definition of the class used to expose the adapter as a custom adapter binding. This class is used to configure the adapter using the WCF-custom adapter. |
| File | Description |
|---|---|
| XYZAdapter.cs | Contains the definition of the main adapter class derived from Microsoft.ServiceModel.Channels.Common.Adapter. |
| XYZAdapterTrace.cs | Contains the definition of a supplementary class that can be used in the code for debugging purposes and tracing in particular. |
After completing this step, you have WCF LOB Adapter skeleton classes that you will fill with functionality in the subsequent steps. In the next step, you will categorize the properties that you created using the wizard.
Step2 : Connection and Pooling Setup
In this step, you will modify the XYZAdapterBindingElement and XYZAdapterUri classes to logically group the binding and connection properties that you created in step 1. You will create three categories and arrange the properties within these categories, as shown in Table 8.
| Property Name | Category |
|---|---|
| EnableConnectionPooling | Misc |
| Application | Connection |
| EnableAuthentication | Connection |
| Host | Connection |
| PollingPeriod | Inbound |
When you complete this step and build the project, the binding and connection properties will be grouped and presented in the Add Adapter Service Reference plug-in and Consume Adapter Service add-in, as shown in Figures 8 and 9.
Figure 8. Categorized connection properties

Although categorizing properties is optional, we recommend that you don't ignore this step. The reasoning is simple—categorizing improves user experience, since in many if not most cases adapter consumers will configure adapters using the UI tools.
Figure 9. Categorized binding properties
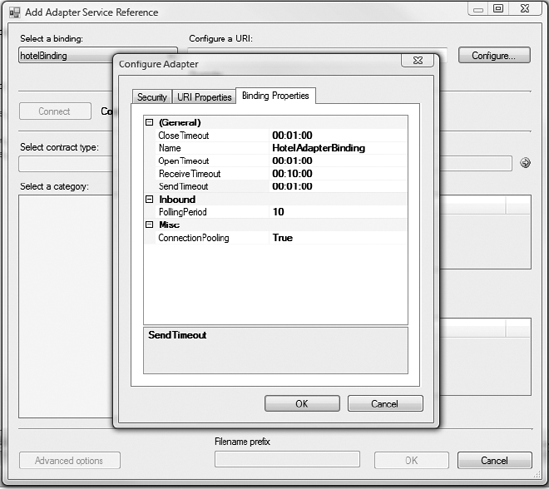
As you can guess, the implementation is fairly straightforward and doesn't require more than applying the System.ComponentModel.Category attribute to the custom properties. Let's start with the XYZAdapterBindingElement class:
1. In Visual Studio, open the XYZAdapterBindingElement.cs file.
2. To assign the Misc category to the EnableConnectionPooling property, place the [System.ComponentModel.Category("")] line of code at the beginning of the EnableConnectionPooling implementation, as shown here:
[System.Configuration.ConfigurationProperty("enableConnectionPooling",
                                          DefaultValue = true)]

public bool EnableConnectionPooling
{
    get
    {
        return ((bool)(base["EnableConnectionPooling"]));
    }
    set
{
        base["EnableConnectionPooling"] = value;
    }
}
3. Specify the Inbound category for the PollingPeriod property by placing the [System.ComponentModel.Category("Inbound")] line of code at the beginning of the PollingPeriod property, as shown in the following code snippet:
[System.ComponentModel.Category("Inbound")]
[System.Configuration.ConfigurationProperty("pollingPeriod",
    DefaultValue = 10)]

public int PollingPeriod
{
     get
     {
        return ((string)(base["pollingPeriod"]));
     }
     set
     {
        base["pollingPeriod"] = value;
     }
}
Follow a similar procedure for the XYZAdapterConnectionUri class:
1. In Visual Studio, open the XYZAdapterConnectionUri.cs file.
2. Expand the Custom Generated Properties region, and apply the [System.ComponentMode.Category("Connection")] attribute to each of the properties in the region. When you finish, the Custom Generated Properties region should match the following code snippet:
#region Custom Generated Properties

[System.ComponentModel.Category("Connection")]
public string Application
{
    get
    {
        return this.application;
    }
    set
    {
        this.application = value;
    }
}
[System.ComponentModel.Category("Connection")]
public bool EnableAuthentication
{
    get
    {
        return this.enableAuthentication;
    }
    set
    {
        this.enableAuthentication = value;
    }
}

[System.ComponentModel.Category("Connection")]
public string Host
{
    get
    {
        return this.host;
    }
    set
    {
        this.host = value;
    }
}

#endregion Custom Generated Properties
3. Save and build the project.
In the next step, you will work with the classes and interfaces responsible for establishing and managing connection to the LOB systems.
Step 3: Implementing the Connection
The runtime connection management is one of the features that makes the WCF LOB Adapters stand apart from their closest competitors: WCF services. Implementing a connection is a mandatory step, even if your LOB system doesn't require a connection, as in the case of our mythical XYZ application. Most, if not all, real-life LOB applications do require establishing a connection before granting access to their features.
To enable runtime connection management, you have to implement three classes generated by the WCF LOB Development Wizard, each performing its specific task:
· XYZAdapterConnectionUri
· XYZAdapterConnectionFactory
· XYZAdapterConnection
3.1. Implementing the XYZAdapterConnectionUri Class
The XYZConnectionUri class inherits the abstract ConnectionUri[] class from the Microsoft.ServiceMode.Channels.Common namespace. The ConnectionUri class represents a connection string to a target LOB system. Table 9 shows the methods and properties that you have to implement in the XYZAdapterConnectionUri class.
[] http://msdn.microsoft.com/en-us/library/microsoft.servicemodel.channels.common.connectionuri.aspx
| Method/Property | Description |
|---|---|
| public override Uri Uri | Contains the connection URI. |
| public XYZAdapterConnectionUri | Instantiates the XYZAdapterConnectionUri class. |
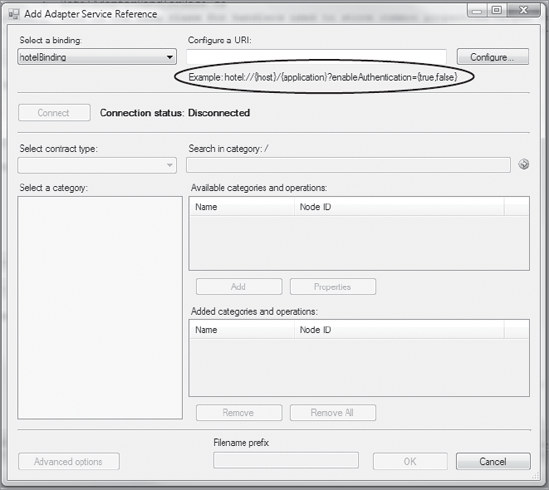
| public override string SampleUriString | Gets the sample URI string to present in the Add Adapter Service Reference plug-in and Consume Adapter Service add-in, as shown in Figure 10. |
Figure 10. Sample Uri string
Here is the process to follow:
1. In Visual Studio, open the XYZAdapterConnectionUri.cs file.
2. Add a new private variable UriBuilder type to the class definition:
private UriBuilder uriBuilder;
3. Update the class constructor as follows:
#region Constructors

        /// <summary>
        /// Initializes a new instance of the ConnectionUri class
        /// </summary>
        public XYZAdapterConnectionUri()
        {
            uriBuilder = new UriBuilder();
        }

        /// <summary>
        /// Initializes a new instance of the ConnectionUri
        /// class with a Uri object
        /// </summary>

        public XYZAdapterConnectionUri(Uri uri)
            : base()
        {
            uriBuilder = new UriBuilder(uri);
        }

        #endregion Constructors
4. Locate the Uri property, and replace it with the following code:
public override Uri Uri
   {
       get
       {
           //check if connection string elements are specified
           if (String.IsNullOrEmpty(this.host))
           {
               throw new InvalidUriException(
                         "Host name must be specified.");
           }
           if (String.IsNullOrEmpty(this.application))
           {
              throw new InvalidUriException(
                   "Application name must be specified.");
           }
           // the connection uri object
this.uriBuilder.Scheme = XYZAdapter.SCHEME;
           this.uriBuilder.Host = host;
           this.uriBuilder.Path = application;
           this.uriBuilder.Query = "enableAuthentication="
               + enableAuthentication.ToString();

           return uriBuilder.Uri;
       }
       set
       {
           this.host = value.Host;
           //walk through connection string segments and get app name
           //it is in the last segment
           if (value.Segments != null && value.Segments.Length > 1)
           {
               foreach (string segment in value.Segments)
               {
                   application = segment;
               }
           }
           this.enableAuthentication = false;
           string[] enableAuthenticationValue =
               GetQueryStringValue(value, "enableAuthentication");
           if (enableAuthenticationValue.Length == 1)
           {
               this.enableAuthentication =
                   Boolean.Parse(enableAuthenticationValue[0]);
           }
       }
   }
Please note the use of the UriBuilder[] class. This class simplifies building and parsing connection strings.
[] http://msdn.microsoft.com/en-us/library/system.uribuilder_members.aspx
5. Specify a sample string as shown in the following code snippet. Although this is not a requirement, providing a sample string for adapter consumers is a good practice.
/// <summary>
        /// Returns the sample connection string
        /// to be presented in UI design-time tools
        /// </summary>
        public override string SampleUriString
        {
            get
{
                return XYZAdapter.SCHEME +
                    "://{host}/{application}?enableAuthentication={true,fals
e}";
            }
        }
In the next subsection, you will implement the XYZAdapterConnectionFactory class.
3.2. Implementing the XYZAdapterConnectionFactory Class
The XYZAdapterConnectionFactory class implements the IConnectionFactory interface from the Microsoft.ServiceModel.Channels.Common namespace. This interface is located in the Microsoft.ServiceModel.Channels assembly. The WCF LOB Development Wizard provides the implementation for the CreateConnectionIConnectionFactory interface. The purpose of this method is to instantiate the XYZAdapterConnection method, which is the only public method exposed by the class, which represents a single connection to the target LOB system.
Here is the process to follow to implement the XYZAdapterConnectionFactory:
1. In Visual Studio, open the XYZAdapterConnectionFactory.cs file.
2. Locate the Private Fields region, and add a new variable:
private XYZAdapterConnectionUri uri;
3. Update the XYZAdapterConnectionFactory constructor so that it looks like the following:
/// <summary>
/// Initializes a new instance of the
///XYZAdapterConnectionFactory class
/// </summary>
public XYZAdapterConnectionFactory(ConnectionUri connectionUri
    , ClientCredentials clientCredentials
    , XYZAdapter adapter)
{
    this.uri = (XYZAdapterConnectionUri)connectionUri;
    this.clientCredentials = clientCredentials;
    this.adapter = adapter;
}
4. Locate the Public Properties region, and add the ConnectionUri and ClientCredentials properties, as shown here:
public ClientCredentials ClientCredentials
{
    get
{
        return this.clientCredentials;
    }
}
/// <summary>
/// Returns the connectionuri
/// </summary>
public XYZAdapterConnectionUri Uri
{
    get
    {
        return this.uri;
    }
}
In the next section, you will implement the XYZAdapterConnection class, the last of the three required to enable the WCF LOB SDK connection management.
3.3. Implementing the XYZAdapterConnection Class
The XYZAdapterConnection class represents a single connection to the target LOB system and implements the IConnection[] interface from the Microsoft.ServiceModel.Channels.Common namespace. This interface is located in the Microsoft.ServiceModel.Channels.dll assembly. Table 10 shows the public methods and properties exposed by the IConnection interface.
| Method/Property | Description |
|---|---|
| Abort | Aborts the connection to the external system/application. |
| BuildHandler | Builds a new instance of the class that implements the IConnectionHandler interface. |
| ClearContext | Clears the context of the connection. This method is called when a connection is returned to the connection pool. |
| IsValid | Returns a value indicating whether the connection is valid. |
| Close | Closes the connection to the target LOB system. |
| Open | Opens the connection to the target LOB system. |
| ConnectionId | Property. Returns the ID of the connection. |
Although XYZAdapter doesn't require a connection to the target system as we mentioned earlier, we nevertheless will show you how to handle user credentials. Most LOB systems require client applications to provide valid credentials before authorizing access to their data and functionality. To set user credentials, you can use the Add Adapter Service Reference plug-in or Consume Adapter Service add-in, as shown in Figure 11.
Figure 11. Security configuration page

When you close the Configure Adapter dialog box and click the Connect button, the WCF LOB SDK runtime component will call the Open method of the XYZAdapterConnection class, which handles the user credentials.
Here is the process you have to follow to implement the IConnect interface and user credentials handling:
1. In Visual Studio, open the XYZAdapterConnection.cs file.
2. Comment out all the NotImplemented exceptions. Modify the IsValid method so that it returns true.
3. In the IConnection Members region, locate the Open method, and replace it with the following code:
if (this.ConnectionFactory.Uri.EnableAuthentication == true)
{
    if (this.connectionFactory.ClientCredentials != null &&
        string.IsNullOrEmpty(
        this.connectionFactory.
        ClientCredentials.UserName.UserName))
{
        throw
           new CredentialsException("Username is expected.");
    }
}
4. Build and deploy the project.
Now that you are familiar with the key classes and interfaces that define connection functionality, we will show you how to implement the connection-based metadata handlers.
Step 4: Implementing the Metadata Handlers
The metadata support is probably the most distinguishing feature of the adapters written using the WCF LOB Adapter SDK. In this step, you will implement the interfaces that turn that magic into realty. Table 11 lists the interfaces.
| Interface | Description |
|---|---|
| IMetadataBrowseHandler | This interface represents the browse capability of the WCF LOB Adapters. You must implement this interface regardless of your adapter functionality. |
| IMetadataSearchHandler | Optional. This interface represents the search capability of the WCF LOB Adapters. |
| IMetadataResolverHandler | This interface is used when the WCF LOB Adapter SDK needs to generate the proxy files in case of .NET applications or XSD specifications in case of BizTalk applications. |
4.1. Implementing the IMetadataBrowseHandler Interface
To enable the browse capability of the adapter, you have to implement the IMetadataBrowse Handler[] interface from the Microsoft.ServiceModel.Channels.Common namespace. The WCF LOB Adapter Development Wizard generated the derived XYZAdapterMetadataBrowseHandler skeleton class for you.
The IMetadataBrowseHandler interface is located in the Microsoft.ServiceModel.Channels. dll assembly and is defined as follows:
public interface IMetadataBrowseHandler : IConnectionHandler, IDisposable
    {
        MetadataRetrievalNode[] Browse(string nodeId,
                                                   int childStartIndex,
                                                   int maxChildNodes,
                                                   TimeSpan timeout);
    }
We've put a description of the parameters accepted by the Browse method in Table 12.
| Parameter | Description |
|---|---|
| nodeId | The node identifier. Browse method evaluates the nodeId and returns either a collection of child nodes, if any, or a collection of operations associated with the given nodeId. |
| childStartIndex | The index of the first child to return. |
| maxChildNodes | The maximum number of child nodes to return. |
| Timeout | The maximum time to wait to complete the operation. |
The Browse method returns an array of the MetadataRetrievalNode[] objects representing either the operation or category type. Table 13 lists the public properties of the MetadataRetrievalNode class.
[] http://msdn.microsoft.com/en-us/library/microsoft.servicemodel.channels.metadataretrievalnode.aspx
| Property | Description |
|---|---|
| Description | Gets or sets the node description. |
| Direction | Gets or sets the direction (inbound or outbound) in which the node is being retrieved. |
| DisplayName | Gets or sets the node name to be displayed by UI. |
| IsOperation | Gets or sets the value indicating that the node is operation. |
| NodeId | Gets or sets the NodeId, which uniquely identifies the node. The NodeId is usually a concatenation of the node path and node name. The node name is not necessarily the same as the DisplayName. |
| Root | Read-only. Gets the root node. |
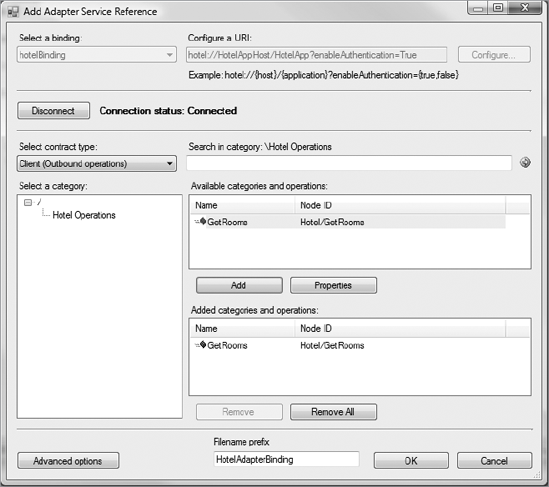
When you finish implementation and deploy the project, you will be able to explore the operations supported by the adapter using the Add Adapter Service Reference or Consume Adapter Server reference tools, as shown in Figure 12.
Figure 12. XYZAdapter metadata
Now let's get to the code and implement the IMetadataBrowseHandler interface. Here is the process to follow:
1. In Visual Studio, open the XYZAdapterMetadataBrowserHandler.cs file.
2. Find the IMetadataBrowseHandler region, and replace it with the following code:
/// <summary>
/// Retrieves an array of MetadataRetrievalNodes from the target
/// system. The browse will return nodes starting from the
/// childStartIndex in the path provided in absoluteName, and
/// the number of nodes returned is limited by maxChildNodes.
/// The method should complete within the specified timespan or
/// throw a timeout exception.
/// If absoluteName is null or an empty string, return nodes starting
/// from the root + childStartIndex.
/// If childStartIndex is zero, then return starting at the node
/// indicated by absoluteName (or the root node if
///absoluteName is null or empty).
/// </summary>
public MetadataRetrievalNode[] Browse(string nodeId
    , int childStartIndex
    , int maxChildNodes, TimeSpan timeout)
{
    //WCF LOB SDK UI tools by deafult start with the root "\" node.
    //for the root node there is only one category "XYZ Operations"
    if (MetadataRetrievalNode.Root.NodeId.CompareTo(nodeId) == 0)
    {
        // Create an inbound and outbound category
        //under the root node
        MetadataRetrievalNode node = new
            MetadataRetrievalNode("XYZOperations");
        node.NodeId = "XYZOperations";
        node.DisplayName = "XYZ Operations";
        node.Description = @"This category contains inbound and
                outbound operations supported by the XYZAdapter.";
        node.Direction = MetadataRetrievalNodeDirections.Inbound |
                           MetadataRetrievalNodeDirections.Outbound;
        node.IsOperation = false;
        return new MetadataRetrievalNode[] { node };
    }
        // if user selected "XYZOperations" in
        //the "Select Category" control populated
        //return two operations
        //OnGuestArrived in Inbound scenario
        //GetRooms in outbound
     else if ("XYZOperations".CompareTo(nodeId) == 0)
    {
        // Create outbound operation
        MetadataRetrievalNode nodeOutbound =
                   new MetadataRetrievalNode("XYZ/GetRooms");
        nodeOutbound.NodeId = "XYZ/GetRooms";
        nodeOutbound.DisplayName = "GetRooms";
        nodeOutbound.Description =
             "This operation returns the number of available rooms.";
        nodeOutbound.Direction =
            MetadataRetrievalNodeDirections.Outbound;
        nodeOutbound.IsOperation = true;
        // Create inbound operation
        MetadataRetrievalNode nodeInbound =
            new MetadataRetrievalNode("XYZ/OnGuestArrived");
        nodeInbound.NodeId = "XYZ/OnGuestArrived";
        nodeInbound.DisplayName = "OnGuestArrived";
        nodeInbound.Description =
                 "This operation notifies of client arrival.";
nodeInbound.Direction =
            MetadataRetrievalNodeDirections.Inbound;
        nodeInbound.IsOperation = true;
        return new MetadataRetrievalNode[]
                     { nodeOutbound, nodeInbound };
    }
    return null;
}
#endregion IMetadataBrowseHandler Members
3. In Visual Studio, open the XYZAdapterHandlerBase.cs file.
4. Find the Dispose method, and comment out the NotImplementedException exception.
5. Save and build the project.
As you can see, the code is not complicated, but it indeed requires accuracy. Although the sample adapter deals with only two operations, adapters for the real-life LOB systems will likely have to provide dozens if not hundreds or even thousands of operations. Imagine if you as an adapter developer had to add an if-else block every time you wanted to expose a new operation. If this is the case, then the very idea of "automatic metadata discovery" turns into "manual metadata discovery" with very little advantages over classic WCF services if at all.
To decide whether your LOB system is a good candidate for being front-ended by the WCF LOB Adapters, you have to take into account how the metadata is organized and whether new operations will be accessible by the previously written code, ideally with no changes (the "write-code-once" concept). If getting to new metadata requires serious modifications of the existing code, this should probably be taken as an alarm bell, because it indicates that the system is not optimally designed. Please note that the "write-code-once" concept applies not only to the browse handler but also to the search and resolve handlers that we will discuss in the next two sections. All three metadata interfaces constitute the metadata capabilities of the WCF LOB Adapters and have to be written according to the concept. To see the "write-code-once" concept in action, we recommend you take a close look at the Contoso Adapter supplied with the WCF LOB Adapter SDK. This adapter is a good example of how metadata in the form of SQL Server stored procedures can be accessed in a unified manner.
4.2. Implementing the IMetadataSearchHandler interface
To enable the optional "search" capability of the adapter, you have to implement the IMetadataSearchHandler[] interface from the Microsoft.ServiceModel.Channels.Common namespace. The WCF LOB Adapter Development Wizard generated the derived XYZ AdapterMetadataSearchHandler skeleton class for you.
The IMetadataSearchHandler interface is located in the Microsoft.ServiceModel.Channels. dll and is defined as follows:
public interface IMetadataSearchHandler : IConnectionHandler, IDisposable
    {
        MetadataRetrievalNode[] Search(string nodeId, string searchCriteria,
                                       int maxChildNodes, TimeSpan timeout);
    }
The Search method returns an array of the MetadataRetrievelNode objects that satisfy specified search criteria. We introduced this class earlier in the "Implementing IMetadataBrowseHandler" section.
We've listed the parameters accepted by the Search method in Table 14.
| Parameter | Description |
|---|---|
| nodeId | The node identifier to start the search from. If nodeId is null or an empty string, then the adapter will start evaluating nodes from the root node (/). |
| searchCriteria | Search criteria. If not specified, the adapter should return all nodes. |
| maxChildNodes | Maximum number of the child elements to return. To return all matching nodes, use the Int.Max32 value. |
| Timeout | Maximum time to wait to complete the operation. |
Here is the process to implement the IMetadataSearchHandler interface:
1. In Visual Studio, open the XYZAdapterMetadataSearchHandler.cs file.
2. Find the IMetadataSearchHandler Members region, and replace it with the following code:
#region IMetadataSearchHandler Members
       /// <summary>
       /// Retrieves an array of MetadataRetrievalNodes
       /// (see Microsoft.ServiceModel.Channels) from the target system.
       /// The search will begin at the path provided in absoluteName,
       /// which points to a location in the tree of metadata nodes.
       /// The contents of the array are filtered by SearchCriteria and the
       /// number of nodes returned is limited by maxChildNodes.
       /// The method should complete within the specified timespan or
       /// throw a timeout exception. If absoluteName is null or an
       /// empty string, return nodes starting from the root.
       /// If SearchCriteria is null or an empty string, return all nodes.
       /// </summary>
       public MetadataRetrievalNode[] Search(string nodeId
           , string searchCriteria
           , int maxChildNodes, TimeSpan timeout)
       {
           List<MetadataRetrievalNode> searchResult =
                           new List<MetadataRetrievalNode>();
searchCriteria = searchCriteria.ToLower();
           //we have only two operations
           // check them one by one
           if ("OnClientArrived".ToLower().Contains(searchCriteria))
           {
               MetadataRetrievalNode nodeInbound =
                   new MetadataRetrievalNode("XYZ/OnClientArrived");
               nodeInbound.DisplayName = "OnClientArrived";
               nodeInbound.Description = @"This operation notifies
                                   external clients of client arrival.";
               nodeInbound.Direction =
                   MetadataRetrievalNodeDirections.Inbound;
               nodeInbound.IsOperation = true;
               searchResult.Add(nodeInbound);
           }
           if ("GetRooms".ToLower().Contains(searchCriteria))
           {
               MetadataRetrievalNode nodeOutbound =
                   new MetadataRetrievalNode("XYZ/GetRooms");
               nodeOutbound.DisplayName = "GetRooms";
               nodeOutbound.Description = @"This operation returns the
                                            number of available rooms.";
               nodeOutbound.Direction =
                   MetadataRetrievalNodeDirections.Outbound;
               nodeOutbound.IsOperation = true;
               searchResult.Add(nodeOutbound);
           }
           return searchResult.ToArray();
       }
       #endregion IMetadataSearchHandler Members
3. Save and build the project.
4.3. Implementing the IMetadataResolverHandler Interface
To provide ASDK with information on the operations and data types supported by the XYZAdapter, you have to implement the IMetadataResolverHandler[] interface from the Microsoft.ServiceModel.Channels.Common namespace. As we mentioned earlier, the IMetadataResolverHandler interface is used by ASDK when it generates proxy files or message type specifications.
The WCF LOB Adapter Development Wizard generated the derived XYZAdapterMetadata ResolverHandler skeleton class for you.
The IMetadataResolverHandler interface is located in the Microsoft.ServiceModel. Channels.dll and is defined as follows:
public interface IMetadataResolverHandler :
                              IConnectionHandler, IDisposable
{
   bool IsOperationMetadataValid(string operationId,
       DateTime lastUpdatedTimestamp, TimeSpan timeout);
   bool IsTypeMetadataValid(string typeId,
       DateTime lastUpdatedTimestamp, TimeSpan timeout);
   OperationMetadata ResolveOperationMetadata(string operationId,
       TimeSpan timeout,
       out TypeMetadataCollection extraTypeMetadataResolved);
   TypeMetadata ResolveTypeMetadata(string typeId, TimeSpan timeout,
       out TypeMetadataCollection extraTypeMetadataResolved);
}
Table 15 describes what each method does.
| Method | Description |
|---|---|
| IsOperationMetadataValid | Returns a Boolean value indicating whether operation metadata is valid. For the XYZAdapter, we assume that operation metadata is always valid. |
| IsTypeMetadataValid | Returns a Boolean value indicating whether type metadata is valid. For the XYZAdapter, we assume that type metadata is always valid. |
| ResolveOperationMetadata | Maps supplied operationId to corresponding Microsoft.ServiceModel.Channels.Common.OperationMetadata. |
| ResolveTypeMetadata | Maps supplied typeId to corresponding Microsoft.ServiceModel.Channels.Common.TypeMetadata. |
Here is the process to implement the IMetadataResolverHandler interface:
1. In Visual Studio, open the XYZAdapterMetadataResolverHandler.cs file.
2. Find the IsOperationMetadataValid method, and modify it to return true.
3. Find the IsTypeMetadataValid method, and modify it to return true.
4. Find the ResolveOperationMetaData method, and replace it with the following code:
/// <summary>
      /// Returns an OperationMetadata object resolved from absolute
      /// name of the operation metadata object.
      /// The method should complete within the specified time
      /// span or throw a timeout exception.
      /// </summary>
      public OperationMetadata ResolveOperationMetadata(string operationId,
                      TimeSpan timeout,
                      out TypeMetadataCollection extraTypeMetadataResolved)
{
          extraTypeMetadataResolved = null;
          ParameterizedOperationMetadata om =
              new ParameterizedOperationMetadata(operationId, operationId);
          // set this if you want this operation to belong
          // to this interface name
          // in the generated proxy, the interface name
          // will be XYZService and the client implementation name
          // will be XYZServiceClient.
          om.OperationGroup = "XYZService";
          // set the operation namespace to be same as service namespace
          om.OperationNamespace = XYZAdapter.SERVICENAMESPACE;
          switch (operationId)
          {
              case "XYZ/GetRooms":
                  om.DisplayName = "GetRooms";
                  om.OriginalName = "originalGetRooms";
                  OperationParameter parm1 =
                      new OperationParameter("XYZName",
                          OperationParameterDirection.In,
                          QualifiedType.StringType, false);
                  parm1.Description = @"This string will
                      contain XYZ name for which
                      number of rooms is being requested";
                  OperationResult result =
                      new OperationResult(new
                          SimpleQualifiedType(XmlTypeCode.String), false);
                  om.Parameters.Add(parm1);
                  om.OperationResult = result;
                  return om;
              case "XYZ/OnClientArrived":
                  om.DisplayName = "OnClientArrived";
                  om.OriginalName = "originalOnClientArrived";
                  OperationParameter pName =
                      new OperationParameter("FirstName",
                          OperationParameterDirection.In,
                          QualifiedType.StringType, false);
                  pName.Description = "Client's first name.";
                  OperationParameter pLastName=
                      new OperationParameter("LastName",
                          OperationParameterDirection.In,
                          QualifiedType.StringType, false);
pLastName.Description = "Client's last name.";
                  om.Parameters.Add(pName);
                  om.Parameters.Add(pLastName);
                  om.OperationResult = null;
                  return om;
   return null;
}
Step5: Implementing the Message Exchange
Now that you have learned how to implement the metadata handlers, it's time to get to the meat and potatoes of any WCF LOB Adapter—communicating with the target LOB system. In this step, you will learn how to implement the synchronous inbound and outbound handlers. In the outbound scenario, the WCF LOB Adapters communicate with the target LOB systems by sending the request and receiving the response that will be returned to the client. In the inbound scenario, the WCF LOB Adapters monitor the target system for a particular event or data and notify the client. These message exchange patterns are represented by two interfaces: IOutboundHandler and IInboundHandler.
5.1. Implementing the IOutboundHandler Interface
To enable the outbound capabilities of the adapter, you have to implement the IOutboundHandler[] interface from the Microsoft.ServiceModel.Channels.CommonIOutboundHandler interface is located in the Microsoft.ServiceMode.Channels.dll assembly and is defined as follows: namespace. The
[] http://msdn.microsoft.com/en-us/library/microsoft.servicemodel.channels.common.ioutboundhandler.aspx
public interface IOutboundHandler : IConnectionHandler, IDisposable
    {
        Message Execute(Message message, TimeSpan timeout);
    }
The Execute method extracts data from the incoming WCF message, invokes the corresponding method on the target LOB system passing the extracted data as parameters, and returns a WCF response message to the client application. Implementing the Execute method, you have to follow two rules:
· If your adapter participates in one-way operations and doesn't expect to receive any outgoing message, the Execute method has to return null.
· If your adapter participates in two-way operations with Microsoft.ServiceModel.Channels.Common.OperationResult equal to nothing, the Execute method has to return the WCF message with an empty body. Otherwise, the outgoing message has to contain the operation result. To be consumable by BizTalk applications, your adapter must support two-way operations because of the restrictions imposed by the BizTalk WCF-adapter.
As the product documentation[] states, the WCF LOB Adapter SDK forms incoming and outgoing messages according to the following rules.
[] http://msdn.microsoft.com/en-us/library/bb798099.aspx
For the incoming WCF request messages:
· Message action = operation's nodeID
· Message body is formed according to the following pattern:
<displayname><parametername>[value]</parametername></displayname>
For the outgoing WCF response messages:
· Message action = operation's nodeID + \response
· Message body takes the following form:
<displayName + "Response"><displayName + "Result">
<datatype>[value]</datatype>
</displayName + "Result"></displayName + "Response">
For example, for the string GetRooms (string) operation supported by the XYZ adapter with nodeId = "XYZ\GetRooms" and displayName="GetRooms", the incoming and outgoing messages will look as follows.
For the incoming message:
<GetRooms>
    <string>{data}
    </string>
</GetRooms>
For the outgoing message:
<GetRoomsResponse>
    <GetRoomsResult>
        <string>{data}</string>
    </GetRoomsResult>
</GetRoomsResponse>
Now let's get to the code:
1. In Visual Studio, open the XYZAdapterOutboundHandler.cs file.
2. Add the using System.Xml and using System.IO directives.
3. Find the Execute method, and replace it with the following code:
/// <summary>
          /// Executes the request message on the target system
          /// and returns a response message.
          /// If there isn't a response, this method should return null
          /// </summary>
          public Message Execute(Message message, TimeSpan timeout)
{
              OperationMetadata om = this.MetadataLookup.
                                   GetOperationDefinitionFromInputMessageAction(
                                                 message.Headers.Action, tim-
  eout);
              if (om == null)
              {
                  throw new AdapterException("Invalid action " +
                                                  message.Headers.Action);
              }
              //actions are specified in the proxy files
              //or can be configured in WCF-custom adapter
              switch (message.Headers.Action)
              {
                  case "XYZ/GetRooms":
                      XmlDictionaryReader inputReader =
                          message.GetReaderAtBodyContents();
                      // move to the content
                      while (inputReader.Read())
                      {
                          if ((String.IsNullOrEmpty(inputReader.Prefix) &&
                                         inputReader.Name.Equals("XYZName"))
                              || inputReader.Name.Equals(
                                      inputReader.Prefix + ":" + "XYZName"))
                              break;
                      }
                      inputReader.Read();
                      //assume there are 10 rooms available.
                      string responseValue = inputReader.Value + ":10 rooms";
                      StringBuilder outputString = new StringBuilder();
                      XmlWriterSettings settings = new XmlWriterSettings();
                      settings.OmitXmlDeclaration = true;
                      // Create response message
                      XmlWriter replywriter =
                                 XmlWriter.Create(outputString, settings);
                      replywriter.WriteStartElement("GetRoomsResponse",
                          XYZAdapter.SERVICENAMESPACE);
                      replywriter.WriteElementString("GetRoomsResponseResult",
                          responseValue);
                      replywriter.WriteEndElement();
                      replywriter.Close();

                      XmlReader replyReader =
                          XmlReader.Create(
                                  new StringReader(outputString.ToString()));
// Output Message Format
                      // <GetRoomsResponse><GetRoomsResult>{rooms}
                      //</GetRoomsResult></GetRoomsResponse>
                      // create output message
                      return Message.CreateMessage(
                              MessageVersion.Default,
                              "XYZ/GetRooms/response",
                              replyReader);
                  default: throw new AdapterException("Invalid action " +
                      message.Headers.Action);
              }
          }
          #endregion IOutboundHandler Members
}
5.2. Implementing the IInboundHandler Interface
To enable the inbound capabilities of the adapter, you have to implement the IInboundHandler[] interface from the Microsoft.ServiceModel.Channels.CommonIInboundHandler interface is located in the Microsoft.ServiceMode.Channels.dll assembly and namespace. The is defined as follows:
[] http://msdn.microsoft.com/en-us/library/microsoft.servicemodel.channels.common.ioutboundhandler.aspx
public interface IInboundHandler : IConnectionHandler, IDisposable
{
    void StartListener(string[] actions, TimeSpan timeout);
    void StopListener(TimeSpan timeout);
    bool TryReceive(TimeSpan timeout, out Message message,
                                      out IInboundReply reply);
    bool WaitForMessage(TimeSpan timeout);
}
Table 16 describes what each method does.
| Method | Description |
|---|---|
| StartListener | Starts listening to messages with the provided WS-Addressing actions. If none is specified, it listens to all or the default actions. |
| StopListener | Stops listening. |
| TryReceive | Tries to receive an inbound message from the target system. |
| WaitForMessage | Waits for the inbound WCF-message from the LOB system. |
Here is the process you have to follow:
1. In Visual Studio, open the XYZAdapter.cs file.
2. Add new ServiceName property, as shown here:
public string ServiceNamespace
  {
      get
      {
          return SERVICENAMESPACE;
      }
  }
3. In Visual Studio, open the XYZInboundHandler.cs file.
4. Expand the Using Directives region, and make sure it matches the following code snippet:
using System;
using System.Collections.Generic;
using System.Text;
using System.Xml;
using System.IO;
using System.ServiceModel.Channels;
using System.Timers;
using Microsoft.ServiceModel.Channels.Common;
5. Add the following class member variables to the class:
private Queue<Message> inboundMessages;
private int pollingPeriod;
private Timer pollingTimer;
private Object syncLock;
6. Replace the XYZInboundHandler constructor with the following code snippet:
public XYZAdapterInboundHandler(XYZAdapterConnection connection
    , MetadataLookup metadataLookup)
    : base(connection, metadataLookup)
{
    pollingPeriod =
        connection.ConnectionFactory.Adapter.PollingPeriod;
    syncLock = new Object();
}
7. Add the implementation for the StartListener and StopListener methods, as shown here:
/// <summary>
/// Start the listener
/// </summary>
public void StartListener(string[] actions, TimeSpan timeout)
{
    //listen for all actions
    //create a Queue to hold inbound messages;
    inboundMessages = new Queue<Message>();
    //set up a timer to pool for guest arrivals

    pollingTimer = new System.Timers.Timer(pollingPeriod * 1000);
    pollingTimer.Elapsed +=
        new System.Timers.ElapsedEventHandler(CheckArrivals);
}


/// <summary>
/// Stop the listener
/// </summary>
public void StopListener(TimeSpan timeout)
{
    if (pollingTimer != null)
    {
        pollingTimer.Stop();
        pollingTimer = null;
    }
    lock (syncLock)
    {
        inboundMessages.Clear();
        inboundMessages = null;
    }
}
8. Now add the implementation for the TryReceive and WaitForMessage methods:
/// <summary>
/// Tries to receive a message within a specified interval of time.
/// </summary>
public bool TryReceive(TimeSpan timeout,
                   out System.ServiceModel.Channels.Message message,
                   out IInboundReply reply)
{
    reply = new XYZAdapterInboundReply();
    message = null;

    //assume timeout is infinite
    while (true)
    {
        lock (syncLock)
{
            if (inboundMessages == null)
            {
                //listener has been closed
                return false;
            }
            if (inboundMessages.Count != 0)
            {
                message = inboundMessages.Dequeue();
                if (message != null)
                {
                    return true;
                }
            }
        }
        System.Threading.Thread.Sleep(500);
    }
}

/// <summary>
/// Returns a value that indicates whether a message
/// has arrived within a specified interval of time.
/// </summary>
public bool WaitForMessage(TimeSpan timeout)
{
    //wait for message to appear in the queue
    while (inboundMessages.Count == 0) { };
    //check if message is there but don't remove it
    Message msg = inboundMessages.Peek();
    if (msg != null)
    {
        return true;
    }
    return false;
}
9. Add the implementation for the ElapsedEventHandler callback, as shown in the following code snippet:
private void CheckArrivals(object sender, ElapsedEventArgs args)
{
    //poll for example a database
    //if new guest found create inbound message
XYZAdapter adapter = this.Connection.ConnectionFactory.Adapter;
    String xmlData = String.Format(@"<OnGuestArrived {0}"">
                         <FirstName>{1}</FirstName>
                         <LastName>{2}</LastName></OnGuestArrived>",
                         adapter.ServiceNamespace,
                         "John",
                         "Smith");
    XmlReader reader = XmlReader.Create(new StringReader(xmlData));
    // create WCF message
    Message requestMessage =
        Message.CreateMessage(MessageVersion.Default
                , "XYZ/OnGuestArrived"
                , reader);
    // add it to inbound queue
    inboundMessages.Enqueue(requestMessage);
}
10. Save and build the project.
You have finished the development stage of the XYZAdapter.
NOTE
In the "scale-out" architecture, your adapters may be deployed on more than one server. If this is the case, then in the inbound scenario, there is a potential danger of sending duplicate messages to the client application when different instances of your adapter react on the same event on the target LOB system. Unfortunately, this issue doesn't have a generic solution, and therefore you, an adapter developer, have to provide the implementation specific to your target LOB system to prevent duplicate messages from occurring.
Step 6: Deployment
To make the XYZAdapter available for consumption by the client applications, you have to deploy it. The deployment procedure is not complicated. First you have to GAC the adapter by signing the adapter's assembly with a strong name key and calling the gacutil.exe utility with the /if switch. Second, you have to register the adapter with WCF by making a few entries in the machine.config file. Here is the process to follow to register the XYZAdapter with WCF:
1. Go to the <%WINDIR%>\Microsoft.NET\Framework\Config folder, locate the machine.config file, and open it in Visual Studio.
2. Update the <system.serviceModel> configuration section to include the XYZAdapter entries as follows:
Code View: Scroll / Show All
<system.serviceModel>
<system.serviceModel>
  <client>
    <endpoint binding="XYZBinding" contract="IMetadataExchange"
      name="XYZ" />
  </client>
  <extensions>
    <bindingElementExtensions>
      <add name="XYZAdapter"
           type="XYZApp.XYZAdapter.XYZAdapterBindingElementExtension,
            XYZApp.XYZAdapter.XYZAdapter,Version=1.0.0.0,
            Culture=neutral, PublicKeyToken=XXXXXXXXXXXXX" />
    </bindingElementExtensions>
    <bindingExtensions>
      <add name="XYZBinding"
           type="XYZApp.XYZAdapter.XYZAdapterBindingCollectionElement,
           XYZApp.XYZAdapter.XYZAdapter,Version=1.0.0.0,
           Culture=neutral, PublicKeyToken=XXXXXXXXXXXXXX" />/>
    </bindingExtensions>
  </extensions>
</system.serviceModel>
7. Step 7: Consuming from an .NET Application
Now that you have finished the deployment, the XYZAdapter can be consumed from the WCF-enabled client applications. You have to generate a proxy and update the app.config file to include the adapter configuration. The Add Adapter Service Reference plug-in is your main tool to do the job.
Here is the process to follow:
1. Open Visual Studio, and create new project called ConsumeAdapterApplication.
2. In the Solution Explorer, right-click the ConsumeAdapterApplication project, and select the Add Adapter Service Reference menu item.
3. In the Select Binding combo box, select XYZBinding. Click the Configure button. The Configure Adapter dialog box will open.
4. Specify the username and password, as shown in Figure 11. Click the OK button to return to the Add Adapter Service Reference plug-in.
5. Click the Connect button. Make sure that the connection status has changed to "connected."
6. In the "Select a category" list, select "XYZ operations."
7. In the "Available categories and operations" list, select Get Rooms, and click the Add button. The Add Adapter Service Reference window now should look like Figure 13.
Figure 13. Add Adapter Service Reference window
8. Click the OK button to generate a proxy file. The app.config file will also be updated. Note that the proxy file named XYZAdapterBindingClient.cs is now part of the solution.
9. Open the Program.cs file, and replace content with the following code:
using System;
using System.Collections.Generic;
using System.Linq;
using System.Text;

namespace ConsumeAdapterApplication
{
    class Program
    {
        static void Main(string[] args)
{
            XYZServiceClient client = new XYZServiceClient();
            client.ClientCredentials.UserName.UserName = "Probiztalk2009";
            string response = client.GetRooms("Indigo XYZ");
            Console.WriteLine(response);
            Console.Read();
        }
    }
}
10. Build and run the application. You will see the XYZAdapter response.
8. Step 8: Consuming from BizTalk Application
To consume the XYZAdapter from a BizTalk application, you have to generate the schemas for the operations supported by the adapter and the binding file to create physical ports. In case of a BizTalk application, the tool to do the job is the Consume Adapter Service add-in. This tool has the same UI as the Add Adapter Service Reference plug-in, but it generates different artifacts.
Here is the process to follow:
1. In Visual Studio, open your BizTalk project.
2. In Solution Explorer, right-click the project, and select Add => Add Generated Items => Consume Adapter Service.
3. In the Select Binding box, select XYZBinding. Click the Configure button. The Configure Adapter dialog box will open.
4. Specify the username and password. Click the OK button to return to the Add Adapter Service Reference window.
5. Click the Connect button. Make sure that the connection status has changed to "connected."
6. In the "Select a category" list, select "XYZ operations."
7. In the "Available categories and operations" list, select Get Rooms, and click the Add button.
8. Click OK to generate the schemas and the binding file. The schema file named XYZAdapterBindings.xsd contains message definitions for the XYZAdapter request and response messages..
9. Implement your project orchestration to communicate with the XYZAdapter through a request-response port. Your orchestration should look like Figure 16.
10. Build and deploy the project.
11. Open the BizTalk Administration Console.
12. Import the binding file to create physical ports. Right-click your application under the Applications group, select Import => Bindings, navigate to your binding file, and click the Open button.
13. Map the orchestration logical ports to the newly created physical ports.
14. Enlist and start your orchestration.
15. Start your application.