InfoPath: Restrict Section Visibility Based on User
Applies To:
SharePoint/InfoPath List Forms
Introduction
Sometimes we need to restrict sections in forms to a certain group of users. Instead of simply marking them with a heading such as "HR Use Only" or "Information Services Use Only", we can show or hide a section based on the logged in user. This article describes how to achieve that in InfoPath.
Creating the Lists
In order to restrict sections in a form, we will need to create a list that contains the users who will have access to the section. We will reference this list in a data connection in InfoPath.
Create the User List
- Create a custom list and name it ElevatedPermissionsUsers
- Create a new column:
- Column name: AdminUser
- Type: Person or Group
- Required: Yes
- Allow selection of: People Only
- Accept the defaults for everything else
- In Advanced Settings, Allow management of content types
- Change the Item content type and hide the Title field
- Change the default All Items view:
- Remove the Title field
- Add Edit (link to edit item) and move it to the first column
Now that your list is ready, add a couple of site users to the list.
Customizing the List Form
If you don't already have a list form that you need to customize, create one now. It can be based on a Custom list template, or any other list template that you need, such as Tasks.
For this excersize, I've created a custom list and named it RestrictedInfoPathSections.
Create the List
- Accept the default Title field
- Create the following fields. For simplicity I kept them as single lines of text except the IsAdmin field, however they can be any field type
Name Type FirstName Single line of text LastName Single line of text Manager Single line of text EmployeeAction Single line of text CurrentUser Single line of text (Hide in all views) IsAdmin Number (Hide in all views)
Customize the list in InfoPath
- On the list ribbon, click the Customize in InfoPath button
- On the newly created InfoPath form
- Delete the last four rows including the fields, Manager, CurrentUsaer, IsAdmin and EmployeeAction
- Add a new section to the bottom of the form
- Insert a Two-Column with Emphasis 3 table layout in the new section
- Add the Manager and EmployeeAction fields in the new table

- Format and change themes to your liking
Manage the Data Connections
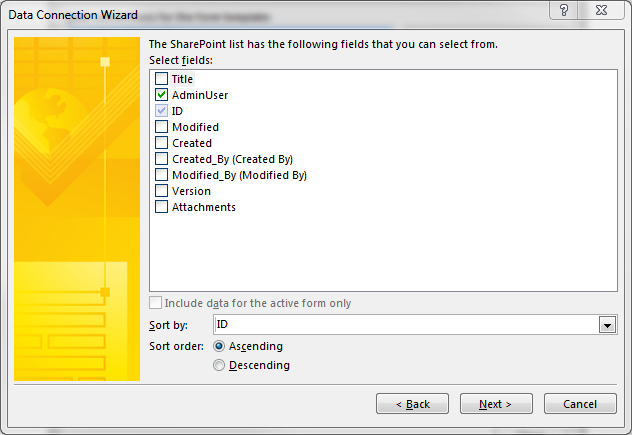
- Add a new connection to the ElevatedPermissionsUsers list and name it GET-ElevatedPermissionsUsers
- Select the following fields:
- Accept the defaults and complete the wizard steps
Create the Rules
- Select the DATA tab in the ribbon
- In the Rules section, click on the Form Load button
- Create a new Action rule and name it Assign Admin Users
- Accept the default Condition - None - Rule runs when form is opened
- Create a new Set a field's value action:
Field: IsAdmin
For Value, click on the fx button
Click Insert a Field or Group
Click on Show advanced view
Change the data source to GET-ElevatedPermissionsUsers
Under dataFields, drill down and select ID
Click Filter Data
Click Add
In the first drop-down box change ID and click Select a field or group...
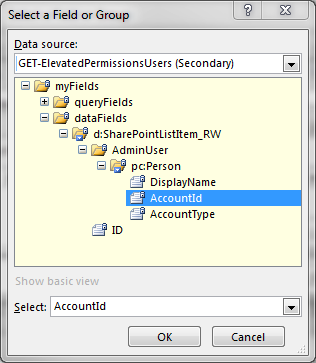
On the Data source dialog, under dataFields, drill down and select AdminUser AccountID
Click OK
Accept the default in the second drop-down: is equal to
From the third drop-down, select Use a fornula...
On the Insert Formula dialog, click the middle button Insert Function...
Select the userName function and click OK
Click OK several times to close all dialog boxes
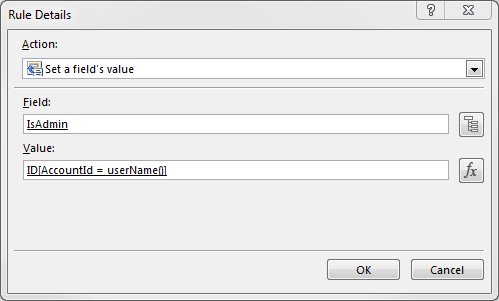
The final Rule Details dialog should look similar to the image below:
Click on the section tab that contains your restricted content
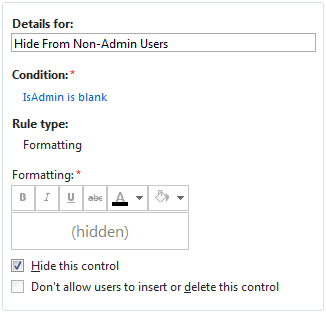
Create a new formatting rule and name it Hide From Non-Admin Users
Set the condition to IsAdmin = Is blank
Select the Hide this control check-box
Right-click on the CurrentUser field in the fields section and select Field Properties...
Change the Default Value by clicking the fx button next to the Value text box
Insert the userName function

Publish the form
Test the form by signing in to the site with a user who is in the ElevatedPermissionsUsers list, then with one who's not in this list.


