MVC: Caching In Web API:
Normally caching is the process of storing data somewhere for the future requests, in our case we can avoid the unwanted hit to database to get the data if we cache the data somewhere, this way we can make sure that the data is served in a faster manner. Here we are going to see the caching in our Web API controller. If you are new to caching, I have written an article about caching in MVC, please read it here: Caching In MVC. We will explain caching with the help of System.Runtime.Caching which is given by Microsoft. This DLL is not available in the default references, you may need to add that separately. I will show you how. I am creating this application in Visual Studio 2015. You can always get the tips/tricks/blogs about these mentioned technologies from the links given below.
Now we will go and create our application. I hope you will like this.
Download the source code
You can always download the source code here:
Background
For the past few days I am working with Web API.Here we are going to see a demo of how to use Caching in Web API in our MVC application. We are going to use the DLL System.Runtime.Caching.dll, which you need to add as reference.
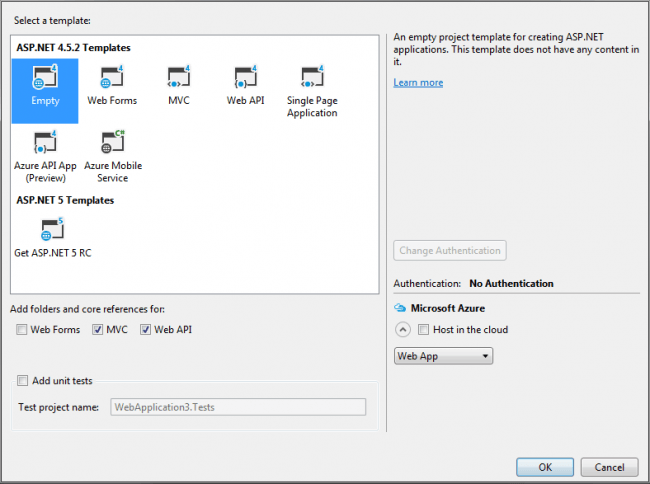
Create a MVC application
Click File-> New-> Project then select MVC application. From the following pop up we will select the template as empty and select the core references and folders for MVC.
http://sibeeshpassion.com/wp-content/uploads/2016/03/Empty-Template-With-MVC-And-Web-API-Folders-e1458711950206.png
Empty Template With MVC And Web API Folders
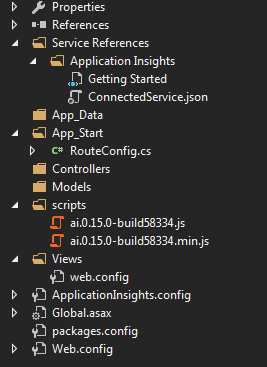
Once you click OK, a project with MVC like folder structure with core references will be created for you.
http://sibeeshpassion.com/wp-content/uploads/2016/03/Folder-Structure-And-References-For-Empty-MVC-Project.png
Folder Structure And References For Empty MVC Project
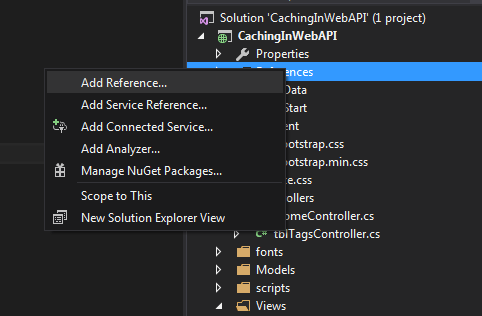
Once your application is ready, we can add the reference for System.Runtime.Caching
Add reference for System.Runtime.Caching
To add the reference, right click on References and click Add reference.
http://sibeeshpassion.com/wp-content/uploads/2016/03/Add_References_.png
Add_References
Now click on the browse button, and search for System.Runtime.Caching
http://sibeeshpassion.com/wp-content/uploads/2016/03/References_Found_-e1458732611680.png
References_Found_
And the click OK, the DLL will be added to your references now.
Using the code
We will set up our database first so that we can create Entity Model for our application later.
Create a database
The following query can be used to create a database in your SQL Server.
USE [master]
GO

/****** Object:  Database  [TrialsDB]
CREATE DATABASE  [TrialsDB]
 CONTAINMENT = NONE
 ON  PRIMARY
( NAME  = N'TrialsDB', FILENAME = N'C:\Program Files\Microsoft SQL Server\MSSQL11.MSSQLSERVER\MSSQL\DATA\TrialsDB.mdf' , SIZE = 3072KB , MAXSIZE = UNLIMITED, FILEGROWTH = 1024KB )
 LOG ON
( NAME  = N'TrialsDB_log', FILENAME = N'C:\Program Files\Microsoft SQL Server\MSSQL11.MSSQLSERVER\MSSQL\DATA\TrialsDB_log.ldf' , SIZE = 1024KB , MAXSIZE = 2048GB , FILEGROWTH = 10%)
GO

ALTER DATABASE  [TrialsDB] SET COMPATIBILITY_LEVEL = 110
GO

IF (1 = FULLTEXTSERVICEPROPERTY('IsFullTextInstalled'))
begin
EXEC [TrialsDB].[dbo].[sp_fulltext_database] @action = 'enable'
end
GO

ALTER DATABASE  [TrialsDB] SET ANSI_NULL_DEFAULT OFF
GO

ALTER DATABASE  [TrialsDB] SET ANSI_NULLS OFF
GO

ALTER DATABASE  [TrialsDB] SET ANSI_PADDING OFF
GO

ALTER DATABASE  [TrialsDB] SET ANSI_WARNINGS OFF
GO

ALTER DATABASE  [TrialsDB] SET ARITHABORT OFF
GO

ALTER DATABASE  [TrialsDB] SET AUTO_CLOSE OFF
GO

ALTER DATABASE  [TrialsDB] SET AUTO_CREATE_STATISTICS ON
GO

ALTER DATABASE  [TrialsDB] SET AUTO_SHRINK OFF
GO

ALTER DATABASE  [TrialsDB] SET AUTO_UPDATE_STATISTICS ON
GO

ALTER DATABASE  [TrialsDB] SET CURSOR_CLOSE_ON_COMMIT OFF
GO

ALTER DATABASE  [TrialsDB] SET CURSOR_DEFAULT  GLOBAL
GO

ALTER DATABASE  [TrialsDB] SET CONCAT_NULL_YIELDS_NULL OFF
GO

ALTER DATABASE  [TrialsDB] SET NUMERIC_ROUNDABORT OFF
GO

ALTER DATABASE  [TrialsDB] SET QUOTED_IDENTIFIER OFF
GO

ALTER DATABASE  [TrialsDB] SET RECURSIVE_TRIGGERS OFF
GO

ALTER DATABASE  [TrialsDB] SET  DISABLE_BROKER
GO

ALTER DATABASE  [TrialsDB] SET AUTO_UPDATE_STATISTICS_ASYNC OFF
GO

ALTER DATABASE  [TrialsDB] SET DATE_CORRELATION_OPTIMIZATION OFF
GO

ALTER DATABASE  [TrialsDB] SET TRUSTWORTHY OFF
GO

ALTER DATABASE  [TrialsDB] SET ALLOW_SNAPSHOT_ISOLATION OFF
GO

ALTER DATABASE  [TrialsDB] SET PARAMETERIZATION SIMPLE
GO

ALTER DATABASE  [TrialsDB] SET READ_COMMITTED_SNAPSHOT OFF
GO

ALTER DATABASE  [TrialsDB] SET HONOR_BROKER_PRIORITY OFF
GO

ALTER DATABASE  [TrialsDB] SET RECOVERY FULL
GO

ALTER DATABASE  [TrialsDB] SET  MULTI_USER
GO

ALTER DATABASE  [TrialsDB] SET PAGE_VERIFY CHECKSUM
GO

ALTER DATABASE  [TrialsDB] SET DB_CHAINING OFF
GO

ALTER DATABASE  [TrialsDB] SET FILESTREAM( NON_TRANSACTED_ACCESS = OFF )
GO

ALTER DATABASE  [TrialsDB] SET TARGET_RECOVERY_TIME = 0 SECONDS
GO

ALTER DATABASE  [TrialsDB] SET  READ_WRITE
GO
Now we will create the table we needed. As of now I am going to create the table tblTags
Create tables in database
Below is the query to create the table tblTags.
USE [TrialsDB]
GO

/****** Object:  Table  [dbo].[tblTags]  Script Date: 23-Mar-16 5:01:22 PM ******/
SET ANSI_NULLS ON
GO

SET QUOTED_IDENTIFIER ON
GO

CREATE TABLE  [dbo].[tblTags](
 [tagId] [int] IDENTITY(1,1) NOT NULL,
 [tagName] [nvarchar](50) NOT NULL,
 [tagDescription] [nvarchar](max) NULL,
 CONSTRAINT [PK_tblTags] PRIMARY KEY  CLUSTERED
(
 [tagId] ASC
)WITH (PAD_INDEX = OFF, STATISTICS_NORECOMPUTE = OFF, IGNORE_DUP_KEY = OFF, ALLOW_ROW_LOCKS = ON, ALLOW_PAGE_LOCKS = ON) ON  [PRIMARY]
) ON  [PRIMARY] TEXTIMAGE_ON [PRIMARY]

GO
Can we insert some data to the tables now?
Insert data to table
You can use the below query to insert the data to the table tblTags
USE [TrialsDB]
GO

INSERT INTO  [dbo].[tblTags]
 ([tagName]
 ,[tagDescription])
 VALUES
 (<tagName, nvarchar(50),>
 ,<tagDescription, nvarchar(max),>)
GO
Next thing we are going to do is creating a ADO.NET Entity Data Model.
Create Entity Data Model
Right click on your model folder and click new, select ADO.NET Entity Data Model. Follow the steps given. Once you have done the processes, you can see the edmx file and other files in your model folder. Here I gave Dashboard for our Entity data model name. Now you can see a file with edmx extension have been created. Now will create our Web API controller.
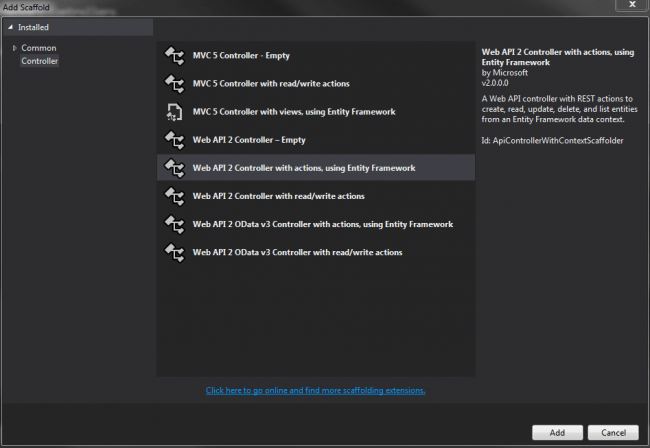
Create Web API Controller
To create a Web API controller, just right click on your controller folder and click Add -> Controller -> Select Web API 2 controller with actions, using Entity Framework.
http://sibeeshpassion.com/wp-content/uploads/2016/03/Web-API-2-Controller-With-Actions-Using-Entity-Framework-e1458709497551.png
Web API 2 Controller With Actions Using Entity Framework
Now select tblTag (CachingInWebAPI.Models) as our Model class and TrialsDBEntities (CachingInWebAPI.Models) as data context class.
As you can see It has been given the name of our controller as tblTags. Here I am not going to change that, if you wish to change, you can do that.
Now you will be given the following codes in our new Web API controller.
using System;
using System.Collections.Generic;
using System.Data;
using System.Data.Entity;
using System.Data.Entity.Infrastructure;
using System.Linq;
using System.Net;
using System.Net.Http;
using System.Web.Http;
using System.Web.Http.Description;
using CachingInWebAPI.Models;

namespace CachingInWebAPI.Controllers
{
 public class  tblTagsController : ApiController
 {
 private TrialsDBEntities db = new TrialsDBEntities();

 // GET: api/tblTags
 public IQueryable<tblTag> GettblTags()
 {
 return db.tblTags;
 }

 // GET: api/tblTags/5
 [ResponseType(typeof(tblTag))]
 public IHttpActionResult GettblTag(int id)
 {
 tblTag tblTag = db.tblTags.Find(id);
 if (tblTag == null)
 {
 return NotFound();
 }

 return Ok(tblTag);
 }

 // PUT: api/tblTags/5
 [ResponseType(typeof(void))]
 public IHttpActionResult PuttblTag(int id, tblTag tblTag)
 {
 if (!ModelState.IsValid)
 {
 return BadRequest(ModelState);
 }

 if (id != tblTag.tagId)
 {
 return BadRequest();
 }

 db.Entry(tblTag).State = EntityState.Modified;

 try
 {
 db.SaveChanges();
 }
 catch (DbUpdateConcurrencyException)
 {
 if (!tblTagExists(id))
 {
 return NotFound();
 }
 else
 {
 throw;
 }
 }

 return StatusCode(HttpStatusCode.NoContent);
 }

 // POST: api/tblTags
 [ResponseType(typeof(tblTag))]
 public IHttpActionResult PosttblTag(tblTag tblTag)
 {
 if (!ModelState.IsValid)
 {
 return BadRequest(ModelState);
 }

 db.tblTags.Add(tblTag);
 db.SaveChanges();

 return CreatedAtRoute("DefaultApi", new  { id = tblTag.tagId }, tblTag);
 }

 // DELETE: api/tblTags/5
 [ResponseType(typeof(tblTag))]
 public IHttpActionResult DeletetblTag(int id)
 {
 tblTag tblTag = db.tblTags.Find(id);
 if (tblTag == null)
 {
 return NotFound();
 }

 db.tblTags.Remove(tblTag);
 db.SaveChanges();

 return Ok(tblTag);
 }

 protected override  void Dispose(bool disposing)
 {
 if (disposing)
 {
 db.Dispose();
 }
 base.Dispose(disposing);
 }

 private bool  tblTagExists(int id)
 {
 return db.tblTags.Count(e => e.tagId == id) > 0;
 }
 }
}
As we are not going to use only read operation, you can remove other functionalities and keep only Getmethods for now.
// GET: api/tblTags
 public IQueryable<tblTag> GettblTags()
 {
 return db.tblTags;
 }
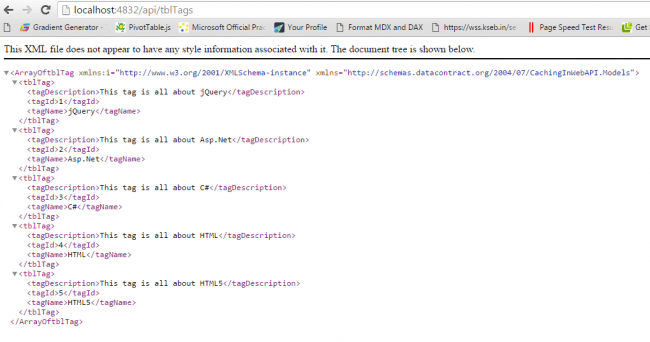
So the coding part to fetch the data from database is ready, now we need to check whether our Web API is ready for action!. To check that, you just need to run the URL http://localhost:4832/api/tblTags. HeretblTags is our Web API controller name. I hope you get the data as a result.
http://sibeeshpassion.com/wp-content/uploads/2016/03/Web_API_Result-e1458733092316.png
Web_API_Result
Now we will start testing our caching. For that please import the namespace System.Runtime.Caching;
using System.Runtime.Caching;
Next we will create an instance of *MemoryCache *class.
http://sibeeshpassion.com/wp-content/uploads/2016/03/MemoryCache_Tooltip_.png
MemoryCache_Tooltip_
As you can see there are four possible settings we can set in *MemoryCache *class.
http://sibeeshpassion.com/wp-content/uploads/2016/03/MemoryCache_Settings-e1458734646751.png
MemoryCache_Settings
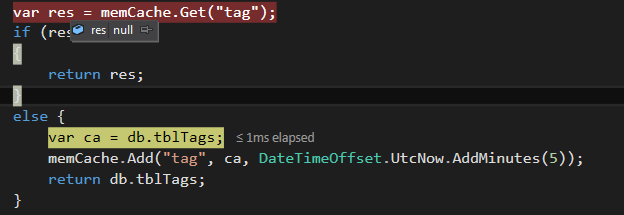
Now we can add MemoryCache as follows.
public IQueryable<tblTag> GettblTags()
 {
 var ca = db.tblTags;
 memCache.Add("tag", ca, DateTimeOffset.UtcNow.AddMinutes(5));
 return db.tblTags;
 }
http://sibeeshpassion.com/wp-content/uploads/2016/03/MemoryCache_Add-e1458734908183.png
MemoryCache_Add
Here "tag" is my key and "ca" is my values and DateTimeOffset.UtcNow.AddMinutes(5) is for setting the cache for five minutes from now.
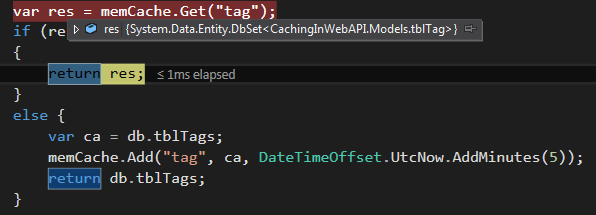
Shall we check how it works now? To check whether the content has been added to the cache we need to use the Get method, please see the code block below.
var res = memCache.Get("tag");
 if (res != null)
 {
 return res;
 }
 else {
 var ca = db.tblTags;
 memCache.Add("tag", ca, DateTimeOffset.UtcNow.AddMinutes(5));
 return db.tblTags;
 }
We will get the cache values in the variable res, remember this values will be there only for five minutes. You can always change that as per need. If the value is not null, we will just return it and do the manipulation and if it is null we will go ahead and fetch the data from database and add the value to cache. Now please run your API by running the URL http://localhost:4832/api/tblTags.
http://sibeeshpassion.com/wp-content/uploads/2016/03/Cache_Value_Null.png
Cache_Value_Null
You can see that we are setting the value to memCache as the memCache.Get("tag") is null.
http://sibeeshpassion.com/wp-content/uploads/2016/03/Cache_Value_Not_Null.png
Cache_Value_Not_Null
So we just tried to load the same Web API URL within five minutes, so we gets values frommemCache.Get("tag"). Sounds good?
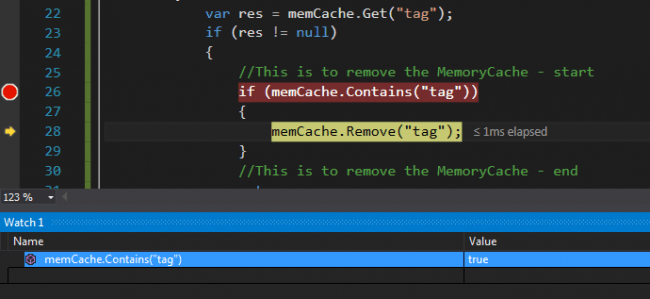
There is an option to remove our cache too, we will see that now. We will use the Remove function for the same. First we will check whether the key is available in the MemoryCache, if it is available we will remove that.
//This is to remove the MemoryCache - start
 if (memCache.Contains("tag"))
 {
 memCache.Remove("tag");
 }
 //This is to remove the MemoryCache - end
http://sibeeshpassion.com/wp-content/uploads/2016/03/MemoryCache_Remove-e1458737311814.png
MemoryCache_Remove
We have done everything!. That's fantastic right? Have a happy coding.