Note
Access to this page requires authorization. You can try signing in or changing directories.
Access to this page requires authorization. You can try changing directories.
Introduction
In this pose we will see how we can extract or unzip the uploaded files and check for some files in it in a in a programmatic manner. We will use a normal MVC application to work with this demo. We will use Microsoft System.IO.Compression, System.IO.Compression.FileSystem namespaces and the classes, for example ZipArchive, in the namespace for extracting or unzipping the files we upload. Once it is uploaded we will check the same by looping through it. For the client side coding, we uses jQuery. I guess this is enough for the introduction, now we will move on to our application. Let us create it. I hope you will like this article.
Download the source code
You can always download the source code here:
Background
As you are aware most websites accept only .zip or any other zipped formats, this is for ensuring that only less amount of data is being uploaded to the server. We can reduce almost 60 percent of the size if we zipped the same. Now the problem is, how you can validate any zipped item which is uploaded to your site? How can you check for any particular file in that zipped item? For example, if you need to find out any files with an extension of .sql, .ico or .txt? What if you want to intimate user that the uploaded items do not have any particular file that must be needed? Do you need to loop through the contents available in it right? This is what we are going to discuss in this post. I had a situation of uploading my old backups of my personal website (http://sibeeshpassion.com/) and after uploading I wanted to check whether the uploaded .zip file has .ico file in it. The process we are going to do is listed below.
- Create a MVC application
- Install jQuery
- Create Controller and View
- Upload Action Using jQuery
- Add System.IO.Compression, System.IO.Compression.FileSystem references
- Checks for the file using ZipArchive class
Using the code
Now we will move into the coding part. I hope your MVC application is ready for action with all the needed packages.
Create a controller
Now we will create a controller, view with an action in it as follows.
publicActionResult Index()
{
return
View();
}
Update the view
Now in the view, we will add a file upload and other needed elements.
< inputtype = "file"
name = "FileUpload1"id = "fileUpload"
placeholder = "Please select the file"
/>< br/>
< inputid = "btnUploadFile"
type = "button"value = "Upload File"
/>
< divid = "message" ></ div >
Add the JS references
Add the references as follows.
< scriptsrc = "~/scripts/jquery-1.10.2.min.js" ></ script >
< scriptsrc = "~/scripts/MyScript.js" ></ script >
Here MyScript.js is where we are going to write some scripts.
Style the elements (Optional)
You can style your view as follows. This step is absolutely optional, for me the view should not as simple as default one.
< style >
#fileUpload {
border: 1px solid #ccc;
padding: 10px;
border-radius: 5px;
font-size: 14px;
font-family: cursive;
color: blue;
}
#btnUploadFile {
border: 1px solid #ccc;
padding: 10px;
border-radius: 5px;
font-size: 14px;
font-family: cursive;
color: blue;
}
#message {
border-radius: 5px;
font-size: 14px;
font-family: cursive;
color: blue;
margin-top: 15px;
}
h2 {
border-radius: 5px;
font-size: 20px;
font-family: cursive;
color: blue;
margin-top: 15px;
}
</ style >
Add the upload action in script
Now it is time to create upload action. For that, please go to the script file MyScript.js and do the coding as follows.
$(document).ready(function () {
$( '#btnUploadFile' ).on( 'click' , function () {
var data = newFormData();
var files = $( "#fileUpload" ). get (0).files;
// Add the uploaded image content to the form data collection
if
(files.length > 0) {
data.append( "UploadedImage" , files[0]);
}
// Make Ajax request with the contentType = false, and procesDate = false
var ajaxRequest = $.ajax({
type: "POST" ,
url: "Home/Upload" ,
contentType: false ,
processData: false ,
data: data,
success: function (data) {
$( '#message' ).html(data);
},
error: function (e)
{
console.log( 'Oops, Something went wrong!.'
+ e.message);
}
});
ajaxRequest.done(function (xhr, textStatus) {
// Do other operation
});
});
});
If you are not aware of uploading and downloading in MVC, I strongly recommend you to have a look here: Uploading and Downloading in MVC Step-by-Step.
So we have set Home/Upload as the URL action in our Ajax function right? So we are going to create that action. Go to your controller and create a JsonResult action as follows.
publicJsonResult Upload()
{
string
isValid = checkIsValid(Request.Files);
return
Json(isValid, JsonRequestBehavior.AllowGet);
}
So we have done that too, now stop for a while. To work with ZipArchive class you must include the namespace as listed below.
usingSystem.IO.Compression;
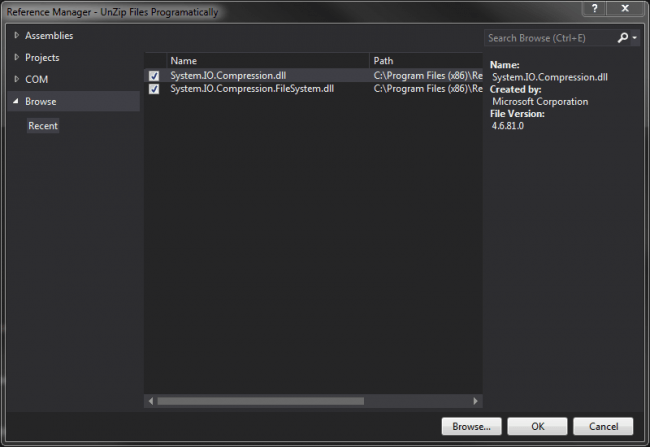
Now you will be shown an error as “Are you missing an assembly reference?”. Yes, we are. We have not added that references right? So now we are going to add the references for System.IO.Compression and System.IO.Compression.FileSystem.
Right click on Reference in your project and browse for the references. If you uses Visual Studio 2015, the references will be in C:\Program Files (x86)\Reference Assemblies\Microsoft\Framework\NETFramework\v4.6.
Please be noted that the folder names will differs according to your framework version
http://sibeeshpassion.com/wp-content/uploads/2016/02/Compression_References-e1455888597687.png
Compression_References
Now we will go back to our controller and write the codes for the function checkIsValid(Request.Files)
privatestringcheckIsValid(HttpFileCollectionBase files)
{
string
isValid = string .Empty;
try
{
foreach
( stringupload in
Request.Files)
{
if
(Request.Files[upload].ContentType == "application/octet-stream" ) //Content type for .zip is application/octet-stream
{
if
(Request.Files[upload].FileName != "" )
{
string
path = AppDomain.CurrentDomain.BaseDirectory + "/ App_Data / uploads /" ;
if
(!Directory.Exists(path))
{
// Try to create the directory.
DirectoryInfo di = Directory.CreateDirectory(path);
}
string
filename = Path.GetFileName(Request.Files[upload].FileName);
string
pth = Path.Combine(path, filename);
Request.Files[upload].SaveAs(pth);
isValid = CheckForTheIcon(pth);
}
}
else
{
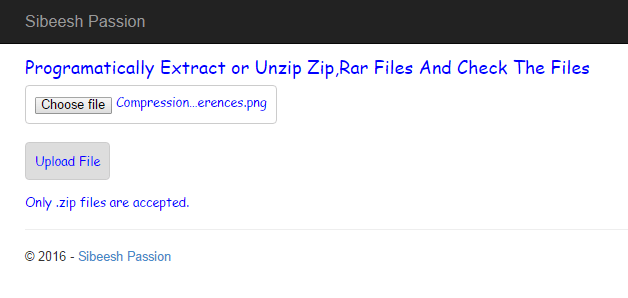
isValid = "Only .zip files are accepted." ;
}
}
return
isValid;
}
catch
(Exception)
{
return
"Oops!. Something went wrong" ;
}
}
As you can see we are looping through the HttpFileCollectionBase files and checks for the content type first.
Please be noted that the content type for the .zip file is application/octet-stream
Once the checking is done, we will save the files to a folder, we will send the path to the functionCheckForTheIcon(pth). So our next thing we need to do is to create the function CheckForTheIcon().
privatestringCheckForTheIcon( string
strPath)
{
string
result = string .Empty;
try
{
using
(ZipArchive za = ZipFile.OpenRead(strPath))
{
foreach
(ZipArchiveEntry zaItem inza.Entries)
{
if
(zaItem.FullName.EndsWith( ".ico" , StringComparison.OrdinalIgnoreCase))
{
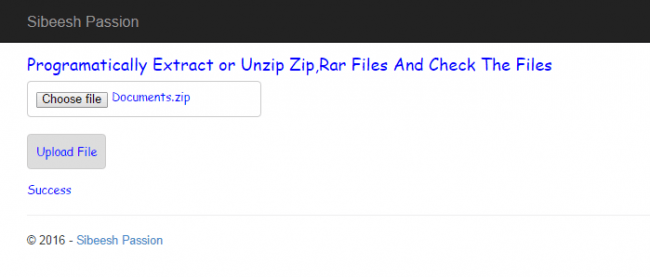
result = "Success" ;
}
else
{
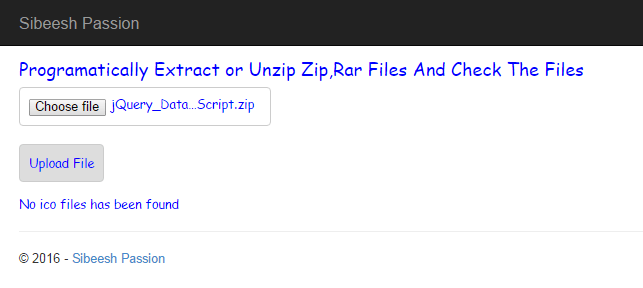
result = "No ico files has been found" ;
}
}
}
return
result;
}
catch
(Exception)
{
result = "Oops!. Something went wrong" ;
return
result;
}
}
As you can see we are looping through each ZipArchive class items and checks for the ‘.ico’ file in it. So if there is no error and there is ‘.ico’ file in the uploaded item zip item, you will get the message as “Success: or if it does not contain the ‘.ico’ file, you will get the message as “No ico files has been found”.
Now it is time to see our output. Please run your application.
Output
http://sibeeshpassion.com/wp-content/uploads/2016/02/If_you_try_to_upload_not_zipped_item.png
If you try to upload not zipped item
http://sibeeshpassion.com/wp-content/uploads/2016/02/If_you_try_to_upload_zipped_item_which_does_not_have_ico_file.png
If you try to upload zipped item which does not have ico file
http://sibeeshpassion.com/wp-content/uploads/2016/02/If_you_try_to_upload_zipped_item_which_have_ico_file-e1455889647121.png
If you try to upload zipped item which have ico file