Cognitive Services Face API demo in WPF Application
Microsoft Cognitive Services are basically a set of APIs, SDKs and services available for developers. Using MCS developers can make their applications more intelligent, user engaging. Microsoft Cognitive Services are more associated with and expansion of Microsoft Azure Machine Learning APIs by which developers can easily enable rich and intelligent features in applications like understanding user emotion and video detection, face detection, speech, vision recognition and speech and language understanding into developer applications. In this article I have implemented one WPF application which detect face from your photo which you can browse. I used Microsoft Face API. What is Face API?
Microsoft Face API
It is a cloud-based service that provides the most advanced face algorithms. Face API has two main functions: face detection with attributes and face recognition. Face API detects up to 64 human faces with high precision face location in an image. And the image can be specified by file in bytes or valid URL. Face rectangle (left, top, width and height) indicating the face location in the image is returned along with each detected face. Optionally, face detection extracts a series of face related attributes such as pose, gender, age, head pose, facial hair and glasses etc.
Face recognition is widely used in many scenarios including security, natural user interface, image content analysis and management, mobile apps, and robotics. Four face recognition functions are provided: face verification, finding similar faces, face grouping, and person identification. Face API verification performs an authentication against two detected faces or authentication from one detected face to one person object.
Open Visual Studio 2015. Go to Start -> New Project-> select Windows -> WPF Application -> give your app name FaceAPiDemoWPF -> OK.

Solution Explorer and add the following references in the project.
Microsoft.ProjectOxford.Face
Newtonsoft.Json
For adding Microsoft.ProjectOxford.Face Reference, right click your project from Solution Explorer and select "Manage NuGet Packages". Click on Browse and find out ProjectOxford.Face and Newtonsoft.Json and Click on Install.
In MainWindow.xaml.cs file add following code:
using Microsoft.ProjectOxford.Face;
using Microsoft.ProjectOxford.Face.Contract;
using System.IO;
namespace FaceApiDemoWPF
{
public partial class MainWindow : Window
{
private readonly IFaceServiceClient objFaceServiceClient = new FaceServiceClient("**********FACE API KEY**********");
public MainWindow()
{
InitializeComponent();
}
private async void btnBrowse_Click(object sender, RoutedEventArgs e)
{
var openDlg = new Microsoft.Win32.OpenFileDialog();
openDlg.Filter = "JPEG Image(*.jpg)|*.jpg";
bool? result = openDlg.ShowDialog(this);
if (!(bool)result)
{
return;
}
string filePath = openDlg.FileName;
Uri fileUri = new Uri(filePath);
BitmapImage bitmapSource = new BitmapImage();
bitmapSource.BeginInit();
bitmapSource.CacheOption = BitmapCacheOption.None;
bitmapSource.UriSource = fileUri;
bitmapSource.EndInit();
imgPhoto.Source = bitmapSource;
Title = "Detecting Face...";
FaceRectangle[] faceRects = await UploadAndTrackFaces(filePath);
Title = String.Format("Detection Finished. {0} Face(s) Detected", faceRects.Length);
if (faceRects.Length > 0)
{
DrawingVisual visual = new DrawingVisual();
DrawingContext drawingContext = visual.RenderOpen();
drawingContext.DrawImage(bitmapSource,
new Rect(0, 0, bitmapSource.Width, bitmapSource.Height));
double dpi = bitmapSource.DpiX;
double resizeFactor = 96 / dpi;
foreach (var faceRect in faceRects)
{
drawingContext.DrawRectangle(
Brushes.Transparent,
new Pen(Brushes.Red, 2),
new Rect(
faceRect.Left * resizeFactor,
faceRect.Top * resizeFactor,
faceRect.Width * resizeFactor,
faceRect.Height * resizeFactor
)
);
}
drawingContext.Close();
RenderTargetBitmap faceWithRectBitmap = new RenderTargetBitmap(
(int)(bitmapSource.PixelWidth * resizeFactor),
(int)(bitmapSource.PixelHeight * resizeFactor),
96,
96,
PixelFormats.Pbgra32);
faceWithRectBitmap.Render(visual);
imgPhoto.Source = faceWithRectBitmap;
}
}
private async Task<FaceRectangle[]> UploadAndTrackFaces(string imageFilePath)
{
try
{
using (Stream imageFileStream = File.OpenRead(imageFilePath))
{
var faces = await objFaceServiceClient.DetectAsync(imageFileStream);
var faceRects = faces.Select(face => face.FaceRectangle);
return faceRects.ToArray();
}
}
catch (Exception)
{
return new FaceRectangle[0];
}
}
}
}
Face API Key Free available in (https://www.microsoft.com/cognitive-services/en-us/face-api) also available in Azure Portal:

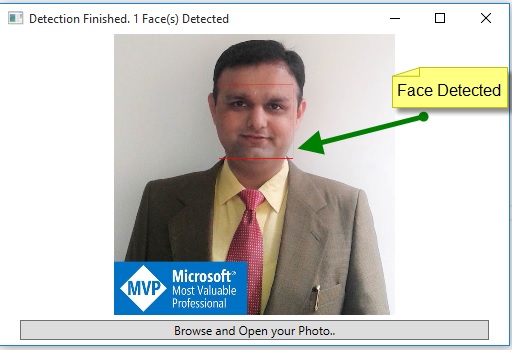
Then Run the Project and See the output my face detected in below snapshot: