Note
Access to this page requires authorization. You can try signing in or changing directories.
Access to this page requires authorization. You can try changing directories.
Download
Download the source here
Introduction
This series of article will walk you through on building a simple Online Poll System with real-time updates using
- SignalR 2,
- jQuery,
- Core EF,
- Core MVC and
- Web API 2.
We will take a look at how each of the technologies will be used within ASP.NET Core 1.0 context by building an application from scratch.
In this particular series, we will create the core foundation of the application starting from creating a new database, creating a new ASP.NET Core project, and setting up the Data Access using EF Core. We will also create a simple page for adding a new poll and a page for displaying the newly added poll in real-time using ASP.NET SignalR 2.
What you will learn:
- Creating a Database using SQL Server 2014
- Creating an ASP.NET Core Project
- Integrating Entity Framework Core 1.0
- Creating Entity Models from Existing Database (Reverse Engineer)
- Registering DBContext using Dependency Injection
- Creating a Poll Management Page using Core MVC
- Adding ViewModels
- Adding the PollManager Repository
- Registering the PollManager Repository
- Adding a Controller
- Adding a View
- Enabling MVC and Developer Diagnostics
- Running the Application
- Integrating ASP.NET SignalR 2
- Integrating Client-Side Packages - jQuery and SignalR Scripts
- Creating a Middleware for Mapping SignalR
- Adding SignalR to the Pipeline
- Creating a Hub
- Invoking a Hub Method
- Creating the Web API
- Displaying the Poll
Let's Get Started!
If you're ready to explore ASP.NET Core and get your hands dirty, then let's get started!
Database Creation
Open MS SQL Server Management Studio and run the following SQL script below to create the database and tables:
CREATE  DATABASE ASPNETCoreDemoDB
GO

USE [ASPNETCoreDemoDB]
GO


CREATE TABLE [dbo].[Poll](
 [PollID] [int] IDENTITY(1,1) NOT NULL,
 [Question] [nvarchar](300) NOT NULL,
 [Active] [bit] NOT NULL,
 CONSTRAINT [PK_Poll] PRIMARY KEY CLUSTERED
(
 [PollID] ASC
)WITH  (PAD_INDEX = OFF, STATISTICS_NORECOMPUTE = OFF, IGNORE_DUP_KEY = OFF, ALLOW_ROW_LOCKS = ON, ALLOW_PAGE_LOCKS = ON) ON [PRIMARY]
) ON [PRIMARY]

GO

CREATE TABLE [dbo].[PollOption](
 [PollOptionID] [int] IDENTITY(1,1) NOT NULL,
 [PollID] [int] NOT NULL,
 [Answers] [nvarchar](200) NOT NULL,
 [Vote] [int] NOT NULL,
 CONSTRAINT [PK_PollOption] PRIMARY KEY CLUSTERED
(
 [PollOptionID] ASC
)WITH (PAD_INDEX = OFF, STATISTICS_NORECOMPUTE = OFF, IGNORE_DUP_KEY = OFF, ALLOW_ROW_LOCKS = ON, ALLOW_PAGE_LOCKS = ON) ON [PRIMARY]
) ON  [PRIMARY]

GO

ALTER  TABLE [dbo].[PollOption]  WITH CHECK  ADD  CONSTRAINT  [FK_PollOption_PollOption] FOREIGN KEY([PollID])
REFERENCES [dbo].[Poll] ([PollID])
GO

ALTER  TABLE [dbo].[PollOption] CHECK CONSTRAINT [FK_PollOption_PollOption]
GO
The SQL script above should create the ASPNETCoreDemoDB database with the following tables:

Figure 1: Poll tables
Creating an ASP.NET Core Project
Our next step is to create the poll management page where we can add polls to be available for users to cast their votes.
Fire-up Visual Studio 2015 and create a new ASP.NET Core Web Application project just like in the figure below:
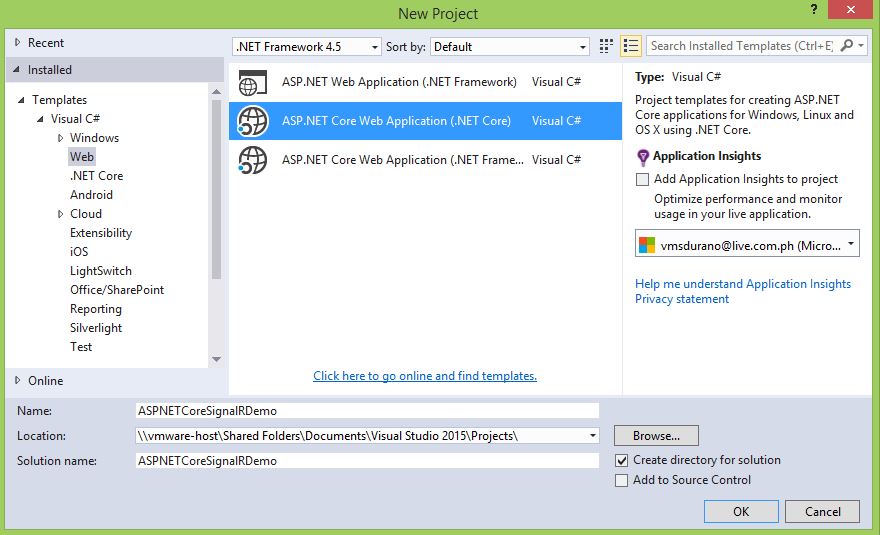
Figure 2: New ASP.NET Core Web Application
Name your project to whatever you like, but in this demo, we will just name it as “ASPNETCoreSignalRDemo”. Click OK and then select “Web API” within ASP.NET Core templates as shown in the following figure below:
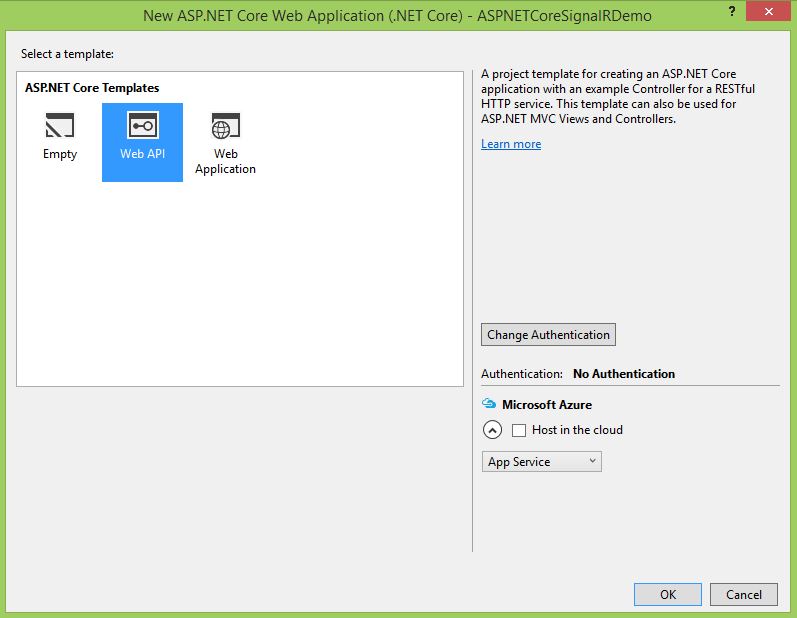
Figure 3: Web API Template
Just click **OK **to let Visual Studio generate the required files needed for us to run the App.
Keep in mind that this article will not deep dive on the details about the files generated in ASP.NET Core app and the significant changes. If you are new to ASP.NET Core then take a look at the following articles below:
- Introducing ASP.NET Core: The New ASP.NET in Town!
- ASP.NET Core: Getting Started with ASP.NET Core MVC
Now create the “Models” folder within the root of your application and under that folder, add the folders: “DB” and “ViewModels”. Your solution should now look something like below:

Figure 4: The Models Folder
The “DB" folder will contain our data access. In this demo, we are going to use Entity Framework Core 1.0 as our data access mechanism. This could mean that we will not be using the old EF designer to generate models for us because EF designer (EDMX) isn’t supported in ASP.NET Core 1.0.
The “ViewModels” folder will contain a set of models that we are going to use in the View. These models are just classes that house some properties that we only need for our View, thus making the data-transfer much lighter.
Integrating Entity Framework Core 1.0
ASP.NET Core was designed to be light-weight, modular and pluggable. This allows us to plug-in components that are only required for our project. To put it in other words, we need to add the Entity Framework Core package in our ASP.NET Core app because we are going to need it. For more details about EF Core then check out: Announcing Entity Framework Core 1.0
There are two ways to add packages in ASP.NET Core; you could either use the “project.json” file to take advantage of the intelliSense feature, or via NuGet Package Manager (NPM). In this demo, we are going to use NPM so you can have a visual reference.
Now, right-click on the root of your application and then select Manage NuGet Packages. In the search bar type in “Microsoft.EntityFrameworkCore.SqlServer”. It should result to something like this:

Figure 5: Manage NuGet Package
Select “Microsoft.EntityFrameworkCore.SqlServer” and click Install. Just follow the wizard instructions until it completes the installation.
We are going to use Database-Approach to work with existing database and in order to do that, we need to install the additional packages below:
- Microsoft.EntityFrameworkCore.Tools (v1.0.0-preview2-final)
- Microsoft.EntityFrameworkCore.SqlServer.Design (v1.0.0)
Now go ahead and install them via package.json file or NPM as shown in the figures below:

Figure 6: Adding Microsoft.EntityFrameworkCore.Tools package
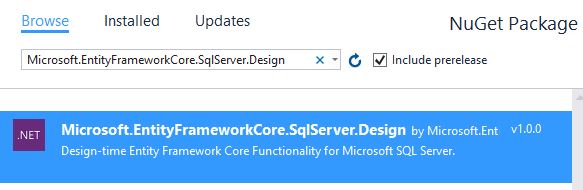
Figure 7: Adding Microsoft.EntityFrameworkCore.SqlServer.Design package
When it’s done restoring all the required packages, you should be able to see them added to your project references as shown in the figure below:
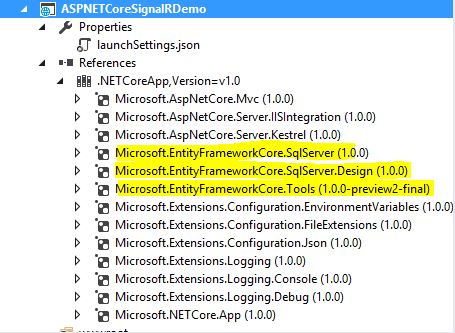
Figure 8: EF Core Packages restored
Open your project.json file and add the Microsoft.EntityFrameworkCore.Tools item under the tools section just like below:
"tools": {
 "Microsoft.EntityFrameworkCore.Tools": "1.0.0-preview2-final",
 "Microsoft.AspNetCore.Server.IISIntegration.Tools": "1.0.0-preview2-final"
 },
Creating Entity Models from Existing Database
Now, it’s time for us to create the EF models based on our existing database that we have just created earlier.
As of this writing, there are two ways to generate models from our existing database:
Option 1: Using Package Manager Console
- Go to Tools –> NuGet Package Manager –> Package Manager Console
- And then run the following command to create a model from the existing database
Scaffold-DbContext "Server=WIN-EHM93AP21CF\SQLEXPRESS;Database=ASPNETCoreDemoDB;Trusted_Connection=True;" Microsoft.EntityFrameworkCore.SqlServer -OutputDir Models/DB
Option 2: Using Command Window
Option 1 doesn’t seem to work for some unknown reasons. Option 2 seems to work pretty well in this case. Here’s what you should do:
- Go to the root folder of your application where the project.json is located. In this case the “ASPNETCoreSignalRDemo”.
- Do a Shift + Right Click and select “Open command window here”
- Then run the following script:
dotnet ef dbcontext scaffold "Server=WIN-EHM93AP21CF\SQLEXPRESS;Database=ASPNETCoreDemoDB;Integrated Security=True;" Microsoft.EntityFrameworkCore.SqlServer --output-dir Models/DB
Note that you need to change the Server value based on your database server configuration. If you are using a different database name, you would need to change the Database value too.
That command will generate models from the database within Models/DB folder. Here’s the screenshot below:
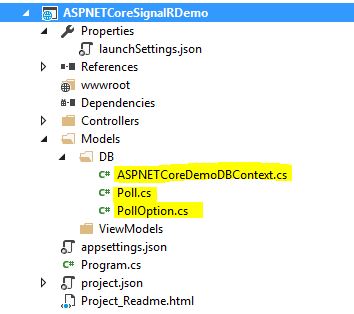
Figure 9: EF Generated Models
Notes:
- If you are still getting errors then you might want to upgrade the PowerShell to version 5. You can download it here.
- You need to change the value of Server and Database in your connection string based on your server configuration. Here’s the actual code generated.
ASPNETCoreDemoDBContext Class
using System;
using Microsoft.EntityFrameworkCore;
using Microsoft.EntityFrameworkCore.Metadata;

namespace ASPNETCoreSignalRDemo.Models.DB
{
 public  partial class ASPNETCoreDemoDBContext : DbContext
 {
  protected override  void OnConfiguring(DbContextOptionsBuilder optionsBuilder)
  {
   optionsBuilder.UseSqlServer(@"Server=WIN-EHM93AP21CF\SQLEXPRESS;Database=ASPNETCoreDemoDB;Integrated Security=True;");
  }

  protected override  void OnModelCreating(ModelBuilder modelBuilder)
  {
   modelBuilder.Entity<Poll>(entity =>
   {
    entity.Property(e => e.PollId).HasColumnName("PollID");

    entity.Property(e => e.Question).HasMaxLength(300);
   });

   modelBuilder.Entity<PollOption>(entity =>
   {
    entity.Property(e => e.PollOptionId).HasColumnName("PollOptionID");

    entity.Property(e => e.Answers)
     .IsRequired()
     .HasMaxLength(200);

    entity.Property(e => e.PollId).HasColumnName("PollID");

    entity.HasOne(d => d.Poll)
     .WithMany(p => p.PollOption)
     .HasForeignKey(d => d.PollId)
     .OnDelete(DeleteBehavior.Restrict)
     .HasConstraintName("FK_PollOption_PollOption");
   });
  }
  public virtual DbSet<Poll> Poll { get; set; }
  public  virtual DbSet<PollOption> PollOption { get; set; }
 }
}
Poll Class
using System.Collections.Generic;

namespace ASPNETCoreSignalRDemo.Models.DB
{
 public  partial class Poll
 {
  public  Poll()
  {
   PollOption = new HashSet<PollOption>();
  }

  public int PollId { get; set; }
  public  string Question { get; set; }
  public bool Active { get; set; }

  public virtual ICollection<PollOption> PollOption { get; set; }
 }
}
PollOption Class
using System;

namespace ASPNETCoreSignalRDemo.Models.DB
{
 public  partial class PollOption
 {
  public  int PollOptionId { get; set; }
  public int PollId { get; set; }
  public  string Answers { get; set; }
  public int Vote { get; set; }

  public virtual Poll Poll {  get; set; }
 }
}
If you have noticed, the models generated are created as partial classes. This means that you can extend them by creating another partial class for each of the entity/model classes when needed.
Registering DBContext using Dependency Injection
The next step is to register our ASPNETCoreDemoDBContext class using Dependency Injection. To follow the ASP.NET Core configuration pattern, we will move the database provider configuration to Startup.cs. To do this, just follow these steps:
- Open Models\DB\ASPNETCoreDemoDBContext.cs file
- Remove the
OnConfiguring()method and add the following code below
public ASPNETCoreDemoDBContext(DbContextOptions<ASPNETCoreDemoDBContext> options)
: base(options)
{ }
- Open
appsettings.jsonfile and add the following script for our database connection string below:
"ConnectionStrings": {
 "PollSystemDatabase": "Server=WIN-EHM93AP21CF\\SQLEXPRESS;Database=ASPNETCoreDemoDB;Integrated Security=True;"
}
- Open
Startup.cs - Add the following namespaces at very top
using ASPNETCoreSignalRDemo.Models;
using ASPNETCoreSignalRDemo.Models.DB;
using Microsoft.EntityFrameworkCore;
- Add the following lines of code within
ConfigureServices()method
public  void ConfigureServices(IServiceCollection services){
  // Add ASPNETCoreDemoDBContext services.
  services.AddDbContext<ASPNETCoreDemoDBContext>(options => options.UseSqlServer(Configuration.GetConnectionString("PollSystemDatabase")));
 // Add MVC services.
 services.AddMvc();
}
That’s it. Now we’re ready to work with data. The next step is to create the application.
For more information see: ASP.NET Core Application to Existing Database (Database First)
Creating the Poll Management Page
The first thing that we are going to build in our application is the Poll management page. In this page, we will create a form that allows us to add a new poll in the database using MVC.
Adding ViewModels
Now let’s create the “AddPollViewModel”. Create the following class under ViewModels folder:
using System.ComponentModel.DataAnnotations;

namespace ASPNETCoreSignalRDemo.Models.ViewModels
{
 public  class AddPollViewModel
 {
  [Required(ErrorMessage = "Question is required.")]
  public string Question {  get; set; }
  [Required(ErrorMessage = "Answer is required.")]
  public string Answer {  get; set; }
 }
}
The class above contains two properties that are decorated with the Required attribute using Data Annotation to enforce pre-defined validation rules.
Create another new class under the ViewModels folder and name it as “PollDetailsViewModel”. Here’s the code for the PollDetailsViewModel class:
using System.Collections.Generic;

namespace ASPNETCoreSignalRDemo.Models.ViewModels
{
 public  class PollDetailsViewModel
 {
  public  int PollID { get; set; }
  public string Question {  get; set; }
  public  IEnumerable<DB.PollOption> PollOption { get; set; }
 }
}
The ViewModel classes above will be used in our View later.
Adding the PollManager Repository
Create a new class/interface file under the Models folder and name it as “IPollManager”. Update the code within that file so it would look similar to the following code below:
using System.Collections.Generic;
using ASPNETCoreSignalRDemo.Models.ViewModels;

namespace ASPNETCoreSignalRDemo.Models
{
 public interface IPollManager
 {
  bool AddPoll(AddPollViewModel pollModel);
  IEnumerable<PollDetailsViewModel> GetActivePoll();
 }
}
If you have noticed, we are defining an interface instead of a class. This interface will be injected in the Controller so we will only need to talk to the interface rather than the actual implementation of our repository.
Next is we are going to create a concrete class that implements the IPollManager interface. Right-click on the Models folder and create a new class. Name the class as “PollManager” and then add the following code below
using System;
using System.Collections.Generic;
using System.Linq;
using ASPNETCoreSignalRDemo.Models.DB;
using ASPNETCoreSignalRDemo.Models.ViewModels;
using Microsoft.EntityFrameworkCore;

namespace ASPNETCoreSignalRDemo.Models
{
 public class PollManager : IPollManager
 {
  private readonly ASPNETCoreDemoDBContext _db;
  public  PollManager(ASPNETCoreDemoDBContext context)
  {
   _db = context;
  }

  public IEnumerable<PollDetailsViewModel> GetActivePoll()
  {
   if (_db.Poll.Any())
    return _db.Poll.Include(o => o.PollOption).Where(o => o.Active == true)
     .Select(o =>  new PollDetailsViewModel {
      PollID = o.PollId,
      Question = o.Question,
      PollOption = o.PollOption
     });

   return Enumerable.Empty<PollDetailsViewModel>();
  }

  public  bool AddPoll(AddPollViewModel pollModel)
  {

   using (var dbContextTransaction = _db.Database.BeginTransaction())
   {
    try
    {
     var answers = pollModel.Answer.Split(new string[] { Environment.NewLine }, StringSplitOptions.RemoveEmptyEntries);
     Poll poll = new Poll();
     poll.Question = pollModel.Question;
     poll.Active = true;
     _db.Poll.Add(poll);
     _db.SaveChanges();

     foreach (var answer in  answers)
     {
      PollOption option = new PollOption();
      option.PollId = poll.PollId;
      option.Answers = answer;
      option.Vote = 0;
      _db.PollOption.Add(option);
      _db.SaveChanges();
     }

     dbContextTransaction.Commit();

    }
    catch
    {
     //TO DO: log error here
     dbContextTransaction.Rollback();
    }
   }

   return  true;
  }
 }
}
The PollManager class handles all database operations for our Poll system. The purpose of this class is to separate the actual data operation logic from the controller and to have a central class for handling create, update, fetch and delete (CRUD) operations.
At the moment, the PollManager class contains two methods: The GetActivePoll() method gets the active poll from the database using LINQ syntax and returns an IEnumerable of PollDetailsViewModel. The AddPoll() method adds a new poll data to the database. What it does is it adds a new record to the Poll table and then adds the associated records to the PollOption table by looping through the answers.
If you have noticed, a simple transaction was used within that method. This is because the table PollOption is related to the Poll table and we need to make sure that we only commit changes to the database if the operation for each table is successful. The Database.BeginTransaction() is only available in EF 6 onwards.
Registering the PollManager Repository
Now add the following line below within the Configure() method in Startup.cs file:
services.AddScoped<IPollManager, PollManager>();
We need to register the IPollManager in the service container because the PollManager class requests an ASPNETCoreDemoDBContext object in its constructor. The container is responsible for resolving all of the dependencies in the graph and returning the fully resolved service. For more information, read on: Dependency Injection
Adding a Controller
Right-click on the Controllers folder and then select Add >New Item >MVC Controller Class. Name the class as “HomeController” and update the code within that class so it would look similar to this:
using Microsoft.AspNetCore.Mvc;
using ASPNETCoreSignalRDemo.Models;
using ASPNETCoreSignalRDemo.Models.ViewModels;

namespace ASPNETCoreSignalRDemo.Controllers
{
 public  class HomeController : Controller
 {
  private  readonly IPollManager _pollManager;

  public  HomeController(IPollManager pollManager)
  {
   _pollManager = pollManager;
  }

  public IActionResult Index()
  {
   return View();
  }

  public  IActionResult AddPoll()
  {
   return  View();
  }

  [HttpPost]
  [ValidateAntiForgeryToken]
  public IActionResult AddPoll(AddPollViewModel poll)
  {
   if (ModelState.IsValid) {
    if  (_pollManager.AddPoll(poll))
     ViewBag.Message =  "Poll added successfully!";
   }
   return View(poll);
  }
 }
}
The class above uses constructor injection to gain access to the methods defined within PollManager class. The Index() and AddPoll() methods simply return their corresponding Views and nothing else. The overload AddPoll() method is decorated with the [HttpPost] attribute which signifies that the method can only be invoked for POST requests. This method is where we actually handle the adding of new data to the database if the model state is valid on posts.
Keep in mind that validation of active polls upon insert will not be covered in this article.
Adding a View
We will need to create a Views folder to follow the MVC convention. Under Views folder, add another folder and name it as “Home”. Right-click on the Home folder and then add the following new MVC View Page:
- AddPoll.cshtml
- Index.cshtml
The AddPoll View is where we add new polls to a database. The Index View is where we display the polls. Our solution structure should now look something like this:
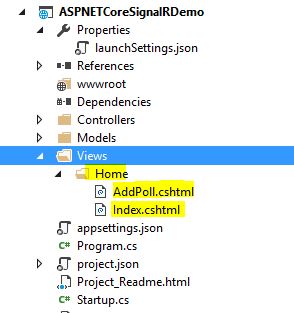
Figure 10: The Views folder
At this point, we will just focus on the AddPoll first. Now update your AddPoll.cshtml file with the following markup below:
@addTagHelper *, Microsoft.AspNetCore.Mvc.TagHelpers
@model ASPNETCoreSignalRDemo.Models.ViewModels.AddPollViewModel

<h1>Add a New Poll</h1>

<form asp-controller="Home" asp-action="AddPoll" method="post" role="form">
 <div>
  @{
   if (ViewBag.Message != null) { @ViewBag.Message; }
  }
  <div asp-validation-summary="All"></div>
  <div>
   <label asp-for="Question"></label>
   <div>
    <input asp-for="Question"/>
   </div>
  </div>
  <div>
   <label asp-for="Answer"></label>
   <div>
    <textarea asp-for="Answer"></textarea>
   </div>
  </div>
  <div>
   <div>
    <input type="submit" value="Add"/>
   </div>
  </div>
 </div>
</form>
The markup above uses Tag Helpers to create and render HTML elements in the View. Tag Helpers is a new feature in ASP.NET Core MVC (a.k.a MVC 6) which we can use as optional replacement for the previous MVC HTML Helpers. For more information, see: Introduction to Tag Helpers
Enabling MVC and Developer Diagnostics
Debugging is mandatory in any form of programming so we need to enable diagnostics in our ASP.NET Core application to troubleshoot future issues that we might face during development. To do this, add the following dependency within project.json file:
"Microsoft.AspNetCore.Diagnostics": "1.0.0"
The line above adds ASP.NET Core middleware for exception handling, exception display pages, and diagnostics information. For more information, read on: Microsoft.AspNetCore.Diagnostics
For those who are not aware, Web API and MVC was merged in ASP.NET Core. So technically, MVC is already integrated since we have created an ASP.NET Core Web API project. But just for the completeness of this demo, I’m going to show how it will be configured. Now open Startup.cs and modify the Configure() method so it would look something like this:
public  void Configure(IApplicationBuilder app, IHostingEnvironment env, ILoggerFactory loggerFactory)
{
   loggerFactory.AddConsole(Configuration.GetSection("Logging"));
   loggerFactory.AddDebug();

   if (env.IsDevelopment())
   {
    app.UseDeveloperExceptionPage();
   }

   app.UseMvc(routes =>
   {
    routes.MapRoute(
     name: "default",
     template: "{controller=Home}/{action=Index}/{id?}");
   });
}
The first two lines enable logging. ASP.NET Core has built-in support for logging, and allows us to easily use our preferred logging framework’s functionality as well. For more information, read on: Logging
The app.UseDeveloperExceptionPage() enables us to see details of the exceptions in the page when our application throws an error. This method is available in Microsoft.AspNet.Diagnostic assembly.
The last line enables MVC with pre-defined default route. In this case, the /Home/Index would be our default page.
Running the Application
Now run the application just to test if our app is working by accessing the following http://localhost:5000/home/addpoll
Leave the entries as blank and try to hit Add. It should display something like this with the validation error messages:
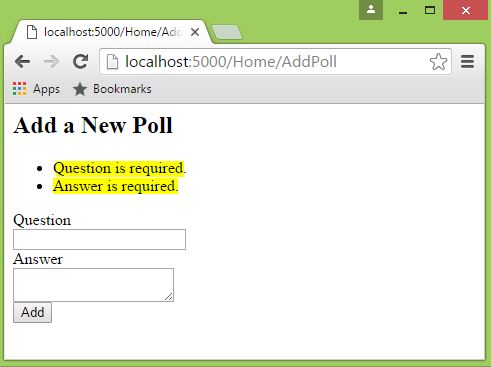
Figure 11: Output
Integrating ASP.NET SignalR 2
For this particular demo we are going to use SignalR 2 to automatically display the newly added poll in the page.
The default templates for ASP.NET Core 1.0 RTM apps only target "netcoreapp1.0". Unfortunately, ASP.NET SignalR is not yet supported in .NET Core 1.0 (RTM) so we need to switch to framework .NET 4.6.1 to be able to utilize the ASP.NET SignalR features. You can view the ASP.NET road map here.
Note: By targeting to net461 framework, we will lose the cross-platform ability in our app. Anyway once SignalR 3 is supported, it will just take few tweaks to integrate that so our app can run on multiple platforms by targeting to netcore1.0 framework. For the time being, let's keep rolling and see how we can use the power of SignalR within our ASP.NET Core app.
If you want to target multiple frameworks then we can do so by first adding the full .NET framework to the list in project.json (e.g. “net461” for .NET Framework 4.6.1) under "frameworks". Next is to move the "Microsoft.NETCore.App" dependency out of global "dependencies" section and into a new "dependencies" section under the "netcoreapp1.0" node in "frameworks". We could then add the dependency to ASP.NET SignalR under net461”. So, our updated project.json “frameworks” section would now look something like this:
"frameworks": {
 "netcoreapp1.0": {
  "imports": [
  "dotnet5.6",
  "dnxcore50",
  "portable-net45+win8"
  ],
  "dependencies": {
  "Microsoft.NETCore.App": {
   "version": "1.0.0",
   "type": "platform"
  }
  }
 },
 "net461": {
  "dependencies": {
  "Microsoft.AspNet.SignalR": "2.2.0"
  }
 }
 },
To reduce the complexity, and for the simplicity of the demo, let's just target the “net461” framework. So, removed the “netcoreapp1.0” dependency at this moment and added the following dependencies:
- "Microsoft.AspNetCore.StaticFiles": "1.0.0"
- "Microsoft.AspNet.SignalR": "2.2.0"
- "Microsoft.AspNet.SignalR.Owin": "1.2.2"
- "Microsoft.AspNetCore.Owin": "1.0.0"
Integrating Microsoft.AspNetCore.StaticFiles enables our app to serve JavaScript, CSS and Image files directly to clients. We need enable this because we are going to add the SignalR JavaScript file within wwwroot. The Microsoft.AspNet.SignalR is responsible for pulling in the server components and JavaScript client required to use SignalR in our application. Microsoft.AspNet.SignalR.Owin contains the OWIN components for ASP.NET SignalR. Microsoft.AspNetCore.Owin is component for OWIN middleware in an ASP.NET Core application, and to run ASP.NET Core middleware in an OWIN application.
Now, update your project.json file so it would like this:
{
 "dependencies": {
 "Microsoft.AspNetCore.Mvc": "1.0.0",
 "Microsoft.AspNetCore.Server.IISIntegration": "1.0.0",
 "Microsoft.AspNetCore.Server.Kestrel": "1.0.0",
 "Microsoft.Extensions.Configuration.EnvironmentVariables": "1.0.0",
 "Microsoft.Extensions.Configuration.FileExtensions": "1.0.0",
 "Microsoft.Extensions.Configuration.Json": "1.0.0",
 "Microsoft.Extensions.Logging": "1.0.0",
 "Microsoft.Extensions.Logging.Console": "1.0.0",
 "Microsoft.Extensions.Logging.Debug": "1.0.0",
 "Microsoft.EntityFrameworkCore.SqlServer": "1.0.0",
 "Microsoft.EntityFrameworkCore.Tools": "1.0.0-preview2-final",
 "Microsoft.EntityFrameworkCore.SqlServer.Design": "1.0.0",
 "Microsoft.AspNetCore.Diagnostics": "1.0.0",
 "Microsoft.AspNetCore.StaticFiles": "1.0.0",
 "Microsoft.AspNet.SignalR": "2.2.0",
 "Microsoft.AspNet.SignalR.Owin": "1.2.2",
 "Microsoft.AspNetCore.Owin": "1.0.0"
 },

 "tools": {
 "Microsoft.EntityFrameworkCore.Tools": "1.0.0-preview2-final",
 "Microsoft.AspNetCore.Server.IISIntegration.Tools": "1.0.0-preview2-final"
 },

 "frameworks": {
 "net461": {}
 },

 "buildOptions": {
 "emitEntryPoint": true,
 "preserveCompilationContext": true
 },

 "runtimeOptions": {
 "gcServer": true
 },

 "publishOptions": {
 "include": [
  "wwwroot",
  "Views",
  "appsettings.json",
  "web.config"
 ]
 },

 "scripts": {
 "postpublish": [ "dotnet publish-iis --publish-folder %publish:OutputPath% --framework %publish:FullTargetFramework%" ]
 }
}
Note that you could also install the SignalR and other package references via NPM if you would like. Take a look at the following figure below:
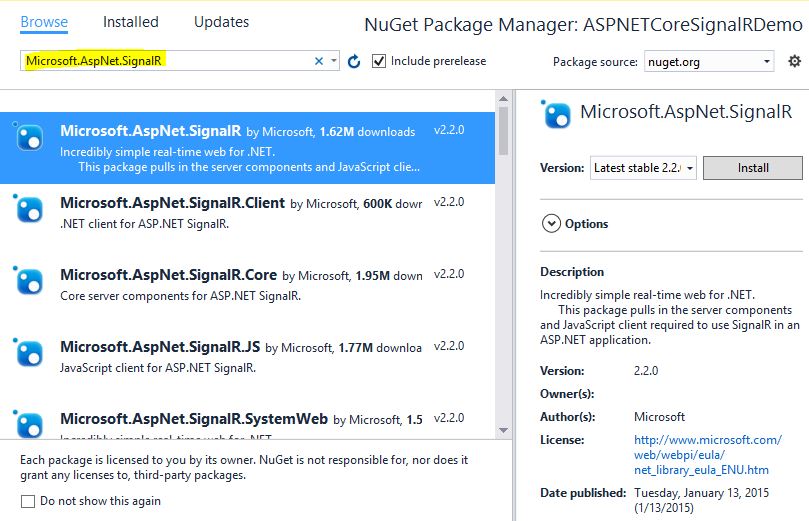
Figure 12: Adding SignalR Packages
As of this writing, the latest version of ASP.NET SignalR is 2.2. Once the required references are installed, you should be able to see them added to your project like below:
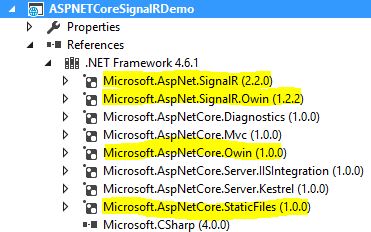
Figure 13: References
Integrating Client-Side Packages - jQuery and SignalR Scripts
In order for us to use the client-side features of SignalR, we need to reference the following scripts dependencies in your View:
- jQuery
- jQuery.signalR
- /signalr/hub
In this demo, we're going to use jQuery CDN to reference the jQuery library. Keep in mind that you can also use NPM or Bower to manage client-side resources such as jQuery in your project.
Now, the tricky part is to add the SignalR 2 Core JavaScript file to our project. The corresponding SignalR Core client scripts are added within Microsoft.AspNet.SignalR.JS components. This component is automatically added as a dependency of the Microsoft.AspNet.SignalR component. Now browse through the following location in your machine:
C:\Users\<UserName>\.nuget\packages\Microsoft.AspNet.SignalR.JS\2.2.0\content
Then copy the Scripts folder and paste it within the wwwroot folder in your application. In this case, within the “ASPNETCoreSignalRDemo/wwwroot”. You should have something like this now in your project:

Figure 14: wwwroot folder
The reference to the SignalR generated proxy is dynamically generated JavaScript code, not to a physical file. SignalR creates the JavaScript code for the proxy on the fly and serves it to the client in response to the "/signalr/hubs" URL/. For more information, read on: ASP.NET SignalR Hubs API Guide - JavaScript Client
Creating a Middleware for Mapping SignalR
We need to create a middleware for SignalR so we can configure to use it by creating an IApplicationBuilder extension method.
Now create a new class within the root of the application and name it as “AppBuilderExtensions”. Here’s the code block below:
using Owin;
using System;
using System.Collections.Generic;
using System.Threading.Tasks;
using Microsoft.AspNetCore.Builder;

namespace ASPNETCoreSignalRDemo
{
 using  Microsoft.Owin.Builder;
 using AppFunc = Func<IDictionary<string, object>, Task>;

 public static  class AppBuilderExtensions
 {
  public static IApplicationBuilder UseAppBuilder(this IApplicationBuilder app, Action<IAppBuilder> configure)
  {
   app.UseOwin(addToPipeline =>
   {
    addToPipeline(next =>
    {
     var appBuilder =  new AppBuilder();
     appBuilder.Properties["builder.DefaultApp"] = next;

     configure(appBuilder);

     return appBuilder.Build<AppFunc>();
    });
   });

   return  app;
  }

  public static  void UseSignalR2(this IApplicationBuilder app)
  {
   app.UseAppBuilder(appBuilder => appBuilder.MapSignalR());
  }
 }
}
The UseAppBuilder extension method adds a new middleware to the ASP.NET pipeline using the UseOwin() extension method. It then adds the MapSignalR() middleware by invoking the UseAppBuilder() method within UseSignalR2() extension method. For more information about OWIN, read on: Open Web Interface for .NET (OWIN)
Adding SignalR to the Pipeline
Now open Startup.cs file update the Configure() method so it would look similar to this:
public  void Configure(IApplicationBuilder app, IHostingEnvironment env, ILoggerFactory loggerFactory){
   loggerFactory.AddConsole(Configuration.GetSection("Logging"));
   loggerFactory.AddDebug();

   if  (env.IsDevelopment())
   {
    app.UseDeveloperExceptionPage();
   }

   app.UseStaticFiles();
   app.UseMvc(routes =>
   {
    routes.MapRoute(
     name: "default",
     template: "{controller=Home}/{action=Index}/{id?}");
   });

   app.UseSignalR2();
}
Calling the app.UseSignalR2() method will add the SignalR middleware to the pipeline.
Creating a Hub
Create a new folder called Hubs within the root of your application then add a new class, and name it as “PollHub”. You project structure should now look something like this:

Figure 15: Project Structure
Now, add the following code below in your “PollHub” class:
using Microsoft.AspNet.SignalR;

namespace ASPNETCoreSignalRDemo.Hubs
{
 public  class PollHub: Hub
 {
  public  static void FetchPoll()
  {
   IHubContext context = GlobalHost.ConnectionManager.GetHubContext<PollHub>();
   context.Clients.All.displayPoll();
  }
 }
}
To provide you a quick overview, the Hub is the center piece of the SignalR. Similar to the Controller in ASP.NET MVC, a Hub is responsible for receiving input and generating the output to the client. The methods within the Hub can be invoked from the server or from the client.
Invoking a Hub Method
In this demo, we’re going to see how to invoke a method from the Hub in the controller action. You can also use this technique if for example, you have a mobile app that syncs data to your database using Web API calls and you need to display real-time results to your website.
Now, open the HomeController file and update the AddPoll() method to this:
[HttpPost]
[ValidateAntiForgeryToken]
public IActionResult AddPoll(AddPollViewModel poll)
{
   if  (ModelState.IsValid) {
    if (_pollManager.AddPoll(poll))
    {
     ViewBag.Message =  "Poll added successfully!";
     ASPNETCoreSignalRDemo.Hubs.PollHub.FetchPoll();
    }
   }
   return View(poll);
}
Calling the FetchPoll() method from the Hub will invoked the displayPoll() ,and all connected clients will get the updates. If in case you are using AJAX to add a new Poll and wanted to trigger the FetchPoll() method in your JavaScript then you can call it like this:
poll = $.connection.pollHub;
poll.server.fetchPoll();
For more information about SignalR Hub API, read here.
Creating the Web API
Create a new folder called API and then add a new Web API Controller class and name it as “PollController”. Your project structure should now look something like this:
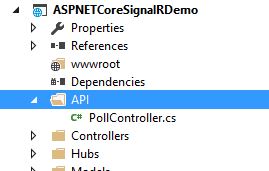
Figure 14: Project Structure
Replace everything within your PollController class with this code:
using System.Collections.Generic;
using System.Linq;
using Microsoft.AspNetCore.Mvc;
using ASPNETCoreSignalRDemo.Models.ViewModels;
using ASPNETCoreSignalRDemo.Models;

namespace ASPNETCoreSignalRDemo.API
{
 [Route("api/[controller]")]
 public class PollController : Controller
 {
  private readonly IPollManager _pollManager;

  public PollController(IPollManager pollManager)
  {
   _pollManager = pollManager;
  }

  [HttpGet]
  public IEnumerable<PollDetailsViewModel> Get()
  {
   var res =  _pollManager.GetActivePoll();
   return  res.ToList();
  }

 }
}
The class above make use of Attribute Routing to determine that the class is an API by decorating with this attribute: [Route("api/[controller]")]
Just like in our HomeController, it also uses a constructor injection to initialize the PollManager. The Get()method simply returns the result of the Poll’s data from the database.
Displaying the Poll
Open Index.cshtml and update the markup so it would look something like this:
<script  src="https://code.jquery.com/jquery-2.2.4.min.js" integrity="sha256-BbhdlvQf/xTY9gja0Dq3HiwQF8LaCRTXxZKRutelT44=" crossorigin="anonymous"></script>
<script src="../Scripts/jquery.signalR-2.2.0.js"></script>
<script  src="../signalr/hubs"></script>

<script>
 $(function () {
  var poll = $.connection.pollHub;

  poll.client.displayPoll = function () {
   LoadActivePoll();
  };

  $.connection.hub.start();
  LoadActivePoll();
 });

 function LoadActivePoll() {
  var $div = $("#divQuestion");
  var $tbl = $("#tblPoll");
  $.ajax({
   url: '../api/poll',
   type: 'GET',
   datatype: 'json',
   success: function (data) {
    if (data.length > 0) {
     $div.html('<h3>' + data[0].question + '</h3>');
     $tbl.empty();
     var rows = [];
     var poll = data[0].pollOption;
     for (var i = 0; i < poll.length; i++) {
      rows.push('<tbody><tr><td>' + poll[i].answers + '</td><td><input name="poll" type="radio"/></td></tr></tbody>');
     }
     $tbl.append(rows.join(''));
    }
   }
  });
 }
</script>

<h1>ASP.NET Core Online Poll System with SignalR 2</h1>
<div  id="divQuestion"></div>
<table id="tblPoll"></table>
Take note of the sequence for adding the Scripts references. jQuery should be added first, then the SignalR Core JavaScript and finally the SignalR Hubs script.
The LoadActivePoll() function uses a jQuery AJAX to invoke a Web API call through AJAX GET request. If there’s any data from the response, it will generate an HTML by looping through the rows. The LoadActivePoll() function will be invoked when the page is loaded or when the displayPoll() method from the Hub is invoked. By subscribing to the Hub, ASP.NET SignalR will do all the complex plumbing for us to do real-time updates without any extra work needed in our side.
Final Output
Here’s the actual output after adding a new poll in AddPoll page and automatically fetches the result in Index page without doing any interaction.
That’s it!
Source Code
Source code can be downloaded here: https://gallery.technet.microsoft.com/Real-Time-Online-Poll-7b44ce13
You can also find it in the Github repo at: https://github.com/proudmonkey/ASPNETCoreSignalR2App
Summary
In this article, we’ve done making the core foundation of the application starting from creating a new database, creating a new ASP.NET Core project, and setting up the Data Access using EF Core. We also learned how to create a simple page for adding a new poll and a page for displaying the newly added poll in real-time using ASP.NET SignalR 2.