Visual Studio Extensibility: Creating Visual Studio VSIX package extension
Introduction
Visual Studio Extensibility features are not new in .NET. It’s just that they are not very commonly used which is a surprise because Visual Studio extensibility features are so powerful they give a new definition to customization. Customization of one's IDE, customization of the desired features that every developer would love to have and even customizations on the IDE that could eventually result in a whole new product altogether (for example, a custom Visual Studio with one’s own extensions and features).
When we talk about extensibility, this is nothing but a literal term that we are talking about, extensibility means that adding some more features or customizing the existing implementation of any product to fulfill one's need.
In this article of Visual Studio Extensibility we’ll learn how to create a new Visual Studio package, deploy that on staging server and GIT via continuous integration setup and at the end create a Visual Studio isolated Shell application with that embedded package. Although this is very rare topic and we could not find enough study material on this topic over the web that explains how to work with it step by step. MSDN contains good content but very generic, and to the point. This article will explain each and every small part step by step, so that one can learn while coding.
VSIX Packages
VSIX packages that are Visual Studio packages that give us as a developer a flexibility to customize Visual Studio as per our need and requirements. As a developer, one always wants that the IDE on which he is working should have certain features apart from the inbuilt one. One can read more about theoretical aspects and understanding the details of VSIX package here. The following is a small definition from the same MSDN link.
"A VSIX package is a .vsix file that contains one or more Visual Studio extensions, together with the metadata Visual Studio uses to classify and install the extensions. That metadata is contained in the VSIX manifest and the [Content_Types].xml file. A VSIX package may also contain one or more Extension.vsixlangpack files to provide localized setup text, and may contain additional VSIX packages to install dependencies.
The VSIX package format follows the Open Packaging Conventions (OPC) standard. The package contains binaries and supporting files, together with a [Content_Types].xml file and a .vsix manifest file. One VSIX package may contain the output of multiple projects, or even multiple packages that have their own manifests. "
The power of Visual Studio extensibility gives us that opportunity to create our own extensions and packages that we can build on top of existing Visual Studio and even distribute/sell those over the Visual Studio market place https://marketplace.visualstudio.com/. This article will explain how we can create an extension in Visual Studio to open the selected file in Windows Explorer. We know that we already have a feature to open the selected project/folder in Windows Explorer directly from Visual Studio, but won’t it be cool to get the feature that, on right-clicking a file opens the selected file in Windows Explorer as well? So basically we create the extensions for ourselves, or we can create an extension for our team members, or as per project’s requirement, or even for fun and to explore the technology.
Prerequisites
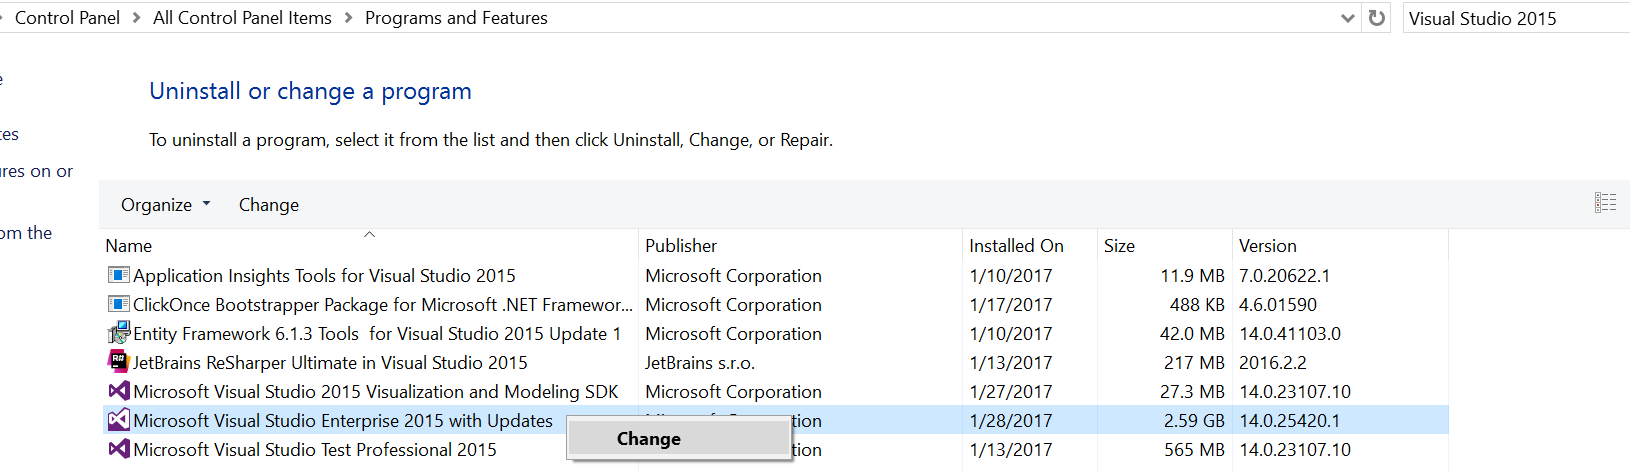
There are certain prerequisites that we need to take care of while working on extensibility projects. If Visual Studio 2015 installed is installed on the machine, go to control panel -> program and features and search for Visual Studio 2015 and right click on it to select the "change" option
Here we need to enable Visual Studio extensibility feature to work on this project type. On the next screen click on "Modify", a list of all selected/unselected features would be available now and all we need to do is in the Features-> Common Tools, select Visual Studio Extensibility Tools Update 3 as shown in the following image.
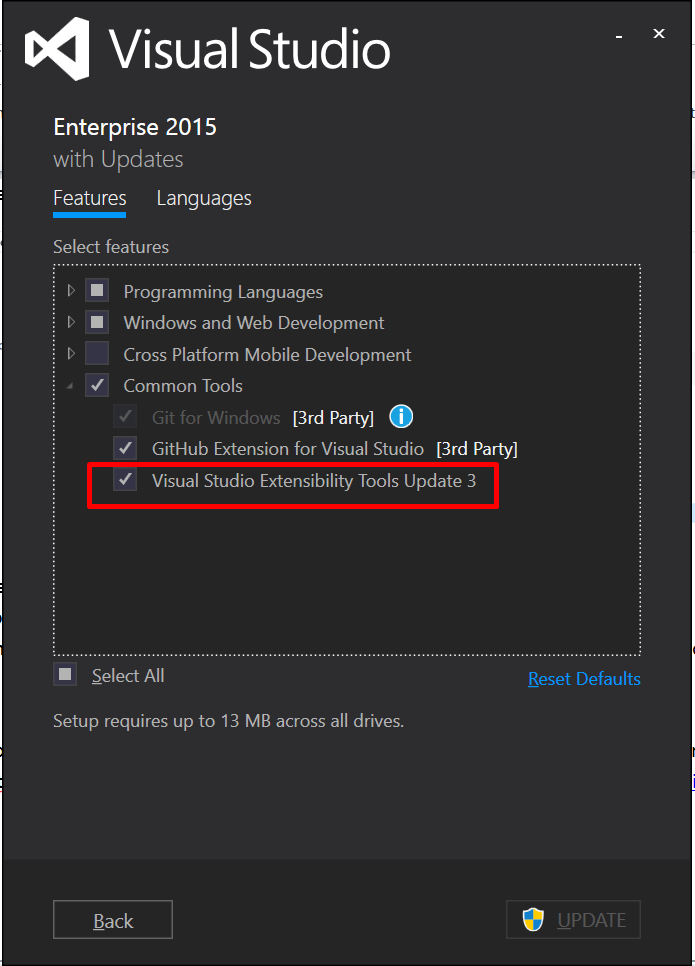
Now press the Update button and let Visual Studio update to extensibility features after which we are good to go.
Before we actually start, download install Extensibility tools written by Mads Kristensen from https://marketplace.visualstudio.com/items?itemName=MadsKristensen.ExtensibilityTools.
This article series is also highly inspired with Mads Kristensen’s speech at Build 2016 and his work on Visual Studio extensibility.
Create VSIX Package
Now we can create our own VSIX package inside Visual Studio. We’ll go step by step, therefore capturing every minute step and taking that into account. We'll try to create an extension that allows us to open the selected Visual Studio file in Windows Explorer. Basically, something that is shown in the below image.
https://www.codeproject.com/KB/dotnet/1169776/image006.png
Step 1: Create a VSIX project
Let’s start from very basic. Open Visual Studio. It is recommended to use Visual Studio 2015 for this article.
https://www.codeproject.com/KB/dotnet/1169776/image007.png
Create a new project like we create every other project in Visual Studio. Select File->New->Project
https://www.codeproject.com/KB/dotnet/1169776/image008.png
Now in the Templates, navigate to Extensibility and select VSIX project. Note that these templates are shown here because we modified Visual Studio configuration to use Visual Studio Extensibility. Select VSIX project and give it a name. For example, "LoctateFolder".
https://www.codeproject.com/KB/dotnet/1169776/image009.png
As soon as the new project is created, a "Getting Started" page would be displayed with a lot of information and updates on Visual Studio extensibility. These are links to MSDN and useful resources that we can explore to learn more and almost everything about extensibility. We got our project with a default structure to start with which has an HTML file, a CSS file and a vsixmanifest file. A manifest file (as the name suggests) keeps all the information related to the VSIX project and this file actually can be called a manifest to the extension created in the project.
https://www.codeproject.com/KB/dotnet/1169776/image010.png
https://www.codeproject.com/KB/dotnet/1169776/image011.png
We can clearly see that the "Getting Started" page comes from the index.html file which uses stylesheet.css. So in our project we really don’t need these files and we can remove these files.
https://www.codeproject.com/KB/dotnet/1169776/image012.png
And now we are only left with the manifest file. So technically speaking, our step one has been accomplished, and we created a VSIX project.
Step 2: Configure Manifest file
When we open the manifest file, we see certain kinds of related information for the type of project that we added. We can modify this manifest file as per our choice for our extension. For example, in the ProductID, we can remove the text that is prefixed to the GUID and only keep the GUID. Note that GUID is necessary as all the linking of items is done via GUID in VSIX projects. We’ll wee this in more detail later.
https://www.codeproject.com/KB/dotnet/1169776/image013.png
Similarly, add a meaningful description in the Description box like "Helps to locate files and folder in windows explorer." This description is necessary as it explains what this extension is for.
And if we look at the code of the manifest file by selecting the file, right-click and view code or just press F7 on the designer opened to view code, and we see an XML file that is created at the background and all this information is saved in a well-defined XML format.
https://www.codeproject.com/KB/dotnet/1169776/image014.png
<?xml version="1.0" encoding="utf-8"?>
<PackageManifest Version="2.0.0" xmlns="http://schemas.microsoft.com/developer/vsx-schema/2011" xmlns:d="http://schemas.microsoft.com/developer/vsx-schema-design/2011">
  <Metadata>
    <Identity Id="106f5189-471d-40ab-9de2-687c0a3d98e4" Version="1.0" Language="en-US" Publisher="Akhil Mittal" />
    <DisplayName>LocateFolder</DisplayName>
    <Description xml:space="preserve">Helps to locate files and folder in windows explorer.Helps </Description>
    <Tags>file locator, folder locator, open file in explorer</Tags>ption>
Step 3: Add Custom Command
We successfully added a new project and configured its manifest file, but the real job is still pending and that is writing an extension to locate file. For that we need to add a new item to our project, so just right-click on the project and select add a new item from the items template.
https://www.codeproject.com/KB/dotnet/1169776/image015.png
As soon as we open the item templates, we see an option to add a new Custom Command under Visual C# items - > Extensibility. The custom commands acts as a button in VSIX extensions. These buttons help us to bind an action to its click event, so we can add our desired functionality to this button/command. Name the custom command we added, for example, give it a name "LocateFolderCommand" and then press Add like shown in the below image.
https://www.codeproject.com/KB/dotnet/1169776/image016.png
Once the command is added, we can see a lot of changes happening to our existing project. Like adding of some required nugget packages, a Resources folder with an icon and an image a .vsct file, a .resx file and a command and CommandPackage.cs file.
https://www.codeproject.com/KB/dotnet/1169776/image017.png
Each of the files has its own significance here. In the tutorial we'll cover all these details.
When we open the LocateFolderCommandPackage.vsct file, we again see an XML file
https://www.codeproject.com/KB/dotnet/1169776/image018.png
And when we remove all the comments to make it more readable, we get a file something like shown below:
<?xml version="1.0" encoding="utf-8"?>
<CommandTable xmlns="http://schemas.microsoft.com/VisualStudio/2005-10-18/CommandTable" xmlns:xs="http://www.w3.org/2001/XMLSchema">

  <Extern href="stdidcmd.h"/>
  <Extern href="vsshlids.h"/>
  <Commands package="guidLocateFolderCommandPackage">
    <Groups>
      <Group guid="guidLocateFolderCommandPackageCmdSet" id="MyMenuGroup" priority="0x0600">
        <Parent guid="guidSHLMainMenu" id="IDM_VS_MENU_TOOLS"/>
      </Group>
    </Groups>
    <Buttons>
      <Button guid="guidLocateFolderCommandPackageCmdSet" id="LocateFolderCommandId" priority="0x0100" type="Button">
        <Parent guid="guidLocateFolderCommandPackageCmdSet" id="MyMenuGroup" />
        <Icon guid="guidImages" id="bmpPic1" />
        <Strings>
          <ButtonText>Invoke LocateFolderCommand</ButtonText>
        </Strings>
      </Button>
    </Buttons>
    <Bitmaps>
      <Bitmap guid="guidImages" href="Resources\LocateFolderCommand.png" usedList="bmpPic1, bmpPic2, bmpPicSearch, bmpPicX, bmpPicArrows, bmpPicStrikethrough"/>
    </Bitmaps>
  </Commands>
  <Symbols>
    <GuidSymbol name="guidLocateFolderCommandPackage" value="{a7836cc5-740b-4d5a-8a94-dc9bbc4f7db1}" />
    <GuidSymbol name="guidLocateFolderCommandPackageCmdSet" value="{031046af-15f9-44ab-9b2a-3f6cad1a89e3}">
      <IDSymbol name="MyMenuGroup" value="0x1020" />
      <IDSymbol name="LocateFolderCommandId" value="0x0100" />
    </GuidSymbol>
    <GuidSymbol name="guidImages" value="{8ac8d2e1-5ef5-4ad7-8aa6-84da2268566a}" >
      <IDSymbol name="bmpPic1" value="1" />
      <IDSymbol name="bmpPic2" value="2" />
      <IDSymbol name="bmpPicSearch" value="3" />
      <IDSymbol name="bmpPicX" value="4" />
      <IDSymbol name="bmpPicArrows" value="5" />
      <IDSymbol name="bmpPicStrikethrough" value="6" />
    </GuidSymbol>
  </Symbols>
</CommandTable>
So, primarily the file contains groups, buttons (that are commands lying in that group), button text and some IDSymbol and image options.
When we talk about "Groups," it is a grouping of commands that are shown in Visual Studio. Like in the below image, when in Visual Studio we click on Debug, we see various commands like Windows, Graphics, Start Debugging, etc. some are separated by horizontal lines as well. These separated horizontal lines are groups. So a group is something that holds commands, and acts as a logical separation between commands. In VSIX project we can create a new custom command and also define the groups to which it will associate, we can create new groups as well or extend existing groups like shown in the .vsct XML file.
https://www.codeproject.com/KB/dotnet/1169776/image019.png
Step 4: Configure Custom Command
So first open the vsct file and let us decide where our command will be placed. We basically want our command to be visible when we right-click on any file in solution explorer. For that, in the .vsct file, we can specify the parent of our command, since it is an item node, we can choose IDM_VS_CTXT_ITEMNODE.
https://www.codeproject.com/KB/dotnet/1169776/image020.png
We can check all available locations at the following link : https://blogs.msdn.microsoft.com/martintracy/2006/05/16/common-context-menu-constants/
Similarly, we can also create menus, sub menus and sub items, but for now we’ll stick to our objective and place our command to item node.
Similarly, we can also define the position at which our command will be shown. Set the priority in the group, by default it is shown as 6th position as shown in the below image, but we can always change it. For example, changed the priority to 0X0200, to see my command at top level second position.
https://www.codeproject.com/KB/dotnet/1169776/image021.png
We can also change the default button text to "Open in File Explorer" and finally, after all the modifications, our XML will look as shown below.
<?xml version="1.0" encoding="utf-8"?>
<CommandTable xmlns="http://schemas.microsoft.com/VisualStudio/2005-10-18/CommandTable" xmlns:xs="http://www.w3.org/2001/XMLSchema">

  <Extern href="stdidcmd.h"/>
  <Extern href="vsshlids.h"/>
  <Commands package="guidLocateFolderCommandPackage">
    <Groups>
      <Group guid="guidLocateFolderCommandPackageCmdSet" id="MyMenuGroup" priority="0x0200">
        <Parent guid="guidSHLMainMenu" id="IDM_VS_CTXT_ITEMNODE"/>
      </Group>
    </Groups>
    <Buttons>
      <Button guid="guidLocateFolderCommandPackageCmdSet" id="LocateFolderCommandId" priority="0x0100" type="Button">
        <Parent guid="guidLocateFolderCommandPackageCmdSet" id="MyMenuGroup" />
        <Icon guid="guidImages" id="bmpPic1" />
        <Strings>
          <ButtonText>Open in File Explorer</ButtonText>
        </Strings>
      </Button>
    </Buttons>
    <Bitmaps>
      <Bitmap guid="guidImages" href="Resources\LocateFolderCommand.png" usedList="bmpPic1, bmpPic2, bmpPicSearch, bmpPicX, bmpPicArrows, bmpPicStrikethrough"/>
    </Bitmaps>
  </Commands>
  <Symbols>
    <GuidSymbol name="guidLocateFolderCommandPackage" value="{a7836cc5-740b-4d5a-8a94-dc9bbc4f7db1}" />
    <GuidSymbol name="guidLocateFolderCommandPackageCmdSet" value="{031046af-15f9-44ab-9b2a-3f6cad1a89e3}">
      <IDSymbol name="MyMenuGroup" value="0x1020" />
      <IDSymbol name="LocateFolderCommandId" value="0x0100" />
    </GuidSymbol>
    <GuidSymbol name="guidImages" value="{8ac8d2e1-5ef5-4ad7-8aa6-84da2268566a}" >
      <IDSymbol name="bmpPic1" value="1" />
      <IDSymbol name="bmpPic2" value="2" />
      <IDSymbol name="bmpPicSearch" value="3" />
      <IDSymbol name="bmpPicX" value="4" />
      <IDSymbol name="bmpPicArrows" value="5" />
      <IDSymbol name="bmpPicStrikethrough" value="6" />
    </GuidSymbol>
  </Symbols>
</CommandTable>
When we open the LocateFolderCommand.cs, that’s the actual place where we need to put our logic. In VS extensibility project/command everything is handled and connected via GUIDs. Here we see in the below image that a commandset is created with a new GUID.
https://www.codeproject.com/KB/dotnet/1169776/image022.png
Now when we scroll down, we see in the private constructor, we retrieve the command service that is fetched from the current service provider. This service is responsible for adding the command, provided that the command has a valid menuCommandId with defined commandSet and commandId
https://www.codeproject.com/KB/dotnet/1169776/image023.png
We also see that there is a call back method bound to the command. This is the same call back method that is called when the command is invoked, and that is the best place to put our logic. By default, this call back method comes with a default implementation of showing a message box that proves the command is actually invoked.
https://www.codeproject.com/KB/dotnet/1169776/image024.png
Let’s keep the default implementation for now and try to test the application. We can later on add business logic to open the file in windows explorer.
Step 5: Test Custom Command with Default implementation
One may wonder that how to test the default implementation. Just compile and run the application. As soon as the application is run via F5, a new window will be launched that is similar to Visual Studio as shown below.
https://www.codeproject.com/KB/dotnet/1169776/image025.png
Note that we are creating an extension for Visual Studio, so ideally it should be tested in Visual Studio itself, on how it should look and how it should work. A new Visual Studio instance is launched to test the command. Note that this instance of Visual Studio is called Experimental Instance. As the name suggests, this is for testing our implementation basically checking how the things will work and look like.
In the launched experimental instance, add a new project like we add in normal Visual Studio. Note that all the features in this experimental instance can be configurable and switched to On and Off on need basis. We can cover the details in my third article when we discuss Visual Studio Isolated Shell.
https://www.codeproject.com/KB/dotnet/1169776/image026.png
To be simple, choose a new console application, and name it of our choice, name it "Sample"
https://www.codeproject.com/KB/dotnet/1169776/image027.png
When the project is added to solution explorer, we see a common project structure. Remember our functionality was to add a command to the selected file in Visual Studio solution explorer. Now we can test our implementation, just right-click on any file and we can see the "Open in File Explorer" command in a new group in the context menu as shown in following image. The text comes from the text that we defined for our command in VSCT file.
https://www.codeproject.com/KB/dotnet/1169776/image028.png
Before we click on the command, place a breakpoint on MenuItemCallback method in the command file. So when the command is clicked, we can see the menuItemCallback method is invoked.
https://www.codeproject.com/KB/dotnet/1169776/image029.png
Since this method contains the code to show a message box, just press F5 and we see a message box with a defined title as shown in the following image.
https://www.codeproject.com/KB/dotnet/1169776/image030.png
This proves that our command works, and we just need to put right logic here.
Step 6: Add actual implementation
So now, this is the time to add our actual implementation. We already know the place, just need to code. For actual implementation, added a new folder to the project and named it Utilities and added a class to that folder and named it LocateFile.cs with the following implementation:
using System.Collections.Generic;
using System.IO;
using System.Linq;
using System.Runtime.CompilerServices;
using System.Runtime.InteropServices;
using System.Runtime.InteropServices.ComTypes;

namespace LocateFolder.Utilities
{
    internal static class LocateFile
    {
        private static Guid IID_IShellFolder = typeof(IShellFolder).GUID;
        private static int pointerSize = Marshal.SizeOf(typeof(IntPtr));

        public static void FileOrFolder(string path, bool edit = false)
        {
            if (path == null)
            {
                throw new ArgumentNullException("path");
            }
            IntPtr pidlFolder = PathToAbsolutePIDL(path);
            try
            {
                SHOpenFolderAndSelectItems(pidlFolder, null, edit);
            }
            finally
            {
                NativeMethods.ILFree(pidlFolder);
            }
        }

        public static void FilesOrFolders(IEnumerable<FileSystemInfo> paths)
        {
            if (paths == null)
            {
                throw new ArgumentNullException("paths");
            }
            if (paths.Count<FileSystemInfo>() != 0)
            {
                foreach (
                    IGrouping<string, FileSystemInfo> grouping in
                    from p in paths group p by Path.GetDirectoryName(p.FullName))
                {
                    FilesOrFolders(Path.GetDirectoryName(grouping.First<FileSystemInfo>().FullName),
                        (from fsi in grouping select fsi.Name).ToList<string>());
                }
            }
        }

        public static void FilesOrFolders(IEnumerable<string> paths)
        {
            FilesOrFolders(PathToFileSystemInfo(paths));
        }

        public static void FilesOrFolders(params string[] paths)
        {
            FilesOrFolders((IEnumerable<string>)paths);
        }

        public static void FilesOrFolders(string parentDirectory, ICollection<string> filenames)
        {
            if (filenames == null)
            {
                throw new ArgumentNullException("filenames");
            }
            if (filenames.Count != 0)
            {
                IntPtr pidl = PathToAbsolutePIDL(parentDirectory);
                try
                {
                    IShellFolder parentFolder = PIDLToShellFolder(pidl);
                    List<IntPtr> list = new List<IntPtr>(filenames.Count);
                    foreach (string str in filenames)
                    {
                        list.Add(GetShellFolderChildrenRelativePIDL(parentFolder, str));
                    }
                    try
                    {
                        SHOpenFolderAndSelectItems(pidl, list.ToArray(), false);
                    }
                    finally
                    {
                        using (List<IntPtr>.Enumerator enumerator2 = list.GetEnumerator())
                        {
                            while (enumerator2.MoveNext())
                            {
                                NativeMethods.ILFree(enumerator2.Current);
                            }
                        }
                    }
                }
                finally
                {
                    NativeMethods.ILFree(pidl);
                }
            }
        }

        private static IntPtr GetShellFolderChildrenRelativePIDL(IShellFolder parentFolder, string displayName)
        {
            uint num;
            IntPtr ptr;
            NativeMethods.CreateBindCtx();
            parentFolder.ParseDisplayName(IntPtr.Zero, null, displayName, out num, out ptr, 0);
            return ptr;
        }

        private static IntPtr PathToAbsolutePIDL(string path) =>
            GetShellFolderChildrenRelativePIDL(NativeMethods.SHGetDesktopFolder(), path);

        private static IEnumerable<FileSystemInfo> PathToFileSystemInfo(IEnumerable<string> paths)
        {
            foreach (string iteratorVariable0 in paths)
            {
                string path = iteratorVariable0;
                if (path.EndsWith(Path.DirectorySeparatorChar.ToString()) ||
                    path.EndsWith(Path.AltDirectorySeparatorChar.ToString()))
                {
                    path = path.Remove(path.Length - 1);
                }
                if (Directory.Exists(path))
                {
                    yield return new DirectoryInfo(path);
                }
                else
                {
                    if (!File.Exists(path))
                    {
                        throw new FileNotFoundException("The specified file or folder doesn't exists : " + path, path);
                    }
                    yield return new FileInfo(path);
                }
            }
        }

        private static IShellFolder PIDLToShellFolder(IntPtr pidl) =>
            PIDLToShellFolder(NativeMethods.SHGetDesktopFolder(), pidl);

        private static IShellFolder PIDLToShellFolder(IShellFolder parent, IntPtr pidl)
        {
            IShellFolder folder;
            Marshal.ThrowExceptionForHR(parent.BindToObject(pidl, null, ref IID_IShellFolder, out folder));
            return folder;
        }

        private static void SHOpenFolderAndSelectItems(IntPtr pidlFolder, IntPtr[] apidl, bool edit)
        {
            NativeMethods.SHOpenFolderAndSelectItems(pidlFolder, apidl, edit ? 1 : 0);
        }


        [ComImport, Guid("000214F2-0000-0000-C000-000000000046"), InterfaceType(ComInterfaceType.InterfaceIsIUnknown)]
        internal interface IEnumIDList
        {
            [PreserveSig, MethodImpl(MethodImplOptions.InternalCall, MethodCodeType = MethodCodeType.Runtime)]
            int Next(uint celt, IntPtr rgelt, out uint pceltFetched);

            [PreserveSig, MethodImpl(MethodImplOptions.InternalCall, MethodCodeType = MethodCodeType.Runtime)]
            int Skip([In] uint celt);

            [PreserveSig, MethodImpl(MethodImplOptions.InternalCall, MethodCodeType = MethodCodeType.Runtime)]
            int Reset();

            [PreserveSig, MethodImpl(MethodImplOptions.InternalCall, MethodCodeType = MethodCodeType.Runtime)]
            int Clone([MarshalAs(UnmanagedType.Interface)] out IEnumIDList ppenum);
        }

        [ComImport, Guid("000214E6-0000-0000-C000-000000000046"), InterfaceType(ComInterfaceType.InterfaceIsIUnknown),
         ComConversionLoss]
        internal interface IShellFolder
        {
            [MethodImpl(MethodImplOptions.InternalCall, MethodCodeType = MethodCodeType.Runtime)]
            void ParseDisplayName(IntPtr hwnd, [In, MarshalAs(UnmanagedType.Interface)] IBindCtx pbc,
                [In, MarshalAs(UnmanagedType.LPWStr)] string pszDisplayName, out uint pchEaten, out IntPtr ppidl,
                [In, Out] ref uint pdwAttributes);

            [PreserveSig, MethodImpl(MethodImplOptions.InternalCall, MethodCodeType = MethodCodeType.Runtime)]
            int EnumObjects([In] IntPtr hwnd, [In] SHCONT grfFlags,
                [MarshalAs(UnmanagedType.Interface)] out IEnumIDList ppenumIDList);

            [PreserveSig, MethodImpl(MethodImplOptions.InternalCall, MethodCodeType = MethodCodeType.Runtime)]
            int BindToObject([In] IntPtr pidl, [In, MarshalAs(UnmanagedType.Interface)] IBindCtx pbc, [In] ref Guid riid,
                [MarshalAs(UnmanagedType.Interface)] out IShellFolder ppv);

            [MethodImpl(MethodImplOptions.InternalCall, MethodCodeType = MethodCodeType.Runtime)]
            void BindToStorage([In] ref IntPtr pidl, [In, MarshalAs(UnmanagedType.Interface)] IBindCtx pbc,
                [In] ref Guid riid,
                out IntPtr ppv);

            [MethodImpl(MethodImplOptions.InternalCall, MethodCodeType = MethodCodeType.Runtime)]
            void CompareIDs([In] IntPtr lParam, [In] ref IntPtr pidl1, [In] ref IntPtr pidl2);

            [MethodImpl(MethodImplOptions.InternalCall, MethodCodeType = MethodCodeType.Runtime)]
            void CreateViewObject([In] IntPtr hwndOwner, [In] ref Guid riid, out IntPtr ppv);

            [MethodImpl(MethodImplOptions.InternalCall, MethodCodeType = MethodCodeType.Runtime)]
            void GetAttributesOf([In] uint cidl, [In] IntPtr apidl, [In, Out] ref uint rgfInOut);

            [MethodImpl(MethodImplOptions.InternalCall, MethodCodeType = MethodCodeType.Runtime)]
            void GetUIObjectOf([In] IntPtr hwndOwner, [In] uint cidl, [In] IntPtr apidl, [In] ref Guid riid,
                [In, Out] ref uint rgfReserved, out IntPtr ppv);

            [MethodImpl(MethodImplOptions.InternalCall, MethodCodeType = MethodCodeType.Runtime)]
            void GetDisplayNameOf([In] ref IntPtr pidl, [In] uint uFlags, out IntPtr pName);

            [MethodImpl(MethodImplOptions.InternalCall, MethodCodeType = MethodCodeType.Runtime)]
            void SetNameOf([In] IntPtr hwnd, [In] ref IntPtr pidl, [In, MarshalAs(UnmanagedType.LPWStr)] string pszName,
                [In] uint uFlags, [Out] IntPtr ppidlOut);
        }

        private class NativeMethods
        {
            private static readonly int pointerSize = Marshal.SizeOf(typeof(IntPtr));

            public static IBindCtx CreateBindCtx()
            {
                IBindCtx ctx;
                Marshal.ThrowExceptionForHR(CreateBindCtx_(0, out ctx));
                return ctx;
            }

            [DllImport("ole32.dll", EntryPoint = "CreateBindCtx")]
            public static extern int CreateBindCtx_(int reserved, out IBindCtx ppbc);

            [DllImport("shell32.dll", CharSet = CharSet.Unicode)]
            public static extern IntPtr ILCreateFromPath([In, MarshalAs(UnmanagedType.LPWStr)] string pszPath);

            [DllImport("shell32.dll")]
            public static extern void ILFree([In] IntPtr pidl);

            public static IShellFolder SHGetDesktopFolder()
            {
                IShellFolder folder;
                Marshal.ThrowExceptionForHR(SHGetDesktopFolder_(out folder));
                return folder;
            }

            [DllImport("shell32.dll", EntryPoint = "SHGetDesktopFolder", CharSet = CharSet.Unicode, SetLastError = true)
            ]
            private static extern int SHGetDesktopFolder_(
                [MarshalAs(UnmanagedType.Interface)] out IShellFolder ppshf);

            public static void SHOpenFolderAndSelectItems(IntPtr pidlFolder, IntPtr[] apidl, int dwFlags)
            {
                uint cidl = (apidl != null) ? ((uint)apidl.Length) : 0;
                Marshal.ThrowExceptionForHR(SHOpenFolderAndSelectItems_(pidlFolder, cidl, apidl, dwFlags));
            }

            [DllImport("shell32.dll", EntryPoint = "SHOpenFolderAndSelectItems")]
            private static extern int SHOpenFolderAndSelectItems_([In] IntPtr pidlFolder, uint cidl,
                [In, Optional, MarshalAs(UnmanagedType.LPArray)] IntPtr[] apidl, int dwFlags);
        }

        [Flags]
        internal enum SHCONT : ushort
        {
            SHCONTF_CHECKING_FOR_CHILDREN = 0x10,
            SHCONTF_ENABLE_ASYNC = 0x8000,
            SHCONTF_FASTITEMS = 0x2000,
            SHCONTF_FLATLIST = 0x4000,
            SHCONTF_FOLDERS = 0x20,
            SHCONTF_INCLUDEHIDDEN = 0x80,
            SHCONTF_INIT_ON_FIRST_NEXT = 0x100,
            SHCONTF_NAVIGATION_ENUM = 0x1000,
            SHCONTF_NETPRINTERSRCH = 0x200,
            SHCONTF_NONFOLDERS = 0x40,
            SHCONTF_SHAREABLE = 0x400,
            SHCONTF_STORAGE = 0x800
        }
    }
}
This class contains the business logic, primarily methods that take file path as a parameter and work with shell to open this file in explorer. I’ll not go into the details of this class, but focus more on how we can invoke this functionality.
Now in the MenuItemCallBack method put the following code to invoke the method of our utility class:
private void MenuItemCallback(object sender, EventArgs e)
     {
         var selectedItems = ((UIHierarchy)((DTE2)this.ServiceProvider.GetService(typeof(DTE))).Windows.Item("{3AE79031-E1BC-11D0-8F78-00A0C9110057}").Object).SelectedItems as object[];
         if (selectedItems != null)
         {
             LocateFile.FilesOrFolders((IEnumerable<string>)(from t in selectedItems
                                                                         where (t as UIHierarchyItem)?.Object is ProjectItem
                                                                         select ((ProjectItem)((UIHierarchyItem)t).Object).FileNames[1]));
         }
     }</string>
This method now first fetches all the selected items using DTE object. With DTE objects we can do all the transactions and manipulations in Visual Studio components. Read more about the power of DTE objects here.
After getting the selected items, we invoke the FilesOrFolders method of the utility class and pass file path as a parameter. Job done. Now again launch the experimental instance and check the functionality.
Step 7: Test actual implementation
Launch experimental instance, add a new or existing project and right click on any file and invoke the command.
https://www.codeproject.com/KB/dotnet/1169776/image032.png
As soon as we invoke the command, we see the folder is opened in windows explorer with that file selected as shown below.
https://www.codeproject.com/KB/dotnet/1169776/image033.png
This functionality also works for the linked files in Visual Studio. Let’s check that. Add a new item in the project opened in experimental instance and add a file as a link as shown in the following image.
https://www.codeproject.com/KB/dotnet/1169776/image034.png
We only need to select "Add as Link" while adding the file. This file would be then be shown in Visual Studio with a different icon showing that this is a linked file. Now select the actual Visual Studio file and the linked file in Visual Studio and invoke the command now.
https://www.codeproject.com/KB/dotnet/1169776/image035.png
When the command is invoked, we can see two folders opened with both the files selected at their own location.
https://www.codeproject.com/KB/dotnet/1169776/image036.png
Not only this, since we have created this extension, in the Extensions and Updates in this experimental instance, we can search for this extension and we get that installed in ourVisual Studio as shown in following image.
https://www.codeproject.com/KB/dotnet/1169776/image037.png
Step 7: Optimizing the package
Our job is nearly done, but there are some more important things that we need to take care of. We need to make this package more appealing, add some image/icons to the extension and optimize the project structure to make it more readable and understandable.
Remember when we started this tutorial, We downloaded and installed VS Extensibility Tools? VS Extensibility Tools provide some useful features that we can really leverage. For example, it allows us to export all the available images in Visual Studio. We can use these images to make our icon and default image for the extension. To start with, in Visual Studio, where our code was written, go to "Tools->Export Image Moniker…"
https://www.codeproject.com/KB/dotnet/1169776/image039.png
A window will be opened to search for the image we need to choose. Search for "Open," and we'll get the same image as shown in the context menu of project to open the project in windows explorer.
https://www.codeproject.com/KB/dotnet/1169776/image040.png
We’ll use this image only for our extension. Give it a size 16*16 and click Export, and save that in our Resources folder of the project. Replace the already existing LocateFolderCommand.png file from this file and give this new exported file the same name. Since in the vsct file, it was defined that the prior image sprint has to be used with first icon, so we always got to see 1X beside the custom command text, but we need a good looking meaningful image now, so we exported this "open in explorer" image.
https://www.codeproject.com/KB/dotnet/1169776/image041.png
Now go to .vsct file and in the Bitmaps first delete all images name in the list except bmpPic1 from the usedList and in the GuidSymbol, delete all IDsymbol except bmpPic1 as shown in below image. We do not need to change the href in Bitmap node because we replaced existing image with the newly exported image with the same name. We did this because we are not using that old default image sprite, but we are using now our newly exported image.
https://www.codeproject.com/KB/dotnet/1169776/image042.png
In that case the LocateFolderCommandPackage.vsct file would look like as shown below,
<?xml version="1.0" encoding="utf-8"?>
<CommandTable xmlns="http://schemas.microsoft.com/VisualStudio/2005-10-18/CommandTable" xmlns:xs="http://www.w3.org/2001/XMLSchema">

  <Extern href="stdidcmd.h"/>
  <Extern href="vsshlids.h"/>
  <Commands package="guidLocateFolderCommandPackage">
    <Groups>
      <Group guid="guidLocateFolderCommandPackageCmdSet" id="MyMenuGroup" priority="0x0200">
        <Parent guid="guidSHLMainMenu" id="IDM_VS_CTXT_ITEMNODE"/>
      </Group>
    </Groups>
    <Buttons>
      <Button guid="guidLocateFolderCommandPackageCmdSet" id="LocateFolderCommandId" priority="0x0100" type="Button">
        <Parent guid="guidLocateFolderCommandPackageCmdSet" id="MyMenuGroup" />
        <Icon guid="guidImages" id="bmpPic1" />
        <Strings>
          <ButtonText>Open in File Explorer</ButtonText>
        </Strings>
      </Button>
    </Buttons>
    <Bitmaps>
      <Bitmap guid="guidImages" href="Resources\LocateFolderCommand.png" usedList="bmpPic1"/>
    </Bitmaps>
  </Commands>
  <Symbols>
    <GuidSymbol name="guidLocateFolderCommandPackage" value="{a7836cc5-740b-4d5a-8a94-dc9bbc4f7db1}" />
    <GuidSymbol name="guidLocateFolderCommandPackageCmdSet" value="{031046af-15f9-44ab-9b2a-3f6cad1a89e3}">
      <IDSymbol name="MyMenuGroup" value="0x1020" />
      <IDSymbol name="LocateFolderCommandId" value="0x0100" />
    </GuidSymbol>
    <GuidSymbol name="guidImages" value="{8ac8d2e1-5ef5-4ad7-8aa6-84da2268566a}" >
      <IDSymbol name="bmpPic1" value="1" />
    </GuidSymbol>
  </Symbols>
</CommandTable>
The next step is to set extension image and a preview image that will be shown for the extension in Visual Studio gallery and Visual Studio market place. These images will represent the extension everywhere.
So follow the same routine of exporting image from Image Monikor. Note that we can also use our own custom images for all the image/icon related operations.
Open the image moniker like explained earlier and search for LocateAll, then export two images, one for icon (90 X 90)
https://www.codeproject.com/KB/dotnet/1169776/image043.png
and one for preview (175 X 175).
https://www.codeproject.com/KB/dotnet/1169776/image044.png
Export both the images with the name Icon.png and Preview.png respectively in the Resources folder. Then in the solution explorer, include those two images in the project as shown in below image.
https://www.codeproject.com/KB/dotnet/1169776/image045.png
Now in the source.extension.vsixmanifest file, set the Icon and Preview images to the same exported images as shown in following image.
https://www.codeproject.com/KB/dotnet/1169776/image046.png
Step 8: Test final package
Again, it’s time to test the implementation with new Images and icons. So compile the project and press F5, experimental instance would launch. Add a new or existing project and right click on any project file to see our custom command.
https://www.codeproject.com/KB/dotnet/1169776/image047.png
So now we got the icon that was earlier selected from Image Moniker for this custom command. Since we have not touched the functionality, it should work fine as before.
Now go to extensions and updates and search for the installed extension "LocateFolder". We’ll see a beautiful image before our extension, this is the same image with dimensions 90X90 and in the right side panel, we can see the enlarged 175X175 preview image.
https://www.codeproject.com/KB/dotnet/1169776/image048.png
Conclusion
This detailed article focused on how a Visual Studio extension could be created.
References
- https://channel9.msdn.com/events/Build/2016/B886
- https://blogs.msdn.microsoft.com/quanto/2009/05/26/what-is-a-vsix
- https://msdn.microsoft.com/en-us/library/dd997148.aspx
Complete Source Code
https://github.com/akhilmittal/LocateFileInWindowsExplorer
Extension at marketplace
https://marketplace.visualstudio.com/items?itemName=vs-publisher-457497.LocateFolder
See Also
- https://msdn.microsoft.com/en-us/library/dd997148.aspx
- https://msdn.microsoft.com/en-us/library/dd885241.aspx