ASP.NET Core, Angular2 CRUD with Animation using Template Pack, WEB API and EF 1.0.1
Introduction

In this article, let's see how to create a ASP.NET Core CRUD web application with Angular2 Animation using Template Pack, WEB API and EF 1.0.1.
In this article, we will see the following:
Creating CRUD web Application ASP.NET Core and Angular2
- C: (Create): Insert New Student Details into the database using ASP.NET Core, EF and Web API.
- R: (Read): Select Student Details from the database using ASP.NET Core, EF and Web API.
- U: (Update): Update Student Details to the database using ASP.NET Core, EF and Web API
- D: (Delete): Delete Student Details from the database using ASP.NET Core, EF and Web API.
We will be using WEB API to perform our CRUD operations. Web API has the following four methods as Get/Post/Put and Delete where:
- Get is to request for the data. (Select)
- Post is to create a data. (Insert)
- Put is to update the data(Update).
- Delete is to delete data(Delete).
Presenting our CRUD Application more rich with simple Angular2 Animations like.
- Angilar2 Animation for Fade-in Elements and controls.
- Angilar2 Animation for Move Elements and controls from Left.
- Angilar2 Animation for Move Elements and controls from Right.
- Angilar2 Animation for Move Elements and controls from Top.
- Angilar2 Animation for Move Elements and controls from Bottom.
- Angilar2 Animation to enlarge Button on Click.

For creating our ASP.NET Core, Angular2 CRUD with Animation we will be
- Creating sample Database and Table in SQL Server to display in our web application.
- Creating ASP.NET Core Angular 2 Starter Application (.NET Core) using Template pack.
- Creating EF, DBContext Class and Model Class.
- Creating WEB API for Get/Post/Put and Delete method.
- Creating First Component TypeScript file to get WEB API JSON result using Http Module for Get/Post/Put and Delete method.
- Creating our first Component HTML file for our Animation and CRUD web Application.
Prerequisites
Make sure you have installed all the prerequisites in your computer. If not, then download and install all of them, one by one.
- First, download and install Visual Studio 2015 with Update 3 from this link.
- If you have Visual Studio 2015 and have not yet updated with update 3, download and install the Visual Studio 2015 Update 3 from this link.
- Download and install .NET Core 1.0.1
- Download and install TypeScript 2.0
- Download and install Node.js v4.0 or above. I have installed V6.9.1 (Download link).
- Download and install Download ASP.NET Core Template Pack visz file from this link.
Step 1 Create a Database and Table
** **We will be using our SQL Server database for our WEB API and EF. First, we create a database named StudentsDB and a table as StudentMaster. Here is the SQL script to create a Database table and sample record insert query in our table. Run the below query on your local SQL server to create Database and Table to be used in our project.
USEMASTER
GO
--1) Check
for the Database Exists.If the database is exist then drop and create new DB
IFEXISTS(SELECT[name] FROMsys.databasesWHERE[name] = 'StudentsDB')
DROPDATABASEStudentsDB
GO
CREATEDATABASEStudentsDB
GO
USEStudentsDB
GO
--1) //////////// StudentMasters
IFEXISTS(SELECT[name] FROMsys.tablesWHERE[name] = 'StudentMasters')
DROPTABLEStudentMasters
GO
CREATETABLE[dbo].[StudentMasters](
 [StdID] INTIDENTITYPRIMARYKEY, [StdName][varchar](100) NOTNULL, [Email][varchar](100) NOTNULL, [Phone][varchar](20) NOTNULL, [Address][varchar](200) NOTNULL
 )
 --insert sample data to Student Master table
INSERTINTO[StudentMasters]([StdName], [Email], [Phone], [Address])
VALUES('Shanu', 'syedshanumcain@gmail.com', '01030550007', 'Madurai,India')
INSERTINTO[StudentMasters]([StdName], [Email], [Phone], [Address])
VALUES('Afraz', 'Afraz@afrazmail.com', '01030550006', 'Madurai,India')
INSERTINTO[StudentMasters]([StdName], [Email], [Phone], [Address])
VALUES('Afreen', 'Afreen@afreenmail.com', '01030550005', 'Madurai,India')
select * from[StudentMasters]
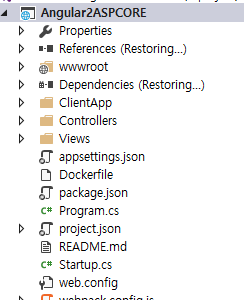
Step 2 Create ASP.NET Core Angular 2 application
After installing all the prerequisites listed above and ASP.NET Core Template, click Start >> Programs >> Visual Studio 2015 >> Visual Studio 2015, on your desktop. Click New >> Project. Select Web >> ASP.NET Core Angular 2 Starter. Enter your project name and click OK.

After creating ASP.NET Core Angular 2 application, wait for a few seconds. You will see that all the dependencies are automatically restoring.
What is new in ASP.NET Core Template Pack ?

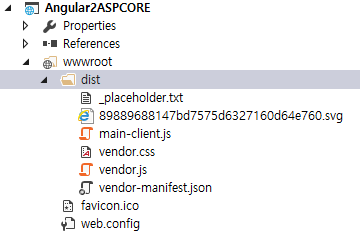
WWWroot
We can see all the CSS,JS files are added under the "dist" folder ."main-client.js" file is the important file as all the Angular2 results will be compiled and results will be loaded from this "js" file to our HTML file.
ClientApp Folder
** **We can see a new folder Client App inside our project solution. This folder contains all Angular2 related applications like Modules, Components and etc. We can add all our Angular 2 related Modules, Component, Template, and HTML files under this folder. We can see in detail about how to create our own Angular2 application here, below, in our article.
In Components folder under app folder, we can see many subfolders like app. counter, fetchdata, home and navmenu. By default, all these sample applications have been created and when we run our application we can see all the sample Angular2 application results.
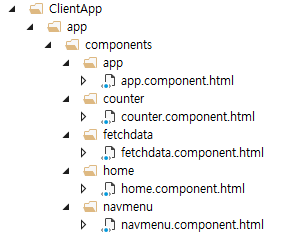
When we run the application, we can see navigation on the left side and the right side contains data. All the Angular2 samples will be loaded from the above folder.

Controllers Folder:
** **This is our MVC Controller folder, we can create both MVC and Web API Controller in this folder.
View Folder:
This is our MVC View folder.
project.json :
** **ASP.NET Core dependency list can be found in this file, We will be adding our Entity Framework in dependency section of this file.
package.json :
** **This is another important file as all Angular2 related dependency list will be added here by default all the Angular2 related dependencies has been added here in ASP.NET Core Template pack.
appsettings.json :
** **We can add our database connection string in this appsetting.json file.
We will be using all this in our project to create, build and run our Angular 2 with ASP.NET Core Template Pack, WEB API and EF 1.0.1
Step 3 Creating Entity Framework
** **Add Entity Framework Packages
To add our Entity Framework Packages in our ASP.NET Core application, open the Project.JSON File and in dependencies add the below line.
Note Here we have used EF version 1.0.1.
"Microsoft.EntityFrameworkCore.SqlServer": "1.0.1",
"Microsoft.EntityFrameworkCore.Tools": "1.0.0-preview2-final"

When we save the project,.json file we can see the reference is restored.

After few second we can see Entity framework package has been restored and all references have been added.

Adding Connection String
** **To add the connection string with our SQL connection open the "appsettings.json" file .Yes this is the JSON file and this file looks like the below image by default.

In this appsettings.json file add our connection string
"ConnectionStrings": {
 "DefaultConnection": "Server=YOURDBSERVER;Database=StudentsDB;user id=SQLID;password=;Trusted_Connection=True;MultipleActiveResultSets=true;"
},
Note
Change the SQL connection string as per your local connection.

Next step is we create a folder named "Data" to create our model and DBContext class.

Creating Model Class for Student
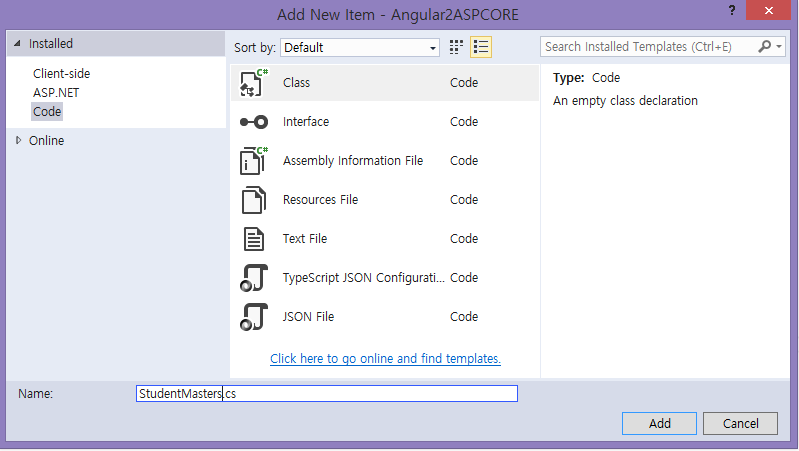
We can create a model by adding a new class file in our DataFolder. Right Click Data folder and click Add>Click Class. Enter the class name as StudentMasters and click Add.
Now in this class, we first create property variable and add a student. We will be using this in our WEB API controller.
using System;
usingSystem.Collections.Generic;
usingSystem.Linq;
usingSystem.Threading.Tasks;
usingSystem.ComponentModel.DataAnnotations;
namespace Angular2ASPCORE.Data {
 publicclassStudentMasters {
 [Key]
 publicintStdID {
 get;
 set;
 }
 [Required]
 [Display(Name = "Name")]
 publicstringStdName {
 get;
 set;
 }
 [Required]
 [Display(Name = "Email")]
 publicstring Email {
 get;
 set;
 }
 [Required]
 [Display(Name = "Phone")]
 publicstring Phone {
 get;
 set;
 }
 publicstring Address {
 get;
 set;
 }
 }
}
Creating Database Context
DBContextis Entity Framework Class for establishing the connection to database.
We can create a DBContext class by adding a new class file in our Data Folder. Right Click Data folder and click Add>Click Class. Enter the class name as StudentContext and click Add.

In this class, we inherit DbContext and created Dbset for our students table.
using System;
usingSystem.Collections.Generic;
usingSystem.Linq;
usingSystem.Threading.Tasks;
usingMicrosoft.EntityFrameworkCore;

namespace Angular2ASPCORE.Data {
 publicclassstudentContext: DbContext {
 publicstudentContext(DbContextOptions < studentContext > options): base(options) {}
 publicstudentContext() {}
 publicDbSet < StudentMasters > StudentMasters {
 get;
 set;
 }
 }
}
Startup.CS
Now we need to add our database connection string and provider as SQL SERVER.To add this we add the below code in Startup.cs file under ConfigureServices method.
services.AddDbContext < studentContext > (options =>
 options.UseSqlServer(Configuration.GetConnectionString("DefaultConnection")));
Step 4 Creating Web API
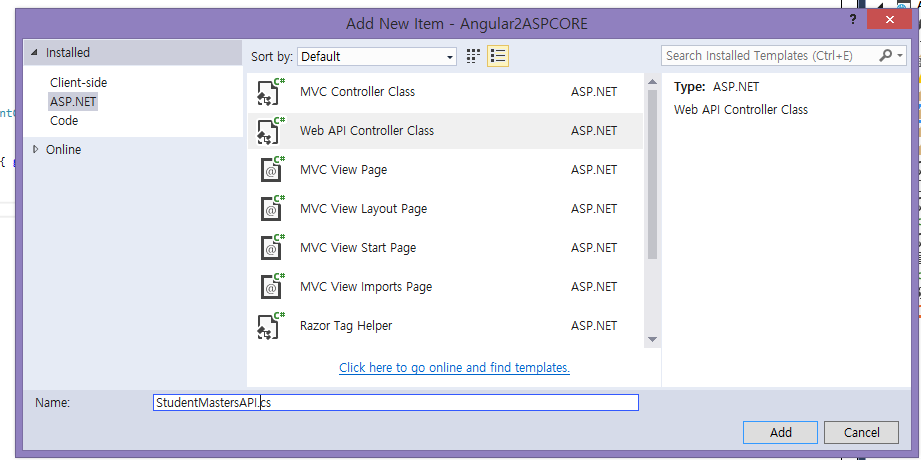
To create our WEB API Controller, right click Controllers folder. Click Add and click New Item.

Click ASP.NET in right side > Click Web API Controller Class. Enter the name as "StudentMastersAPI.cs" and click Add.
As we all know Web API is a simple and easy way to build HTTP Services for Browsers and Mobiles.
Web API has the following four methods as Get/Post/Put and Delete.
- Get is to request for the data. (Select)
- Post is to create a data. (Insert)
- Put is to update the data.
- Delete is to delete data.
Get Method(Select Operation)
Get Method is to request single item or list of items from our selected Database. Here we will be get all student information's from StudentMasters Table.
[HttpGet]
 [Route("Student")]
 public IEnumerable<StudentMasters> GetStudentMasters()
 {
 return _context.StudentMasters;

 }
Post Method (Insert Operation)
Post Method will be used to Insert the data to our database. In Post Method, we will also check if StudentID is already created and return the message. We will pass all Student Master Column parameters for insert in to the Student Master Table.
// POST: api/StudentMastersAPI
 [HttpPost]
 public async Task<IActionResult> PostStudentMasters([FromBody] StudentMasters studentMasters)
 {
 if (!ModelState.IsValid)
 {
 return BadRequest(ModelState);
 }

 _context.StudentMasters.Add(studentMasters);
 try
 {
 await _context.SaveChangesAsync();
 }
 catch (DbUpdateException)
 {
 if (StudentMastersExists(studentMasters.StdID))
 {
 return new StatusCodeResult(StatusCodes.Status409Conflict);
 }
 else
 {
 throw;
 }
 }

 return CreatedAtAction("GetStudentMasters", new { id = studentMasters.StdID }, studentMasters);
 }
 private bool StudentMastersExists(int id)
 {
 return _context.StudentMasters.Any(e => e.StdID == id);
 }
Put Method (Update Operation)
Put Method will be used to Updated the selected student data to our database .In Put Method we will pass StudentID along with all other parameters for update.We pass the StudentID to update the StudentMaster Table by StudentID.
// PUT: api/StudentMastersAPI/5
 [HttpPut("{id}")]
 public async Task<IActionResult> PutStudentMasters([FromRoute] int id, [FromBody] StudentMasters studentMasters)
 {
 if (!ModelState.IsValid)
 {
 return BadRequest(ModelState);
 }

 if (id != studentMasters.StdID)
 {
 return BadRequest();
 }

 _context.Entry(studentMasters).State = EntityState.Modified;

 try
 {
 await _context.SaveChangesAsync();
 }
 catch (DbUpdateConcurrencyException)
 {
 if (!StudentMastersExists(id))
 {
 return NotFound();
 }
 else
 {
 throw;
 }
 }

 return NoContent();
 }
Delete Method (Delete Operation)
Delete Method will be used to delete the selected student data from our Database. In Delete Method we will pass StudentID to delete the record.
// DELETE: api/StudentMastersAPI/5
 [HttpDelete("{id}")]
 public async Task<IActionResult> DeleteStudentMasters([FromRoute] int id)
 {
 if (!ModelState.IsValid)
 {
 return BadRequest(ModelState);
 }

 StudentMasters studentMasters = await _context.StudentMasters.SingleOrDefaultAsync(m => m.StdID == id);
 if (studentMasters == null)
 {
 return NotFound();
 }

 _context.StudentMasters.Remove(studentMasters);
 await _context.SaveChangesAsync();

 return Ok(studentMasters);
 }
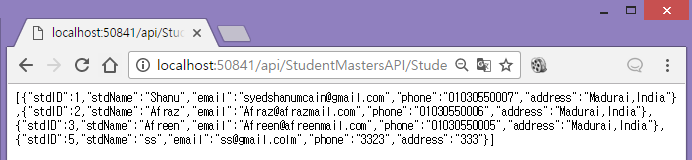
To test it we can run our project and copy the get method api path; here we can see our API path for get is api/StudentMastersAPI/Student
Run the program and paste the above API path to test our output.
Working with Angular2
We create all Angular2 related Apps, Modules, Services, Components and HTML templates under ClientApp/App folder.
We create "students" folder under app folder to create our typescript and HTML file for displaying Student details.

Step 5 Working with Angular2 Animation
Angular animations are all build on top of the standard Web Animations API .Kindly check this reference link which explains more detail about Angular2 Animations https://angular.io/docs/ts/latest/guide/animations.html
Adding Animation in web applications will give more rich look for our web site. Here in this application we will be using Angular2 Animation for Fade-in Enlarge controls on click event and move elements or controls from Left, Right, Top and Bottom.
Angular2 Animation in Home Component:
Here we will be adding our animation in our home page. For that we edit the Home Component for creating our Angular2 Animation.
Import part:
For using the Angular2 Animation we need to first import "trigger, state, style, transition, animate".
Our import will look like this
import {Component, Input, trigger, state, style, transition, animate, keyframes} from '@angular/core';
Component Part
In component we need to add animations: [] for performing our animation with triggers.
The trigger is used to connect Component with our HTML Template for example here let's see on creating a simple Animation to change the color and resize the Button on click event.** **
For this first we create a trigger with name as "moveBottom" we will be using this trigger name in our HTML element or control to move from bottom. In this Animation, we have used transition('void => *' which means this animation will be perform during the page load. We have set the amination time for '1s' and in style we set the 'translateY(-200px) which means we initially set the button location to bottom -200 from actual location of button.When the page loads the button will be start from -200 Y-axis place and move toward up till the actual button location that is 'translateY(0)'
trigger('moveBottom', [
 transition('void => *', [
 animate('1s', keyframes([
 style({ opacity: 0, transform: 'translateY(-200px)', offset: 0 }),
 style({ opacity: 1, transform: 'translateY(25px)', offset: .75 }),
 style({ opacity: 1, transform: 'translateY(0)', offset: 1 }),
 ]))
 ])
 ])
In HTML template, we will be using this trigger name with @ symbol for performing the animation like below.Here we have add the animation for div tag.
<div  [@moveBottom]= `moveBottom'>
 ASP.NET  Angular2
 </div>
Same like Bottom we do rest of Animations for,Left,Right,Top and Fade-In, here is the complete code for Home Animation component.
import { Component, Input, trigger,  state,  style,  transition,  animate,  keyframes } from '@angular/core';

@Component({
 selector: 'home',
 animations: [
 trigger('moveBottom', [
 transition('void => *', [
 animate('1s', keyframes([
 style({ opacity: 0, transform: 'translateY(-200px)', offset: 0 }),
 style({ opacity: 1, transform: 'translateY(25px)', offset: .75 }),
 style({ opacity: 1, transform: 'translateY(0)', offset: 1 }),

 ]))
 ])

 ]),
 trigger('moveTop', [

 transition('void => *', [
 animate('1s', keyframes([
 style({ opacity: 0, transform: 'translateY(+400px)', offset: 0 }),
 style({ opacity: 1, transform: 'translateY(25px)', offset: .75 }),
 style({ opacity: 1, transform: 'translateY(0)', offset: 1 }),

 ]))
 ])

 ]),

 trigger('moveRight', [

 transition('void => *', [
 animate('1s', keyframes([
 style({ opacity: 0, transform: 'translateX(-400px)', offset: 0 }),
 style({ opacity: 1, transform: 'translateX(25px)', offset: .75 }),
 style({ opacity: 1, transform: 'translateX(0)', offset: 1 }),

 ]))
 ])

 ]),
 trigger('movelLeft', [

 transition('void => *', [
 animate('4s', keyframes([
 style({ opacity: 0, transform: 'translateX(+800px)', offset: 0 }),
 style({ opacity: 1, transform: 'translateX(150px)', offset: .75 }),
 style({ opacity: 1, transform: 'translateX(0)', offset: 1 }),

 ]))
 ])

 ]),
 trigger('fadeIn', [

 transition('void => *', [
 animate('3s', keyframes([
 style({ opacity: 0, transform: 'translateX(0)', offset: 0 }),
 style({ opacity: 1, transform: 'translateX(0)', offset: 1 }),
 ]))
 ])
 ])
 ],
 template: require('./home.component.html')
})
export class HomeComponent {
 myName: string = "Shanu";
}
Here is the complete code for Home Html Template.
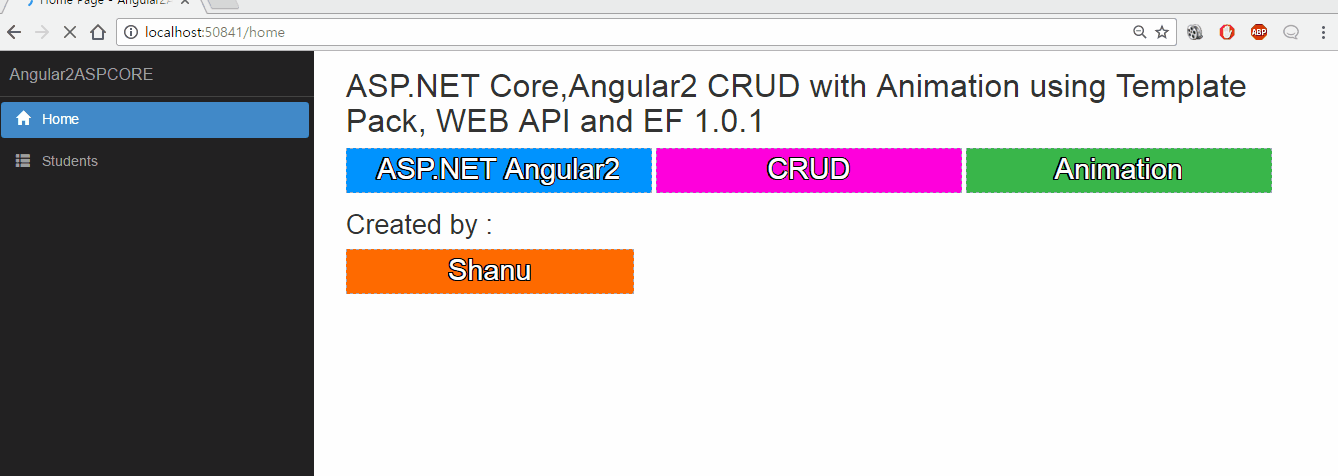
<h1 [@fadeIn]='animStatus'>ASP.NET Core,Angular2 CRUD with Animation using Template Pack, WEB API and EF 1.0.1  </h1>
<div class="column">
 <div style="background-color:#0094ff;color:White;xx-large;width:340px;height:50px;text-shadow:  -2px -1px 0px #000,
 0px -1px 0px #000,
 1px -1px 0px #000,
 -2px  0px 0px #000,
 1px  0px 0px #000,
 -2px  1px 0px #000,
 0px  1px 0px #000,
 1px  1px 0px #000;text-align:center;display:inline-block;
 border-color:#a2aabe;border-style:dashed;border-width:2px;" [@moveBottom]='moveBottom'>
 ASP.NET  Angular2
 </div>
 <div style="background-color:#ff00dc;color:White;xx-large;width:340px;height:50px;text-shadow:  -2px -1px 0px #000,
 0px -1px 0px #000,
 1px -1px 0px #000,
 -2px  0px 0px #000,
 1px  0px 0px #000,
 -2px  1px 0px #000,
 0px  1px 0px #000,
 1px  1px 0px #000;text-align:center;display:inline-block;
border-color:#a2aabe;border-style:dashed;border-width:2px;" [@moveTop]='moveTop'>
 CRUD
 </div>
 <div style="background-color:#3ab64a;color:White;xx-large;width:340px;height:50px;text-shadow:  -2px -1px 0px #000,
 0px -1px 0px #000,
 1px -1px 0px #000,
 -2px  0px 0px #000,
 1px  0px 0px #000,
 -2px  1px 0px #000,
 0px  1px 0px #000,
 1px  1px 0px #000;text-align:center;display:inline-block;
border-color:#a2aabe;border-style:dashed;border-width:2px;" [@moveRight]='moveRight'>
 Animation
 </div>
</div>
<div class="column">
 <h2>Created by : </h2>
 <div style="background-color:#ff6a00;color:White;xx-large;width:320px;height:50px;text-shadow:  -2px -1px 0px #000,
 0px -1px 0px #000,
 1px -1px 0px #000,
 -2px  0px 0px #000,
 1px  0px 0px #000,
 -2px  1px 0px #000,
 0px  1px 0px #000,
 1px  1px 0px #000;text-align:center;
border-color:#a2aabe;border-style:dashed;border-width:2px;" [@movelLeft]='movelLeft'>
 {{myName}}

 </div>
</div>
Step 6 Creating Component TypeScript
Right Click on student folder and click on add new Item. Select Client-side from left side and select TypeScript File and name the file "students.component.ts" and click Add

In Students.component.ts file we have three parts first is the,
- import part
- Next is component part
- Next we have the class for writing our business logics.
First, we import angular files to be used in our component here we import http for using http client in our Angular2 component along with Animation.
In component, we have selector, animation and template. Selector is to give a name for this app and in our html file we use this selector name to display in our html page. Animation is used to perform animation for our Angular2 application. As we have seen in our home component we have used Move, Left, Right, Bottom, Top and fade-In, we will be using the same animation in our CRDU page. In template we give our output html file name. here we will create on html file as "students.component.html".
Export Class is the main class where we do all our business logic and variable declaration to be used in our component template. In this class we get the APImethod result and bind the result to the student array and also we will be perform rest or Post, Put and Delete method to perform our CRUD operations.
import {
 Component, Input, trigger,
 state,
 style,
 transition,
 animate,
 keyframes } from '@angular/core';
import { Http, Response,  Headers, RequestOptions } from '@angular/http';
import { FormsModule } from '@angular/forms';


@Component({
 selector: 'students'
 ,
 animations: [

 trigger('buttonReSize', [
 state('inactive', style({
 transform: 'scale(1)',
 backgroundColor: '#f83500'
 })),
 state('active', style({
 transform: 'scale(1.4)',
 backgroundColor: '#0094ff'
 })),
 transition('inactive => active', animate('100ms ease-in')),
 transition('active => inactive', animate('100ms ease-out'))
 ]),

 trigger('moveBottom', [

 transition('void => *', [
 animate(900, keyframes([
 style({ opacity: 0, transform: 'translateY(-200px)', offset: 0 }),
 style({ opacity: 1, transform: 'translateY(25px)', offset: .75 }),
 style({ opacity: 1, transform: 'translateY(0)', offset: 1 }),

 ]))
 ])

 ]),
 trigger('moveTop', [

 transition('void => *', [
 animate(900, keyframes([
 style({ opacity: 0, transform: 'translateY(+400px)', offset: 0 }),
 style({ opacity: 1, transform: 'translateY(25px)', offset: .75 }),
 style({ opacity: 1, transform: 'translateY(0)', offset: 1 }),

 ]))
 ])

 ]),

 trigger('moveRight', [

 transition('void => *', [
 animate(900, keyframes([
 style({ opacity: 0, transform: 'translateX(-400px)', offset: 0 }),
 style({ opacity: 1, transform: 'translateX(25px)', offset: .75 }),
 style({ opacity: 1, transform: 'translateX(0)', offset: 1 }),

 ]))
 ])

 ]),
 trigger('movelLeft', [

 transition('void => *', [
 animate(900, keyframes([
 style({ opacity: 0, transform: 'translateX(+400px)', offset: 0 }),
 style({ opacity: 1, transform: 'translateX(25px)', offset: .75 }),
 style({ opacity: 1, transform: 'translateX(0)', offset: 1 }),

 ]))
 ])

 ]),
 trigger('fadeIn', [
 transition('* => *', [
 animate('1s', keyframes([
 style({ opacity: 0, transform: 'translateX(0)', offset: 0 }),
 style({ opacity: 1, transform: 'translateX(0)', offset: 1 }),
 ]))
 ])
 ]),


 ],
 template: require('./students.component.html')
})

export class studentsComponent {
 // to get the Student Details
 public student: StudentMasters[] = [];
 // to hide and Show Insert/Edit
 AddstudetnsTable: Boolean = false;
 // To stored Student Informations for insert/Update and Delete
 public StdIDs = "0";
 public StdNames  = "";
 public Emails = "";
 public Phones = "";
 public Addresss= "";

 //For display Edit and Delete Images
 public imgEdit = require("./Images/edit.gif");
 public imgDelete = require("./Images/delete.gif");

 myName: string;
 //for animation status
 animStatus: string = 'inactive';
 constructor(public http: Http) {
 this.myName = "Shanu";
 this.AddstudetnsTable = false;
 this.getData();
 }

 //for Animation to toggle Active and Inactive
 animButton() {
 this.animStatus = (this.animStatus === 'inactive' ? 'active' : 'inactive');
 }

 //to get all the Student data from Web API
 getData()
 {
 this.http.get('/api/StudentMastersAPI/Student').subscribe(result => {
 this.student = result.json();
 });
 }


 // to show form for add new Student Information
 AddStudent() {
 this.animButton();
 this.AddstudetnsTable = true;
 this.StdIDs = "0";
 this.StdNames = "";
 this.Emails = "";
 this.Phones = "";
 this.Addresss = "";
 }

 // to show form for edit Student Information
 editStudentsDetails(StdID, StdName, Email, Phone, Address) {
 this.animButton();
 this.AddstudetnsTable = true;
 this.StdIDs = StdID;
 this.StdNames = StdName;
 this.Emails = Email;
 this.Phones = Phone;
 this.Addresss = Address;
 }

 // If the studentid is 0 then insert the student information using post and if the student id is more than 0 then edit using put mehod
 addStudentsDetails(StdID, StdName, Email, Phone, Address) {
 alert(StdName);
 var headers = new Headers();
 headers.append('Content-Type', 'application/json; charset=utf-8');
 if (StdID == 0)
 {
 this.http.post('api/StudentMastersAPI', JSON.stringify({ StdID: StdID, StdName: StdName, Email: Email, Phone: Phone, Address: Address }), { headers: headers }).subscribe();
 alert("Student Detail Inserted");
 }
 else
 {
 this.http.put('api/StudentMastersAPI/' + StdID, JSON.stringify({ StdID: StdID, StdName: StdName, Email: Email, Phone: Phone, Address: Address }), { headers: headers }).subscribe();
 alert("Student Detail Updated");
 }

 this.AddstudetnsTable = false;
 this.getData();
 }

 //to Delete the selected student detail from database.
 deleteStudentsDetails(StdID) {
 var headers = new Headers();
 headers.append('Content-Type', 'application/json; charset=utf-8');

 this.http.delete('api/StudentMastersAPI/' + StdID, { headers: headers }).subscribe();
 alert("Student Detail Deleted");
 this.getData();
 }

 closeEdits()
 {
 this.AddstudetnsTable = false;
 this.StdIDs = "0";
 this.StdNames = "";
 this.Emails = "";
 this.Phones = "";
 this.Addresss = "";
 }
}

export interface StudentMasters {
 stdID: number;
 stdName: string;
 email: string;
 phone: string;
 address: string;
}
Step 7 Creating Component HTML File
Right Click on student folder and click on add new Item. Select Client-side from the left side and select html File and name the file as "students.component.html" and click Add.

<h1 [@fadeIn]='animStatus'>ASP.NET Core,Angular2 CRUD with Animation using Template Pack, WEB API and EF 1.0.1  </h1>
 <div class="column">

 <h2>Created by : </h2>
 <div style="background-color:#ff6a00;color:White;xx-large;width:260px;height:50px;text-shadow:  -2px -1px 0px #000,
 0px -1px 0px #000,
 1px -1px 0px #000,
 -2px  0px 0px #000,
 1px  0px 0px #000,
 -2px  1px 0px #000,
 0px  1px 0px #000,
 1px  1px 0px #000;text-align:center;
 border-color:#a2aabe;border-style:dashed;border-width:2px;"  [@movelLeft]='animStatus'>

 {{myName}}

 </div>
</div>


<hr style="height: 1px;color: #123455;background-color: #d55500;border: none;color: #d55500;" />
<p *ngIf="!student"><em>Loading Student Details please Wait ! ...</em></p>

<table id="tblContainer" style='width: 99%;table-layout:fixed;'>
 <tr>
 <td>
 <table style="background-color:White; border: dashed 3px White; padding: 5px;width: 99%;table-layout:fixed;" cellpadding="2"
 cellspacing="2">
 <tr style="height: 30px;  color:#123455 ;border: solid 1px #659EC7;">
 <td width="40px"> </td>
 <td width="50%">
 <h1> Add New Students Information <strong style="color:#0094ff"> </strong></h1>

 </td>
 <td align="right">
 <button (click)=AddStudent() style="background-color:#f83500;color:White;large;width:260px;height:50px;
 border-color:#a2aabe;border-style:dashed;border-width:2px;" [@moveRight]='animStatus'  [@buttonReSize]='animStatus'>
 Add New Studetnt Information
 </button>

 </td>
 </tr>
 </table>

 </td>
 </tr>
 <tr>
 <td>
 <hr style="height: 1px;color: #123455;background-color: #d55500;border: none;color: #d55500;" />
 </td>
 </tr>
 <tr *ngIf="AddstudetnsTable">
 <td  [@fadeIn]='animStatus'>
 <table>
 <tr>
 <td>


 <table style="background-color:White; border: dashed 3px #6D7B8D; padding :5px;width :99%;table-layout:fixed;" cellpadding="2" cellspacing="2">
 <tr style="height: 30px; background-color:#336699 ; color:White ;border: solid 1px #659EC7;">
 <td width="40">

 </td>
 <td>
 <h2>Insert/Edit Student Details : </h2>
 </td>
 </tr>
 <tr>
 <td width="100">

 </td>
 <td>
 <table style="color:#9F000F;large; padding :5px;" cellpadding="12" cellspacing="16">
 <tr>
 <td><b>Students ID: </b> </td>
 <td>
 <input type="text" #StdID (ngModel)="StdIDs" value="{{StdIDs}}" style="background-color:tan" readonly>
 </td>
 <td width="20"> </td>
 <td><b>Students Name: </b> </td>
 <td>
 <input type="text" #StdName (ngModel)="StdNames" value="{{StdNames}}">
 </td>
 <td></td>
 </tr>
 <tr>
 <td><b>Email: </b> </td>
 <td>
 <input type="text" #Email (ngModel)="Emails" value="{{Emails}}">
 </td>
 <td width="20"> </td>
 <td><b>Phone: </b> </td>
 <td>
 <input type="text" #Phone (ngModel)="Phones" value="{{Phones}}">
 </td>
 <td></td>
 </tr>
 <tr>
 <td><b>Address: </b> </td>
 <td  >
 <input type="text" #Address (ngModel)="Addresss" value="{{Addresss}}">

 </td>
 <td width="20"> </td>
 <td align="right" colspan="2">
 <button (click)=addStudentsDetails(StdID.value,StdName.value,Email.value,Phone.value,Address.value) style="background-color:#428d28;color:White;large;width:220px;
 border-color:#a2aabe;border-style:dashed;border-width:2px;"  [@moveBottom]='animStatus' >
 Save
 </button>


 </td>
 <td>

 <button (click)=closeEdits() style="background-color:#334668;color:White;large;width:180px;
 border-color:#a2aabe;border-style:dashed;border-width:2px;"  [@moveTop]='animStatus' >
 Close
 </button>
 </td>
 </tr>
 </table>
 </td>
 </tr>

 </table>
 </td>
 </tr>
 <tr>
 <td colspan="2">
 <hr style="height: 1px;color: #123455;background-color: #d55500;border: none;color: #d55500;" />
 </td>
 </tr>
 </table>
 </td>

 </tr>
 <tr>
 <td  [@moveBottom]='animStatus' >


 <table class='table' style="background-color:White; border:2px #6D7B8D; padding:5px;width:99%;table-layout:fixed;" cellpadding="2" cellspacing="2" *ngIf="student">

 <tr style="height: 30px; background-color:#336699 ; color:White ;border: solid 1px #659EC7;">
 <td width="70" align="center">Edit</td>
 <td width="70" align="center">Delete</td>
 <td width="100" align="center">Student ID</td>
 <td width="160" align="center">Student Name</td>
 <td width="160" align="center">Email</td>
 <td width="120" align="center">Phone</td>
 <td width="180" align="center">Address</td>


 </tr>
 <tbody *ngFor="let StudentMasters  of student"  [@moveTop]='animStatus'>
 <tr>
 <td align="center" style="border: solid 1px #659EC7; padding: 5px;table-layout:fixed;">
 <span style="color:#9F000F">
 <img src="{{imgEdit}}"  style="height:32px;width:32px" (click)=editStudentsDetails(StudentMasters.stdID,StudentMasters.stdName,StudentMasters.email,StudentMasters.phone,StudentMasters.address)>
 </span>

 </td>

 <td align="center" style="border: solid 1px #659EC7; padding: 5px;table-layout:fixed;">
 <span style="color:#9F000F">
 <img src="{{imgDelete}}" style="height:32px;width:32px" (click)=deleteStudentsDetails(StudentMasters.stdID)>
 </span>

 </td>

 <td align="center" style="border: solid 1px #659EC7; padding: 5px;table-layout:fixed;">
 <span style="color:#9F000F">{{StudentMasters.stdID}}</span>
 </td>

 <td align="left" style="border: solid 1px #659EC7; padding: 5px;table-layout:fixed;">
 <span style="color:#9F000F">{{StudentMasters.stdName}}</span>
 </td>

 <td align="left" style="border: solid 1px #659EC7; padding: 5px;table-layout:fixed;">
 <span style="color:#9F000F">{{StudentMasters.email}}</span>
 </td>

 <td align="center" style="border: solid 1px #659EC7; padding: 5px;table-layout:fixed;">
 <span style="color:#9F000F">{{StudentMasters.phone}}</span>
 </td>

 <td align="left" style="border: solid 1px #659EC7; padding: 5px;table-layout:fixed;">
 <span style="color:#9F000F">{{StudentMasters.address}}</span>
 </td>
 </tr>
 </tbody>
 </table>
 </td>
 </tr>
 </table>
Step 8 Adding Navigation menu
We can add our newly created student details menu in the existing menu. To add our new navigation menu open the "navmenu.component.html" under navmenumenu.write the below code to add our navigation menu link for students.
<li[routerLinkActive]="['link-active']">
 <a[routerLink]="['/students']">
 <spanclass='glyphiconglyphicon-th-list'>
 </span> Students
 </a>
 </li>
Step 9 App Module
App Module is the root for all files and we can find the app.module.ts under ClientApp\app, and import our students component.
import { NgModule } from '@angular/core';
import { RouterModule } from '@angular/router';
import { UniversalModule } from 'angular2-universal';
import { AppComponent } from './components/app/app.component'
import { NavMenuComponent } from './components/navmenu/navmenu.component';
import { HomeComponent } from './components/home/home.component';
import { FetchDataComponent } from './components/fetchdata/fetchdata.component';
import { CounterComponent } from './components/counter/counter.component';
import { studentsComponent } from './components/students/students.component';

@NgModule({
 bootstrap: [ AppComponent ],
 declarations: [
 AppComponent,
 NavMenuComponent,
 CounterComponent,
 FetchDataComponent,
 HomeComponent,
 studentsComponent
 ],
 imports: [
 UniversalModule, // Must be first import. This automatically imports BrowserModule, HttpModule, and JsonpModule too.
 RouterModule.forRoot([
 { path: '', redirectTo: 'home', pathMatch: 'full' },
 { path: 'home', component: HomeComponent },
 { path: 'counter', component: CounterComponent },
 { path: 'fetch-data', component: FetchDataComponent },
 { path: 'students', component: studentsComponent },
 { path: '**', redirectTo: 'home' }
 ])
 ]
})
export class AppModule {
}
Step 10 Build and run the Application
Build and run the application and you can see our Student page will be loaded with all Student information. 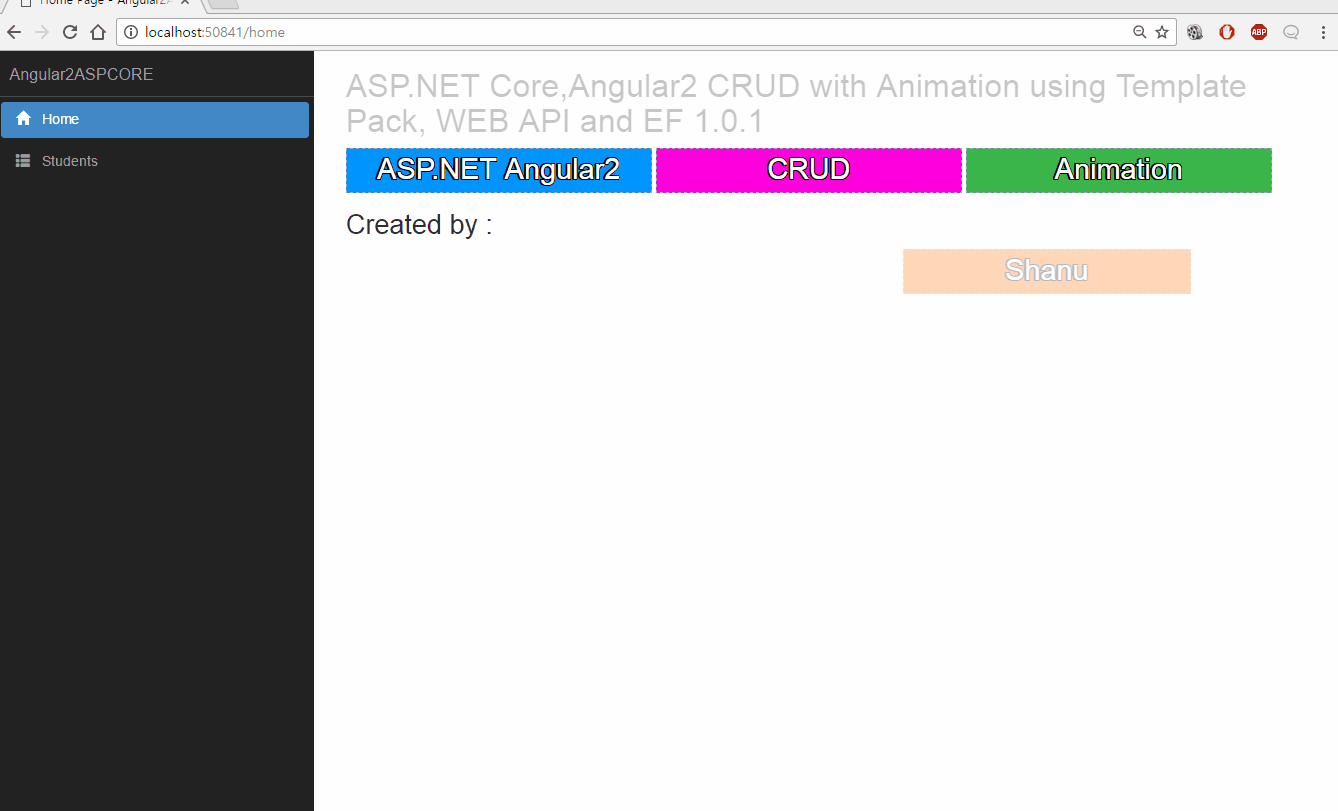 First, create the Database and Table in your SQL Server. You can run the SQL Script from this article to create StudentsDB database and StudentMasters Table and also don't forget to change the Connection string from "appsettings.json".
Download Code
You can download the Source Code from this link Download Source Code
See Also
- ASP.NET Core Template Pack
- ASP.NET Core Angular 2 EF 1.0.1 Web API Using Template Pack
- ASP.NET Core, Angular 2 Master Detail HTML Grid using Web API and EF 1.0.1