Note
Access to this page requires authorization. You can try signing in or changing directories.
Access to this page requires authorization. You can try changing directories.
Introduction
Properties are members that provide a flexible mechanism to read, write or compute the values of private fields, in other words by the property we can access private fields. In other words we can say that a property is a return type function/method with one parameter or without a parameter. These are always public data members. It uses methods to access and assign values to private fields called accessors.
The get and set portions or blocks of a property are called accessors. These are useful to restrict the accessibility of a property, the set accessor specifies that we can assign a value to a private field in a property and without the set accessor property it is a readonly field. By the get accessor we can access the value of the private field, in other words it returns a single value. A Get accessor specifies that we can access the value of a field publicly.
C# language has the three types of properties Read/Write, ReadOnly and WriteOnly. Let's see each one by one.
Declare and read/write example of property
We create an example that is used for the Name and Age properties for a Person. So first of all create a Person class then we will use this class in an executable program. The following code snippet for same.
namespace PropertyExample
{
    public class  Person
    {
        private string  mName = string.Empty;
        private int  mAge = 0;

        public string  Name
        {
            get
            {
                return mName;
            }
            set
            {
                mName = value;
            }
        }

        public int  Age
        {
            get
            {
                return mAge;
            }
            set
            {
                mAge = value;
            }
        }
    }
}
Now, this class is an executable program by creating an object of the Person class. It is VS intellisense that automatically shows object properties when we enter the dot (. ) operator after an object. In the following figure we can see Age and Name properties of a Person.
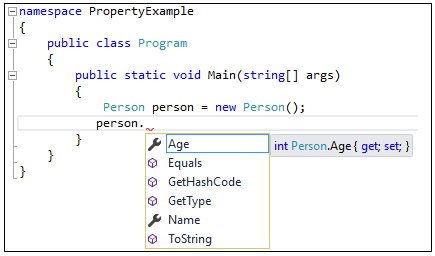
Figure 1: VS intellisense
Now executable class reads and writes values for the property. The following code snippet for same.
using static  System.Console;

namespace PropertyExample
{
    public class  Program
    {
        public static  void Main(string[] args)
        {
            Person person = new  Person();
            person.Name = "John Deo";
            person.Age = 27;
            WriteLine($"{person.Name} is {person.Age} years old");
            ReadKey();
        }
    }
}
Now, runs the application and result shows as per below figure.

Figure 2: Output
Let's see the line of code.
person.Name = "John Deo";
This line of code is called the set accessor of the Name property in the Person class where we are using the private field mName in the set block, so this line of code actually assigns a value in the mName field, in other words we can assign a value to the private field by property.
WriteLine($"{person.Name} is {person.Age} years old.");
This line of code is called a get accessor of the Name and Age Properties in the Person class, in other words we can access the mName and mAge private fields by the Name and Age Properties respectively because the Name property get accessor returns a value of the private field mName and same for Age property. So the private field is accessible by the property.
Create Readonly Property
We can also create a read only property. Read only means that we can access the value of a property but can't assign a value to it. When a property does not have a set accessor then it is a read only property. For example in the Person class we have a Gender property that has only a get accessor and doesn't have a set accessor. The following code snippet for updated Person class.
namespace PropertyExample
{
    public class  Person
    {
        public string  Gender
        {
            get { return "Male"; }
        }
    }
}
When we assign a value to the Gender Property of the Person class object then we get an error that it is a readonly property and can't assign a value to it.
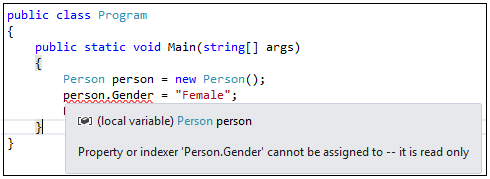
Figure 3: Read Only Property
So the Gender property of the Person class always returns a value and can't assign a value to it.
Create WriteOnly Property
We can also create a write only property. A write only property is a property that assigns a value but can't get that value because that property doesn't have a get accessor. For example we have a Person class that has the property FirstName that has a set accessor but doesn't have a get accessor so it is a write only property. The following code snippet for Person class.
namespace PropertyExample
{
    public class  Person
    {
        private string  mFirstName = string.Empty;

        public string  FirstName
        {
            set { mFirstName = value; }
        }
    }
}
Now access the value of the FirstName property in entry point class then an error shows like:
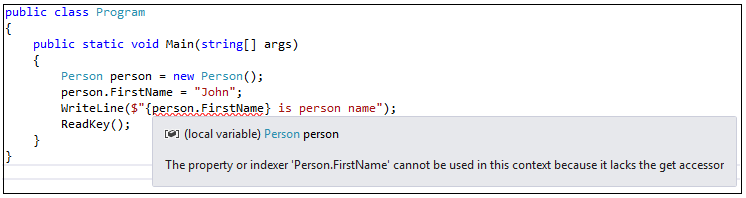
Figure 4: Write only property
As the write only property is created that’s why its value can’t be accessed.
Assign Values to Properties on Object Creation
We can also assign values to properties when creating an object of the class. For example, we create a Person class object then we can assign the Name and Age properties to the person object.
Person person = new  Person
            {
                Name = "John Deo",
                Age = 27
            };
The properties of object are a block defined by curly braces and in the block each property will be separated by a comma.
Auto Mapped Property
We can also create auto mapped property. When we create auto mapped property then we don't need define to local private field in get and set accessors. For example we have an Employee class which has two properties one in EmployeeId and another is Name. To define these properties, we don't need to create private field for these two properties and directly declare it. The following code snippet for Employee class.
namespace PropertyExample
{
    public class  Employee
    {
        public int  EmployeeId { get; set; }
        public string  Name { get; set; }
    }
}
Now we access Employee class properties in executable program as per following code snippet.
using static  System.Console;

namespace PropertyExample
{
    public class  Program
    {
        public static  void Main(string[] args)
        {
            Employee employee = new  Employee
                                {
                                    EmployeeId = 1001,
                                    Name = "John"
                                };
            WriteLine($"Employee Id is :{employee.EmployeeId} and Name is :{employee.Name}");
            ReadKey();
        }
    }
}
Now, runs the application and result shows as below figure.

Figure 5: Output
Validate Property Value
We can validate a value of a property before it's set to a variable, in other words we can check a value to be assigned to a private field and if it is correct then it will be assigned to the private field otherwise it will give an error.
Suppose we are citizen of India and participate as a voter in a parliamentary election so your age must be greater than or equal to 18 otherwise we can't cast our vote. To implement this function we have a Voter class and that class has an Age property. The Age property can have a value greater than or equal to 18 otherwise it will show 0(zero) for the age with a message. The following code snippet for Voter class.
using static  System.Console;

namespace PropertyExample
{
    public class  Voter
    {
        private int  mAge = 0;
        public int  Age
        {
            get
            {
                return mAge;
            }
            set
            {
                if (value >= 18)
                {
                    mAge = value;
                }
                else
                {
                    WriteLine("You aren't eligible for voting");
                }
            }
        }
    }
}
Now, assign an age value of a Voter in the executable class as per following code snippet.
using System;
using static  System.Console;

namespace PropertyExample
{
    public class  Program
    {
        public static  void Main(string[] args)
        {
            WriteLine("Please enter your age");
            Voter voter = new  Voter
            {
                Age = Convert.ToInt32(ReadLine())
            };
            WriteLine($"Your age is :{voter.Age} years");
            ReadKey();
        }
    }
}
Now, runs the application and enter a value less than 18 then message shows with 0 years. We enter age value 15 and result shows as per following figure.

Figure 6: Output
In the output screen above we get a message from the set accessor and the value isn't set in the private field so we get a default value of the private field that we already set 0. Don't be confused by the message and return value. Here set is not returning a value. It is just printing a message on the console before get accessor calls the Age property. The following picture shows the message shown before calling the get accessor.

Figure 7: Program execution
If we use a value greater than or equal to 18 then we get the private field value without a message.
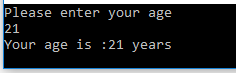
Figure 8: Output
Use of Property as a Method
We can also use a property instead of a method that has one parameter and a return value. Because a property can have custom logic in the get and set accessors.
Suppose we have a rule for a student that when a student gets marks greater than or equal to 80 then they get 5 bonus marks and when they get marks greater than or equal to 70 but less than or equal to 79 then they get 2 bonus marks. So we define logic in the get accessor that adds marks depending on the student's original marks and thereafter the total marks (original marks + bonus marks) of the student will be returned.
namespace PropertyExample
{
    public class  Student
    {
        private int  mMarks = 0;
        public int  Marks
        {
            get
            {
                if (mMarks >= 80)
                {
                    mMarks += 5;
                }
                else if  (mMarks <= 79 && mMarks >= 70)
                {
                    mMarks += 2;
                }
                return mMarks;
            }
            set
            {
                mMarks = value;
            }
        }
    }
}
Now create a program by which we can input student marks. The following code snippet for same.
using System;
using static  System.Console;

namespace PropertyExample
{
    public class  Program
    {
        public static  void Main(string[] args)
        {
            WriteLine("Please enter your marks");
            Student student = new  Student
            {
                Marks = Convert.ToInt32(ReadLine())
            };
            WriteLine($"Your marks are :{student.Marks} marks");
            ReadKey();
        }
    }
}
Now, enter more than 80 marks and get the total marks with bonus as shown in below figure.

Figure 9: Output
Property in C# 6
The C# 6 serves auto initialize property that can be initialized inline. These are same as other but it uses an assignment operator, the value to initialize the property. The inline property statement ends with a semicolon. We can directly assign the value of the property at the time of defining the new property.
Let’s see an example, We create an Employee class which holds two properties. The following code snippet for same.
using System;

namespace PropertyExample
{
    public class  Employee
    {
        public Guid EmployeeId { get; } = Guid.NewGuid();
        public string  Name { get; set; } = "John";
    }
}
Here EmployeeId has only get accessor and assigned a value. It’s readonly property while Name property which assigned a value is a read/write property.
Now, Employee class uses in executable program and assign value as per following code snippet.
using static  System.Console;

namespace PropertyExample
{
    public class  Program
    {
        public static  void Main(string[] args)
        {
            Employee employee = new  Employee
            {
                Name = $"John Deo"
            };
            WriteLine($"Employee Id {employee.EmployeeId} name is {employee.Name}");
            ReadKey();
        }
    }
}
Now, runs the application and result shows as following figure.

Figure 10: Output
Conclusion
This article introduced that how to use a property in the application design. A variable stores value while a property uses as a method which performs operations on data and returns a result value. It also stores value same as a variable.
See Also
There are some more article related C#. These are: