Visual Studio Team Services: Getting Started
In this article, we will discuss in details about the Visual Studio Team Services, walkthrough VSTS features, comparison with VSTS and TFS, how to create VSTS account and how to publish the source code to VSTS.
In this article, we will see the followings
Prerequisite
- Microsoft Account
- Visual Studio 2017
What is VSTS?
VSTS is an ALM. VSTS provides an integrated, collaborative environment that supports Git, Continuous integration and agile tools.
The three main key areas in VSTS as following
- Source control to manage versioning of source code files.
- Tracking tools to support planning and tracking work, code defects, issues and so on.
- DevOps tools to support building, testing, and continuous release of software apps.
Comparison with VSTS and TFS
S.No. |
VSTS |
TFS |
| 1 | Cloud offering |
On-premises offering |
| 2 | Git Version Control (i.e. DVCS) |
TFVC Version Control (i.e. CVCS) |
| 3 | We can use the inheritance process model which supports WYSIWYG customization. |
We can use the on-premises XML process model which supports customization through import/export of XML definition files for work tracking objects. |
| 4 | Does not support integration with SharePoint or Project server |
It's support integration with SharePoint or Project Server |
| 5 | you can authenticate with Microsoft Account or Azure Active Directory |
you can authenticate with Windows Authentication or Active Directory |
| 6 | Does not support integration with SSRS |
It's support integration with SSRS |
Walkthrough VSTS features
As you all know, VSTS is a powerful productivity tool for improving the software development process. You can see list of features available in the VSTS as following
- Git
- TFVC
- Agile Tools
- Continuous Integration
- Tools for Java Teams
- Reporting
- Release Management
- Package Management
- DevOps
- Testing Tools
- Cloud based load testing and more.
How to create Visual Studio Team Services account
You can go to Visual Studio Team Service web page, Click Free Account as shown below
You can sign up for Visual Studio account with your personal Microsoft account as shown below
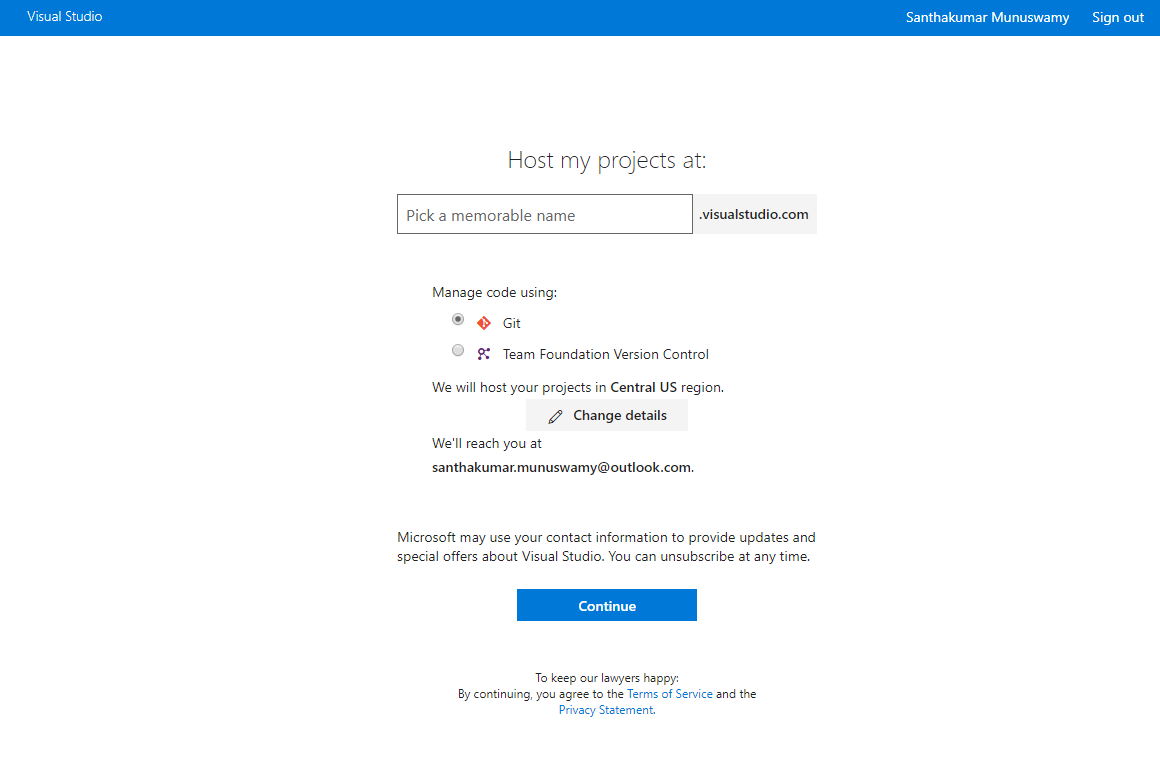
After successfully logged in VSTS, you can see the host my project page as shown below
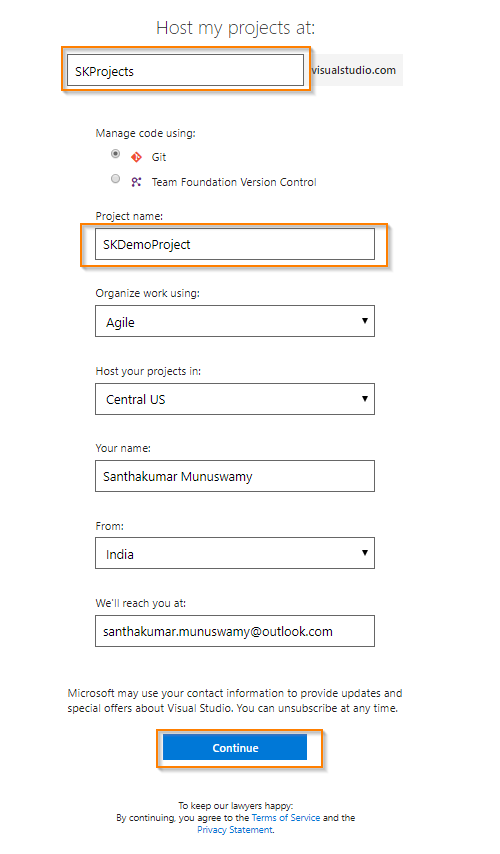
Now, you can enter the following details as shown below
If you want to change above details such as manage code, organize work using, host your projects in, your name, from and Email but my case I didn’t change those details. Click Continue button.
After successfully creating VSTS account, you can see your project details as shown below
How to create a new project in VSTS
After successfully logged in VSTS, you can see new project button on my home page. Click New project as shown below
Create new project window opened. Now, you can enter the project name and description. Click Create button.
After successfully creating HelloWorld project, you can see your project details as shown below
How to add existing project to Git Repo from Visual Studio
We already created sample MVC application using Visual Studio 2017 on my desktop. Now, we can open Visual Studio 2017 with my existing project. Once the project is opened, you can see the bottom of Visual Studio 2017 status bar and find the Add to Source Control, click Add to Source Control button as shown below
The team explorer window will open, you can see the two option as following
- Push to Visual Studio Team Services
- Push to Remote Repository
We already created Git repository in VSTS. So we can do push to remote repository now by clicking Push Git Repo as show below
Now, you can copy and paste the Git Repo URL from the VSTS. Click Publish button as shown below
After successfully publishing source code to VSTS, you can see the all the source code files in the respective project of VSTS
Reference
Conclusion
We hope you understand now about VSTS, how to create VSTS account, How to create a new project in VSTS and how to add an existing project to Git Repo from Visual Studio. We have covered all the required things. If you find anything missing, please let me know.
Please share your valuable comments or feedback to improve my future articles.


