Note
Access to this page requires authorization. You can try signing in or changing directories.
Access to this page requires authorization. You can try changing directories.
Introduction
Schema is an Active Directory component, that defines Active Directory database structure. Schema consists of Object Class and Object Attributes.
**In this article, we will discuss how to modify Active Directory Schema attribute. **
IMPORTANT: The auxiliary class and attribute names used in this guide are not a good choice for naming your attributes and classes. You should always prefix your names in the schema with company and solution name to make them unique relative to other schema extensions. So for example the attribute name should be contoso-hrdb-Gender.
X.500 and OID Namespace
Active Directory is based upon the X.500 Directory Standard. The X.500 series was developed by ITU-T.
Every object and attribute within Active Directory has an unique OID (Object Identifiers). Object Identifiers (OIDs) are unique numeric values (with dotted notations) issued by Microsoft and other issuing authorities to uniquely identify objects within Active Directory. When you plan to add custom attribute, you have to ensure that the OID that you will use is unique, to avoid any possible conflict with any other object's OID. Conflict of OID within Active Directory can result replication issue or in worst case, data loss.
There is a VBscript in MSDN site, which helps us to generate unique OID for our organization. We need to run this script from the Schema Master Domain Controller, to get the unique OID.
http://msdn2.microsoft.com/en-us/library/ms677620.aspx
Note: This script is a viable solution for Test / Dev / Mid-size production environment. However, for large enterprise, best practice dictates that they should obtain a globally unique OID namespace directly from IANA and issue OIDs from there.
Once we have a base OID, we have to be careful when deciding how the OIDs should be divided into categories, because these OIDs are contained in the prefix table and are part of the DC replication data. Microsoft recommends that no more than two OID categories be created.
As mentioned before, we can create subsequent OIDs for new schema classes and attributes by appending digits to the OID in the form of OID.X, where X may be any number that we choose.
For more details please refer this URL: https://msdn.microsoft.com/en-us/library/ms677620.aspx
Planning for Schema Update
Microsoft designed Active Directory to hold the most common objects and attributes we will require. However, organizations need additional field to store custom attributes which are not available by default in Active Directory. Hence the need for Schema Extension arises.
Before we plan for Schema extension, we should consider below points:
- Schema is common for the entire AD Forest, any change in Schema structure would reflect and in the entire forest.
- Schema modification cannot be reverted; any new class or attribute that we create in the schema is a permanent addition. We can disable or redefine schema extensions, but we can never remove them completely.
- If there is an alternate solution available, we should always consider that. For example, we need a custom field called “Roll Number” in our Active Directory. BY default, there is no attribute available called “Roll Number”, but there is an attribute called “Employee ID”. So we should consider if some existing attribute can solve the purpose, and if yes we should go for that solution instead of extending schema.
- For a large enterprise, we should always involve all stakeholders before we extend the Schema. Also, it should be first deployed in a Test / Dev environment and should be observed for few weeks, before deploying in production.
- Active Directory database should be backed up before modifying Schema.
- Rather than directly adding a custom attribute in the existing class, we should always create an Auxiliary Class and add the attribute there. Then this Auxiliary Class can be linked to the class where the new attribute is required.
- We should always obtain a unique OID, using the script or directly from IANA. Also, we should carefully plan for OID branching. Improper OID branching can lead to Replication Issue or in worst case, data loss.
- The Schema can be extended only from that Domain Controller which is holding Schema Master FSMO Role. Also, it requires Schema Admin privilege to modify the Schema.
- During Schema extension, all Domain Controllers in the forest should be available and there should not be any Replication issue. This is because Active Directory wants to ensure that no other Domain Controller has seized the Schema Master FSMO role, and this Domain Controller (from where we are extending the Schem is indeed the real Schema Master. So if we have any Domain Controller which is not available but still there in AD database, we may encounter problem during Schema modification.
- First do a dry run in a test forest and assess the impact for few days / weeks ; before upgrading the Schema of production forest.
Step by Step : Add Custom Attribute
There are three ways to modify the schema:
- Through the Active Directory Schema MMC snap-in,
- Using LDIF files
- Programmatically using ADSI or LDAP.
We will use the first method, using Active Directory Schema MMC snap-in.
We would like to add the attribute “Gender” in Active Directory User Class.
However, as mentioned above, we will follow the best practice and will not add the attribute directly in user class. Instead, we will follow below steps:
- Create a new Auxiliary class called “ClassGender”.
- Create a new attribute “Gender”.
- Add the attribute “Gender” to “ClassGender”.
- Link “ClassGender” Auxiliary Class to “User” Structural Class.
Please backup Active Directory Database before proceed.
Step 1: Login to Schema Master Domain Controller, with Schema Admin privilege.
As mentioned before, Schema update can be done only from the Domain Controller which is having the Schema Master role. This role is unique in the entire forest, so there will be only one domain controller in the forest (in root domain) which is having schema master role.
If you are unsure which Domain Controller is Schema Master, then run 'netdom query fsmo' from any Domain Controller within that forest, and identify Schema Master.
Also, your account should be member of 'Schema Admin' group to perform schema update.
Step 2: Allow Schema Modification by changing registry.
We need to make a change to the registry on the Schema Master, so that we can modify the Schema.
On the schema master , open up the registry using regedt32.exe or regedit.exe and locate the following key: HKLM\SYSTEM\CurrentControlSet\Services\NTDS\Parameters.
Now, create a new REG_DWORD value called Schema Update Allowed and set the value to 1.
We can now edit the schema on this domain controller.
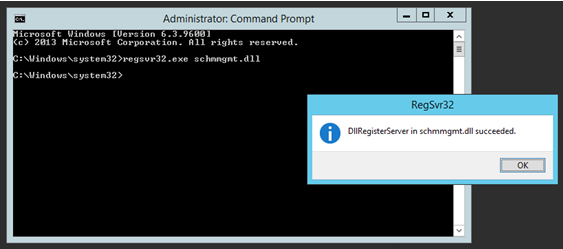
Step 3: Register Schema Management Snap-in.
The Schema Management MMC snap-in is not available from the Administrative Tools menu, like the other Active Directory snap-ins. To use it, we need to first register the Dynamic Link Library (DLL) file for the snap-in by typing the following command at the command prompt:
regsvr32.exe schmmgmt.dll
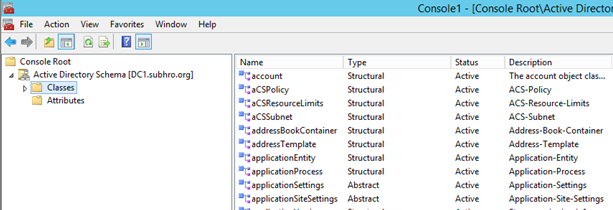
Step 4: Open the Active Directory Schema MM
Now, go to MMC and open Active Directory Schema MMC.
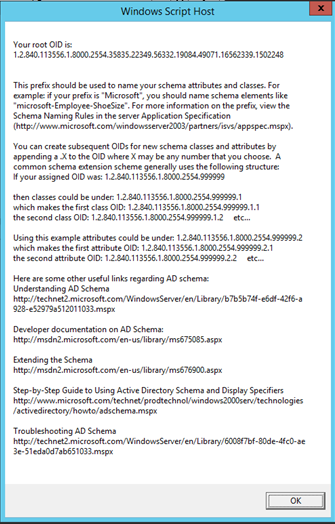
Step 5: Obtain Unique OID.
Download the VBScript from http://msdn2.microsoft.com/en-us/library/ms677620.aspx.
Run it from the Schema Master Domain Controller. This will generate our unique OID root which is :
1.2.840.113556.1.8000.2554.35835.22349.56332.19084.49071.16562339.1502248 in our case.
Now we have to plan for the OID branching, and here is how we will do the OID branching:
1. All new classes will follow X.1 branching, where X is OID Base. So in this case, our class OID will follow the branch
1.2.840.113556.1.8000.2554.35835.22349.56332.19084.49071.16562339.1502248.1
2. All new attributes will follow X.2 branching, where X is OID Base. So in this case, our attribute OID will follow the branch
1.2.840.113556.1.8000.2554.35835.22349.56332.19084.49071.16562339.1502248.2
Step 6: Create a new Auxiliary Class.
In the MMC console, right click on “Classes” and
Click on “Create Class”.
Click “Continue” on the warning message.
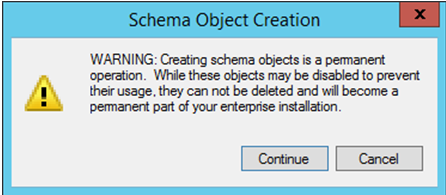
Supply all the required values as shown below, and click “Apply” and “OK”.
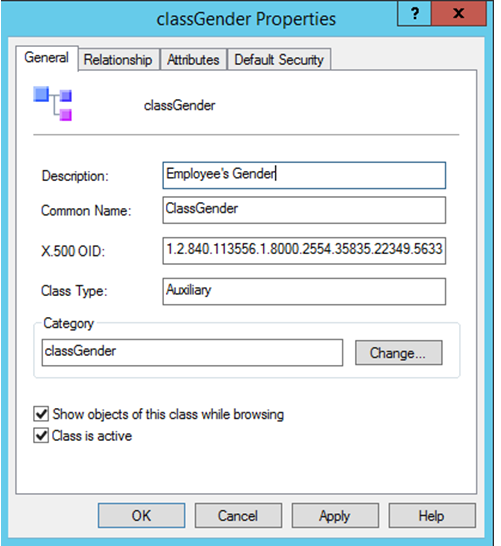
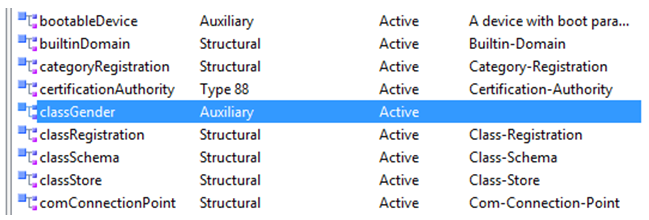
So the new Auxiliary class “classGender” has been created successfully.
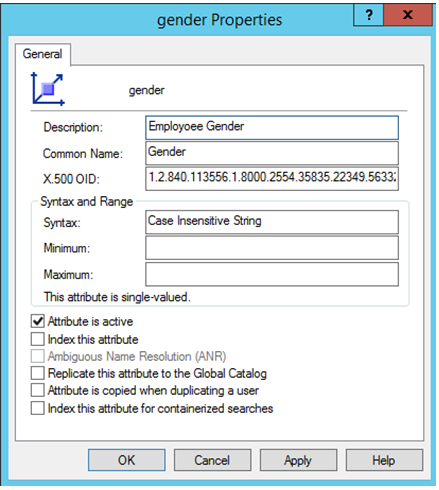
Step 7: Create a new attribute "Gender".
- Rick click on “Attributes” and click on “Create Attribute”. Click “Continue” on the warning message.
- Supply all the required values. Select the Syntax very carefully, in this case it is “Case Insensitive String”.
- If you would like to replicate this attribute to the Global Catalog, then select the option “Replicate this attribute to the Global Catalog”. This would make this attribute searchable from other domains in the same forest, but it would also put some additional load on the global catalog. So do not select this option unless it is not required.
- Finally, click “Apply” and “OK”.
Step 8: Add the attribute “Gender” to “ClassGender”.
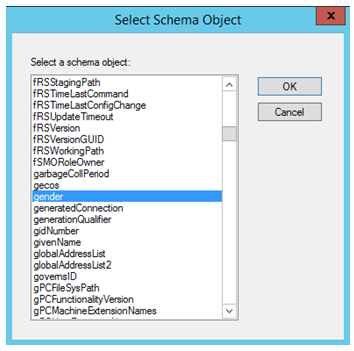
Open the class “ClassGender” , go to “Attributes” tab and click on “Add”.
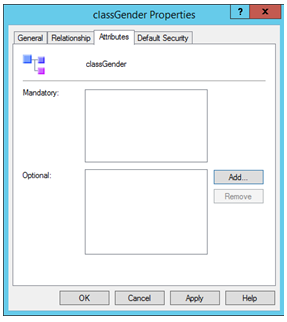
Select the attribute “Gender” and click “OK”.
Click "Apply" and "OK.
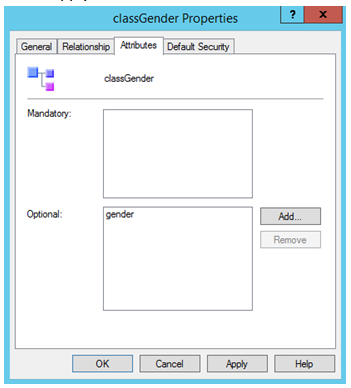
So, now the attribute “Gender” has been linked with the Auxiliary class “classGender”.
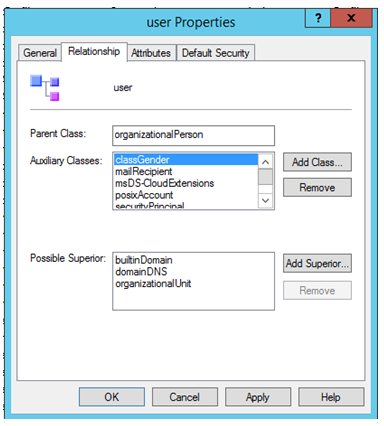
Step 9: Link “ClassGender” Auxiliary Class to “User” Structural Class.
- Locate the “User” class , go to properties and go to “relationship” tab.
- Add the “classGender” Auxiliary class to the “User” structural class.
- Click on “Apply” and “OK”.
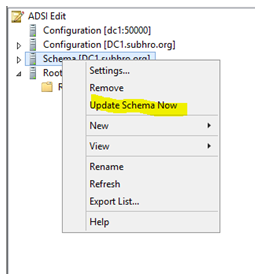
Step 10: Update Schema Data.
Open ADSI Edit (Run > ADSIEDIT.MS.
Connect to the Schema naming context . In this case it would be CN=Schema,CN=Configuration,DC=Subhro,DC=org)
Right click on Schema container and click “Update Schema now”. This wil update the Schema cache on this Domain Controller (Schema master).
Step 11: Restart Schema Master Domain Controller.
Restart Schema Master Domain Controller, alternatively restart the Active Directory Domain Service on Schema Master.
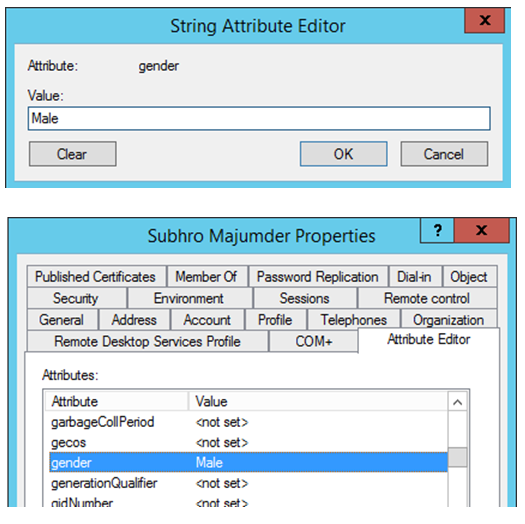
Step 12: Validate the new attribute.
Open ADUC (Dsa.ms console, select advanced view.
Right click a user, and go to attribute editor.
The new Gender attribute is here !

Now set the value to the new attribute.
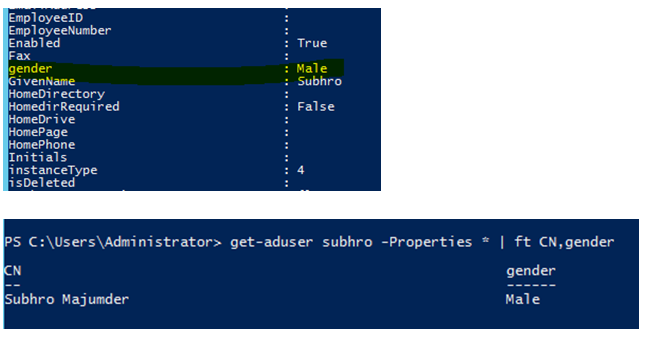
Note: Powershell “Get-ADuser <user> –properties *” command may not display the custom attribute if it does not contain any value. However, our test shows that if we set a value in this custom attribute (In this case : male), it would show the value.
Enable search using the custom attribute
So we have added the custom attribute successfully in Active Directory Schema. Now we would also like to add this attribute in LDAP search criteria, which means we would like to search Active Directory using the “Gender” attribute.
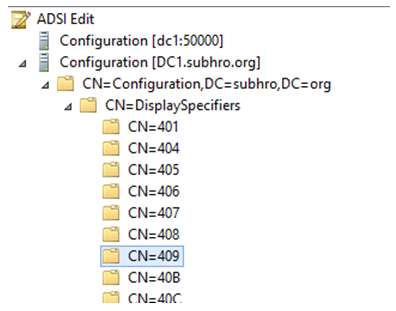
Step 1: Open ADSI Edit and connect to “Configuration” Naming Context.
Step 2: Expand the “DisplaySpecifier” container.
Step 3: Select “409”. This is for the English Language.
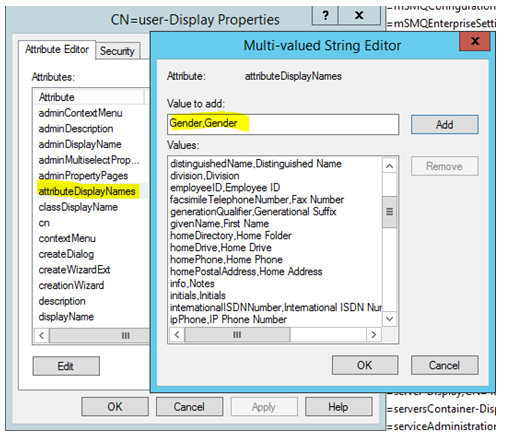
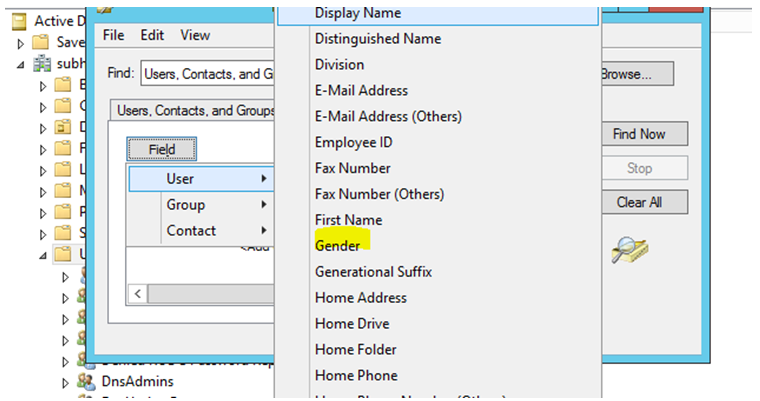
Step 4: On the right hand side of the console, locate the user-Display” object. Go to Properties.
Step 5: Locate and modify the attributeDisplayNames attribute by adding a value in the below format:
our_new_Attribute,friendly_name (In this case Gender,Gender)
Step 6: Save the configuration.
Step 7: We have to reboot the Schema Master or restart Active Directory Domain Service to reflect the new settings.
Validation of search criteria addition
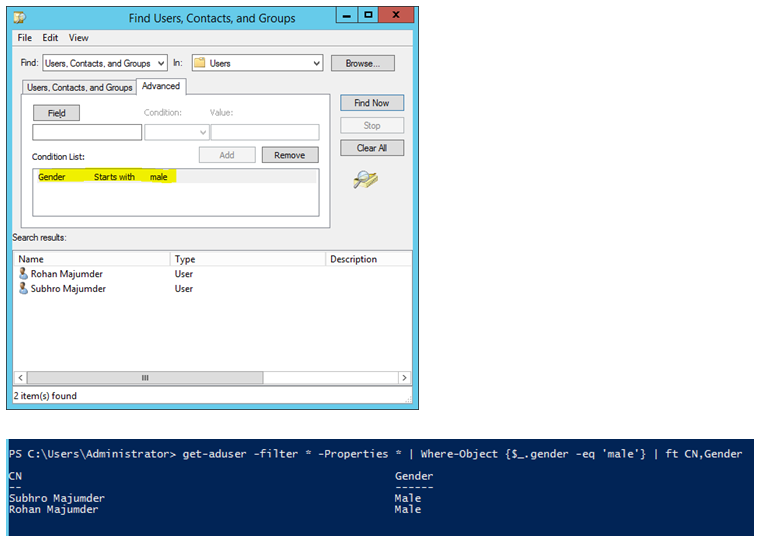
Once done, we should see the new attribute in the search criteria.
We should also be able to search using the new criteria, both by using GUI or Powershell.
Summary
The schema is the blueprint for data storage in Active Directory. In this article, we have discussed about Schema and it's structure. We have covered Schema classes and Schema attributes. Finally, we have discussed how to add custom attribute in Schema and what are the points that we should consider before we extend the Schema.
As Schema is one of the most critical component of Active Directory, we have to plan very well and test the deployment properly before we implement in production. Also, appropriate backout plan is important which is typically restoring the Active Directory from Backup.