ASP.NET Core 2.0: CRUD Operation With Entity Framework
https://msdnshared.blob.core.windows.net/media/2016/05/0640_NinjaAwardTinyGold.png Gold Award Winner
Introduction
In this article, we are going to create a basic web application using ASP.NET Core MVC and Visual Studio Code in a Windows system. We will be creating a sample Employee Records Management System with the help of ASP.NET Core 2.0, Entity Framework, and SQLite.
Prerequisites
Now, we are ready to proceed with the creation of our first web app.
Create the MVC Web App
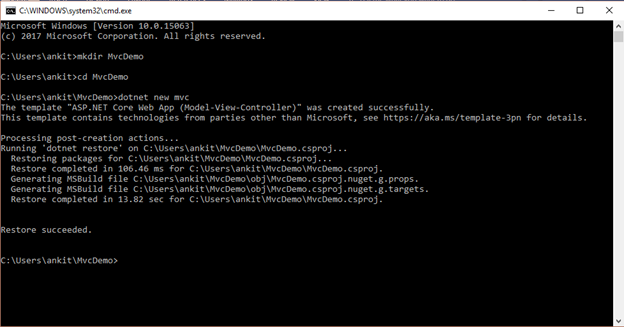
Press Window+R. It will open the "Run" window. Type `cmd' and press `OK'. It will open the command prompt in your system.

Type the following commands. It will create our MVC application "MvcDemo".
- mkdir MvcDemo
- cd MvcDemo
- dotnet new mvc
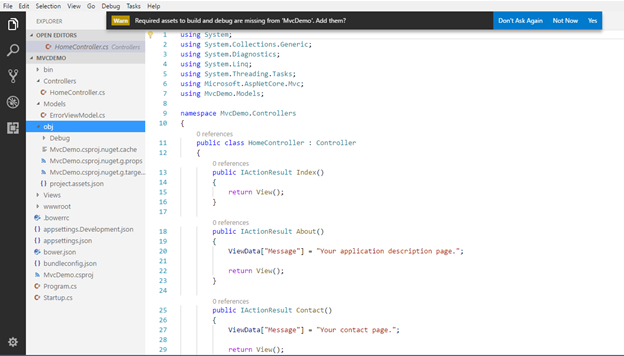
Open this "MvcDemo" application using Visual Studio Code. If it prompts the message "Required assets to build and debug are missing from 'MvcDemo'. Add them?", select "Yes".
Add data Model Class
Right-click Models folder and select a "New "file. Give it a name such as *Employees.cs. *It will create a file inside Models folder.

Open *Employees.cs *file and paste the following code to create Employee class.
using System;
using System.ComponentModel.DataAnnotations;

namespace MvcDemo.Models
{
 public class Employees
 {
 public int Id {  get; set; }
 [Required]
 public string Name {  get; set; }
 [Required]
 public string City {  get; set; }
 [Required]
 public string Department { get;  set; }
 [Required]
 public int Salary {get;set;}
 }
}
Since we are adding the required validators to the fields of Employee class, so we need using System.ComponentModel.DataAnnotations at the top.
Add references to scaffolding
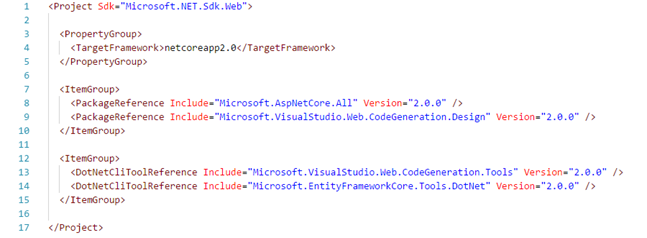
Now, our data model class is created. We will create Views and Controllers using scaffolding. For scaffolding, we need to add NuGet package references in the <ItemGroup> tag in MvcDemo.csproj file.
<Project Sdk="Microsoft.NET.Sdk.Web">

 <PropertyGroup>
 <TargetFramework>netcoreapp2.0</TargetFramework>
 </PropertyGroup>

 <ItemGroup>
 <PackageReference Include="Microsoft.AspNetCore.All" Version="2.0.0" />
 <PackageReference Include="Microsoft.VisualStudio.Web.CodeGeneration.Design" Version="2.0.0" />
 </ItemGroup>

 <ItemGroup>
 <DotNetCliToolReference Include="Microsoft.VisualStudio.Web.CodeGeneration.Tools" Version="2.0.0" />
 <DotNetCliToolReference Include="Microsoft.EntityFrameworkCore.Tools.DotNet" Version="2.0.0" />
 </ItemGroup>

</Project>
Save the file and select "Restore" to the Info message "There are unresolved dependencies".
Now, your *MvcDemo.csproj *will look like this.
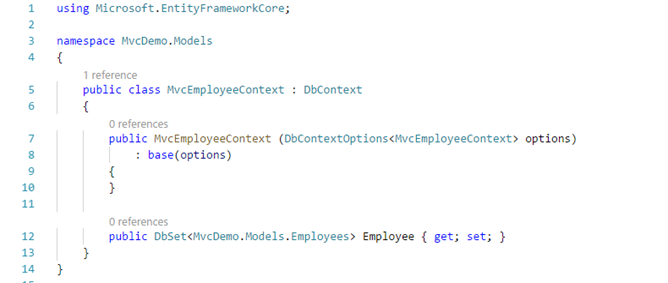
The next step is to add MVCEmployeeContext.cs file in our Models folder. Open the file and add the following lines of code.
using Microsoft.EntityFrameworkCore;

namespace MvcDemo.Models
{
 public class MvcEmployeeContext : DbContext
 {
 public MvcEmployeeContext (DbContextOptions<MvcEmployeeContext> options)
 : base(options)
 {
 }

 public DbSet<MvcDemo.Models.Employees> Employee { get; set; }
 }
}
Now, your MVCEmployeeContext.cs file looks like this.
Now, open Startup.cs file and add following two using statements at the top.
using Microsoft.EntityFrameworkCore;
using MvcDemo.Models
Add database context to Startup.cs file by adding following line in ConfigureServices method
services.AddDbContext<MvcEmployeeContext>(options =>options.UseSqlite("Data Source=MvcEmployee.db"));
This line of code tells Entity Framework which model classes are included in the data model. You're defining one entity set of Employee object, which will be represented in the database as an Employee table.
So our *Startup.cs *will look like this,
using System;
using System.Collections.Generic;
using System.Linq;
using System.Threading.Tasks;
using Microsoft.AspNetCore.Builder;
using Microsoft.AspNetCore.Hosting;
using Microsoft.Extensions.Configuration;
using Microsoft.Extensions.DependencyInjection;
using Microsoft.EntityFrameworkCore;
using MvcDemo.Models;

namespace MvcDemo
{
 public class Startup
 {
 public Startup(IConfiguration configuration)
 {
 Configuration = configuration;
 }

 public IConfiguration Configuration { get; }
 public void ConfigureServices(IServiceCollection services)
 {
 services.AddMvc();

 services.AddDbContext<MvcEmployeeContext>(options =>options.UseSqlite("Data Source=MvcEmployee.db"));
 }

 // This method gets called by the runtime. Use this method to configure the HTTP request pipeline.
 public void Configure(IApplicationBuilder app, IHostingEnvironment env)
 {
 if (env.IsDevelopment())
 {
 app.UseDeveloperExceptionPage();
 }
 else
 {
 app.UseExceptionHandler("/Home/Error");
 }

 app.UseStaticFiles();

 app.UseMvc(routes =>
 {
 routes.MapRoute(
 name: "default",
 template: "{controller=Home}/{action=Index}/{id?}");
 });
 }
 }
}
Scaffold the Employee Controller
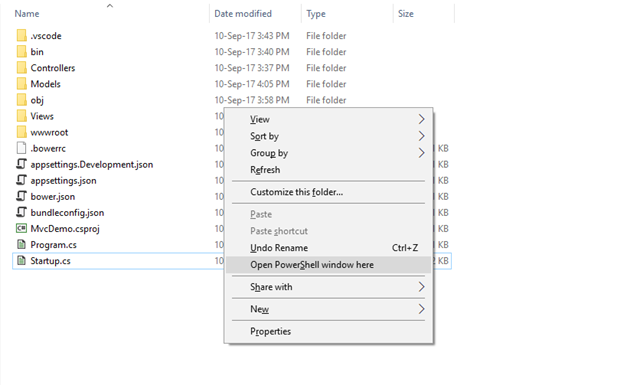
Now, we are going to Scaffold the controller and Razor view files. Navigate to MvcDemo project folder in your system. Press and hold *Shift *and right-click, it will give you the option to "open PowerShell window here "as shown in image below. Click and it will open a PowerShell window.
We are using Windows Powershell in this tutorial, but you can use command prompt also. It will give the same results.
Run the following commands in PowerShell console.
dotnet restore
dotnet aspnet-codegenerator controller -name EmployeeController -m Employees -dc MvcEmployeeContext --relativeFolderPath Controllers --useDefaultLayout --referenceScriptLibraries
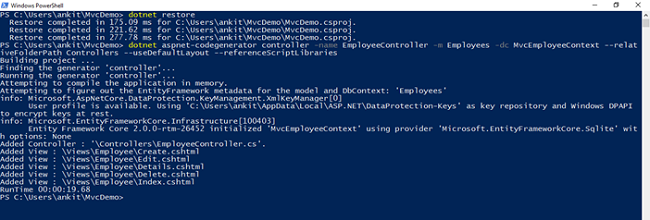
This will create following in our project
An Employee controller (Controllers/EmployeeController.cs)
Razor view files for Create, Delete, Details, Edit and Index pages (Views/Employee/\cshtml)
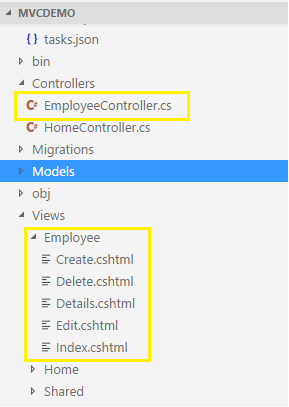
This process of automatically creating CRUD (Create, Read, Update, Delete) action methods and views is known as scaffolding.
Initial Migration of Database
Open PowerShell in Project folder again.
Run the following commands,
- dotnet ef migrations add InitialCreate
- dotnet ef database update
The "dotnet ef migrations add InitialCreate" command generates code to create the initial database schema. The schema is based on the model specified in the DbContext (In the Models/MVCEmployeeContext.cs file).
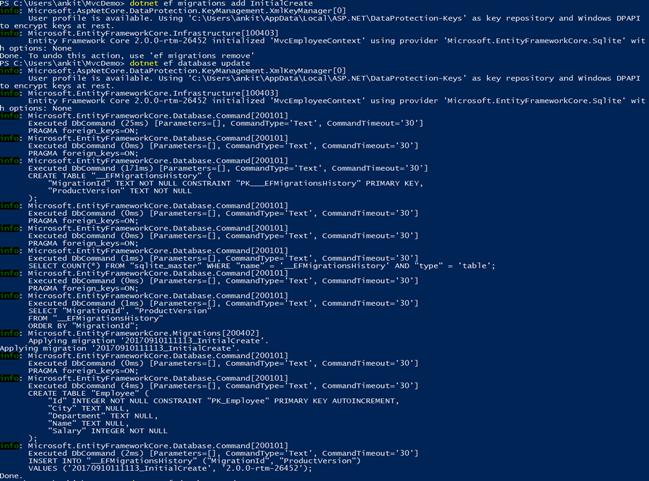
After running the second command you will get a message at end "Done".
And that's it. We have created our first ASP.Net Core MVC application.
Before running the application, open launch.json and make sure that `Program' path is set correctly as
"program": "${workspaceRoot}/bin/Debug/netcoreapp2.0/MvcDemo.dll"
Now your launch.json will look like this,
{
 // Use IntelliSense to find out which attributes exist for C# debugging
 // Use hover for the description of the existing attributes
 // For further information visit https://github.com/OmniSharp/omnisharp-vscode/blob/master/debugger-launchjson.md ;
 "version": "0.2.0",
 "configurations": [
 {
 "name": ".NET Core Launch (web)",
 "type": "coreclr",
 "request": "launch",
 "preLaunchTask": "build",
 // If you have changed target frameworks, make sure to update the program path.
 "program": "${workspaceRoot}/bin/Debug/netcoreapp2.0/MvcDemo.dll",
 "args": [],
 "cwd": "${workspaceRoot}",
 "stopAtEntry": false,
 "internalConsoleOptions": "openOnSessionStart",
 "launchBrowser": {
 "enabled": true,
 "args": "${auto-detect-url}",
 "windows": {
 "command": "cmd.exe",
 "args": "/C start ${auto-detect-url}"
 },
 "osx": {
 "command": "open"
 },
 "linux": {
 "command": "xdg-open"
 }
 },
 "env": {
 "ASPNETCORE_ENVIRONMENT": "Development"
 },
 "sourceFileMap": {
 "/Views": "${workspaceRoot}/Views"
 }
 },
 {
 "name": ".NET Core Attach",
 "type": "coreclr",
 "request": "attach",
 "processId": "${command:pickProcess}"
 }
 ]
}
Execution Demo
Press F5 to debug the application. It will open the browser, navigate to http://localhost:xxxx/employee
You can see the page shown below.
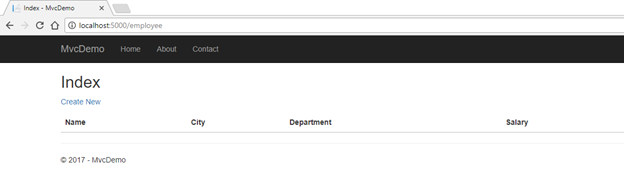
Now we will proceed with our CRUD operations.
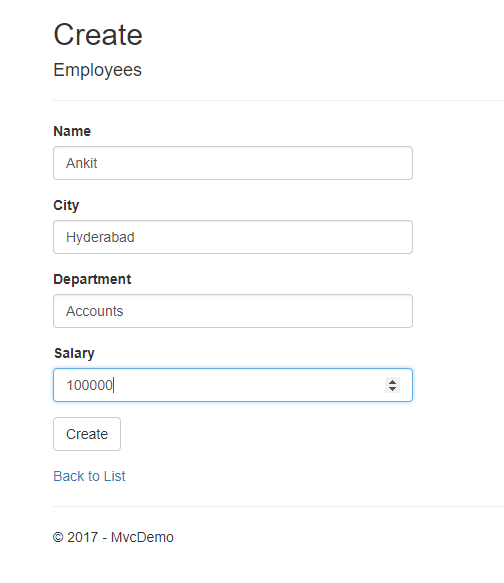
Click on CreateNew to create a new Employee record. Add a new Employee record as shown in the image below
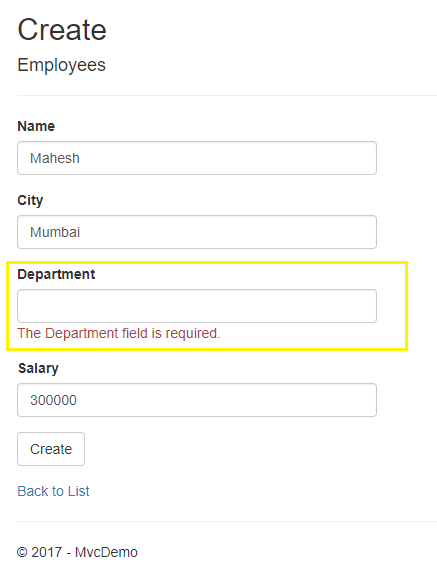
If we miss data in any fields while creating employee record, we will get a required field validation message
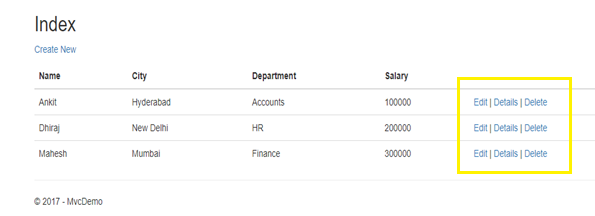
After you click Create button in "Create View", it will redirect to Index View where we can see all the employees added by us. Here, we can also see action methods Edit, Details, and Delete.
If we want to edit an existing employee record, then click Edit action link. It will open Edit View as below where we can change the employee data.
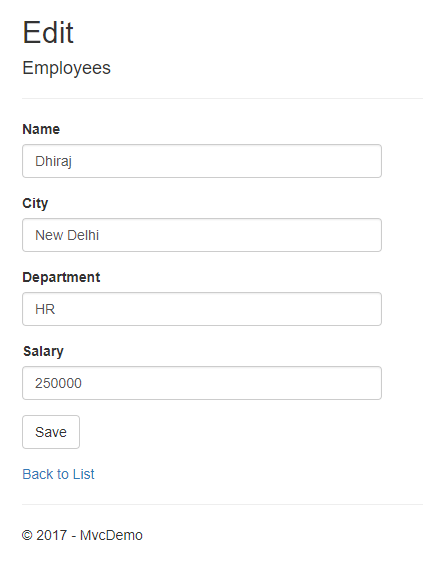
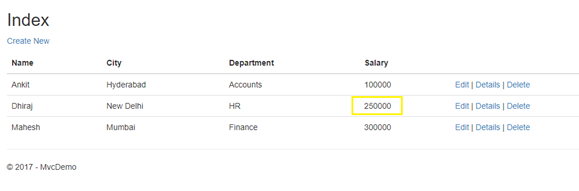
Here we have changed the Salary of an employee with name Dhiraj from 200000 to 250000. Click Save to return to Index view to see the updated changes as highlighted in the image below.
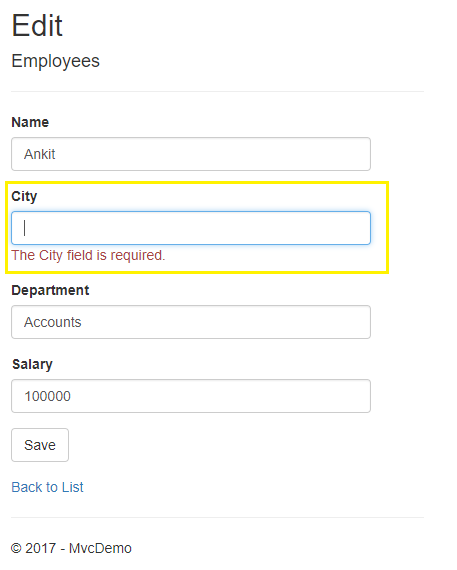
If we miss any fields while editing employee records, then edit view will also throw required field validation error message.
If you want to see the details of any Employee, then click Details action link, which will open the Details view as shown in the image below.

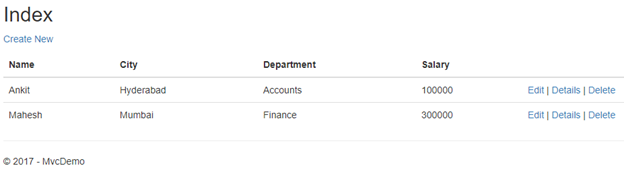
Click Back to List to go back to Index view. Now we will perform Delete operation on Employee with name Dhiraj. Click Delete action link which will open Delete view asking for a confirmation to delete the employee.

Once we click Delete button the employee record gets deleted and we will be redirected to Index view. Here we can see that the employee with name Dhiraj has been removed from our record.
An Insight into Delete method
Open EmployeeController.cs and scroll down to Delete method. You can observe that we have two Delete method, one each for HTTP Get and HTTP Post.
// GET: Employee/Delete/5
 public async Task<IActionResult> Delete(int? id)
 {
 if (id == null)
 {
 return NotFound();
 }

 var employees = await _context.Employee
 .SingleOrDefaultAsync(m => m.Id == id);
 if (employees == null)
 {
 return NotFound();
 }

 return View(employees);
 }

 // POST: Employee/Delete/5
 [HttpPost, ActionName("Delete")]
 [ValidateAntiForgeryToken]
 public async Task<IActionResult> DeleteConfirmed(int id)
 {
 var employees = await _context.Employee.SingleOrDefaultAsync(m => m.Id == id);
 _context.Employee.Remove(employees);
 await _context.SaveChangesAsync();
 return RedirectToAction(nameof(Index));
 }
Note that the HTTP GET Delete method doesn't delete the specified employee record, it returns a view of the employee where you can submit (HttpPost) the deletion. Performing a delete operation in response to a GET request (or for that matter, performing an edit operation, create operation, or any other operation that changes data) opens up a security hole.
The [HttpPost] method that deletes the data is named DeleteConfirmed to give the HTTP POST method a unique signature.
Conclusion
We have learned about creating a sample web application using ASP.Net Core MVC and perform CRUD operations on it. We have used Entity Framework and SQLite for our Demo.
Source Code
Download the source code files from here
See Also
- ASP.NET Core 2.0: CRUD Operation With Razor Pages
- ASP.NET Core 2.0: CRUD Using Angular 5 And Entity Framework Core
- ASP.NET Core 2.0: CRUD Operation With ADO.NET
- ASP.NET Core 2.0: Cookie Authentication
Reference
/en-us/aspnet/core/tutorials/first-mvc-app-xplat/