ASP.Net Core: Single Page Application with AngularJs
In this post we are going to create a Single Page Application (SPA) with AngularJS and ASP.Net Core. We will use Angular-UI-Router for our application routing instead of MVC routing. If you are new to ASP.Net Core, get a complete startup overview here: http://shashangka.com/2016/11/26/net-core-startup/
Prerequisites
Before getting started make sure development environment is prepared properly. These are listed prerequisites to develop the sample application.
Key Points
The following point will be cared to develop the sample application, which is the key mechanism listed below.
- Manage Packages
- Transfer Libraries Using Gulp
- Working with AngularJs App
- Adding Middleware
- Scaffolding MSSQL Database
- Web-API
- Enable CORS
- Build AngularJS App Using Gulp
- Test Application (CRUD)
- Publish in IIS
Getting started
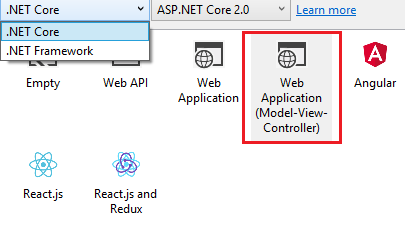
Let's get started, open visual studio to create a new project, Goto > File > New > Project then choose project for creating ASP.Net Core application with ASP.Net Core 2.0 MVC Web Application like below screenshot.
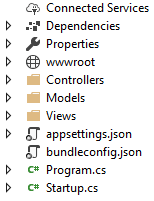
Initially application folder structure might look like this, we are going to modify those as following our requirements.
As our planning, we are using AngularJS routing to create the Single Page Application by ASP.NET static file serving. We need to point a static page to get all the request then Angular will handle the request and decide which page to serve. Let's create html page in wwwroot folder. This will be our main page to load on client request.
Serve Default Page
Now we need to modify Startup.cs file to add middleware for serving the static html page. Here is the code snippet which is going to serve the page. In this app I have created it as "index.html".
DefaultFilesOptions options = new  DefaultFilesOptions();
options.DefaultFileNames.Clear();
options.DefaultFileNames.Add("/index.html");
app.UseDefaultFiles(options);
Middleware to Handle Client Side Routes Fallback:
To avoid 404 error while reload the page in AngularJS SPA app we need to add middleware to handle client side route fallback.Below code snippet will take care of that.
app.Use(async (context, next) =>
{
 await next();
 if (context.Response.StatusCode == 404 && !Path.HasExtension(context.Request.Path.Value))
 {
 context.Request.Path = "/index.html";
 context.Response.StatusCode = 200;
 await next();
 }
});
Get more details on middleware here: https://docs.microsoft.com/en-us/aspnet/core/fundamentals/middleware/?tabs=aspnetcore2x If we run our application to test, the static page will serve by default. Now let's get started with client-end package managing.
Client-Side:
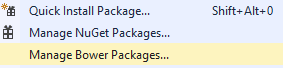
Package Manage: We need to add some frontend package like AngularJS, as we can see our initial template has nothing like that.

To add new package right click on project the click on "Manage Bower Packages"
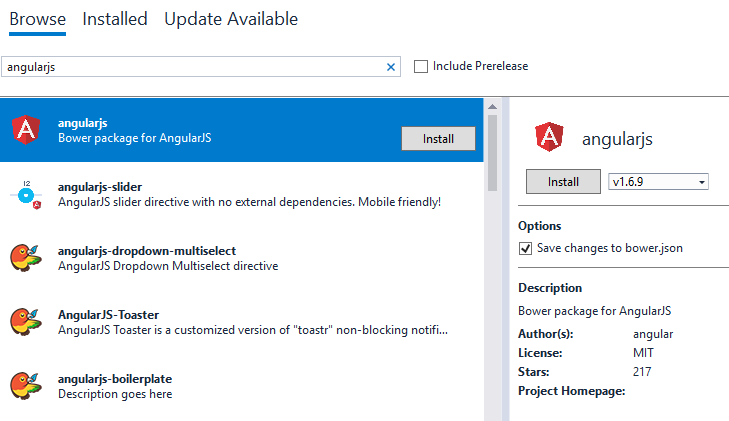
Install the required package by searching one by one. Finally the installed packages will listed like below screenshot.
http://shashangka.com/wp-content/uploads/2018/03/Spa6.png
Let's add some Node Packages to our application, first we need to add npm config file to our project. Right click the project Goto > Add > New Item. From the new item add window choose npm Configuration File like below screenshot. http://shashangka.com/wp-content/uploads/2018/03/Spa7.png
Add all those packages to devDependencies, it'll automatically install to our project.
"gulp": "^3.9.1",
"gulp-concat": "^2.6.1",
"gulp-rename": "^1.2.2",
"gulp-cssmin": "^0.2.0",
"gulp-uglify": "^3.0.0",
"gulp-htmlclean": "^2.7.20",
"rimraf": "^2.6.2"
Finally our package dependencies are listed.
http://shashangka.com/wp-content/uploads/2018/03/Spa8.png
Let's transfer the required libraries from bower_components folder to "wwwroot" for calling it to the main html page. Add a gulp file then copy below code snippet and paste it to the newly added file
/// <binding AfterBuild='build-all' />

var gulp = require("gulp"),
 rimraf = require("rimraf"),
 concat = require("gulp-concat"),
 cssmin = require("gulp-cssmin"),
 uglify = require("gulp-uglify"),
 rename = require("gulp-rename");

var root_path = {
 webroot: "./wwwroot/"
};

//library source
root_path.nmSrc = "./bower_components/";

//library destination
root_path.package_lib = root_path.webroot + "lib/";


gulp.task('copy-lib-css', function  () {
 gulp.src('./bower_components/bootstrap/dist/css/bootstrap.min.css')
 .pipe(gulp.dest(root_path.webroot + '/css/'));
 gulp.src('./bower_components/toastr/toastr.min.css')
 .pipe(gulp.dest(root_path.webroot + '/css/'));
});

gulp.task('copy-lib-js', function  () {
 gulp.src('./bower_components/jquery/dist/jquery.min.js')
 .pipe(gulp.dest(root_path.package_lib + '/jquery/'));

 gulp.src('./bower_components/bootstrap/dist/js/bootstrap.min.js')
 .pipe(gulp.dest(root_path.package_lib + '/bootstrap/'));

 gulp.src('./bower_components/toastr/toastr.min.js')
 .pipe(gulp.dest(root_path.package_lib + '/toastr/'));

 gulp.src('./bower_components/angular/angular.min.js')
 .pipe(gulp.dest(root_path.package_lib + 'angular/'));
 gulp.src('./bower_components/angular-ui-router/release/angular-ui-router.min.js')
 .pipe(gulp.dest(root_path.package_lib + 'angular/'));
});

gulp.task("copy-all", ["copy-lib-css", "copy-lib-js"]);
//Copy End
Now from top menu in visual studio Goto > View > Other Window > Task Runner Explorer. Let's get the task list by refreshing then run the task like below screenshot.
http://shashangka.com/wp-content/uploads/2018/03/Spa9.png As we can see the libraries has transferred to the root folder. We have used an admin template so the others libraries are listed in "js" folder.
http://shashangka.com/wp-content/uploads/2018/03/Spa10.png
We are now going to add the AngularJs library reference in the main layout page. Like below.
<!DOCTYPE html>
<html lang="en" ng-app="templating_app">
 <head></head>
 <body>
 <!-- Core JS Files  -->
<script src="/lib/jquery/jquery-1.10.2.js" type="text/javascript"></script>
<script src="/lib/bootstrap/tether.min.js"></script>
<script src="/lib/bootstrap/bootstrap.min.js" type="text/javascript"></script>

<!-- App JS Files  -->
<script src="/lib/angular/angular.min.js"></script>
<script src="/lib/angular/angular-ui-router.min.js"></script>
 </body>
</html>
AngularJS Application:
Let's get started with AngularJS application, create a new folder name it "app". The "app" folder will hold our all of frontend development files. Let's create all required file and folders. In shared folder we have added partial views like sidebar/topbar menu that is going to call by angular directive.
http://shashangka.com/wp-content/uploads/2018/03/Spa13.png
Module:
This will define our application.
var templatingApp;
(
 function () {
 'use strict';
 templatingApp = angular.module('templating_app', ['ui.router']);
 }
)();
Route:
This file will handle our application route coming from URL's.
templatingApp.config(['$locationProvider', '$stateProvider', '$urlRouterProvider', '$urlMatcherFactoryProvider', '$compileProvider',
 function ($locationProvider, $stateProvider, $urlRouterProvider, $urlMatcherFactoryProvider, $compileProvider) {

 //console.log('Appt.Main is now running')
 if (window.history && window.history.pushState) {
 $locationProvider.html5Mode({
 enabled: true,
 requireBase: true
 }).hashPrefix('!');
 };
 $urlMatcherFactoryProvider.strictMode(false);
 $compileProvider.debugInfoEnabled(false);

 $stateProvider
 .state('home', {
 url: '/',
 templateUrl: './views/home/home.html',
 controller: 'HomeController'
 })
 .state('dashboard', {
 url: '/dashboard',
 templateUrl: './views/home/home.html',
 controller: 'HomeController'
 })
 .state('user', {
 url: '/user',
 templateUrl: './views/user/user.html',
 controller: 'UserController'
 })
 .state('about', {
 url: '/about',
 templateUrl: './views/about/about.html',
 controller: 'AboutController'
 });

 $urlRouterProvider.otherwise('/home');
 }]);
Route Problem
This file will handle our application route coming from URL's. In AngularJs we need to enable HTML5 Mode to remove /#!/ symbols in URL''s below code snippet for enabling the mode.
$locationProvider.html5Mode({ enabled: true, requireBase: true}).hashPrefix('!');
Also we need to specify the base in main page.

<base href="/">
Directives: For Top Navigation Bar:
templatingApp.directive("navbarMenu", function  () {
 return {
 restrict: 'E',
 templateUrl: 'views/shared/navbar/nav.html'
 };
});
For Top Side Bar:
templatingApp.directive("sidebarMenu", function () { return { restrict: 'E', templateUrl: 'views/shared/sidebar/menu.html' };});
Angular Controller:
This is the Angular Controller which will manage the views and perform all http call from client end to server.
templatingApp.controller('UserController', ['$scope', '$http', function ($scope, $http) { $scope.title = "All User"; $scope.ListUser = null; $scope.userModel = {}; $scope.userModel.id = 0; getallData(); //******=========Get All User=========****** function getallData() { $http({ method: 'GET', url: '/api/Values/GetUser/' }).then(function (response) { $scope.ListUser = response.data; }, function (error) { console.log(error); }); }; //******=========Get Single User=========****** $scope.getUser = function (user) { $http({ method: 'GET', url: '/api/Values/GetUserByID/' + parseInt(user.id) }).then(function (response) { $scope.userModel = response.data; }, function (error) { console.log(error); }); }; //******=========Save User=========****** $scope.saveUser = function () { $http({ method: 'POST', url: '/api/Values/PostUser/', data: $scope.userModel }).then(function (response) { $scope.reset(); getallData(); }, function (error) { console.log(error); }); }; //******=========Update User=========****** $scope.updateUser = function () { $http({ method: 'PUT', url: '/api/Values/PutUser/' + parseInt($scope.userModel.id), data: $scope.userModel }).then(function (response) { $scope.reset(); getallData(); }, function (error) { console.log(error); }); }; //******=========Delete User=========****** $scope.deleteUser = function (user) { var IsConf = confirm('You are about to delete ' + user.Name + '. Are you sure?'); if (IsConf) { $http({ method: 'DELETE', url: '/api/Values/DeleteUserByID/' + parseInt(user.id) }).then(function (response) { $scope.reset(); getallData(); }, function (error) { console.log(error); }); } }; //******=========Clear Form=========****** $scope.reset = function () { var msg = "Form Cleared"; $scope.userModel = {}; $scope.userModel.id = 0; };}]);
Server-Side:
Database: Let's Create a Database in MSSQL Server. Here is the table where we are storing data.
CREATE TABLE  [dbo].[User](
 [Id] [int] IDENTITY(1,1) NOT NULL,
 [Name] [nvarchar](250) NULL,
 [Email] [nvarchar](250) NULL,
 [Phone] [nvarchar](50) NULL
) ON  [PRIMARY]
GO
In server-end we are going to generate EF models from existing database using reverse engineering.
Entity Framework: Before we use Entity Framework to our application we need to install packages. Let's right click on project then GoTo > Tools > NuGet Package Manager > Package Manager Console install below packages one by one.
- Install-Package Microsoft.EntityFrameworkCore.SqlServer
- Install-Package Microsoft.EntityFrameworkCore.SqlServer.Design
- Install-Package Microsoft.EntityFrameworkCore.Tools.DotNet
After installation the .csproj file will look like this. ** **
NUGET Packages:
<ItemGroup>
 <PackageReference Include="Microsoft.AspNetCore.All" Version="2.0.6" />
 <PackageReference Include="Microsoft.EntityFrameworkCore.SqlServer" Version="2.0.2" />
 <PackageReference Include="Microsoft.EntityFrameworkCore.SqlServer.Design" Version="1.1.5" />
 <PackageReference Include="Microsoft.VisualStudio.Web.CodeGeneration.Design" Version="2.0.2" />
</ItemGroup>

<ItemGroup>
 <DotNetCliToolReference Include="Microsoft.VisualStudio.Web.CodeGeneration.Tools" Version="2.0.3" />
 <DotNetCliToolReference Include="Microsoft.EntityFrameworkCore.Tools.DotNet" Version="2.0.0" />
</ItemGroup>
EF Model: Let's run the following command using Package Manager Console. dotnet ef dbcontext scaffold "Server=DESKTOP-80DEJMQ;Database=dbCore;Trusted_Connection=True;" Microsoft.EntityFrameworkCore.SqlServer --output-dir Models
http://shashangka.com/wp-content/uploads/2018/03/Spa11.png
Now open the DbContext file then add a constructor to pass configuration like connectionstring into the DbContext.
public dbCoreContext(DbContextOptions<dbCoreContext> options) :
 base(options){
 }
Register DbContext: In Startup.cs let's add our DbContext as service to enable database connection.
//Database Connection
var connection = @"Server=DESKTOP-80DEJMQ;Database=dbCore;Trusted_Connection=True;";
services.AddDbContext<dbCoreContext>(options => options.UseSqlServer(connection));
Enable CORS: To access the API's from other domain we have enabled CORS. We have added the service in Startup.cs in ConfigureServices method.
services.AddCors(o => o.AddPolicy("AppPolicy", builder =>
 {
 builder.AllowAnyOrigin()
  .AllowAnyMethod()
  .AllowAnyHeader();
 }));
CORS Mechanism:
http://shashangka.com/wp-content/uploads/2018/03/CORS_principle.png
Image Source: https://developer.mozilla.org/en-US/docs/Web/HTTP/CORS
API's:
Here's our MVC API Controller using specific RoutePrefix attribute globally. With this api controller class we are performing database operation using Entity Framework DbContext.
[Route("api/Values"), Produces("application/json"), EnableCors("AppPolicy")]public class ValuesController : Controller{ private dbCoreContext _ctx = null; public ValuesController(dbCoreContext context) { _ctx = context; } // GET: api/Values/GetUser [HttpGet, Route("GetUser")] public async Task<object> GetUser() { List<User> users = null; object result = null; try { using (_ctx) { users = await _ctx.User.ToListAsync(); result = new { User }; } } catch (Exception ex) { ex.ToString(); } return users; } // GET api/Values/GetUserByID/5 [HttpGet, Route("GetUserByID/{id}")] public async Task<User> GetUserByID(int id) { User user = null; try { using (_ctx) { user = await _ctx.User.FirstOrDefaultAsync(x => x.Id == id); } } catch (Exception ex) { ex.ToString(); } return user; } // POST api/Values/PostUser [HttpPost, Route("PostUser")] public async Task<object> PostUser([FromBody]User model) { object result = null; string message = ""; if (model == null) { return BadRequest(); } using (_ctx) { using (var _ctxTransaction = _ctx.Database.BeginTransaction()) { try { _ctx.User.Add(model); await _ctx.SaveChangesAsync(); _ctxTransaction.Commit(); message = "Saved Successfully"; } catch (Exception e) { _ctxTransaction.Rollback(); e.ToString(); message = "Saved Error"; } result = new { message }; } } return result; } // PUT api/Values/PutUser/5 [HttpPut, Route("PutUser/{id}")] public async Task<object> PutUser(int id, [FromBody]User model) { object result = null; string message = ""; if (model == null) { return BadRequest(); } using (_ctx) { using (var _ctxTransaction = _ctx.Database.BeginTransaction()) { try { var entityUpdate = _ctx.User.FirstOrDefault(x => x.Id == id); if (entityUpdate != null) { entityUpdate.Name = model.Name; entityUpdate.Phone = model.Phone; entityUpdate.Email = model.Email; await _ctx.SaveChangesAsync(); } _ctxTransaction.Commit(); message = "Entry Updated"; } catch (Exception e) { _ctxTransaction.Rollback(); e.ToString(); message = "Entry Update Failed!!"; } result = new { message }; } } return result; } // DELETE api/Values/DeleteUserByID/5 [HttpDelete, Route("DeleteUserByID/{id}")] public async Task<object> DeleteUserByID(int id) { object result = null; string message = ""; using (_ctx) { using (var _ctxTransaction = _ctx.Database.BeginTransaction()) { try { var idToRemove = _ctx.User.SingleOrDefault(x => x.Id == id); if (idToRemove != null) { _ctx.User.Remove(idToRemove); await _ctx.SaveChangesAsync(); } _ctxTransaction.Commit(); message = "Deleted Successfully"; } catch (Exception e) { _ctxTransaction.Rollback(); e.ToString(); message = "Error on Deleting!!"; } result = new { message }; } } return result; }}
We are almost done with application steps, now it's time to minify our application in a single js file then reference it to the main html page. ** **
Modify Gulp: Add below code snippet to existing gulp file, Goto > TaskRunnerExplorer then refresh the window, it will work while we build the application due to its binding.
gulp.task('min-js', function () {
 gulp.src(['./app/**/*.js'])
 .pipe(concat('app.js'))
 .pipe(uglify())
 .pipe(gulp.dest(root_path.webroot))
});

gulp.task('copy-folder-html', function () {
 gulp.src('app/**/*.html')
 .pipe(gulp.dest(root_path.webroot + 'views'));
});

gulp.task("build-all", ["min-js", "copy-folder-html"]);
//Build End
As we can see from below screenshot build is done successfully. http://shashangka.com/wp-content/uploads/2018/03/Spa12.png After build the application "wwwroot" folder will look like this.
http://shashangka.com/wp-content/uploads/2018/03/Spa14.png
Finally Main Html: let's add the app.js file to the main html page.
<!DOCTYPE html>
<html lang="en" ng-app="templating_app">
 <head>
 </head>
 <body>
    <!-- Core JS Files -->
<script src="/lib/jquery/jquery-1.10.2.js" type="text/javascript"></script>
<script src="/lib/bootstrap/tether.min.js"></script>
<script src="/lib/bootstrap/bootstrap.min.js" type="text/javascript"></script>

<!-- App JS Files -->
<script src="/lib/angular/angular.min.js"></script>
<script src="/lib/angular/angular-ui-router.min.js"></script>
<script src="/app.js"></script>
 </body>
</html>
OutPut: Here we can see user data is listed in grid, this data can also be accessible from other domain or devices. http://shashangka.com/wp-content/uploads/2018/03/Spa15-1024x314.png
Publish To IIS: Right Click on project file Goto > Publish window, choose a type to publish. I have choose folder publishing. http://shashangka.com/wp-content/uploads/2018/03/Spa16.png
Now open IIS to add a new website
http://shashangka.com/wp-content/uploads/2018/03/Spa17.png
Goto Application Pool make sure about .Net CLR Version of 2.0 like below image.
http://shashangka.com/wp-content/uploads/2018/03/clr.png
Solve Underlying provider Issue in IIS: Goto URL: http://shashangka.com/2015/12/15/the-underlying-provider-failed-on-open-only-under-iis Let's browse the website from IIS.
http://shashangka.com/wp-content/uploads/2018/03/Spa18-1024x369.png
Source Code: I've uploaded the full source code to download/clone @github, Hope this will help
Reference:
- http://shashangka.com/2016/08/12/crud-using-net-core-angularjs2-webapi
- http://shashangka.com/2016/11/26/net-core-startup
- https://benjii.me/2016/01/angular2-routing-with-asp-net-core-1
- /en-us/aspnet/core/security/cors
- /en-us/ef/core/get-started/aspnetcore/existing-db
- https://www.c-sharpcorner.com/article/enable-cross-origin-resource-sharing-cors-in-asp-net-core