ASP.NET Core 2.0: Getting Started With Blazor
Introduction
Microsoft has recently announced the release of a new .NET web framework – Blazor. In this article, we will understand Blazor and setup Blazor development environment in our machine and execute our first program in ASP.NET core using Blazor and Visual Studio 2017. We will also create a sample calculator application using Blazor.
What is Blazor?
Blazor is a new .NET web framework for creating client-side applications using C#/Razor and HTML that runs in the browser with WebAssembly. It can simplify the process of creating single page application (SPA) and at the same time enables full stack web development using .NET.
Using .NET for developing Client-side application has multiple advantages that are mentioned below,
- .NET offers a range of API and tools across all platform that are stable and easy to use.
- The modern languages such as C# and F# offer a lot of features that make programming easier and interesting for developers.
- The availability of one of the best IDE in form of Visual Studio provides a great .NET development experience across multiple platforms such as Windows, Linux, and MacOS.
- .NET provides features such as speed, performance, security, scalability, and reliability in web development that makes full stack development easier.
What is WebAssembly?
WebAssembly (abbreviated Wasm) is a low-level assembly-like language with a compact binary format that can run in modern web browser. Since it is a low-level binary code, it cannot be read/written by humans but we can compile the code from other languages to WebAssembly to facilitate their execution on the browser. It is a subset of JavaScript and is designed to complement and run alongside JavaScript. It enables us to run code written in multiple languages on the web at near native speed.
WebAssembly is developed as a web standard and is supported by all the major browsers without plugins.
Why use Blazor?
Blazor makes web development easier and more productive by providing a full stack web development with .NET. It runs in all browsers on the real .NET runtime and has full support for .NET Standard without the need of any extra plugin. Blazor is fast, have reusable components and is open-source with a great support from the community.
Blazor also supports features of an SPA framework such as :
- Routing
- Layouts
- Forms and validation
- JavaScript interop
- Build on save
- Server-side rendering
- Dependency Injection
Prerequisite
- Install .NET Core 2.1 Preview 2 SDK from here
- Install latest preview of Visual Studio 2017 (15.7) from here
- Install ASP.NET Core Blazor Language Services extension from here
The Blazor framework is not supported on versions below Visual Studio 2017 v15.7
Getting Started with Blazor
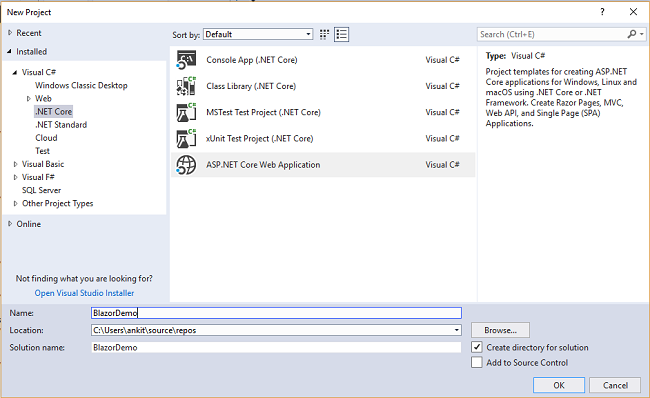
Open Visual Studio and select File >> New >> Project. After selecting the project, a "New Project" dialog will open. Select .NET Core inside Visual C# menu from the left panel. Then, select “ASP.NET Core Web Application” from available project types. Put the name of the project as *BlazorDemo *and press OK.
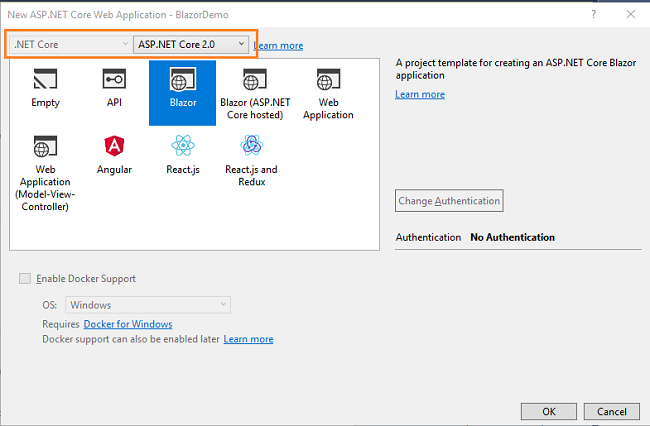
After clicking on OK, a new dialog will open asking you to select the project template. You can observe two drop-down menus at the top left of the template window. Select “.NET Core” and “ASP.NET Core 2.0” from these dropdowns. Then, select “Blazor” template and press OK.
Now, our first Blazor project will be created. You can observe the folder structure in Solution Explorer as shown in the below image.
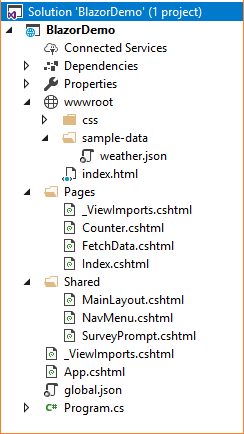
You can see that we have a “Pages” folder. We will be adding our view pages to this folder only and these pages will be rendered on the web. Execute the program, it will be open the browser and you will see a page similar to the one shown below.

Here you can see a navigation menu on the left side, which contains the navigation links to all the pages we have in our application. By default, we have “Counter” and “Fetch Data” pages provided. We are going to add a “Calculator” page for our sample calculator application.
Create a Sample Calculator Using Blazor
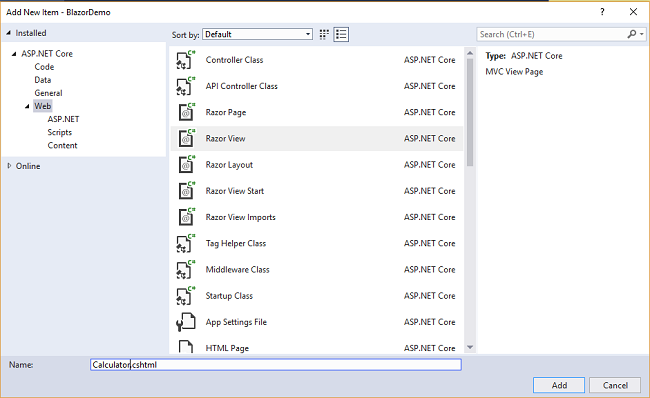
We are going to create a basic calculator app, which is able to do addition, subtraction, multiplication, and division. Right click on Pages folder and select Add >> New Item. An “Add New Item” dialog box will open. Select Web from the left panel, then select “Razor View” from templates panel and put the name as Calculator.cshtml. Press OK.
Open *Calculator.cshtml *and put the following code into it.
@page "/calculator"

<h1>Basic Calculator Demo Using Blazor</h1>
<hr />
<div>
    <div class="row">
        <div class="col-sm-3">
            <p>First Number</p>
        </div>
        <div class="col-sm-4">
            <input placeholder="Enter First Number" bind="@num1" />
        </div>
    </div>
    <br />
    <div class="row">
        <div class="col-sm-3">
            <p>Second Number</p>
        </div>
        <div class="col-sm-4">
            <input placeholder="Enter Second Number" bind="@num2" />
        </div>
    </div>
    <br />
    <div class="row">
        <div class="col-sm-3">
            <p>Result</p>
        </div>
        <div class="col-sm-4">
            <input readonly bind="@finalresult" />
        </div>
    </div>
    <br />
    <div class="row">
        <div class="col-sm-2">
            <button onclick="@AddNumbers" class="btn">Add (+)</button>
        </div>
        <div class="col-sm-2">
            <button onclick="@SubtractNumbers" class="btn btn-primary">Subtract (−)</button>
        </div>
        <div class="col-sm-2">
            <button onclick="@MultiplyNumbers" class="btn btn-success ">Multiply (X)</button>
        </div>
        <div class="col-sm-2">
            <button onclick="@DivideNumbers" class="btn btn-info">Divide (X)</button>
        </div>
    </div>
</div>

@functions {

string num1;
string num2;
string finalresult;

void AddNumbers()
{
    finalresult = (Convert.ToDouble(num1) + Convert.ToDouble(num2)).ToString();
}

void SubtractNumbers()
{
    finalresult = (Convert.ToDouble(num1) - Convert.ToDouble(num2)).ToString();
}

void MultiplyNumbers()
{
    finalresult = (Convert.ToDouble(num1) * Convert.ToDouble(num2)).ToString();
}

void DivideNumbers()
{
    if (Convert.ToDouble(num2) != 0)
    {
        finalresult = (Convert.ToDouble(num1) / Convert.ToDouble(num2)).ToString();
    }

    else
    {
        finalresult = "Cannot Divide by Zero";
    }
}
}
Let’s understand this code. On the top, we are defining the route of this page using @page directive. So in this application, if we append “/calculator” to base URL then we will be redirected to this page.
Then we have defined the HTML section to read two numbers from the user and display the result in another textbox. The attribute “bind” is used to bind the value entered in the textbox to the variables we have defined. We also created four buttons to perform our basic arithmetic operations. We are calling our business logic methods on button click.
At the bottom of the page, we have a @functions section which contains all our business logic. We have declared three variables, two to read the value from the user and another one to display the result. We have also defined four methods to handle addition, subtraction, multiplication, and division. The “bind” attribute will work only for string variables not for floating point values. Hence, we need to convert a string to double to perform our arithmetic operations.
Finally, we will add the link to our “calculator” page in the navigation menu, open /Shared/NavMenu.cshtml page and put the following code into it.
<div class="top-row pl-4 navbar navbar-dark">
    <a class="navbar-brand" href="/">BlazorTest</a>
    <button class="navbar-toggler" onclick=@ToggleNavMenu>
        <span class="navbar-toggler-icon"></span>
    </button>
</div>

<div class=@(collapseNavMenu ? "collapse" : null) onclick=@ToggleNavMenu>
    <ul class="nav flex-column">
        <li class="nav-item px-3">
            <NavLink class="nav-link" href="/" Match=NavLinkMatch.All>
                <span class="oi oi-home" aria-hidden="true"></span> Home
            </NavLink>
        </li>
        <li class="nav-item px-3">
            <NavLink class="nav-link" href="/counter">
                <span class="oi oi-plus" aria-hidden="true"></span> Counter
            </NavLink>
        </li>
        <li class="nav-item px-3">
            <NavLink class="nav-link" href="/fetchdata">
                <span class="oi oi-list-rich" aria-hidden="true"></span> Fetch data
            </NavLink>
        </li>
        <li class="nav-item px-3">
            <NavLink class="nav-link" href="/calculator">
                <span lass="oi oi-list-rich" aria-hidden="true"></span> Calculator
            </NavLink>
        </li>
    </ul>
</div>

@functions {
bool collapseNavMenu = true;

void ToggleNavMenu()
{
    collapseNavMenu = !collapseNavMenu;
}
}
And hence we have created our first application using ASP.NET Core and Blazor. Let's execute the code and see the output
Execution Demo
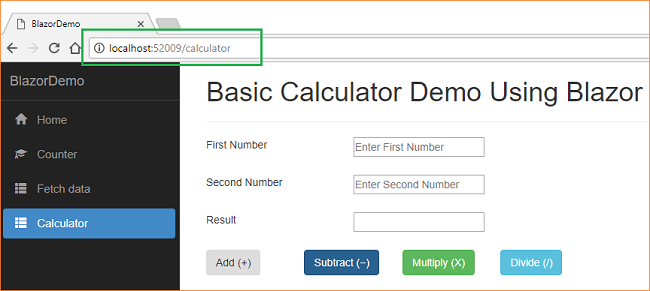
Launch the application. You can see a “Calculator” link in the navigation menu on the left. Click on it to navigate to our calculator page. Notice the URL, it has /calculator appended to it.
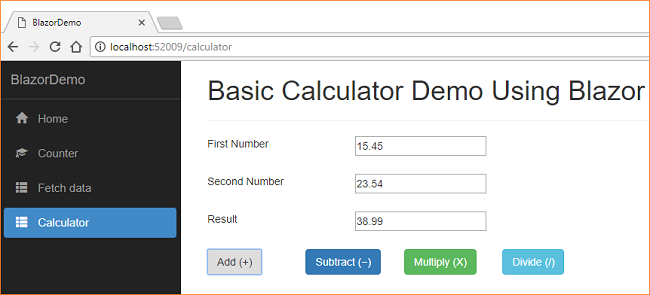
Let's perform add operation. Input two numbers and click on Add(+) button. You can see the addition result in the Result textbox.
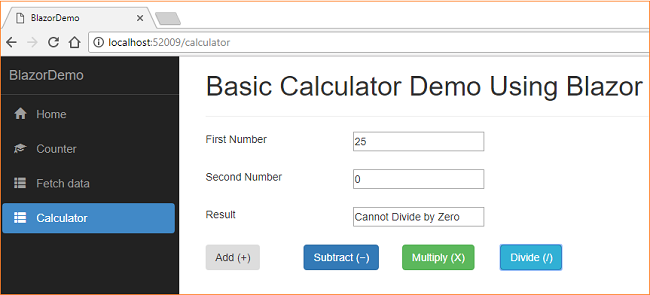
Now try to perform division on two numbers. You can get the result in Result textbox. If you try to perform division by Zero, you will get an error message "Cannot Divide by Zero".
Conclusion
We learned about the new .NET framework – Blazor. It gives us a full stack web development experience using .NET. We have also created a simple calculator application using Blazor and performed arithmetic operations on it. Please get the source code and play with it for a better understanding.
Source Code
Download the source code from here
See Also
- ASP.NET Core – CRUD Using Blazor And Entity Framework Core
- Blazor: Deploying An Application On IIS 10
- Blazor: Creating a Cascading DropDownList Using EF Core
- ASP.NET Core 2.0: CRUD Operation With Razor Pages
- ASP.NET Core 2.0: CRUD Using Angular 5 And Entity Framework Core
- ASP.NET Core 2.0: CRUD Operation With ADO.NET
- ASP.NET Core 2.0: Cookie Authentication