DPM: Step-by-Step Installing and Attaching a server in a Workgroup / DMZ environment
*This guide applies to System Center Data Protection Manager 2012 R2, 2016, 1801, 1807
*
Introduction
Non-domain servers which often are referred to as workgroup or DMZ servers are quite common in most environments.
These servers are in need of backup as much as any server that belongs to a domain.
The process for backing up workgroup or DMZ servers is exactly the same as with domain-joined servers, but installing the DPM agent is slightly different and requires a few additional steps.
In this blog post, we will go through on how to install and attach a DPM agent on a server that resides in a workgroup or DMZ environment.
We have a Windows Server 2016 Standard that currently resides in a non-domain environment also known as WORKGROUP. We will go through some of the important settings before starting the process of installing the DPM agent.
DPM version:
Network configuration of the workgroup server
For the DPM server to be able to resolve a server that resides in a workgroup or DMZ environment, we will need to set up a DNS resolution.
Both the DPM server and the workgroup server have to be able to resolve each other’s DNS.
Below we have the network connection details of our workgroup server:
In our environment, the Domain Controller (DC) also hosts the DNS (Domain Name System) role, let’s take note of our IP address 192.168.0.111 which we will need later.
Assigning a DNS suffix to the workgroup server
In this step, we will assign a DNS suffix to our workgroup server.
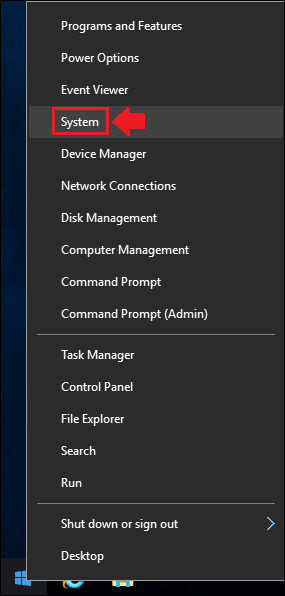
1. Right-click on the Windows taskbar icon and choose System.
2. In the System window, locate the Change settings button in the middle of the window.
3. A System Properties window will now open up, now click on Change.
4. A Computer Name/Domain Changes window will open up, click on More.
5. Provide a suffix for your workgroup server, in our case, we will use the same as our domain suffix: lab.ad.
6. Write down the server name, in this case, WINSRV2016V2 as we will need it later.
7. Finish up by clicking OK three (3) times to apply the setting and restart the workgroup server.
Adding a DNS entry for the workgroup server
We will now have to create a DNS entry for our workgroup server so that our DPM server can resolve it.
1. Open up the DNS Manager.
2. Head to the Forward Lookup Zones select our domain, in our case lab.ad.
3. Now right-click on the domain (lab.ad in our case) and choose New Host (A or AAAA).
4. Enter the server name and the IP address of our workgroup server and then click Add Host.
5. We’ll now get a message that tells us that the host record was successfully created, click OK.
6. The host record can now also be seen in the DNS Manager.
DPM Agent installation
Now that we have created the necessary steps for the workgroup server, we can finally start installing the DPM agent.
1. Run the DPMAgentInstaller.exe (Run as administrator) on the workgroup server, the latest DPM agent can be found from the DPM installation folder on the DPM server, by default at: C:\Program Files\Microsoft System Center\DPM\DPM\agents\RA\5.1.378.0\amd64\1033
Note: If you can’t access the DPM server, you can mount up the DPM installation ISO on the workgroup server and install the agent from there.
2. Click Accept in the Microsoft Software License Terms windows to start the DPM agent installation.
3. The DPM agent installation will popup some window and then close automatically once the installation is complete.
The agent installation should take roughly 10 seconds.
4. Once the DPM agent installation is complete, open up a Command Prompt (Admin) on the workgroup server.
5. Head to the installation folder of the DPM agent, it can be located here:
C:\Program Files\Microsoft Data Protection Manager\DPM\bin
**6. **Now we will provide which DPM server we want our workgroup server to communicate to by running the SetDpmServer.exe command.
Since our server is located in a workgroup or DMZ environment, we will have to run the following command:
SetDpmServer.exe -dpmServerName <serverName> -isNonDomainServer -userName <userName> [-productionServerDnsSuffix <DnsSuffix>]
| -DpmServerName Specify the name of the DPM server. Use either an FQDN if the server and computer are accessible to each other using FQDNs, or a NETBIOS name. -IsNonDomainServer Use to indicate that the server is in a workgroup or untrusted domain in relation to the computer you want to protect. Firewall exceptions are created for required ports. -UserName Specify the name of the account you want to use for NTLM authentication. To use this option you should have the -isNonDomainServer flag specified. A local user account will be created and the DPM protection agent will be configured to use this account for authentication. -ProductionServerDnsSuffix Use this switch if the server has multiple DNS suffixes configured. This switch represents the DNS suffix that the server uses to connect to the computer you’re protecting.[docs.microsft.com] |
7. In this guide, the DPM server name is DPM.lab.ad, for the user name we will create a user called DPM-User, and the production server DNS suffix we will be using lab.ad.
8. Once we run the above command we will be asked twice to provide a password for our newly created DPM-User.
9. Once a password has been provided, firewall exceptions will be configured automatically and we should have the configuration done.
10. We can now also verify that our DPM-User account has been successfully created on the workgroup server.
Attaching the DPM agent
Now it’s time to finally attach our DPM agent located on our workgroup server.
**1. **Open the System Center DPM Administrator Console on the DPM server.
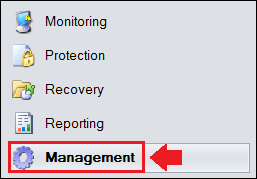
2. Head to the Management tab.
3. In the upper left corner, click on Add.
**4. **Check the Windows Servers check box, as we are attaching a DPM agent on a Windows Server operating system, click Next to continue.
5. In the next step, select Attach agents and at the bottom check the box for Computer in a workgroup or untrusted domain, click Next to continue.
**6. **Provide the FQDN of the workgroup server (in our case DPM.lab.ad), the user name and password of the local user we created earlier, click Add and then click Next.
**7. **Finally, click on Attach to attach our workgroup server’s DPM agent.
8. Our DPM agent should now be attached successfully, click Close to finish.
We have now successfully installed and attached a DPM agent on a server in a workgroup/DMZ environment!
Troubleshooting
Problem 1:
| Error (ID 32698). The DPM server name is not a fully qualified domain name. If you have specified ProductionServerDnsSuffix and want to use the fully qualified domain name of this server, you must also specify the fully qualified domain name for the DPM server. To further troubleshoot failures with SetDpmServer, go to http://go.microsoft.com/fwlink/?LinkId=169142 |
Solution 1:
Make sure to use the fully qualified domain name of the DPM server when running the command below:
SetDpmServer.exe -dpmServerName <serverName> -isNonDomainServer -userName <userName> -productionServerDnsSuffix <DnsSuffix>
Problem 2:
| Attach protected computer SERVERNAME failed. Error 32549: The server specified is invalid. Recommended action: If SERVERNAME is configured to use NETBIOS, specify the NETBIOS name. Otherwise specify the DNS name of the workgroup computer |
Solution 2:
If you have added a suffix to your workgroup/DMZ computer, make sure to provide the fully qualified domain name (FQDN) of the workgroup server in the DPM agent attachment wizard.


